

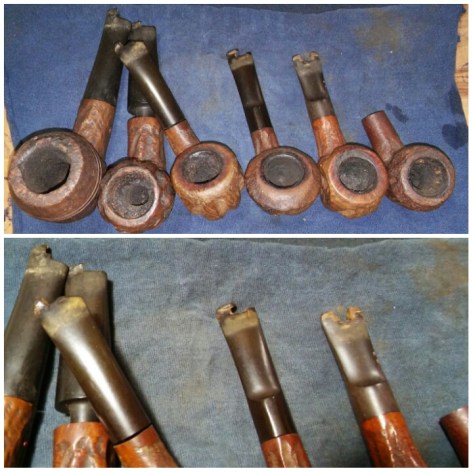
A couple of months ago I picked up a lot of Custom-Bilt and His Nibs pipes that were in poor condition, with things busy around here they were pushed aside until I could dedicate myself to pipes that would need more attention then normal. Now with a little free time I rummaged through the pipe box and came out with a small 4″ His Nibs, the perfect pipe for a quick winters smoke. The His Nibs pipes were introduced under Eugene Rich in the summer of 1947, designed for a short smoke while fishing, between classes or intermission at the theater, a smaller pipe but styled after is full size Custombilt counterpart.
The Restore

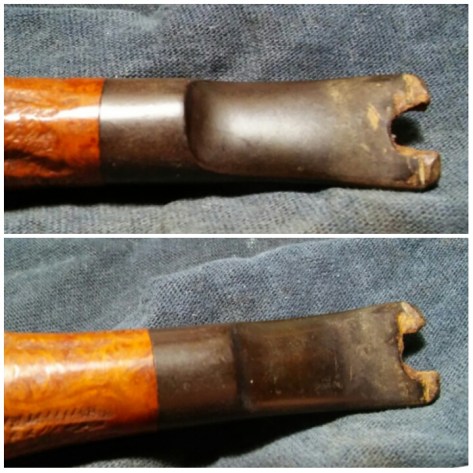
This pipe like many others in the lot was well loved, each one smoked within an inch of it’s life. The nomenclature of this Nibs caught my eye it was well stamped, His Nibs over Imported Briar, the chamber held an uneven cake, the rim had a little build up and a scorched area towards the shank. The stem was in rough shape broken off dead center at the bit.

I reamed back the cake with the PipNet and Castleford reamers, starting with the Castlefords smallest attachment, then the PipNets smallest and finally back to the Castleford and its second smallest attachment bring the chamber back to briar, the chamber was free of imperfections.

I decided to re-stem rather then rebuild, the stem itself was an inch and three quarters long and the bit was missing a 6 mm section, so cutting and rebuilding the button was out of the question. I’m confident in my patch repair work if its a bite though but I was unsure if a patch would last in this situation. I started with the stummel, cleaning the mortise with EverClear, Q-Tips and stiff/soft pipe cleaners, cleaning until my final pipe cleaner came out as it went in. I set the stummel aside to dry and moved to cutting the replacement stem.
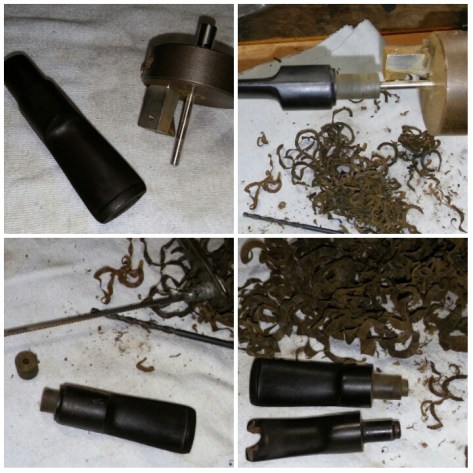
Before cutting the tenon I drilled the bore with a 1/8 drill bit so the stem could slide onto the Pemo’s guide pin, I then mounted the Pemo tenon turning tool into a variable speed drill. I slid the stem onto the guide pin and adjusted the cutter set screw to make my first pass, removing a couple millimeters of material. I now measured the stock stem for the original length and using a coping saw I cut a few millimeters off the new tenon. Using the stock stem for measurements I made another pass on the tenon cutter until I had a tenon length match, I popped the stock stem onto the tenon cutter and set the cutter to match the tapered end of the stock tenon, I now slid the replacement stem onto the guide pin and cut the taper into the tenon.

Now I slid the stock stem back onto the guide pin and set my cutter to the thickness of the stock tenon, backing it off a bit so my cut of the replacement tenon would not be an exact fit. The final snug fit between tenon and mortise would be achieved by removing the tenon material with 400 and 800 grit sandpaper wet. (You have to take your time here forcing the tenon into the mortise could result in a cracked shank or you risk snapping the tenon.)

Once I achieved a snug fit between tenon and mortise and with the stem face flush with the stummel, I taped off the shank with painters tape to keep my abrasive sanding from damaging the stummel. Using a rotary sanding bit I removed the bulk of the stem material, leaving a step up from shank to stem.

Now switching to 220 grit sandpaper and then made a final pass with an emery board, (you do not want an exact mach between stem and shank at this point there should still be a small step up from shank to stem, there is still plenty of sanding to be done) This is where things get tedious, I removed the painters tape and re-taped the shank with electrical tape, pulling it tight. I now sanded the stem with the finer grits of sandpaper. Using 400 grit sandpaper wet I sanded the saddle until my sandpaper began to hit the lip of the electrical tape (this allows you to know your getting closer to an exact match between shank and stem) , I now moved to 1000 grit sandpaper wet, sanding and removing the tape and re-tapping the shank from time to time to check the surface of the stem and shank (there should still be a very, very small step up from shank to stem at this point) I stopped my work on matching the stummel and stem and began shaping the stem and button using 400, 800 and 1000 grit sandpaper wet.

Once I have achieved the stem and button shape I was looking for I could move to my final sanding. At this point a very, very small step up from shank to stem still remains.

Before my final fit and sanding of the stem I shaped and widened the slot using a slot funneling tool and needle files.

This is the most time consuming step, using a divider between shank and stem I sanded the stem with 1500 sandpaper wet, sanding until the step up between shank and stem no longer exists. With the fit between shank and stem flush and smooth, I ran the stem with divider still in place through the various grits of micro-mesh 1500-2400 wet and 3200-6000 dry.

Before polishing the stem with the remaining micro-mesh pads I bent the stem slightly using a Bic lighter, by brushing the stem lightly with the flame and bending it over a nail polish bottle. (use care with this method, things can go wrong quick, keep the flame at a distance moving it at all times never leaving it in one spot too long)

With a smooth fit and finish and the slight bend I was looking for I polished the stem with the remaining micro-mesh pads 8000 and 12000 dry.

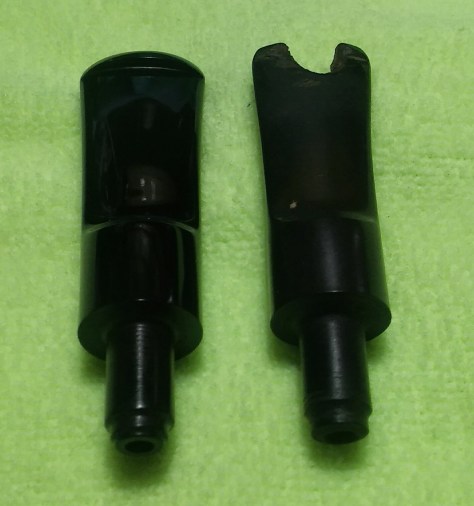
Above the replacement and stock stem.

With the stem complete it was time to finish the stummel, I applied Method Wood For Good Polish to the rim and left it upside down on a makeup pad for an hour to penetrate the build up. With the build up now softened I removed the debris with Q-Tips and a makeup pad. After cleaning the rim there were a few knock out dings left behind, using a house hold iron set to medium heat and a damp rag I steamed out the imperfections. I placed a damp rag over the rim and applied the rim flat against the hot iron, I would repeat this process a couple of times to get the results I was looking for. At the beginning of the restore I cleaned the mortise only in order to fit the new stem with the stem now complete I continued with the internal cleaning of the stummel and chamber, using EverClear, Q-Tips, stiff/soft pipe cleaners and mortise/shank brushes, cleaning until my final pipe cleaner came out as it went in.

After steaming the rim there were still a few shallow imperfections and a darker area at the back of the rim, using worn 3200, 3600 and 4000 micro-mesh pads I smoothed out and lightened the rim. Before moving on I gave the stummel a wipe down with Method to remove the fine sanding dust and grime.

As a final step before hitting the wheel I applied Howard’s Butcher Block Conditioner using a Q-Tip into the deeper craving of the stummel, left aside to penetrate for a few minutes and removing the excess with a clean rag.
Complete.


I finished up the stummel with a few coats carnauba and a spin on the nude wheel. Buffing the stem with blue compound, white diamond and carnauba. Hand buffing the pipe as a whole with a microfiber cloth just before the photos.

You must be logged in to post a comment.