

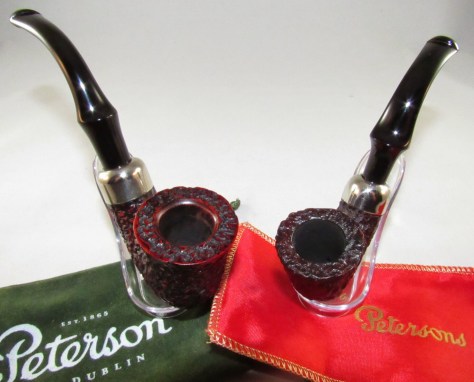
Its funny but sometimes you can surprise yourself , when it comes to pipe refurbishing I’m my number one critic, sometimes you should leave well enough alone before things get out of hand and you make more work for yourself. In this case I was happy with the finished pipe, I only hope the photos due it justice. This Pete is one more form the lot my wife gifted me for Christmas and so far my favorite. I wish Peterson would bring back there deep craggy rustication, the look and feel are incredible.
The Pete.

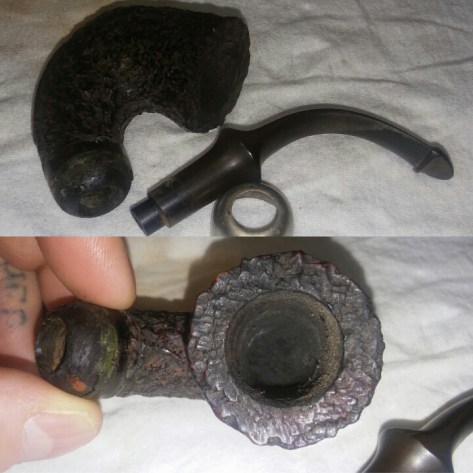

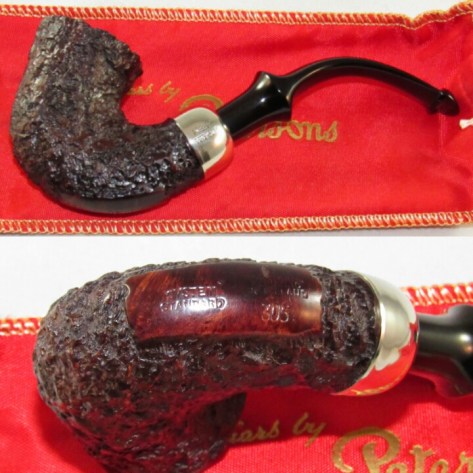
This System Standard 305 was loved and well enjoyed, chunky cake, stem oxidation, very faint chatter, grime embedded in the crags, loose band and rim build up. So much grime had built up from handling the pipe over the years the stummel appeared black. I have a newer XL 305 and love the way it smokes so this was a great addition.

I started by reaming the chamber with the PipNet reamer, knowing the pipe had been put though its paces I decided to bring it back to briar. I then lightly sanded the chamber with 400 grit sandpaper. I uncovered one good crack and charring in the left side of the chamber.
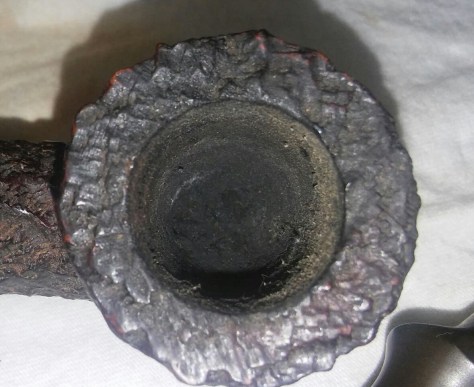
Next the rim build up, I applied a generous amount of Method Good For Wood polish and left it aside to penetrate the old tar and char. Once the build up softened I removed the residue with Q-Tips and a pick to get the crud out of the deeper rustication.

With the rim clean I moved to the internal cleaning of the stem and stummel. I inserted a cotton ball into the mortise and soaked it in EverClear, I left it aside to brake up the old tars and nicotine. After soaking for an hour or so I cleaned the stummel and stem using EverClear, shank/mortise brushes, Q-Tips and stiff/soft pipe cleaners, cleaning until my final pipe cleaner came out as it went in.

Forced air heating is a blessing this time of year, a killer on the sinuses but great for bowl coating cure. The bowl coating I use is something I try to avoid if I can, in the summer it can take a week or more depending on the humidity to achieve the right cure but when it cures fully its smooth and rock solid.

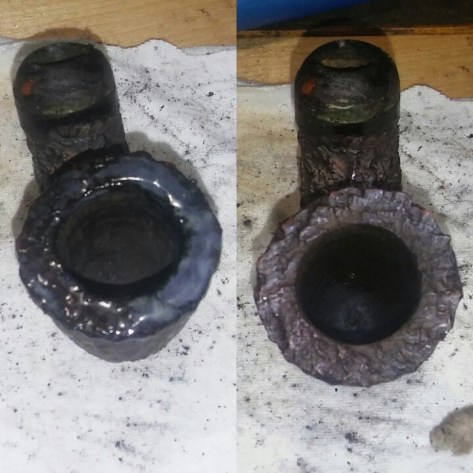
Prepping the chamber before applying the bowl coat, the chamber was scrubbed thoroughly with EverClear during my internal cleaning but I gave it one more round with an EverClear dipped Q-Tip and allowed it to dry, removing any the loose debris from the crack with a pick. I then mixed a little cigar ash and water together to make pipe mud to fill the crack, I applied it with a finger and left to dry. Once the mud was hardened in the crack I wiped the excess from the chamber with a rag. The bowl coating is a three step process starting first with mixing the primer coat. (Step One)- I start with honey about 2.5 ml in an old medicine cup, I add activated charcoal powder a little at a time to the honey and stir with a toothpick until I get the right constancy (it will ball up on its self as the charcoal coasts the honey but continued mixing will combined the two) basically your looking for the toothpick to stand on its own for a few seconds before falling to the side of the cup. I let the mixture settle until the bubbles rise to the top. (Step Two)-I apply a thin layer of the mixture to the chamber with a small flat paint brush, starting from the bottom of the chamber and working up the side walls being careful not to get it on the rim (If you do get it on the rim warm water and a Q-Tip will remove it just try not to get water in the chamber itself). There will be quite a bit of primer coating leftover, I store it in a lock&lock and will keep for a while for reuse.

I let the coating set in the chamber for a few minutes just so it looses some of its shine, I then insert a folded pipe cleaner into the airway and lay down a piece of printer paper on my desk top before moving to the next step.(Step Three)- I add a little charcoal powder to the bottom of the chamber and slowly turn the stummel in hand to coat the entire chamber any excess charcoal powder that falls to the paper can be reused. I leave the stummel aside to dry, the chamber should be a dark gray color when completely coated if any dark wet spots reappear repeat step three. When the chamber is well coated and wet spots have not re-emerge I tap the stummel lightly on the side of my finger to remove any leftover charcoal powder. In warm dry conditions I leave the chamber to cure for a couple of days before buffing the stummel, in high humidity it could take up to a week or longer. Once the coating has cured for a few days and is dry to the touch and doesn’t smear (If it does smear and appears wet again repeat step three and let dry) I’ll remove the pipe cleaner, blow out any leftover powder and wait an additional week before packing and puffing. To be honest its a pain and takes a long time to fully cure which is why I avoid it if I can but I believe the clean smooth finish is worth it. All I can say is if you decide to try this bowl coating take your time and be patient, its all trial and error.
 As I was waiting for the bowl coating to cure I worked on removing the stem oxidation. I applied non- bleach Soft Scrub to the stem and left it aside, once the Soft Scrub turned from white to a brownish color I started scrubbing with a rag, the oxidation was stubborn as it is with most Petes I’ve run across, each time it looked as if the oxidation was removed and I went to the sink to wash off the Soft Scrub the stem would instantly turn a brownish tan color and it appeared there was more oxidation now then when I originally started. I started over and went though the same process again but this time I was sidetracked and the stem was pushed back on the desk with the Soft Scrub still on it and there it sat for a day and a half, by the time I sat down to work again the stem was encased in crusty Soft Scrub. This has never happened before an hour at most with Soft Scrub I wasn’t sure what would happen to the stem material, in this case after a good scrubbing the oxidation was all but gone and the stem was left perfect. I was able to buff the stem with white diamond back to a glossy black without the use of micro-mesh, the light chatter was buffed off as well. I’ll have to retry this again to make sure it wasn’t a fluke but I was pretty happy with the results.
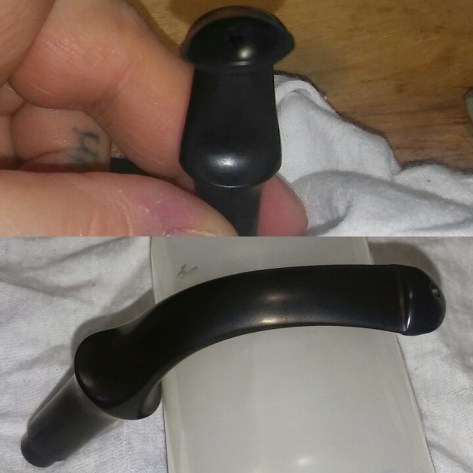
When I received the pipe the bit was cocked to the left, I heated the stem with a Bic lighter moving the flame at all times so not to burn the stem and re-bent it over a bottle.

Buffing the band with it removed from the stummel was much easier then tapping things off, I buffed the band with Brown Tripoli on the wheel, I was able to remove the pitting and tarnish.
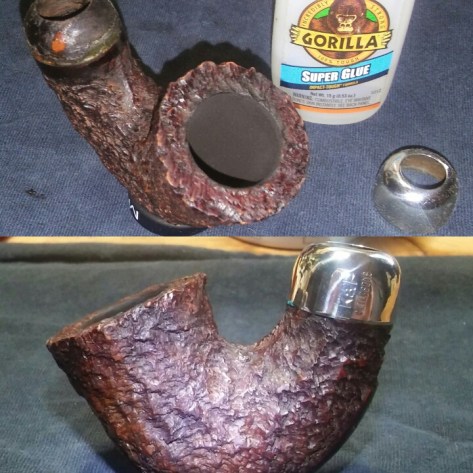
With the band buffed I reattached it to the shank with a bit of Gorilla Glue holding it in place until dry.
Complete.


I buffed the stummel with Renaissance Wax and a shoe polish brush , polishing the band with Brown Tripoli and buffing the stem with white diamond and carnauba.

You must be logged in to post a comment.