Tag Archives: Peterson pipe

Peterson’s Emerald 150

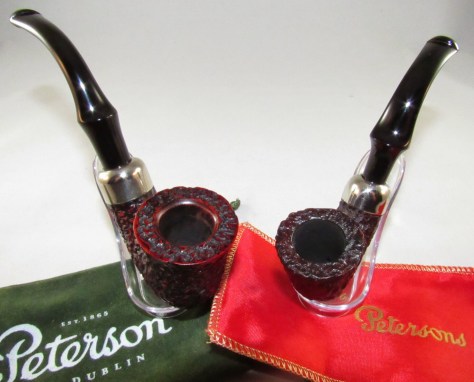
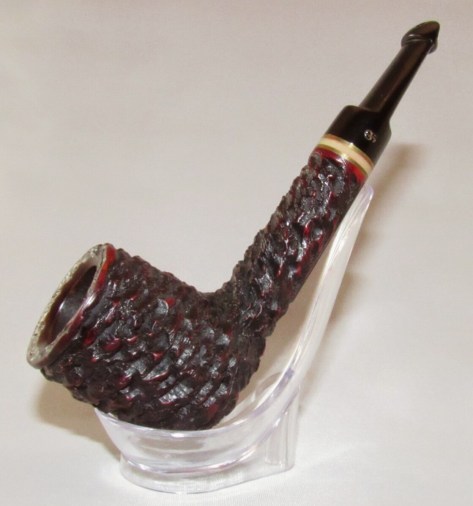
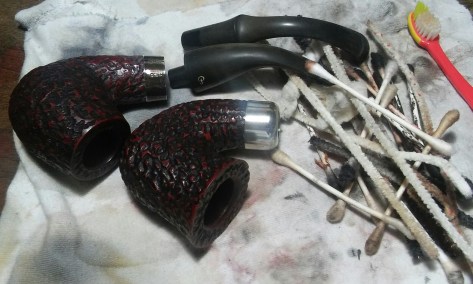
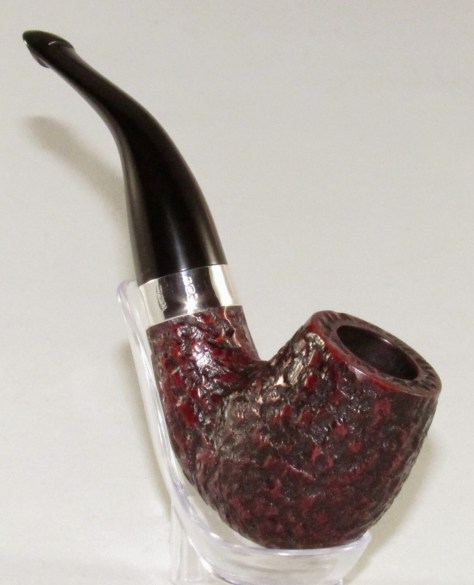
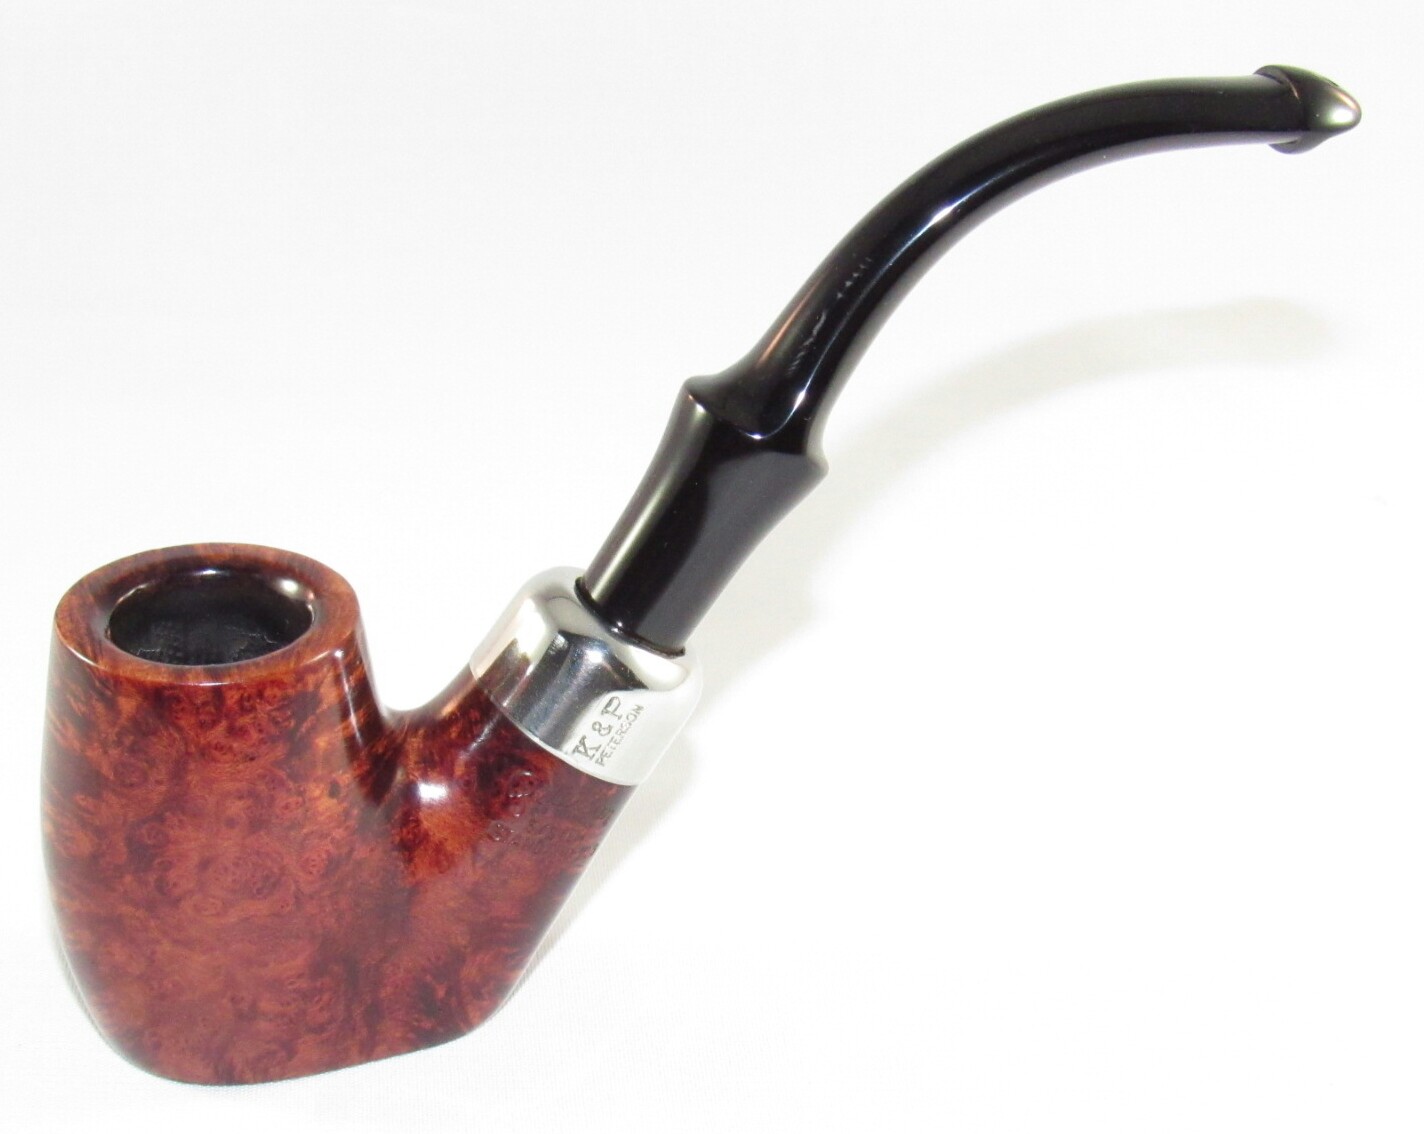
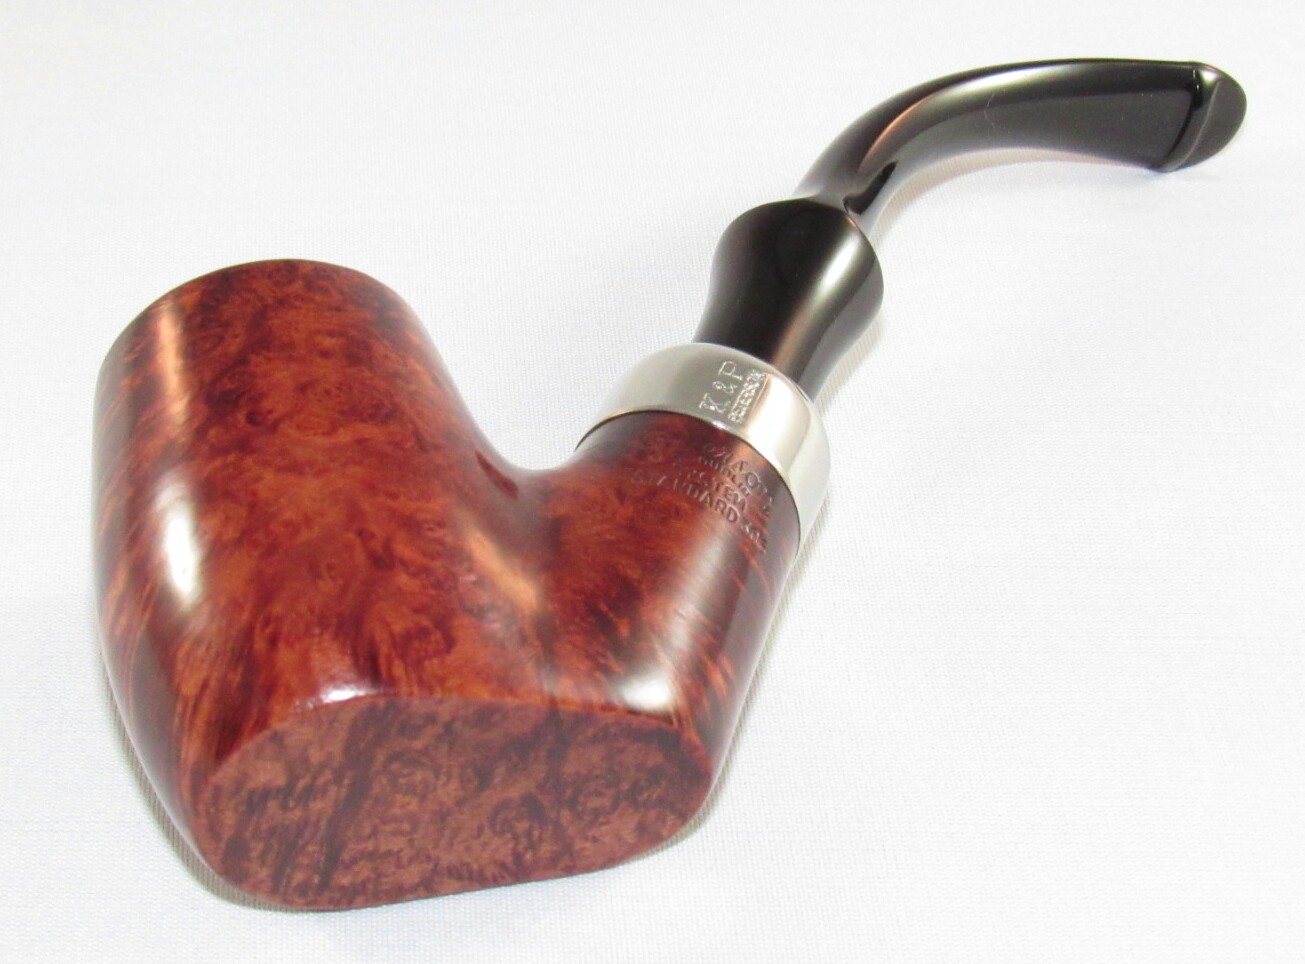
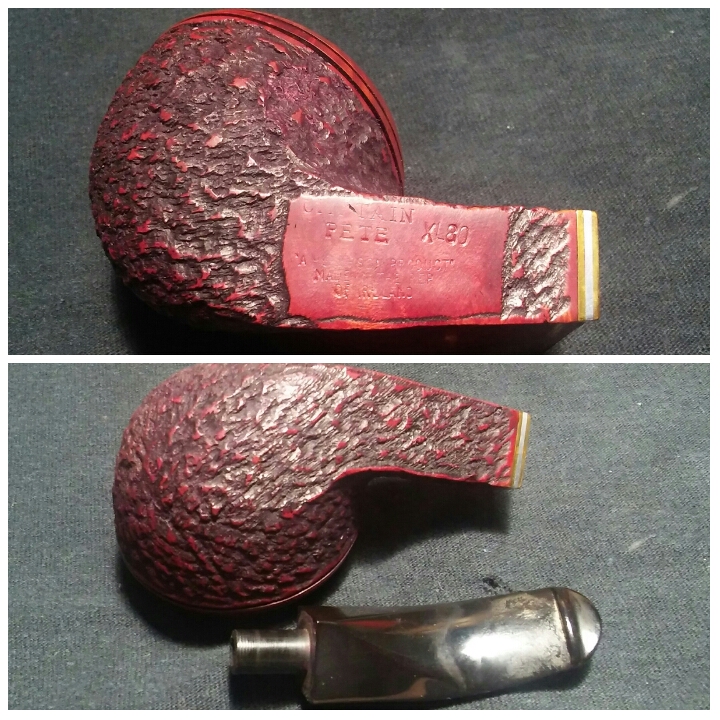
The grain is incredible and the bulldog is steadily becoming one of my favorite shapes. I’m getting down to the last few from the lot my wife gifted me for Christmas, this is the last Pete from the lot and just as beautiful as the other two. The Emerald line is one I’ll keep an eye out for going forward. The rusticated Emerald 53 I did a couple of posts back is unlike any  other rusticated Pete in my collection the Emerald’s rustication is deep and craggy reminiscent of a weathering coastline, beautiful.

The Emerald 150’s Revival

photogrid_1483067615509photogrid_1483067704908photogrid_1483067380791photogrid_1483067448274

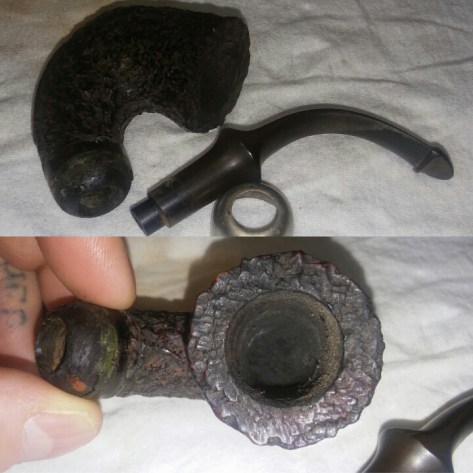
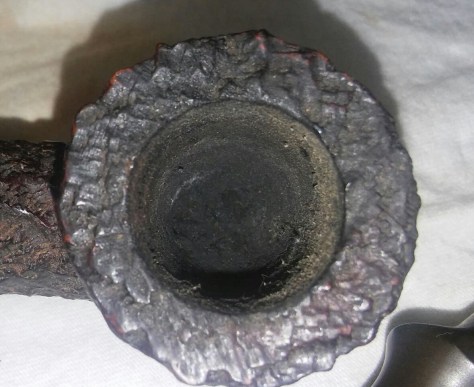
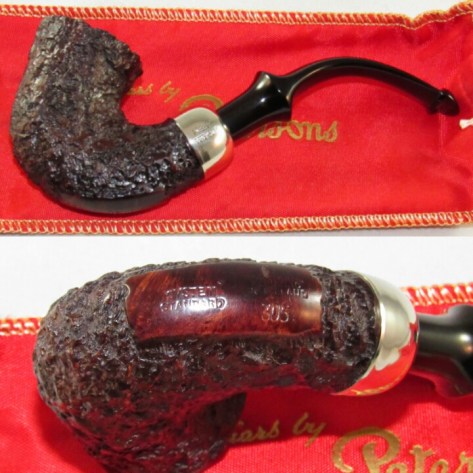
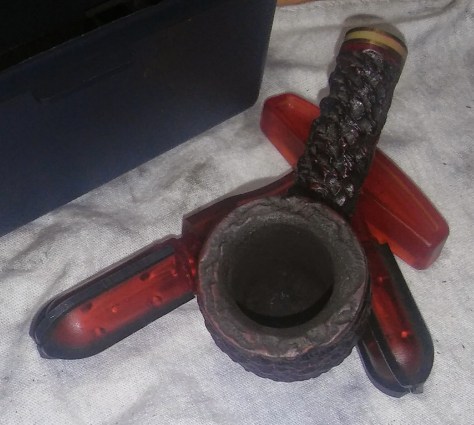
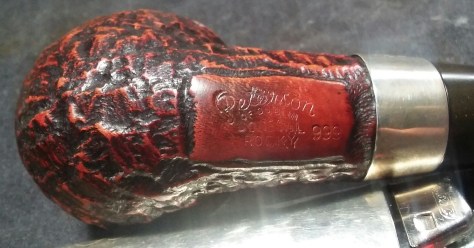
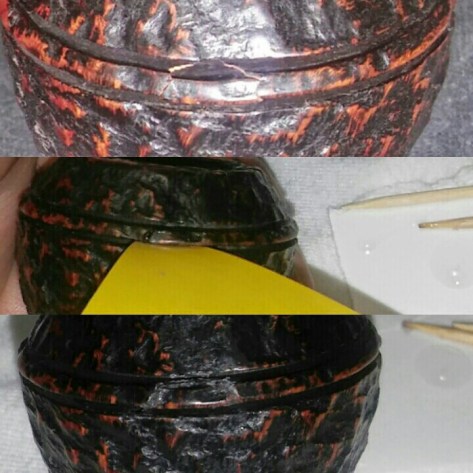
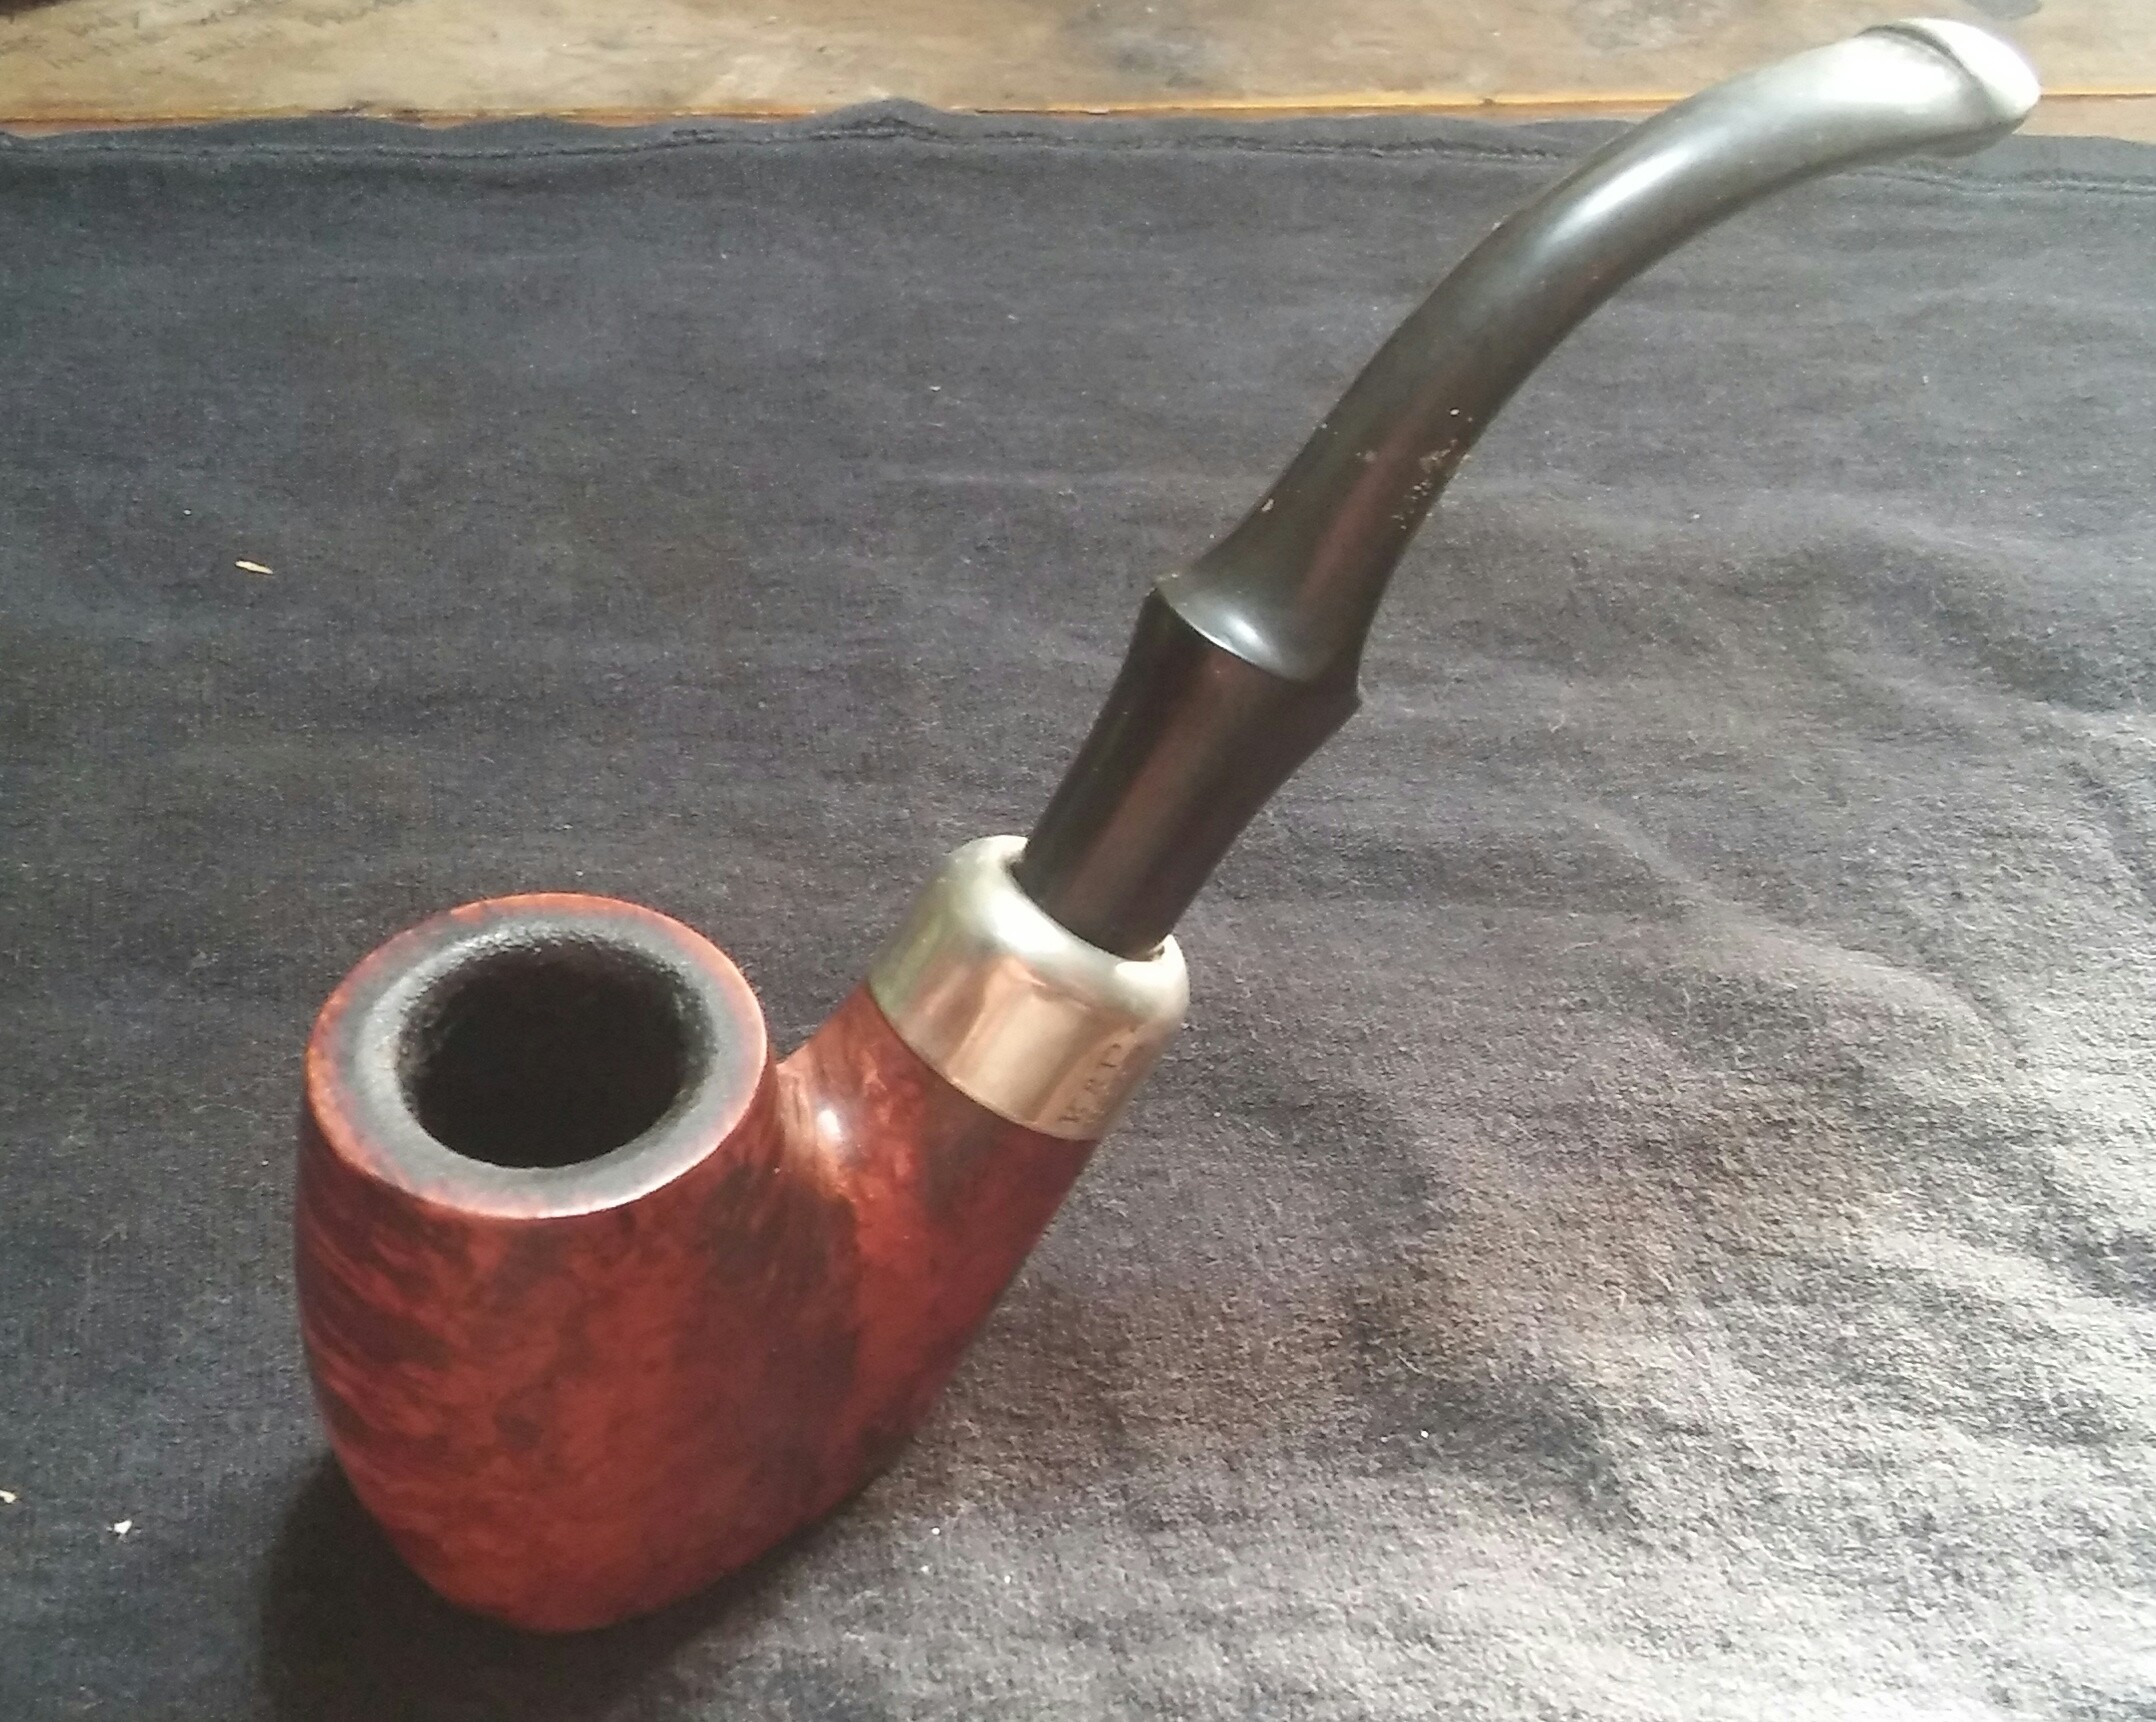
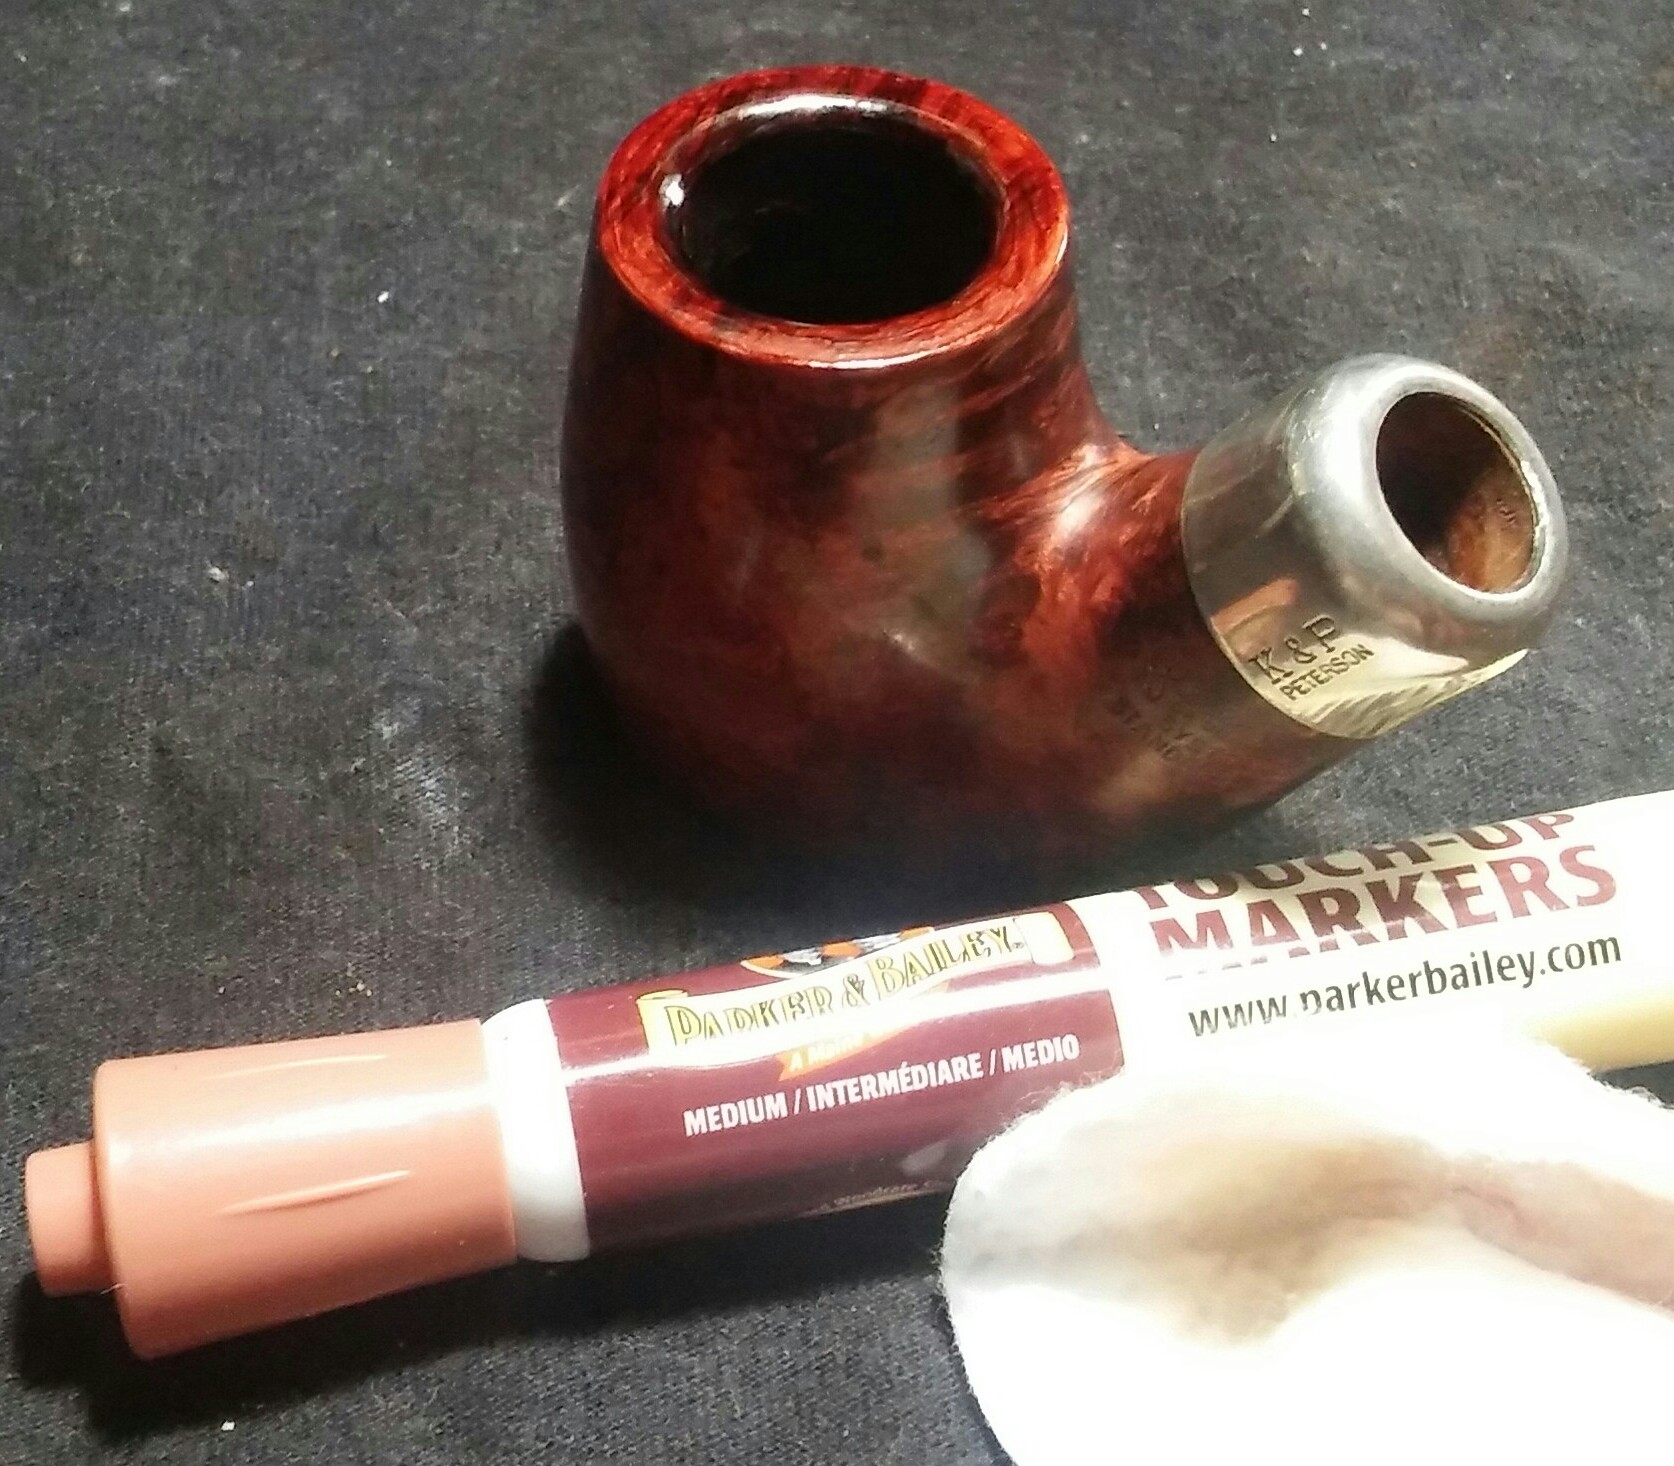
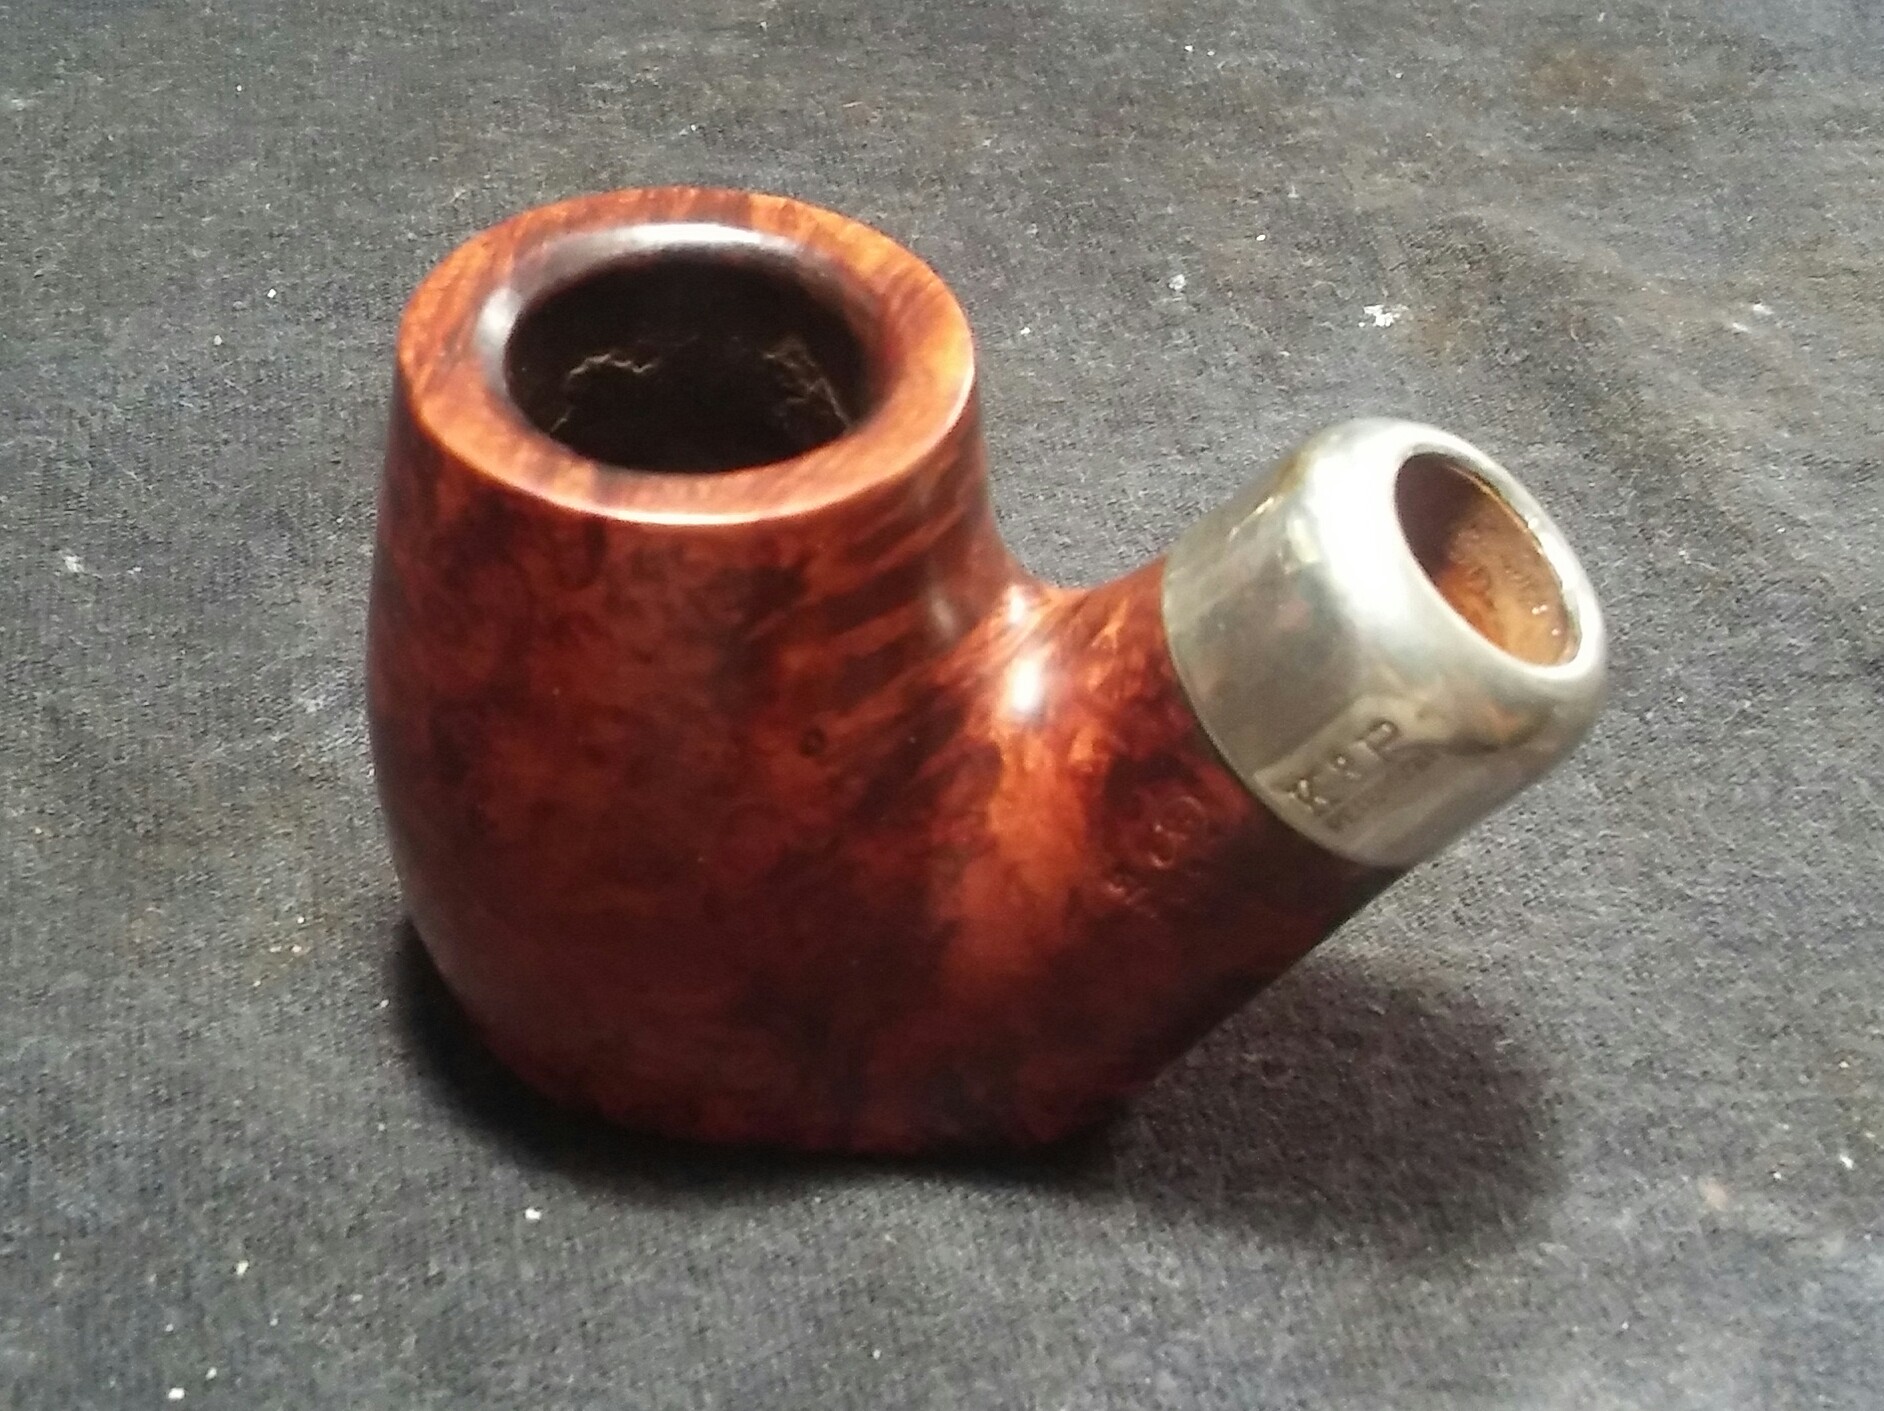
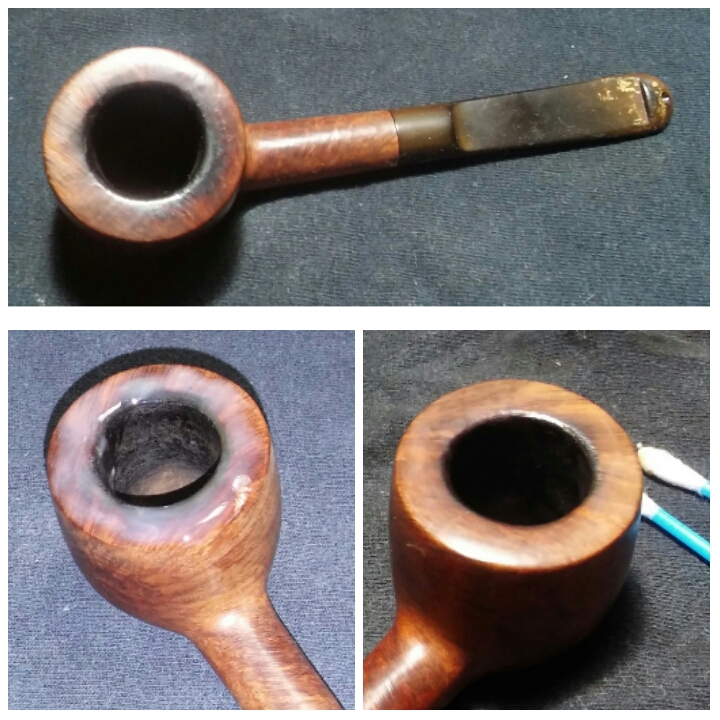
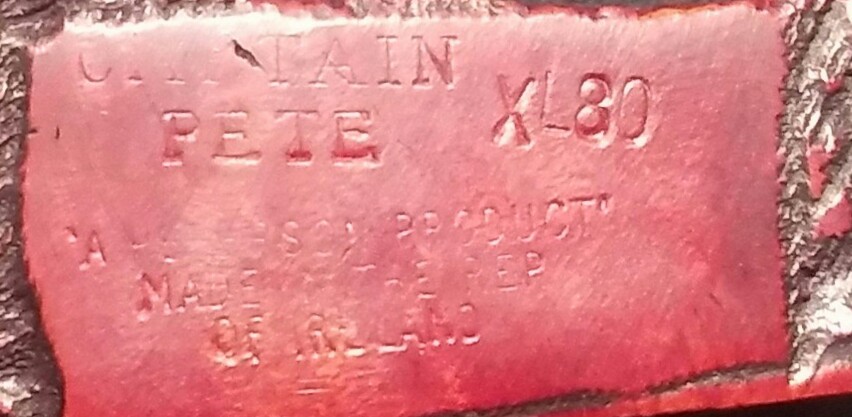
The nomenclature is crisp- Peterson’s over Emerald on the left of the shank and made in the Republic of Ireland 150 on the right. The Emerald band still has a tint of green left, the stem is oxidized and shallow chatter. The rim has a little build up, I counted two small fills and the chambers old cake and leftover tobacco.

20161230_1102312

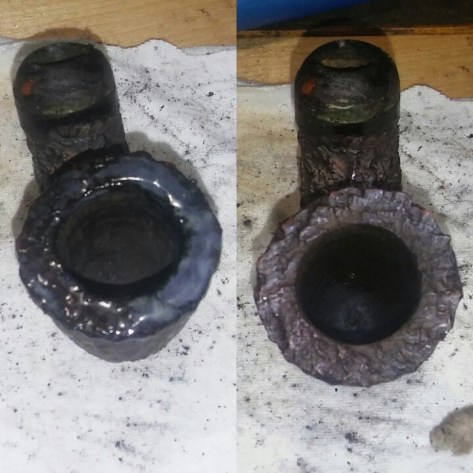
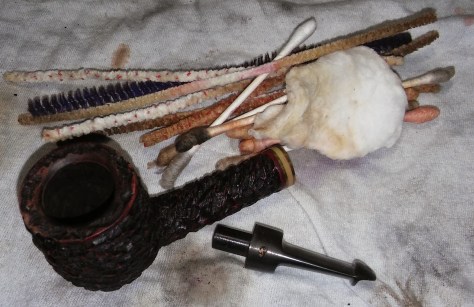
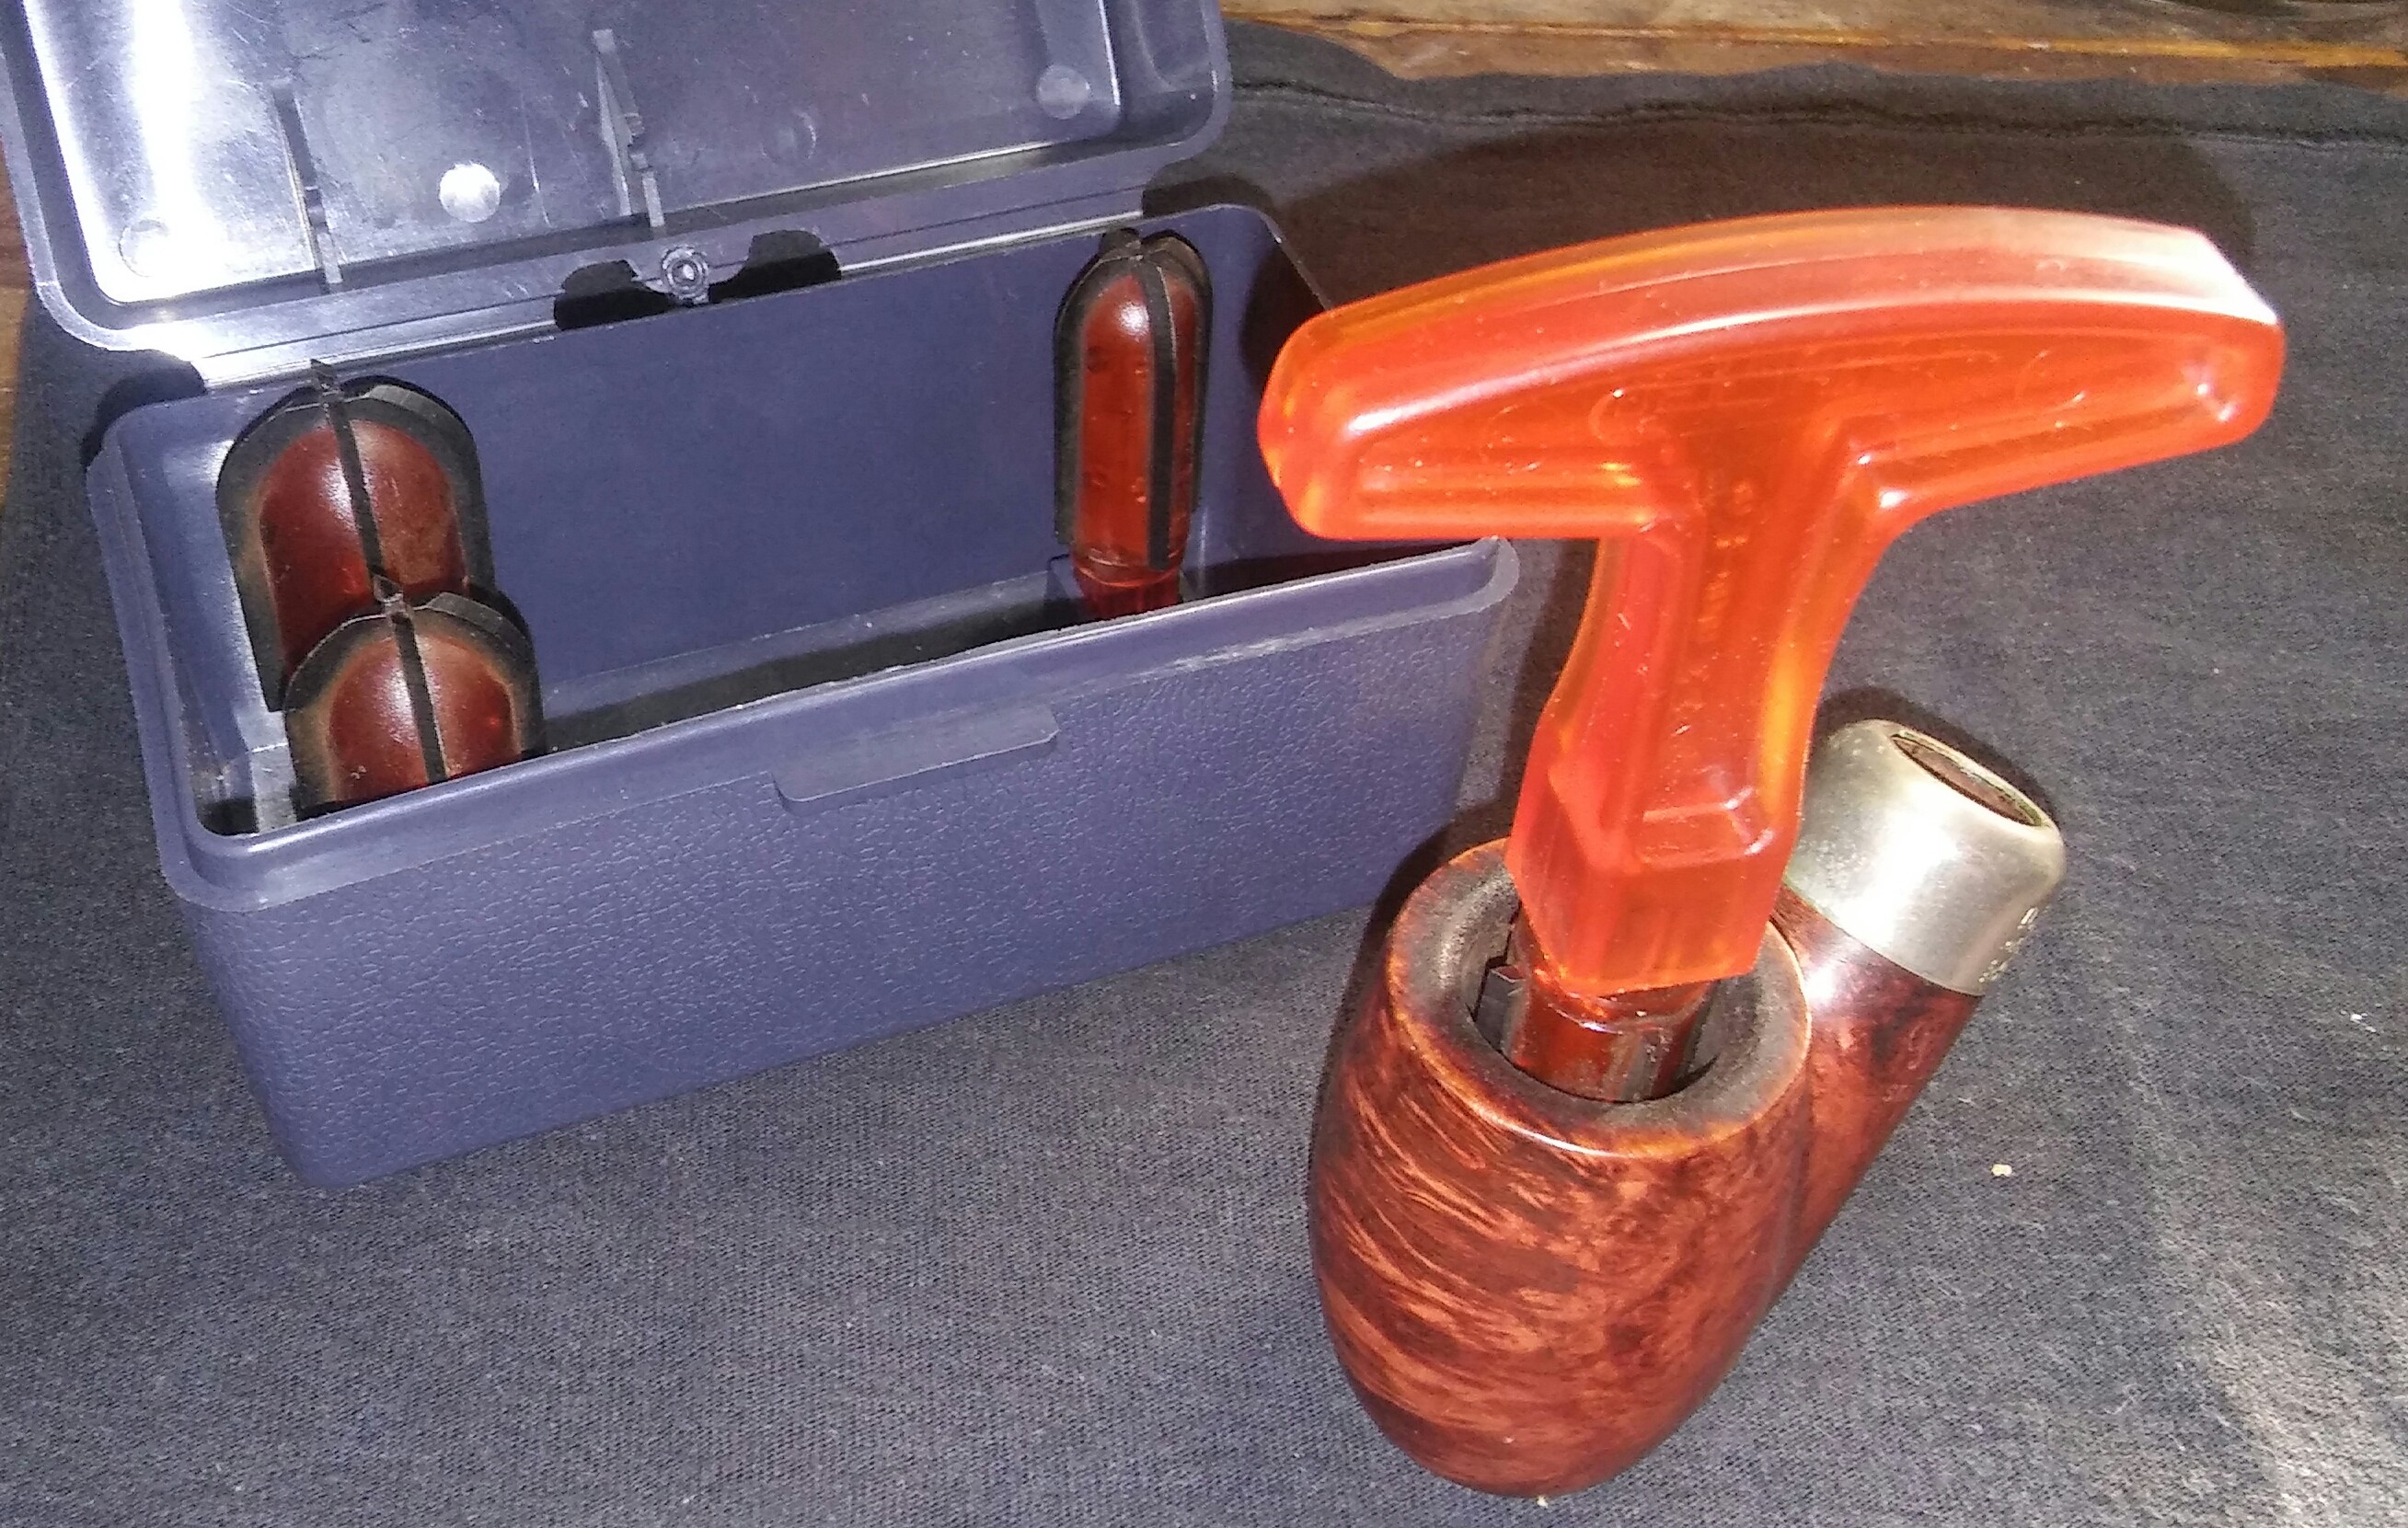
I started with the chamber and the PipNet reamer and reamed the cake back using the first two attachments, the chamber was free of cracks or charring.

photogrid_1483757459888

Next the rim build up, it was heavy towards the back of the rim. I applied Method Good For Wood polish to the rim and left it to soften the build up. Once the build up softens I scrubbed the area with Q-Tips, I had to repeat this a few times to remove all the build up. I gave the stummel a wipe down with a rag and Method.

photogrid_1483757037539

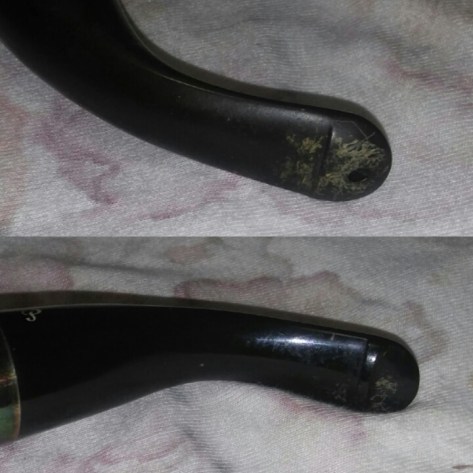
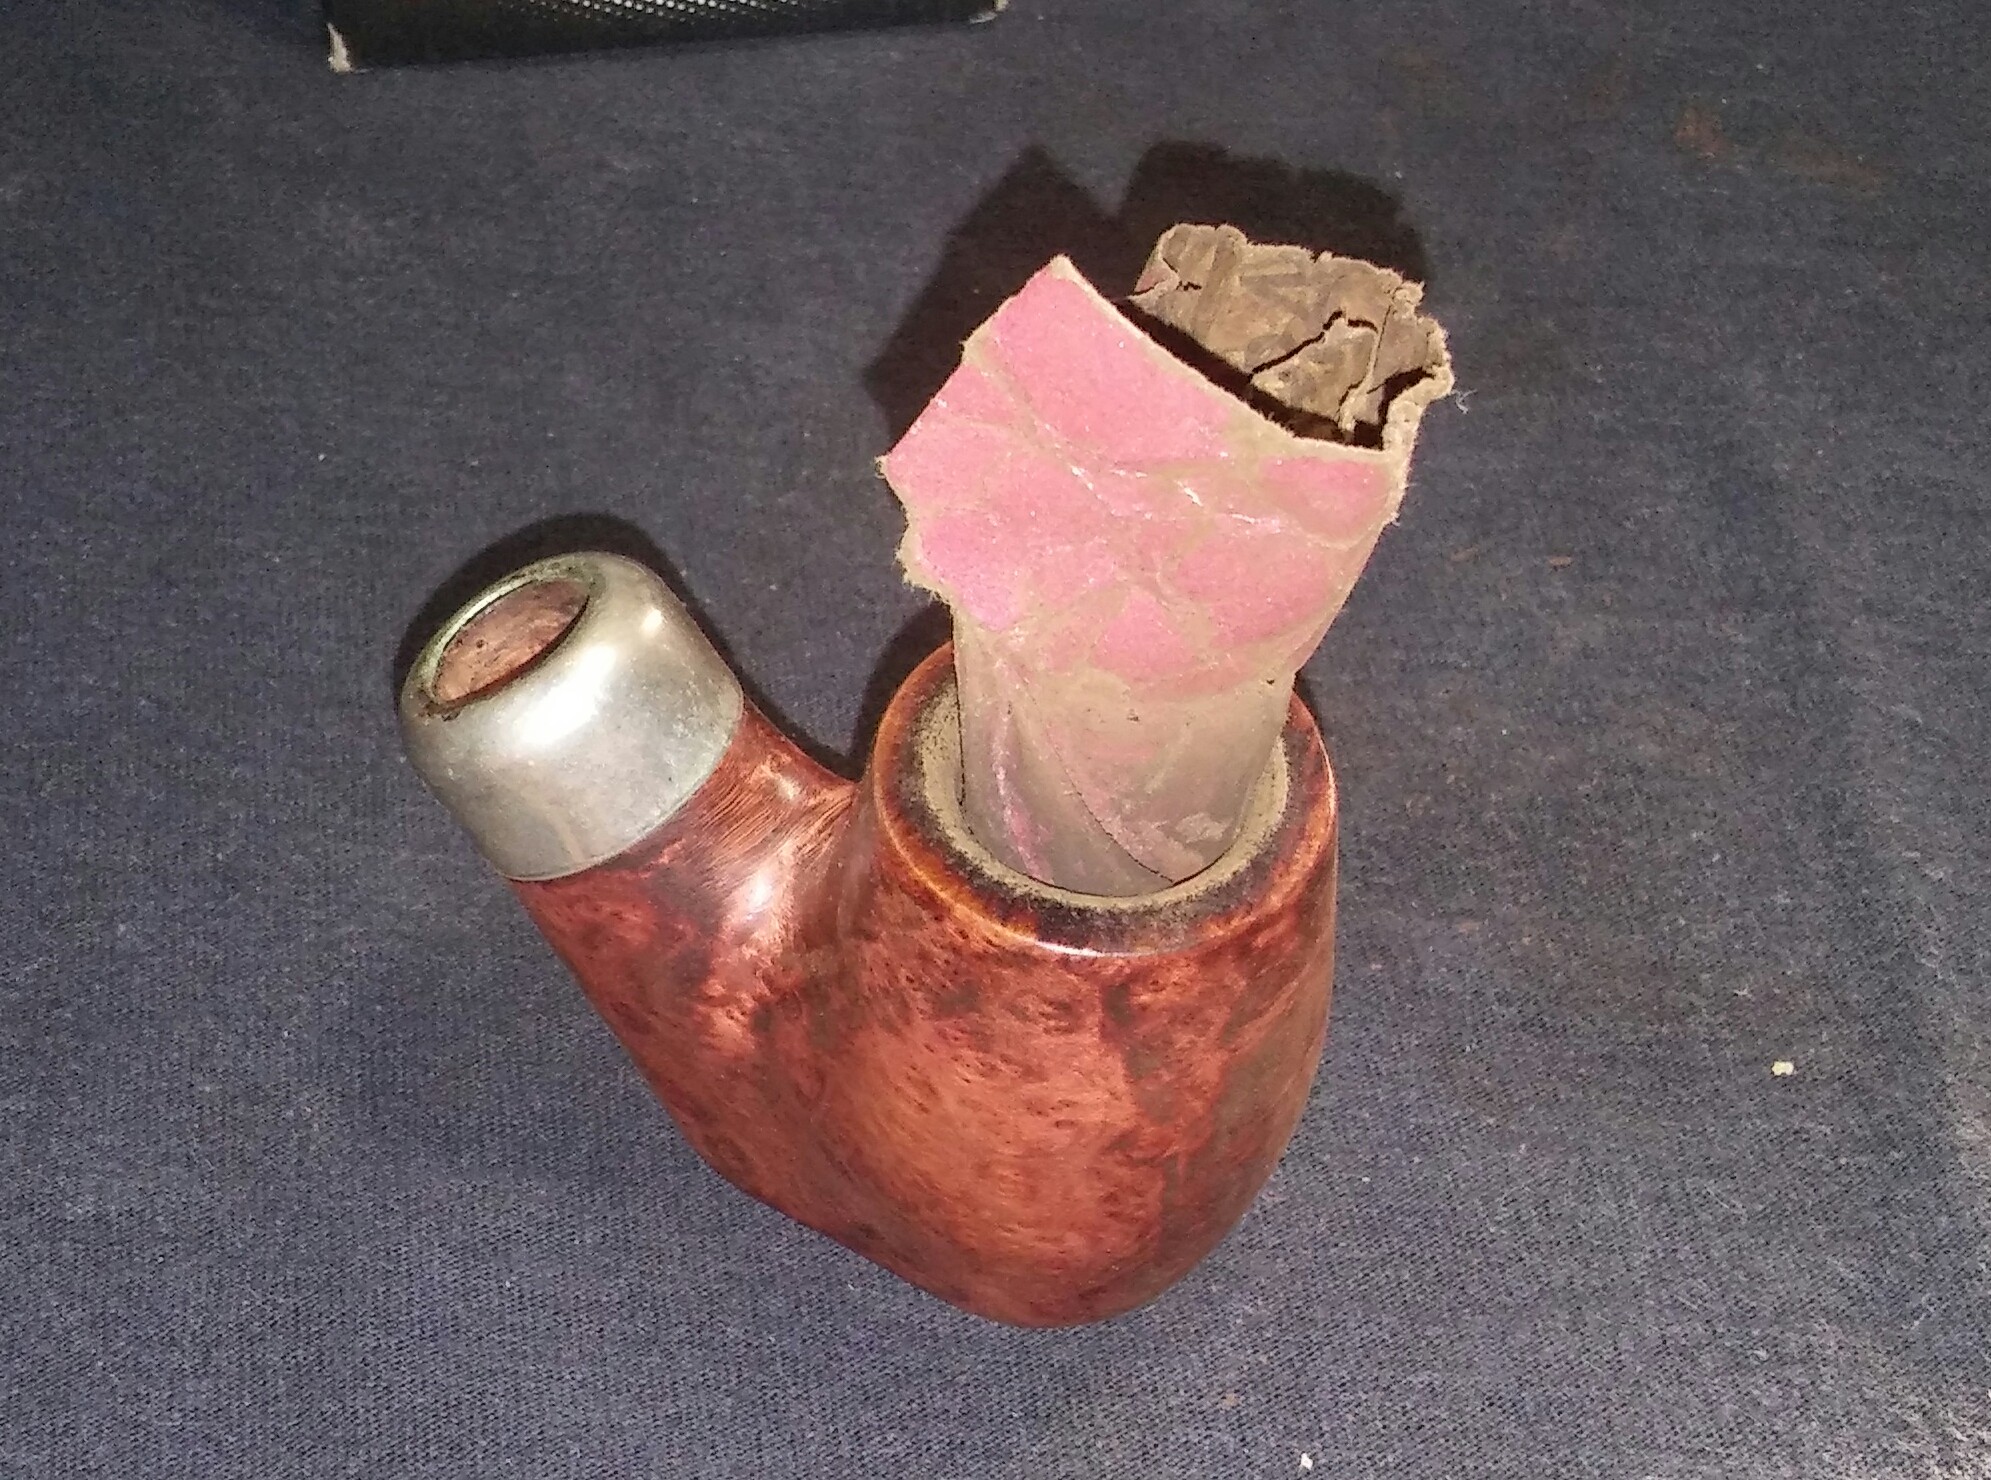
I cleaned the internals of the stem and stummel using EverClear , shank/mortise brushes, stiff/soft pipe cleaners and Q-Tips, cleaning until my final pipe cleaner came out as it went in. The internals were surprisingly clean, well maintained by the previous owner.

20161230_1539392photogrid_1483757111318

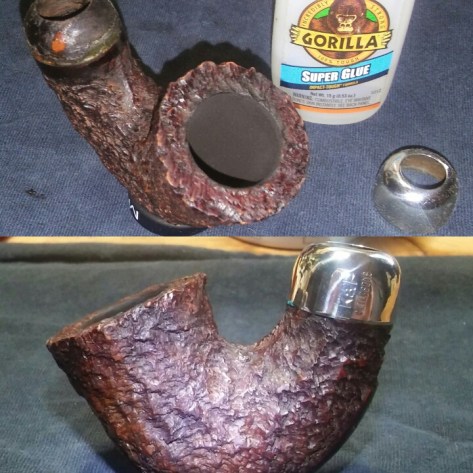
 The bead was intact but stuffed with old carnauba, using an X-Acto knife I carefully removed the old wax then cleaning the area with Method polish.

photogrid_1483757203302

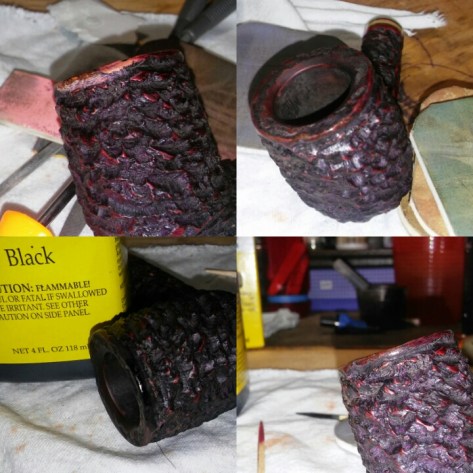
There were a few dings in the briar that I steamed out using an iron set to medium heat and a damp rag. I covered the area to be steamed with the damp rag and placed the heated iron on the blemish, it took a few applications to get each ding flush with the existing briar.

photogrid_1483757255807

The two fills in the briar to be honest blended fairly well and I was going to leave them be but in the process of steaming out the dings I inadvertently popped out the filler. I applied a drip of Method polish to each fill and left it to soften and once soft I removed the fill with an X-Acto knife and pick. I lightly cleaned the area with EverClear and a Q-Tip. Using a toothpick I applied a small amount of gorilla Glue to the pit and packed with briar dust and left to dry a few minutes.

photogrid_1483757700542

With the patch dry I lightly sanded the area first with an emery-board, then 800, 1000 and 1500 grit sandpaper and finishing with a worn 3200 micro-mesh pad. I didn’t re-stain the area the natural finish of the pipe blended with the area of repair, just handling the stummel while working helped blend it further.

photogrid_1483756861302

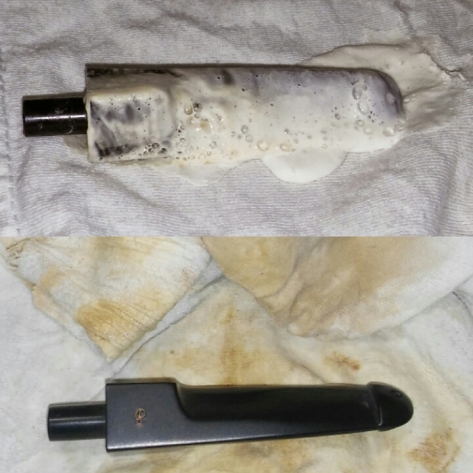
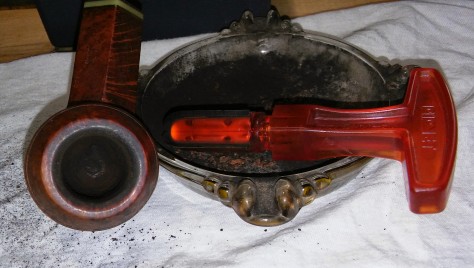
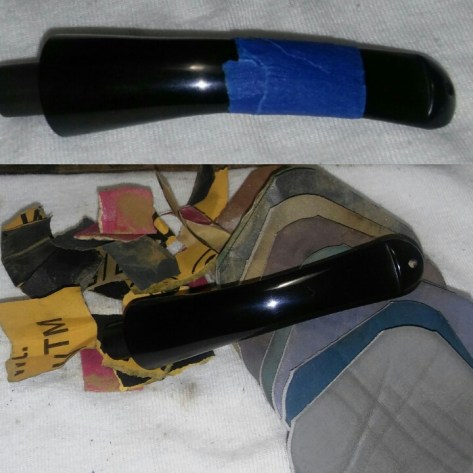
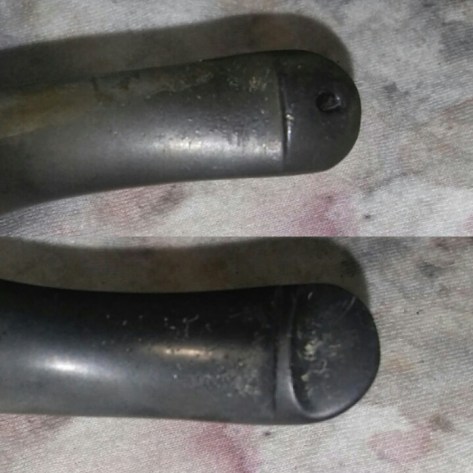
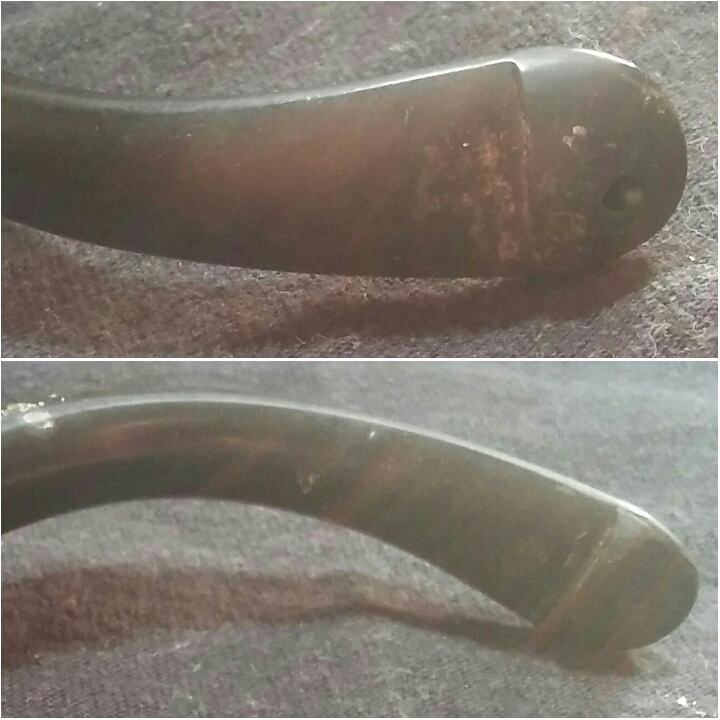
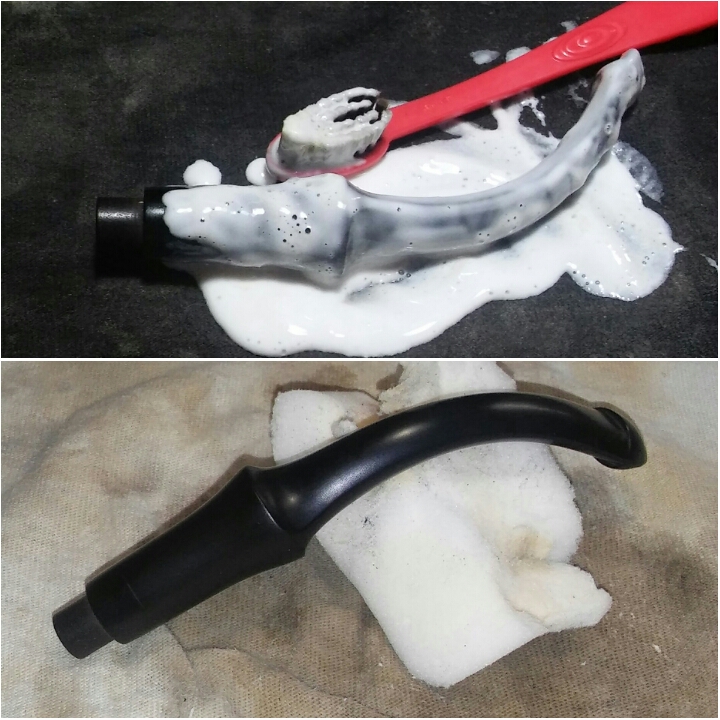
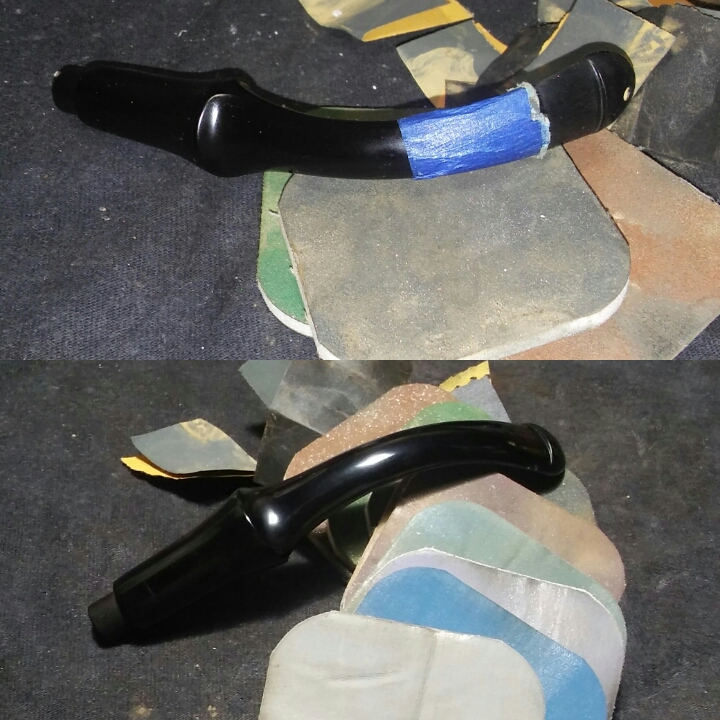
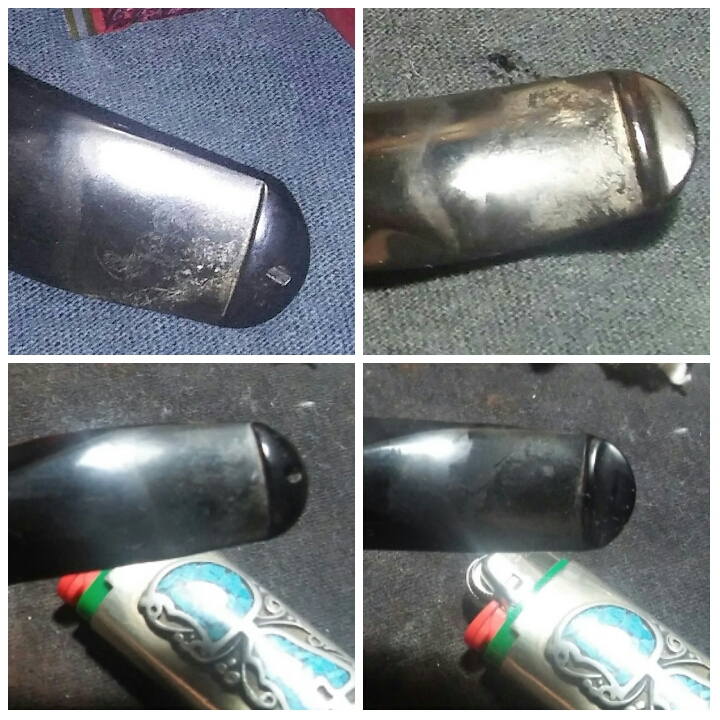
The stubborn Peterson oxidation, I applied non-bleach Soft Scrub to the stem and left it to penetrate the oxidation, once the Soft Scrub turns from white to a brownish color I scrub with a rag adding more Soft Scrub as needed until all oxidation is removed (Holding the stem under natural light will help to see if all oxidation has been removed) I worked on this stem on and off for an hour to remove all oxidation.

photogrid_1483757601154

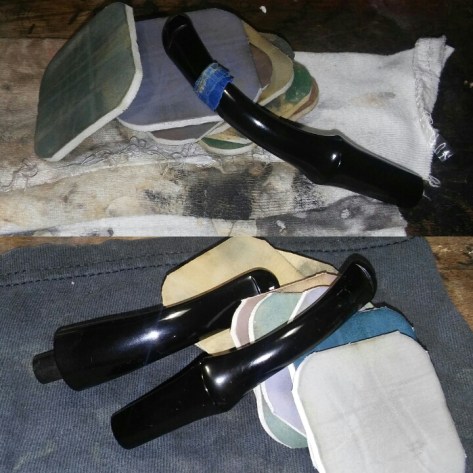
There was a couple of deeper tooth impressions that would need sanding but the bulk of the stem looked good. I taped off the bit so my more abrasive sanding would remain in one area. I sanded the impressions with 400, 800, 1000 and 1500 sandpaper wet until the impressions were flush with the rest of the stem. I then sanded with micro-mesh pads 1500-2400 wet and finished with 3200-6000 dry, I removed the tape for the final two pads and polished the whole stem with 8000 and 12000 dry.

Complete 

2017010814054422201701081404112photogrid_1483896136341photogrid_1483896175534photogrid_1483896115511

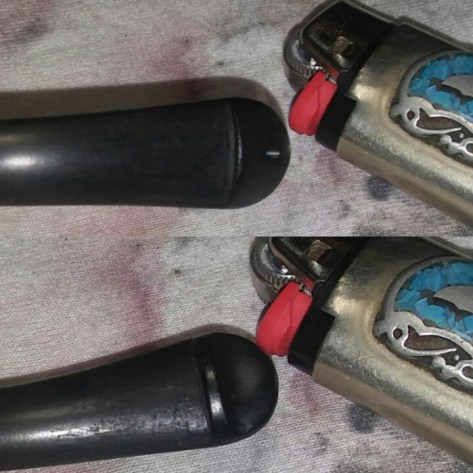
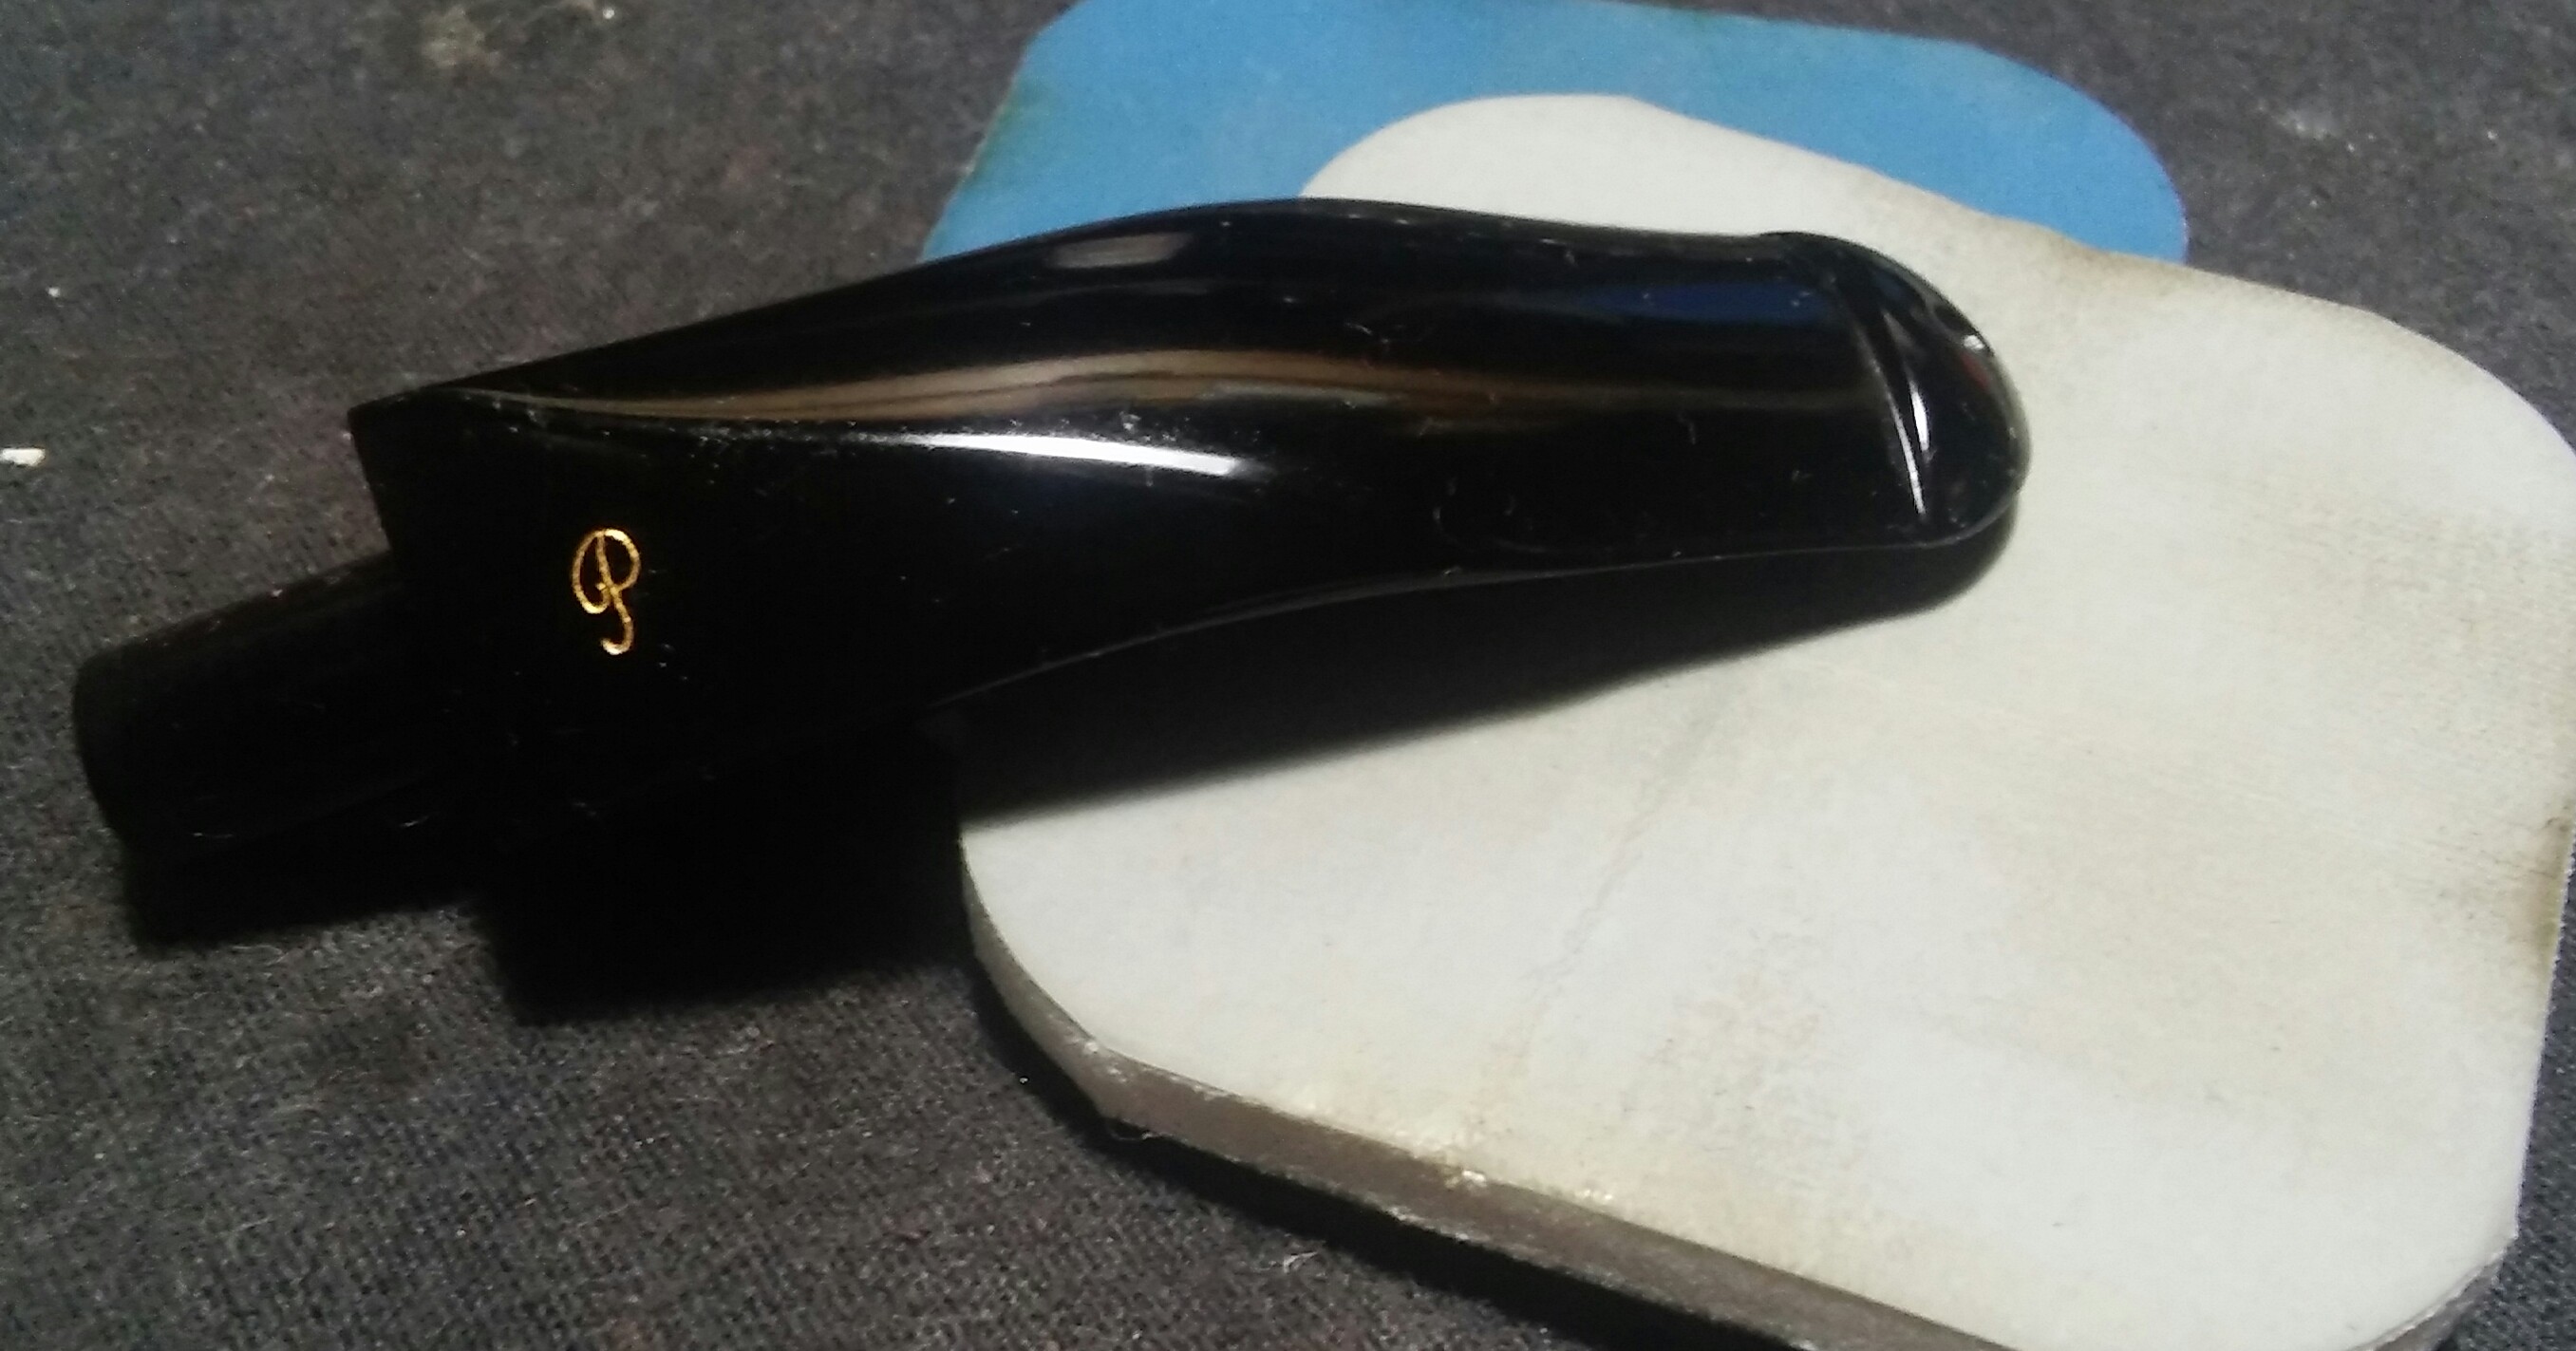
I buffed the stummel with white diamond, a few coats of carnauba and a round on a nude wheel, buffing the stem with white diamond and carnauba. A final Hand buffing with a microfiber cloth before photos.

Happy Hunting, Refurbishing and Puffing.

Tim.

Peterson System Standard 305

 Its funny but sometimes you can surprise yourself , when it comes to pipe refurbishing I’m my number one critic,  sometimes you should leave well enough alone before things get out of hand and you make more work for yourself. In this case I was happy with the finished pipe, I only hope the photos due it justice. This Pete is one more form the lot my wife gifted me for Christmas and so far my favorite. I wish Peterson would bring back there deep craggy rustication, the look and  feel are incredible.

The Pete.


photogrid_1483662628115photogrid_1483662743740photogrid_1483662656938

 This System Standard 305 was loved and well enjoyed, chunky cake, stem oxidation, very faint chatter, grime embedded in the crags, loose band and rim build up. So much grime had built up from handling the pipe over the years the stummel appeared black. I have a newer XL 305 and love the way it smokes so this was a great addition.

20170101_1936192

I started by reaming the chamber with the PipNet reamer, knowing the pipe had been put though its paces I decided to bring it back to briar. I then lightly sanded the chamber with 400 grit sandpaper. I uncovered one good crack and charring in the left side of the chamber.

20170101_1901532photogrid_1483663042890

Next the rim build up, I applied a generous amount of Method Good For Wood polish and left it aside to penetrate the old tar and char. Once the build up softened I removed the residue with Q-Tips and a pick to get the crud out of the deeper rustication.

photogrid_1483663100064

With the rim clean I moved to the internal cleaning of the stem and stummel. I inserted a cotton ball into the mortise and soaked it in EverClear, I left it aside to brake up the old tars and nicotine. After soaking for an hour or so I cleaned the stummel and stem using EverClear, shank/mortise brushes, Q-Tips and stiff/soft pipe cleaners, cleaning until my final pipe cleaner came out as it went in.

photogrid_1483663004863

Forced air heating is a blessing this time of year, a killer on the sinuses but great for bowl coating cure. The bowl coating I use is something I try to avoid if I can, in the summer it can take a week or more depending on the humidity to achieve the right cure but when it cures fully its smooth and rock solid.

photogrid_1483662326209

Prepping the chamber before applying the bowl coat, the chamber was scrubbed thoroughly with EverClear during my internal cleaning but I gave it one more round with an EverClear dipped Q-Tip and allowed it to dry, removing any the loose debris from the crack with a pick. I then mixed a little cigar ash and water together to make pipe mud to fill the crack, I applied it with a finger and left to dry. Once the mud was hardened in the crack I wiped the excess from the chamber with a rag. The bowl coating is a three step process starting first with mixing the primer coat. (Step One)- I start with honey about 2.5 ml in an old medicine cup, I add activated charcoal powder a little at a time to the honey and stir with a toothpick until I get the right constancy (it will ball up on its self as the charcoal coasts the honey but continued mixing will combined the two) basically your looking for the toothpick to stand on its own for a few seconds before falling to the side of the cup. I let the mixture settle until the bubbles rise to the top. (Step Two)-I apply a thin layer of the mixture to the chamber with a small flat paint brush, starting from the bottom of the chamber and working up the side walls being careful not to get it on the rim  (If you do get it on the rim warm water and a Q-Tip will remove it just try not to get water in the chamber itself).  There will be quite a bit of primer coating leftover, I store it in a lock&lock and will keep for a while for reuse.

photogrid_1483662403388

I let the coating set in the chamber for a few minutes just so it looses some of its shine, I then insert a folded pipe cleaner into the airway and lay down a piece of printer paper on my desk top before moving to the next step.(Step Three)- I add a little charcoal powder to the bottom of the chamber and slowly turn the stummel in hand to coat the entire chamber any excess charcoal powder that falls to the paper can be reused. I leave the stummel aside to dry, the chamber should be a dark gray color when completely coated if any dark wet spots reappear repeat step three. When the chamber is well coated and wet spots have not re-emerge I tap the stummel lightly on the side of my finger to remove any leftover charcoal powder. In warm dry conditions I leave the chamber to cure for a couple of days before buffing the stummel, in high humidity it could take up to a week or longer. Once the coating has cured for a few days and is dry to the touch and doesn’t smear (If it does smear and appears wet again repeat step three and let dry) I’ll remove the pipe cleaner, blow out any leftover powder and wait an additional week before packing and puffing. To be honest its a pain and takes a long time to fully cure which is why I avoid it if I can but I believe the clean smooth finish is worth it. All I can say is if you decide to try this bowl coating take your time and be patient, its all trial and error.

photogrid_1483662468237  
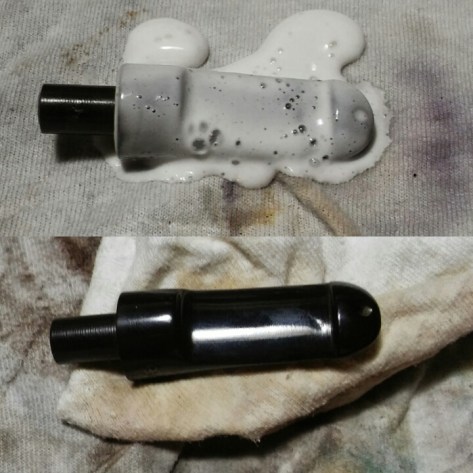
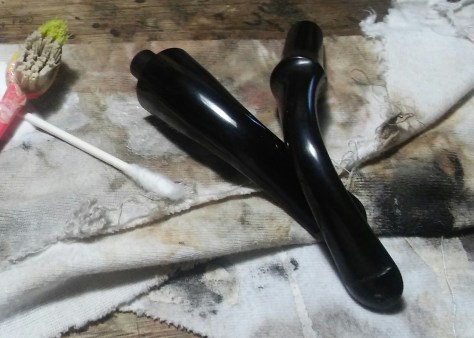
As I was waiting for the bowl coating to cure I worked on removing the stem oxidation. I applied non- bleach Soft Scrub to the stem and left it aside, once the Soft Scrub turned from white to a brownish color I started scrubbing with a rag, the oxidation was stubborn as it is with most Petes I’ve run across, each time it looked as if the oxidation was removed and I went to the sink to wash off  the Soft Scrub the stem would instantly turn a brownish tan color and it appeared there was more oxidation now then when I originally started. I started over and went though the same process again but this time I was sidetracked and the stem was pushed back on the desk with the Soft Scrub still on it and there it sat for a day and a half, by the time I sat down to work again the stem was encased in crusty Soft Scrub. This has never happened before an hour at most with Soft Scrub I wasn’t sure what would happen to the stem material, in this case after a good scrubbing the oxidation was all but gone and the stem was left perfect. I was able to buff the stem with white diamond back to a glossy black without the use of micro-mesh, the light chatter was buffed off as well. I’ll have to retry this again to make sure it wasn’t a fluke but I was pretty happy with the results.
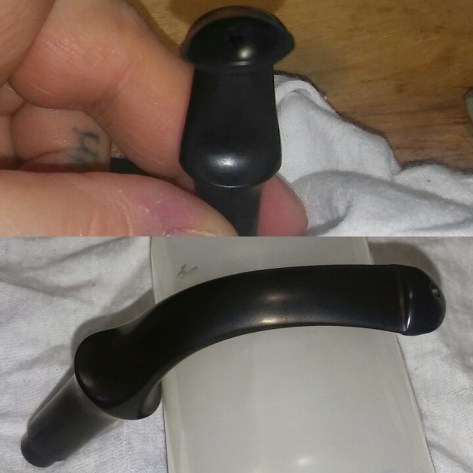
photogrid_1483662761364

When I received the pipe the bit was cocked to the left, I heated the stem with a Bic lighter moving the flame at all times so not to burn the stem and re-bent it over a bottle.

photogrid_1483662810768

Buffing the band with it removed from the stummel was much easier then tapping things off, I buffed the band with Brown Tripoli on the wheel, I was able to remove the pitting and tarnish.

photogrid_1483662869945

With the band buffed I reattached it to the shank with a bit of Gorilla Glue holding it in place until dry.

Complete.


photogrid_1483843125082201701072257572201701072257372201701072255502201701072256262201701072258112photogrid_1483843069396201701072257132


201701072304222
The old and the newPipe left 2000’s Peterson System Standard XL 305 Pipe right 1980’s Peterson System Standard 305.

I buffed the stummel with Renaissance Wax and a shoe polish brush , polishing the band with Brown Tripoli  and buffing the stem with white diamond and carnauba.

Thanks Baby and Thanks For Taking A Look.

Tim.

Peterson Emerald 53

I hope everyone had a Happy and safe Christmas, enjoyed family and friends and received some memorable gifts. My memorable gift would come as a lot of estate pipes that my wife snagged as a Christmas gift and after a little digging I saw what she payed and I was even more surprised.

screenshot_2016-12-27-19-35-372screenshot_2016-12-27-19-35-112

   Newly listed, new seller (zero feedback) and my wife said she knew at least one in the lot was a Peterson, even if she was wrong it was still a good deal. I had to go back through completed listings to find the original auction and I must say she has a good eye, the photos were poor and the description above offered null. So I guess there are deals to be had on the old bay.

photogrid_1482790206150

I was a pretty happy pappy on Christmas morning. Three Peterson’s, a Jobey, a small leather covered Big Ben and a bent little dinky pipe named Dinky. I started with the Peterson Emerald 53, a neat little pipe, tho the emerald band had lost its luster.

The Restore

photogrid_1482789842422photogrid_1482790092226photogrid_1482789880870photogrid_1482891080655

Overall the little Pete was in good shape, some rim build up, light chatter and oxidation, the emerald band was now a cream color and a chip at the rim, (highlighted in the above photos).

20161226_1637102

I started off with the chamber and my PipNet reamer, starting with the smallest attachment and finishing with the second. The chamber was free of any char/defects.

20161217_1027342photogrid_1482817793197

Next the rim build up, I applied Method Wood For Good polish to the rim with a Q-Tip and left it aside to penetrate the debris.Once the build up softens its easily removed with Q-Tips.

20161226_1819522

Now with the rim clean I moved onto the internal cleaning. Using EverClear, shank/mortise brushes, Q-Tips and stiff/soft pipe cleaners I scrubbed the internals of the stummel and stem until my final pipe cleaner came out as it went in. I wiped down the exterior of the stem with an EverClear dampened makeup pad.

photogrid_1482817379996

Now to address the chipped rim. I stated by cleaning the area to be repaired with a Q-Tip dipped in EverClear and removing any loose bits of briar. I then applied a thin layer of Gorilla Glue to the chipped area and then packed with briar dust, I would repeat this process a few times, building layer upon layer of glue and briar dust until I had built up the area just past the existing rim. I now had room to sand the repair without changing the shape of the pipe. With the patch not completely set I lightly sanded the area with an emery board until it was flush with the original rim, using a pick and micro-mesh pads I carefully began to rework the patch to match the original rim and rustication.

photogrid_1482817548519

Once the shape and rustication I wanted was achieved I applied Fiebing’s black to the patch and lightly flamed to set the dye, removing the excess with an alcohol dampened Q-Tip. I then lightly polished the area with a worn micro-mesh pad, then going back in with red Fiebing’s dye, lightly flaming once again to set the dye, removing the excess with an alcohol dampened Q-Tip and lightly polishing the area one last time with worn micro-mesh.

photogrid_1482817309560

With the stummel complete I moved to the stems oxidation, I applied a generous amount of non-bleach Soft Scrub to the stem and left it to penetrate the oxidation. Once the Soft Scrub turns from white to a brownish color its time to scrub vigorously with a rag adding more Soft Scrub as needed until all oxidation has been removed (holding the stem under natural light will help to see if all oxidation has been removed).

20161226_2349402

With the oxidation removed the stem was in fine shape aside from some light chatter, I taped off the bulk of the stem to keep my sanding in one area. Using 1000 grit sand paper wet I began working the area until no visible chatter was left. I then ran the stem though the various grits of micro-mesh 1500-2400 wet and 3200-12000 dry. I removed the tape before polishing the whole stem with 8000 and 12000 mesh pads. (When tapping off a portion of the stem there will be a visible difference between the area of work and the untouched portion, it requires buffing with blue compound to remove the fine sanding marks and will match up once again).

20161227_00165622

Now the rustication of the Peterson Emerald is far deeper then the Donegal line, so standard buffing would be disastrous, I went with Renaissance Wax and a shoe polish brush instead. I will say Renaissance Wax is not something I’ll break out that often, its not that the finished pipe isn’t beautiful, its the smell,” I can’t stand the smell ” but the aroma fades with time and leaves behind a beautiful pipe.

Complete


201612291819352201612291819492201612291820212photogrid_1483049060357201612291822202

Buffed the stummel with Renaissance Wax and a shoe polish brush, buffing the stem with blue compound.

Thanks For stopping by.

Tim.

Peterson – Donegal Rocky 999

20160705_174524

I’m down to the last few from the lot I picked up, I was drawn to this lot because of the Donegal’s its one of my favorite lines from Peterson, this is the first 999 I’ve gotten my hands on and I can see why its so popular with Peterson collectors, the shape alone is appealing but the comfort in hand is what sold me. I have parted with many from this lot but the Donegal’s are at home here.

The Restoration

PhotoGrid_146809091055420160709_124042~2PhotoGrid_1468090956390PhotoGrid_1468091021079PhotoGrid_1468090925882

 She was in good, lightly smoked condition, the biggest issue was a crack in the bead but thankfully the piece was still in place. The stem was oxidized and the P logo was half buffed flush with the stem surface, light chatter and a little rim build-up. The silver band would need a bit of shining up as well.

PhotoGrid_1468091425037

The chamber had seen very little use, it would not need reaming, a quick  scrub with EverClear  and Q-Tips would do the trick. The original bowl coating was still in great shape, it looked almost new.

PhotoGrid_1468091228916

Like the pipes chamber the draught, mortise and stems airway needed very little cleaning. Using EverClear, Q-Tips and stiff/soft pipe cleaners I cleaned the internals until my finial pipe cleaner came out as it went in.

20160709_140100~2

I now gave the rim, stummel and silver band a wipe down with Method Wood For Good Polish to remove the old oils, dirt and tarnish.

PhotoGrid_1468091138408~2~2

With the stummel clean I could now address the crack in the bead. I cleaned the area to be repaired with EverClear and a Q-Tip and let dry. I first applied Gorilla Glue to the crack with a toothpick, using an old charge card wedged in the recess I slowly moved the cracked portion back into place.I held the piece in place until the glue set. Once set I left the repair  to dry for an hour or so.

PhotoGrid_1468091190242~2~2

After dry time I could now remove any excess glue, using folded 400, 1000 and 1500 sandpaper I carefully sanded away the excess, cleaning the area with alcohol to remove the fine sanding dust. I now re-stained the recessed portion of the bead with Fiebing’s black  leather dye, removing the excess stain with an alcohol dampened Q-Tip.

PhotoGrid_1468105799694

The stummels finish was worn and the repaired area was lighter from the work done. I mixed Fiebing’s dark brown and red leather dye together with a little EverClear to lighten the stain bit and applied a few coats to the stummel with a brush, hitting it with a Bic lighter to set the stain. I used an alcohol dampened rag to remove the excess.

20160709_212352~2

Now to shine the band up. I taped off the shank with painters tape to keep the compound from overlapping and darkening the shank. I buffed the band with brown tripoli back to a shine. The stummel was now ready for the wheel.

PhotoGrid_1468105727066

With the summel complete and waiting to be buffed I could now concentrate on the stem oxidation, I applied non-bleach Soft Scrub to the stem and left aside so the Soft Scrub could penetrate the oxidation. Once the Soft Scrub turns from white to a brownish color its time to scrub vigorously with a rag until all oxidation has been removed, adding more Soft Scrub as needed. ( Holding the stem under natural light will help to see if all oxidation has been removed )

PhotoGrid_1471355475242

The stem could now be sanded and polished. I tapped off the bit end of the stem with painters tape so my more abrasive sanding would remain in one area. To remove the light chatter I sanded with 800 and 1000 grit sandpaper wet and micro-mesh pads 1500-2400 wet then 3200-4000 dry. I removed the tape and sanded the whole stem with the remaining micro-mesh pads 6000-12000 dry.

20160709_203305~2

Before attempting to reapply the logo I buffed the stem with blue compound to remove the fine sanding blemishes.

20160816_113313~2

I used an alcohol dampened Q-Tip to remove the oils and compound from the P logo area. The bottom of the logo was still recessed but the top portion was buffed flush, the remaining top of the P was more of a faint outline. Using white enamel nail polish and paintbrushes for nail art ( gotta love having women in the house ) I attempted to reapplied the P logo numerous times to no success, my hands and eyes are not what they used to be, so my wife stepped in and reapplied the P, its damn close in my opinion , she left it aside to dry before I put it on the wheel.

Complete

20160816160400~220160816160509~220160816160448~22016081616033920160816160350

I taped off the silver band and buffed the stummel with a few coats carnauba and a micro-fiber hand buff, buffing the stem with blue compound and carnauba.

Happy  Collecting, Restoring and Puffing

Tim.

Peterson – Donegal Rocky 264

20160705_174524

My latest estate lot had quite a few goodies and I found myself totally engulfed in my work, pipe after pipe, only pausing to take photos of my process. The next subject to hit my work desk, a Peterson Donegal Rocky 264. A more petite Pete then I would typically collect but I’ve always had a soft spot for the Donegal Rocky series. I have a new found respect for the Lovat shape, a mini version of the Canadian shape that I so love.

The Restoration  

PhotoGrid_1468504063897PhotoGrid_1468504012077PhotoGrid_1468458836257

Lightly smoked like many of the pipes in this lot, the chamber was free of any real build up and its silver band was tarnished. A little oxidation was present, as well as some light chatter, the Peterson’s “P” logo was present and accounted for, it seems it did not meet its demise as its counterparts did in this lot.

PhotoGrid_1468504128520

I tag-teamed the chamber with my PipNet and Castle Ford reamer, taking what little cake there was back to a suitable level. I then cleaned the internals with EverClear, stiff/soft pipe cleaners, makeup pads and Q-Tips, cleaning until my final pipe cleaner came out as it went in.

20160713_110554~2

I gave the stummel and silver band a wipe down with Method Wood For Good Polish with a rag to remove the oils, dirt and debris. I left it aside to dry.

20160713_143719~2

While the stummel dried I mixed Fiebing’s red and dark brown leather dye together, more red then brown and added a little EverClear to lighten the stain.

PhotoGrid_1468503210926

I applied a few coats of the stain with a brush and hit it with a Bic lighter to set the stain, removing the excess stain with an alcohol dampened rag.

20160713_145240~2

After cleaning the silver band it was dull and had a few faint surface scratches. I taped off the shank with blue painters tape and buffed the band with tripoli, bringing back its shine.

PhotoGrid_1468458885077

I used caution when removing the oxidation from the stem, the “P” logo was in fine shape. Many of the pipe stem logos in this lot were buffed clean off or at least partially missing. I applied non-bleach Soft Scrub to the oxidized areas of the stem and let the Soft Scrub penetrate the oxidation. Once the Soft Scrub turned from white to a brownish color I scrubbed the area with a Q-Tip so not to disturb the logo. I usually use a rag to remove the oxidation but in fear of loosing the logo I went slow with a Q-Tip, I would have to repeat this a few times until all oxidation was removed.

20160713_210657~2

There was some light chatter at the bit/lip area of the stem I used 400, 800 and 1000 grit sandpaper to remove the chatter. I then ran the stem though the various grits of micro-mesh.

Complete

20160725152830~220160725152852~220160725152926~2PhotoGrid_1469471850921PhotoGrid_1469471800219

 Finished up on the wheel with white diamond, a few coats carnauba and a micro-fiber hand buff. Buffing the stem with blue compound and carnauba.

Thanks For Stopping In

Tim.


Quick Clean Up of 2 Petersons

Peterson.

Donegal Rocky XL90 & Standard XL305


Its always nice to add a couple more Petes to the collection and in decent condition to boot. I enjoy a challenge as much as the next guy but its also nice to do a leisurely standard cleaning.

The Clean Up.


20160629_053013~2PhotoGrid_1467193304402PhotoGrid_1467193244125PhotoGrid_1467193280416PhotoGrid_1467193185706PhotoGrid_1467193209469

 For the price they were both in great lightly smoked condition. A little oxidation , chatter and the silver band on the Donegal was tarnished.

20160630_113726~2

I started with my PipNet reamer and reamed back the cake to a suitable thickness. The Donegal chamber was perfect, still had the bowl coating. The 315 was a little different the bowl coating was still there but there was an indentation on the side of the chamber that was caused by careless reaming in the past. I sanded the area to smooth out the damage as much as possible, in the long run it will not affect the smoke .

20160630_122943~2

Next I cleaned the internals with EverClear stiff/soft pipe cleaners and Q-Tips. Very clean internals on both pipes, if you were to judge the pipes by there mortise alone you’d think they were un-smoked.

20160630_123728~2

With the internals clean I now gave the stummals a wipe down with Method Wood For Good Polish and found a new use for the polish in the process it also cleans the tarnish from  silver bands. I’m amazed by this stuff more and more each time I use it.

PhotoGrid_1467307914974PhotoGrid_1467307954142PhotoGrid_1467193209469PhotoGrid_1467307987435

Before removing the oxidation I tried a little heat to remove some of the chatter. ( holding the stem above the flame of a Bic Lighter moving the flame at all times so not to burn the stem)  Both stems responded pretty well, the XL90 responded the best leaving only minimal marks, the 305’s upper side was left with very little chatter after the heat , the under side  didn’t respond as well and would still need sanding,

20160630_130359~220160630_160529~2

With the bulk of the chatter removed I moved onto the oxidation, I applied a generous amount  of non-bleach Soft Scrub and left it aside to allow the Soft Scrub to brake up the oxidation, once the Soft Scrub turns from white to a brownish color its time to scrub vigorously with a rag adding more Soft Scrub as needed. ( Holding the stem under natural light will help to see if all oxidation has been removed)

PhotoGrid_1467377717656

I now ran the stems thought the various grits of micro-mesh. The XL90 didn’t need much attention but the 305 needed a bit more work, I taped off the bit end with blue painters tape so my more abrasive sanding would remain in one area. I sanded with 400,800 and 1000 grit sandpaper wet to remove the rest of the chatter I then ran it though the micro-mesh pads.

20160701_121917~2

During my process of removing the oxidation I also inadvertently removed the P from the XL90 stem , I taped off the P originally but the tape was no match for the Soft Scrub. My white Rub’n Buff dried up so gold would have to do, using a toothpick I applied the Rub’n Buff and allowed it to dry, I then lightly polished with 8000 and 12000 micro-mesh pads.

Complete.

20160701234016~220160701234110~220160701234127~220160701234200~220160701234233~220160701234256~220160701234326~2

I finished up on the wheel with a few coats of carnauba and micro-fiber hand buffing. Buffing the stem with blue compound and carnauba.

Thanks For Taking A look.

Tim.

Peterson System Standard 306

Screenshot_2016-01-21-21-34-52~2

 This is the first of eleven pipes I recently acquired. The Peterson System Standard 306 is the first sitter in my small Peterson collection. I am unsure of its age as it does not have a made in or hallmarks, which I found odd as all my other Petes have some sort of way to date them. The only markings on the pipe is Peterson of Dublin System Standard 306 and K&P Peterson on the band.
As Received.


20160223_081032~220160223_080952~220160223_080944~220160223_081050~2PhotoGrid_1456276037968

Over all in pretty descent shape, the stem was oxidized and a few tooth impressions. The chamber had an uneven crumbling cake and the rim was built up with old tar/oils, there is also charring around the inside edge of the rim. The finnish was worn and tired and one small spot of filler. The biggest hurdle was the Lakeland ghost.

20160223_081648~220160223_081920~2

I started with the stummel and my Pipnet Reamer. Starting with the smallest attachment and working up to the second largest, I brought the chamber back to briar, it was free of burn or pitting. I smoothed things out with 400 grit sandpaper wrapped around a finger .

PhotoGrid_1456276847786

Next I could tackle the caked and charred rim. I applied a generous amount of Method Good For Wood Polish to the rim and set it aside to penetrate the build-up for a few minutes. Using Q-tips I removed the rim build-up, I would repeat this process a few times to remove all the debris. After the build-up was removed the rim darkening was still present, using worn micro-mesh I was able to fade most of the darker spots of the rim.

PhotoGrid_1456276703846

Next I gave the internals a good cleaning. Using EverClear, shank brushes, Q-tips and stiff/soft pipe cleaners. Cleaning until the last pipe cleaner came out as it went in. I now filled the chamber and mortise with cotton balls and added EverClear until the cotton balls were saturated and set it aside for a few hours to absorb the tars and oils. The Lakeland ghost would not give up, the stummel was left over night  with EverClear and cotton balls and hopefully did the trick.

PhotoGrid_1456276643670

My attention now turned to the oxidized stem. I applied non-bleach Soft Scrub to the stem with a children’s toothbrush and left it aside to penetrate the oxidation. Once the Soft Scrub turns from white to a brownish color its time to introduce the old elbow grease and scrub vigorously with a rag until the oxidation is removed. I finished up with a damp Magic Eraser to remove the leftover oxidation.

PhotoGrid_1456276798588

With the oxidation removed I could begin removing the impressions at the bit. I tapped off the stem with blue painters tape just before the P-lip so my rough sanding would remain in one area, the rest of the stem would not need as abrasive grit. Starting with 400 grit sandpaper wet I removed the deep impressions, then working through 800, 1000 grit sandpaper wet, 1500, 1800 micro-mesh wet, 2000 grit sandpaper wet and finally 2400 micro-mesh wet until smooth. Before sanding with the finial six micro-mesh pads I removed the painters tape and dry sanded the entire stem 3200-12000.

PhotoGrid_1456276094304

There was one small spot of filler that would need to be removed. To remove I used Method Good For Wood Polish, an X-ACTO knife and a Q-tip, I applied a small amount of the polish with a Q-tip to the filler and left it aside to soften up. Once softened I removed the filler with the X-ACTO knife, I then cleaned the area with a Q-tip and EverClear to remove any oils or debris. I filled the pit with Gorilla Glue and briar dust and allowed it to dry. Once dry I sanded the area with worn micro-mesh until the repair was flush.

20160223_133249~2~220160223_134138~2

The rim and filler spot was left lighter after sanding with  the micro-mesh, using a touch up marker I  was able to blend the faded rim and filler spot into the rest of the finnish. Coloring in the rim and filler spot with the marker allowing to dry and removing the excess with an alcohol dampened rag. In the end I could not exserminate the Lakeland ghost completely but with smoking it will likely dissipate.

Complete.

20160224145519~220160224145634~220160224145641~220160224145909~220160224145653~220160224145823~220160224145836~2

I finished up on the wheel with white diamond, a few coats of carnauba and a microfiber hand buffing. Buffing the stem with blue compound.

Thanks For Taking A Look.

Peterson’s DeLuxe 608S

Screenshot_2016-01-21-21-34-52~2

Peterson’s DeLuxe 608S

My pipe refurbishing companion, shes in need of some TLC herself. I will admit when I’m working on a pipe I have a bad habit of puffing away like theres no tomorrow, the P lip seems to helps in this area as not to cause tongue bite. The flat, saddle, P lip bit is also comfortable clenched in jaw for hours on end. She was picked up as an estate and has been in service for myself going on six years. While refurbishing my last pipe it dawned on me that my little DeLuxe hasn’t been cleaned property by me ever, my skills have changed  much since  its cleaning almost six years ago and I thought now would be a good time to do right by her and give her a good once over.

My DeLuxe

20160122_154604~2PhotoGrid_1453496238732PhotoGrid_145349626917120160122_154633~2

I’m a little embarrassed with the upkeep of one of my favorites or lack their of but this is the only pipe in my possession that has been overlooked, it has always rested on my work desk there in a pinch when needed. Oxidation, rim tar&char and the stain has since faded .

PhotoGrid_1453651688165

I started with the rim tar/oils there was no need to ream, I wipe my chamber clean after each smoke, what cake has built I’m keeping. I applied Method Wood For Good Polish to the rim build up with a Q-tip and allowed it to penetrate the tars and oils for a few minutes, removing the debris with a Q-tip.

PhotoGrid_1453651578075

I cleaned the internals of the stummel and stem with EverClear ,Q-tips and stiff/soft pipe cleaners working until the pipe cleaners came out as they went in.

PhotoGrid_1453651552716

The stain was faded and dull it would have to be re-stained. I gave the stummel a good wipe down with an alcohol dampened makeup pad, removing the worn stain and oils from handling.

20160124_111557~2

I would re-stain with Fiebings leather dye. I mixed a little EverClear,a little red dye and dark brown together.

PhotoGrid_1453657210736

I inserted a Bic pen end into the mortise so I could apply the stain, using an old homemade brush I applied a generous amount of the mixed stain , being careful not to get in the chamber. I then hit it with a Bic Lighter to set the stain, removing the excess with a alcohol dampened rag. I now left it aside to dry while I worked on the stem.

PhotoGrid_1453657358872

The stem was oxidized and had a little chatter, I applied non-bleach Soft Scrub to the stem with a children’s toothbrush and left it aside topenetrate the oxidation. Once the Soft Scrub turns from white to a brownish color its time to introduce the old elbow grease and scrub vigorously with a rag until the oxidation is removed, finished up with a damp Magic Eraser to remove the leftover oxidation.

20160124_143034~2

I removed the chatter with 1000 grit sandpaper wet, I then ran the stem through the various grits of sandpaper and micro-mesh , 1500mesh, 1800mesh, 2000 paper and 2400mesh wet and 3200-12000 dry. With the stem polished and stummel stained and dry she was ready for the buffer.

Complete.
She’s ready for six more years and a bowl of Royal Yacht.


20160124181149~2PhotoGrid_145367208871020160124180953~220160124180938~2

Finished her up on the wheel with white diamond, a few coats of carnauba and a microfiber hand buffing ,Buffing the stem with blue compound.

Thanks For Taking A Look.

Peterson Captain Pete XL80

Screenshot_2016-01-21-21-34-52~2
I was gifted this Captain Pete for Christmas by my wife its one that has pasted me by a few times and I didn't think I'd get in the shape I wanted the XL80, a shape I'm very found of.  The Captain Pete XL80 is chunky and has a shorter stem then the standard 80 shape and thats what was so eye catching for me, short and fat like many of the pipes in my collection. Jim Lilley connoisseur and collector of Peterson Pipes wrote a post on the Captain Pete on his blog, he has also contributed to Pipedia The Peterson Page , the Peterson's in his collection are amazing.
As Received
20151226_231320220160120_164427~3~2PhotoGrid_1453351875420
The Captain was in was in decent shape when I received it, rim build up, tight tennon fit, a little chatter, worn stain and the start of an uneven cake.
PhotoGrid_1453338820830
After looking over and disassembling the pipe, I set aside the stem and started with the stummel. First reaming the chamber with my Pipnet reamer starting with the smallest attachment and working up to the second attachment, smoothing things out with 400 grit sandpaper wrapped around a finger. The chamber was free of burn or pitting. Now my attention turned to the rim build up, I applied a generous amount of Method Wood For Good Polish with a Q-tip and allowed it to penetrate the oils and tars.
20160120_215204~2
After the Method Polish had time to penetrate the build it was easily removed with Q-tips. Some of the stain was removed along with the build up, which doesn't typically happen with Method polish.
PhotoGrid_1453351993631
With the rim free of oils/tar I began my internal cleaning of the stem, chamber and mortise using EverClear, Q-tips, makeup pads and stiff/soft pipe cleaners, cleaning until the pipe cleaners came out as they went in.
20160121_191506~2
After my internal cleaning, I did a EverClear and cotton ball soak on the chamber allowing it to absorb the tars and oils while I worked on the stem.
PhotoGrid_1453338716397
The stem was in good condition aside from a a little chatter and a couple of tooth impressions. To remove some of the shallow tooth chatter I heated the area with a Bic Lighter ( moving the flame at all times never leaving it in one spot too long) all but a couple of impressions raised.
PhotoGrid_1453422352636
I now applied non-bleach Soft Scrub to the stem with a children's toothbrush and left it aside to penetrat the oxidation. Once the Soft Scrub turns from white to a brownish color its time to scrub vigorously with a rag until the oxidation is removed, removing the leftover oxidation with a damp Magic Eraser.
PhotoGrid_1453422173363
The couple of tooth impressions that were left I would remove with 1000 grit sandpaper wet. I tapped off the bit/button portion of the stem with blue painters tape so my rough sanding would remain in one area.
PhotoGrid_1453429652299
Before polishing the stem with the finial three Micro-Mesh pads I touched up the P with Rub'n Buff. I applied it with a Q-tip and buffed off the excess with a rag and continued with my final polishing with the last three micro-mesh pads.
20160121_163530~320160121_215951~2
The  rest of the stem would not need as much work as the bit/button portion, as the Soft Scrub and Magic Eraser removed all the oxidation. I left the painters tape on the stem and  ran the button area though the various grits of sandpaper and micro-mesh 1500, 1800, 2000 paper, 2400 wet then 3200-4000 dry, I removed the painters tape just before sanding the entire stem with the last three Micro-Mesh pads 6000-12000 dry.
PhotoGrid_1453422789282
Raising rim dents with steam. Using a household iron on medium/high heat and damp rag, I covered the rim dents with the damp rag and applied it to the hot iron working in intervals until all the dents raised.
PhotoGrid_1453422643851PhotoGrid_1453422706940
This is the first time I had results work this well and would not have to sand the area afterwords.
PhotoGrid_1453429694158
When I received the Captain the red stain on the rim was faded to an almost pink color and after cleaning the debris from the rim it was more so. I decided to re-stain the whole stummel with Fiebings Red leather dye. I gave the stummel a wipe down with an alcohol dampened rag, allowing it to dry then appling the red stain, I hit it with a Bic Lighter to set the stain, removed the excess stain with a alcohol dampened rag and left it overnight to dry completely before buffing.
Captain Complete
20160124181457~220160124181541~2PhotoGrid_145367218872520160124181714~220160122152256~2PhotoGrid_1453490486893PhotoGrid_1453490601364 

I Finished up on the wheel with white diamond, a few coats of carnauba and a microfiber hand buffing. Buffing the stem with blue compound and buffing the spacer with black emery before gluing it back in place.


I had fun taking photos of this one, My Pop was a Navy Man so I’m also a collector of vintage nautical item’s as well.

Thanks For Taking A Look.