Tag Archives: tobacco pipe refurbishing

A Pipe For Poppy.

20160525202518~2

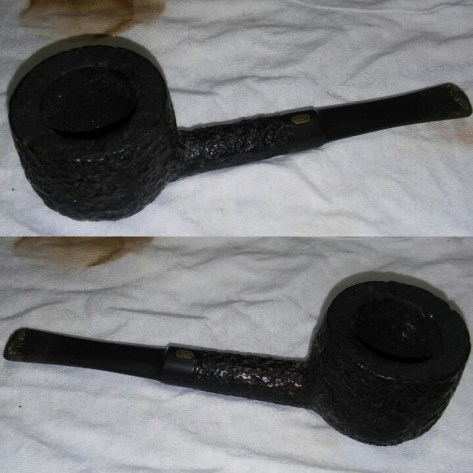
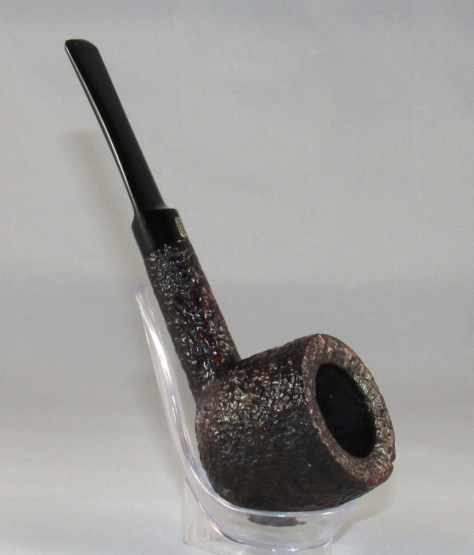
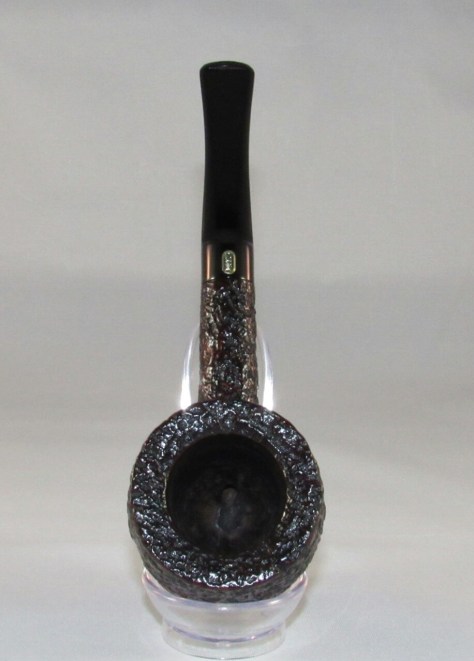
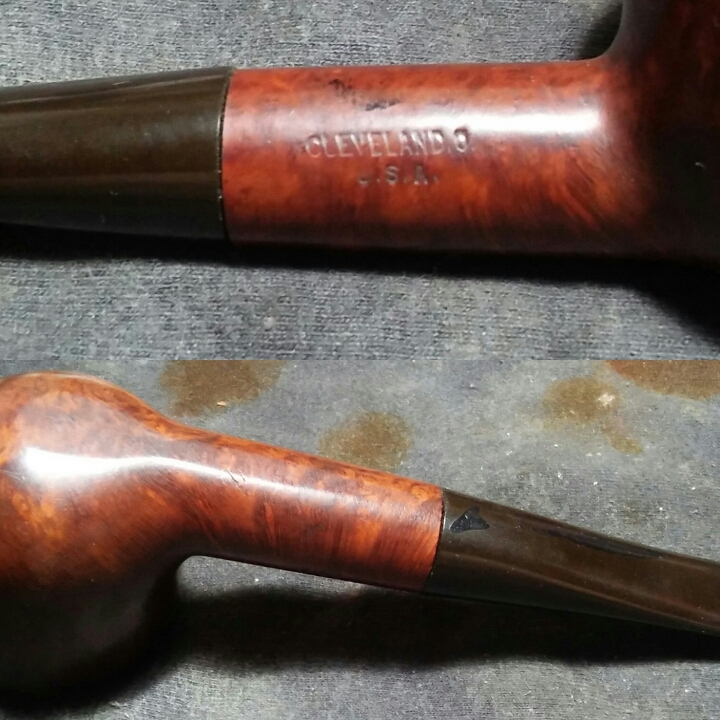
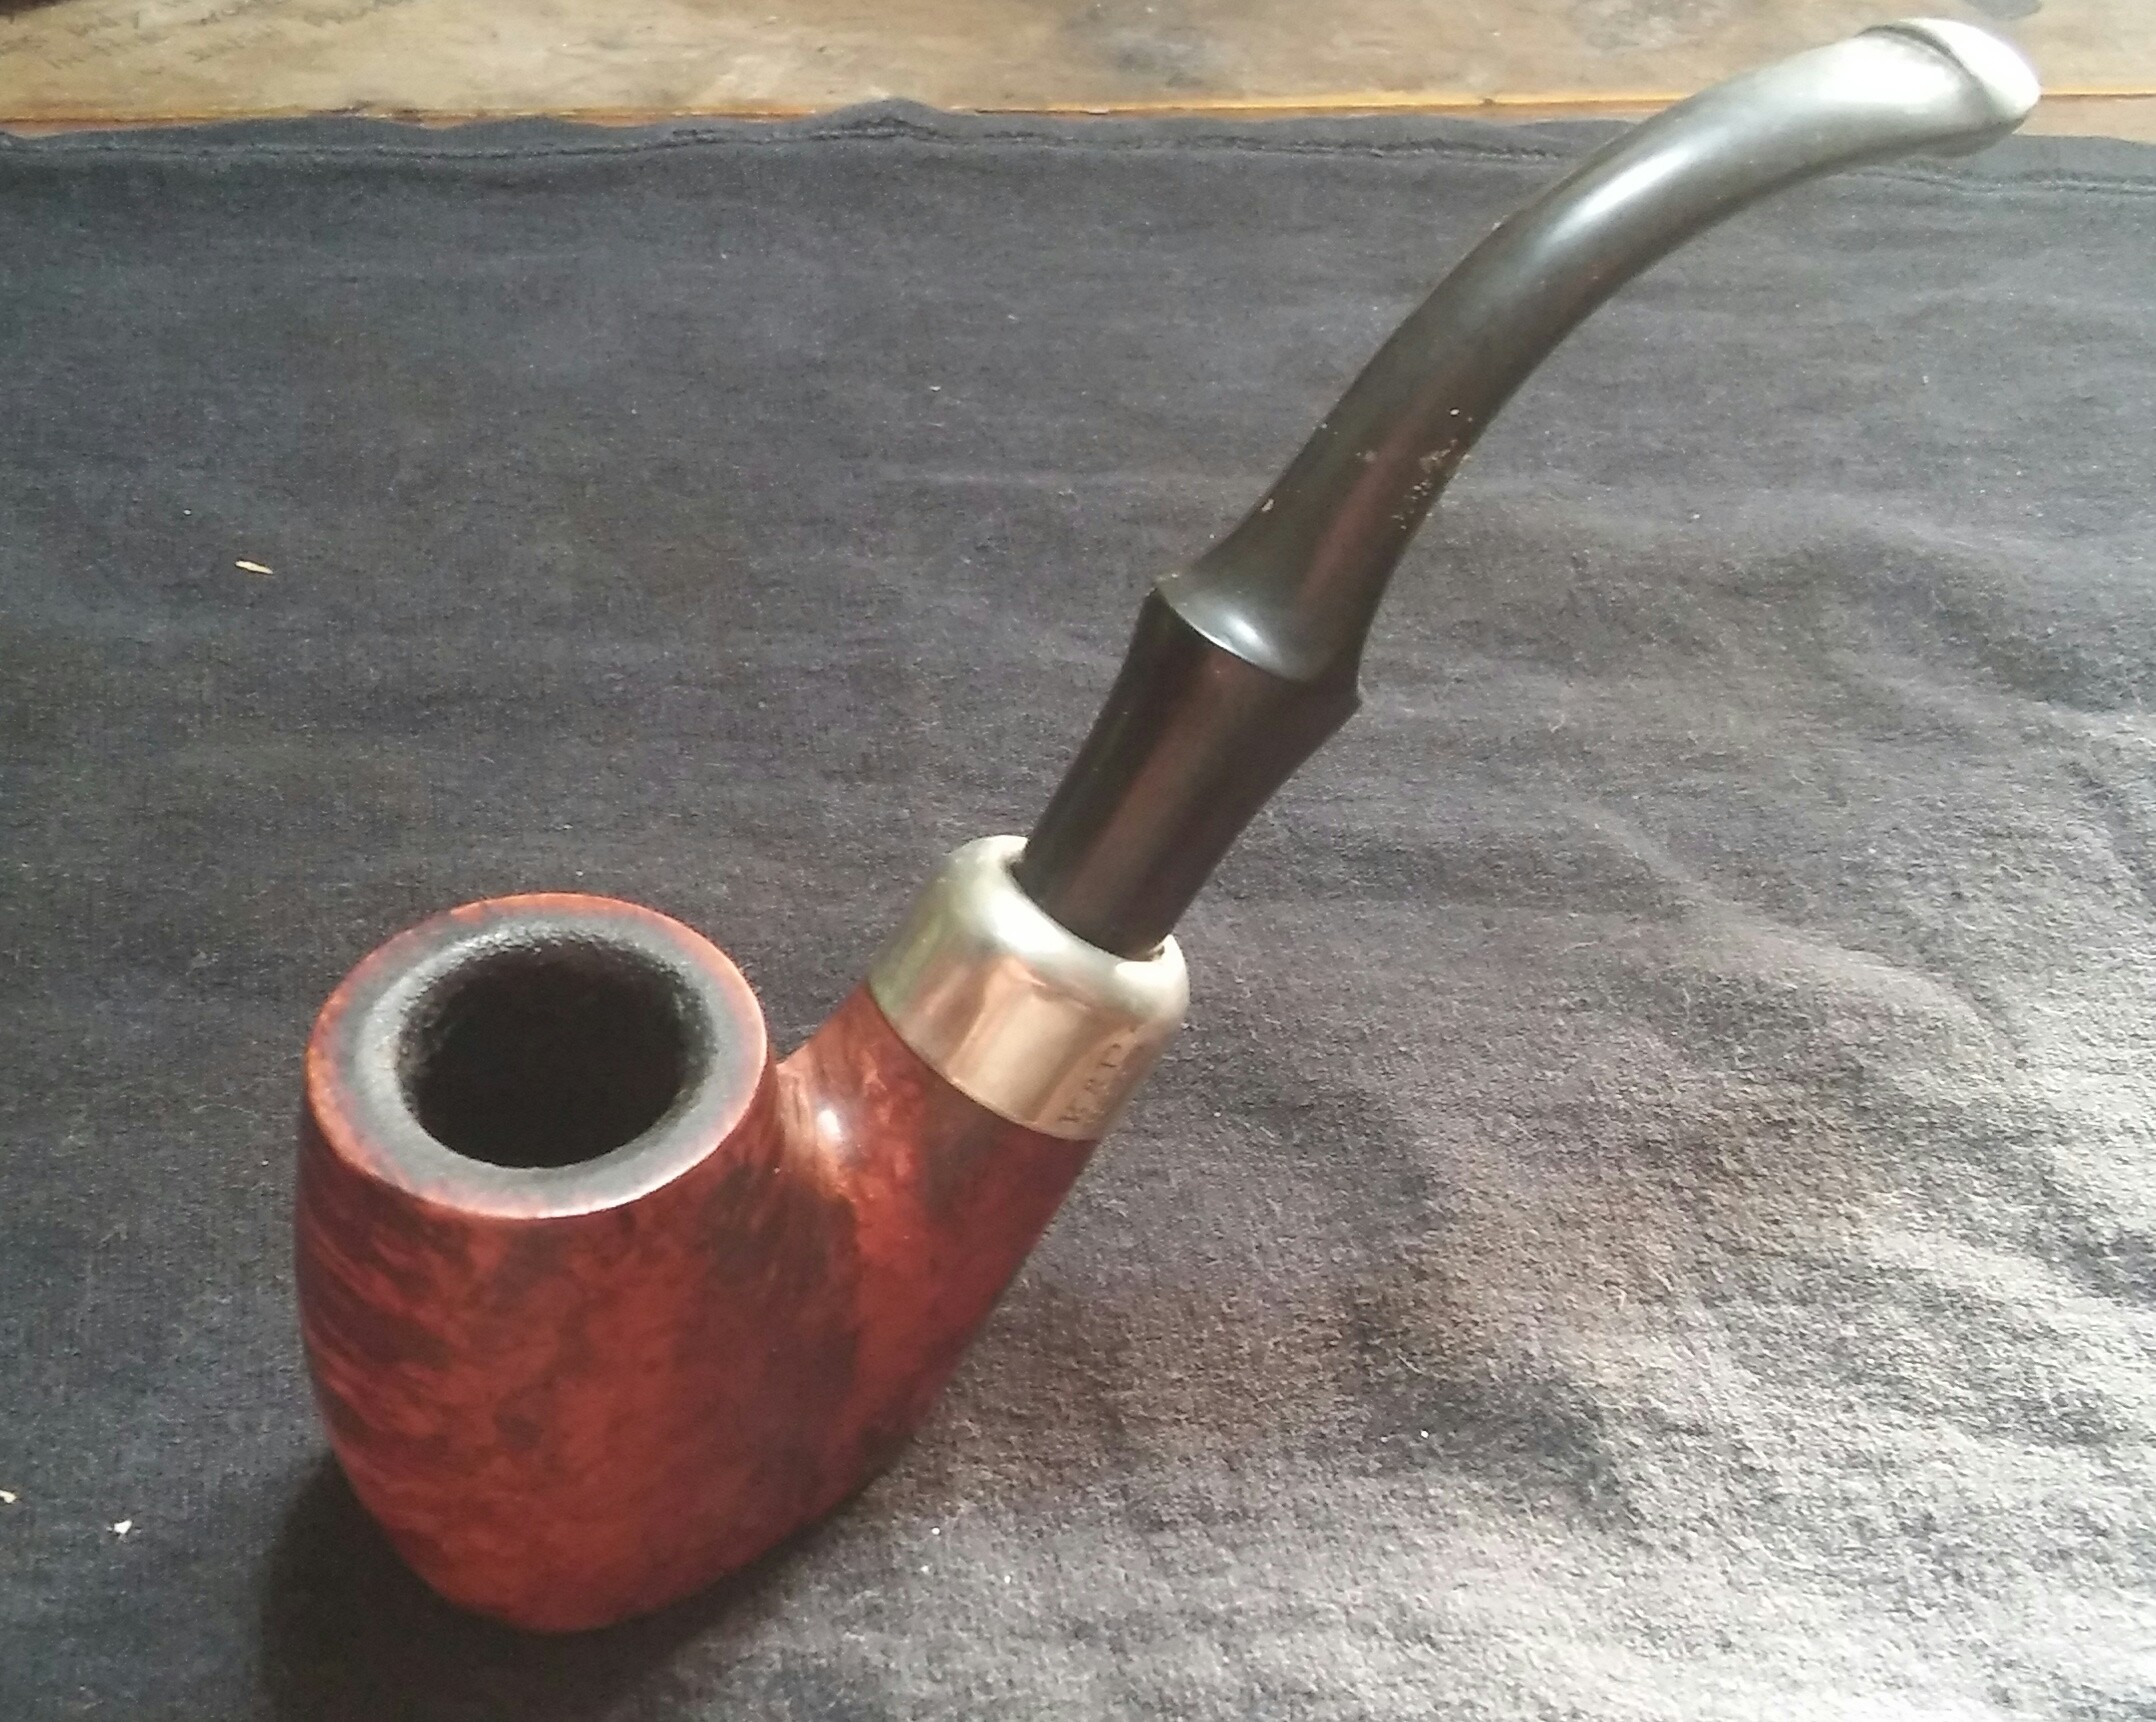
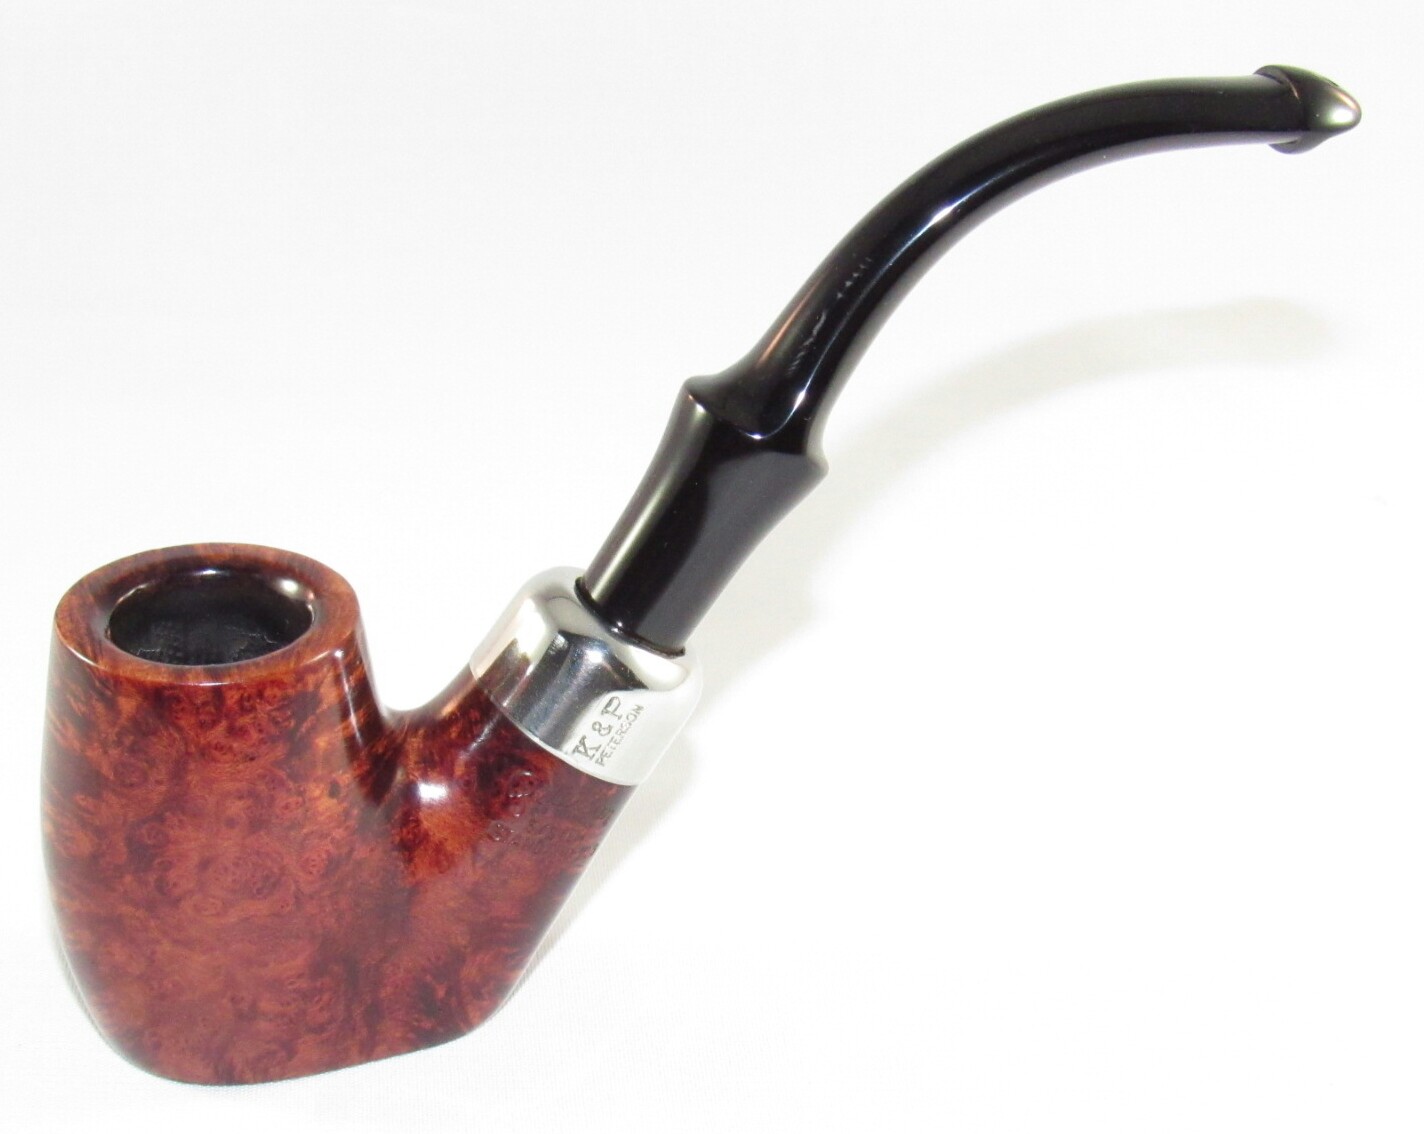
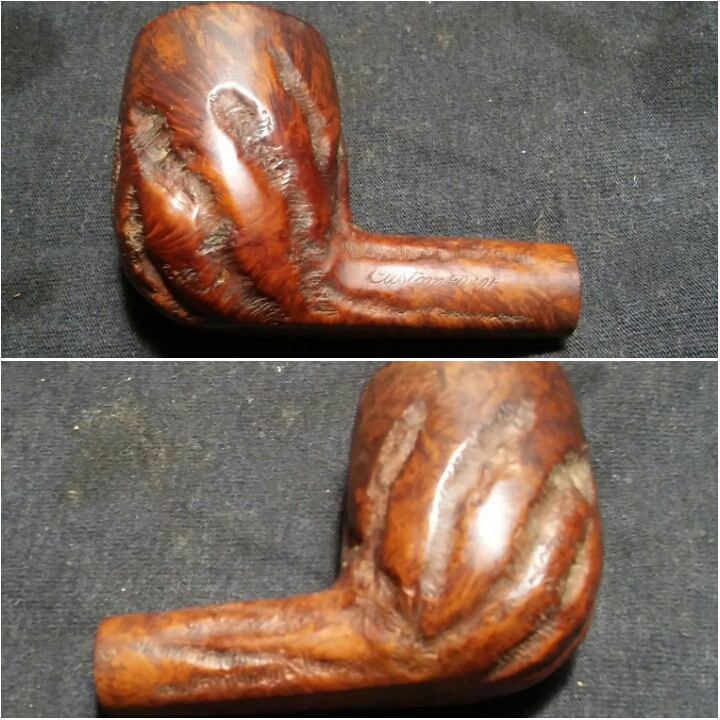
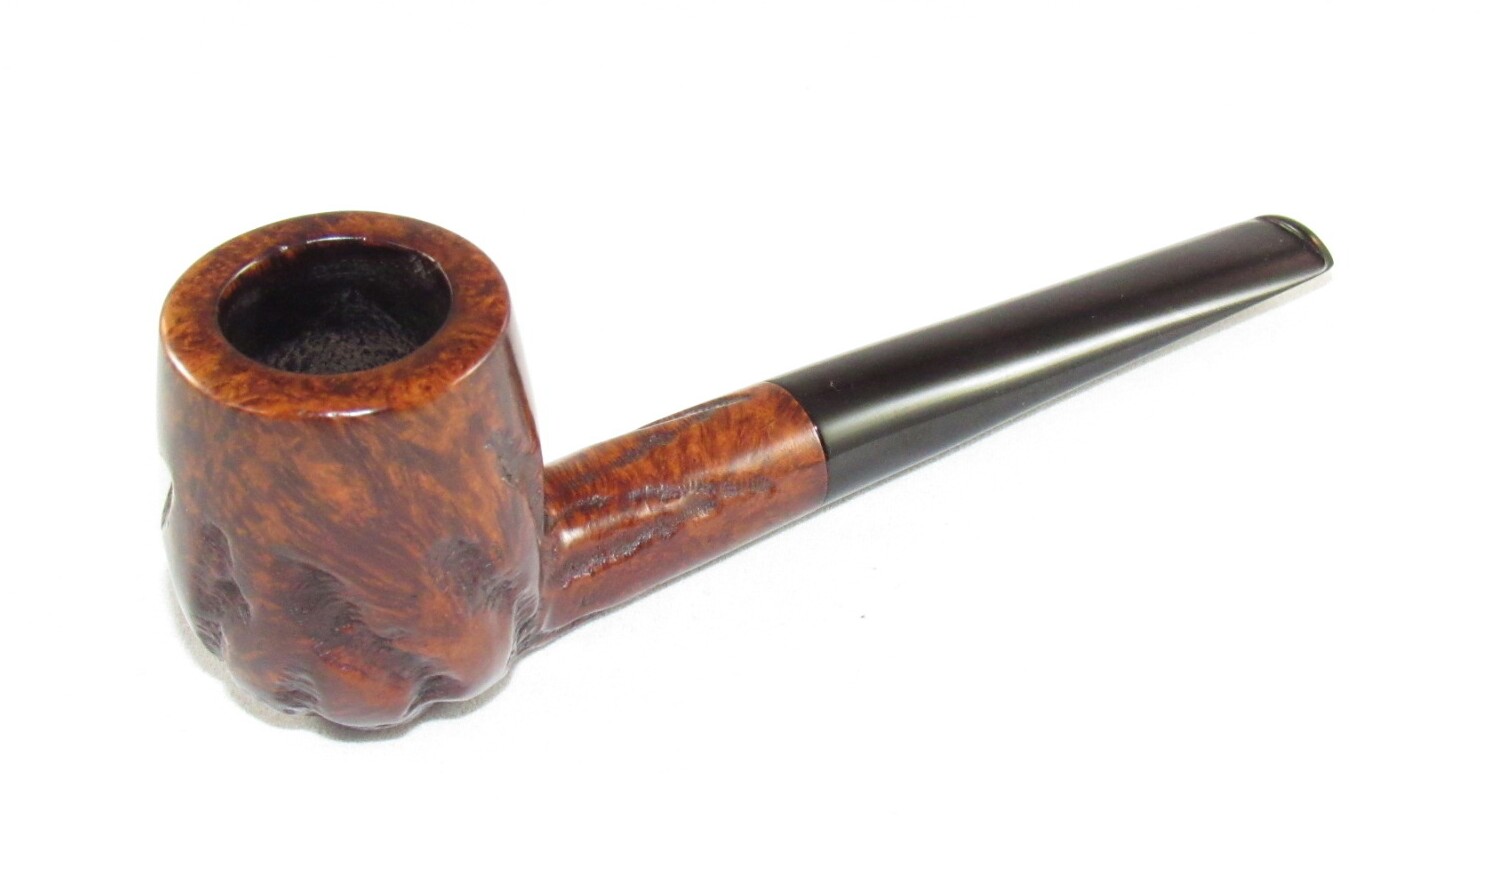
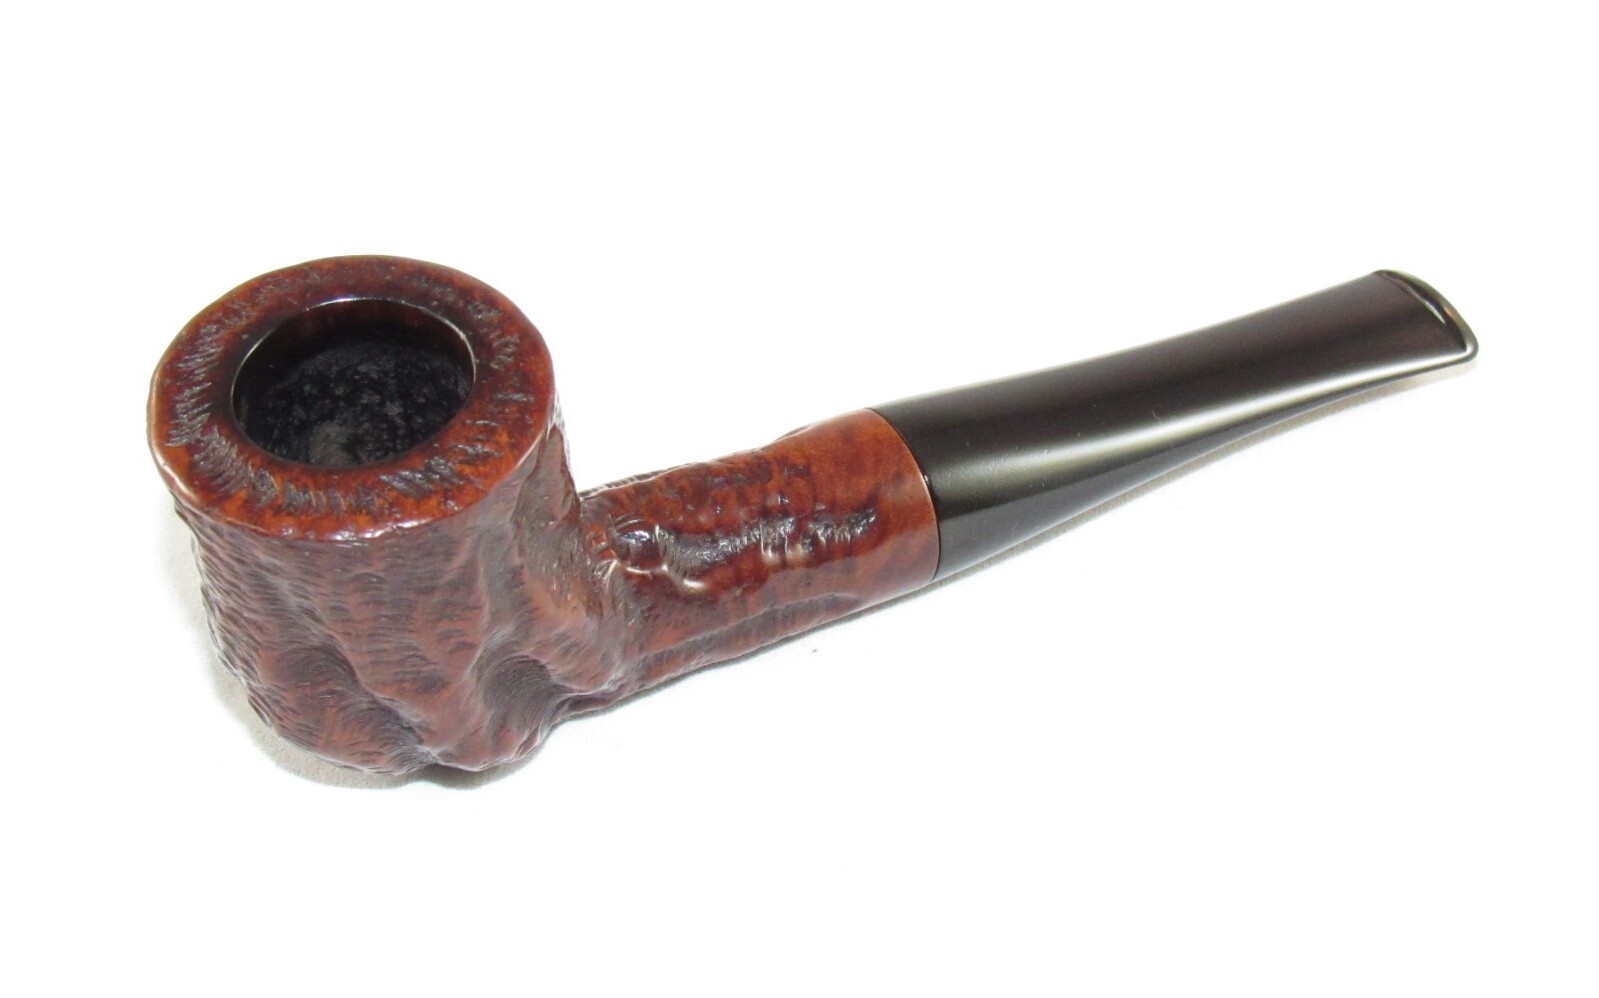
Custombilt Oom Paul.

My daughter lovingly calls my father Poppy they have been inseparable since her birth 11 years ago , my fathers pretty incredible ,give ya the shirt off his back, drop everything to help in anyway and give ya his last dime if you needed it. Almost a year ago we had a scare, while hanging out at our house Dad suffered a mini-stroke. Doctors said it wasn’t as severe as other strokes but nevertheless it scared the hell out of all of us. It took him sometime to get back to the way he was before. Now doctors say hes as healthy as a horse ,so he has decided to take up the pipe once again after a thirty year hiatus. He picked a pipe from the wall to start with a bent Grabow with a spoon stinger , one of the first if not the first pipe I had redone years ago. I then told him I would like to redo a Custombilt that was similar to a Tom Howard he had liked. So that brings me to A Pipe For Poppy , a Wally Frank era Bilt Oom Paul. Shes been in the to do rack going on three years I would start but lose interest and put her back but now I had a reason to complete it. I gave him the pipe yesterday and his eyes lit up, needless to say he was very happy with finished pipe.
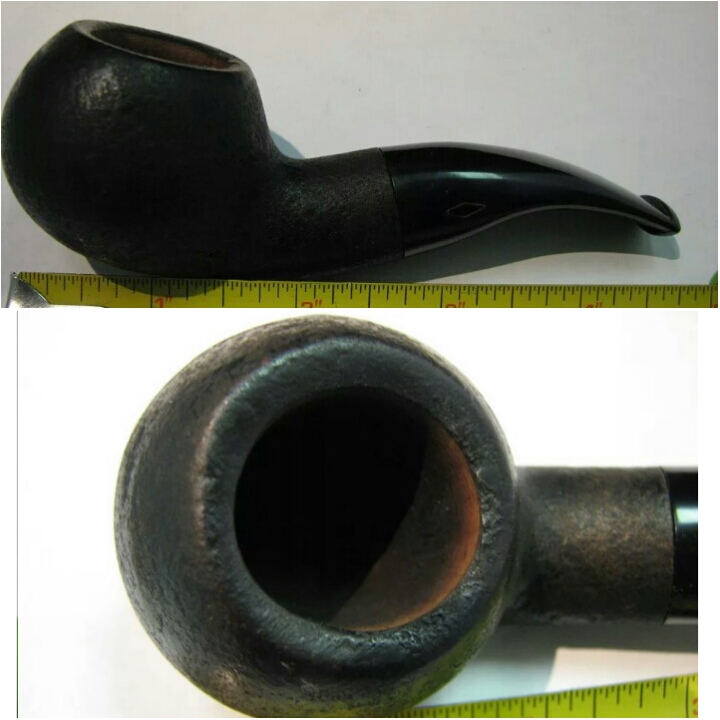
The Restoration.


PhotoGrid_1464056971789PhotoGrid_1464057005118PhotoGrid_1464056942680

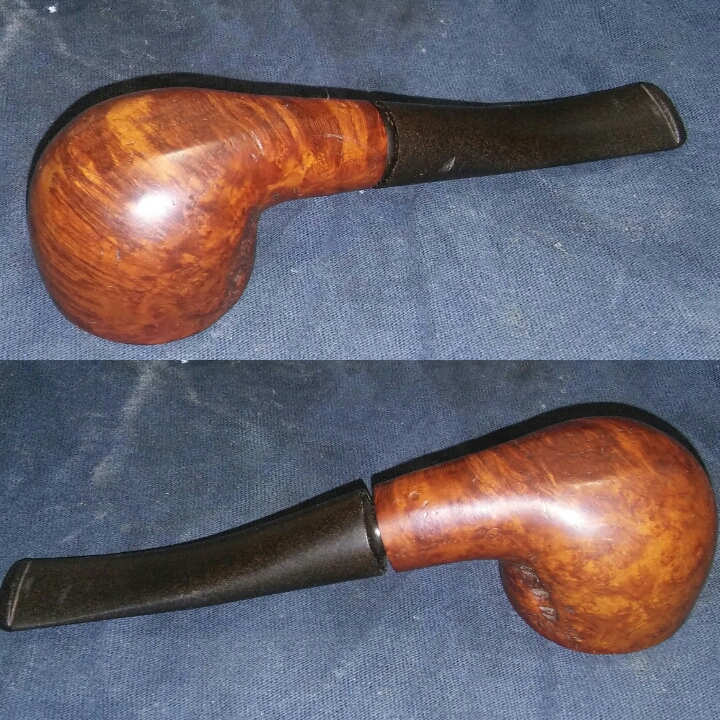
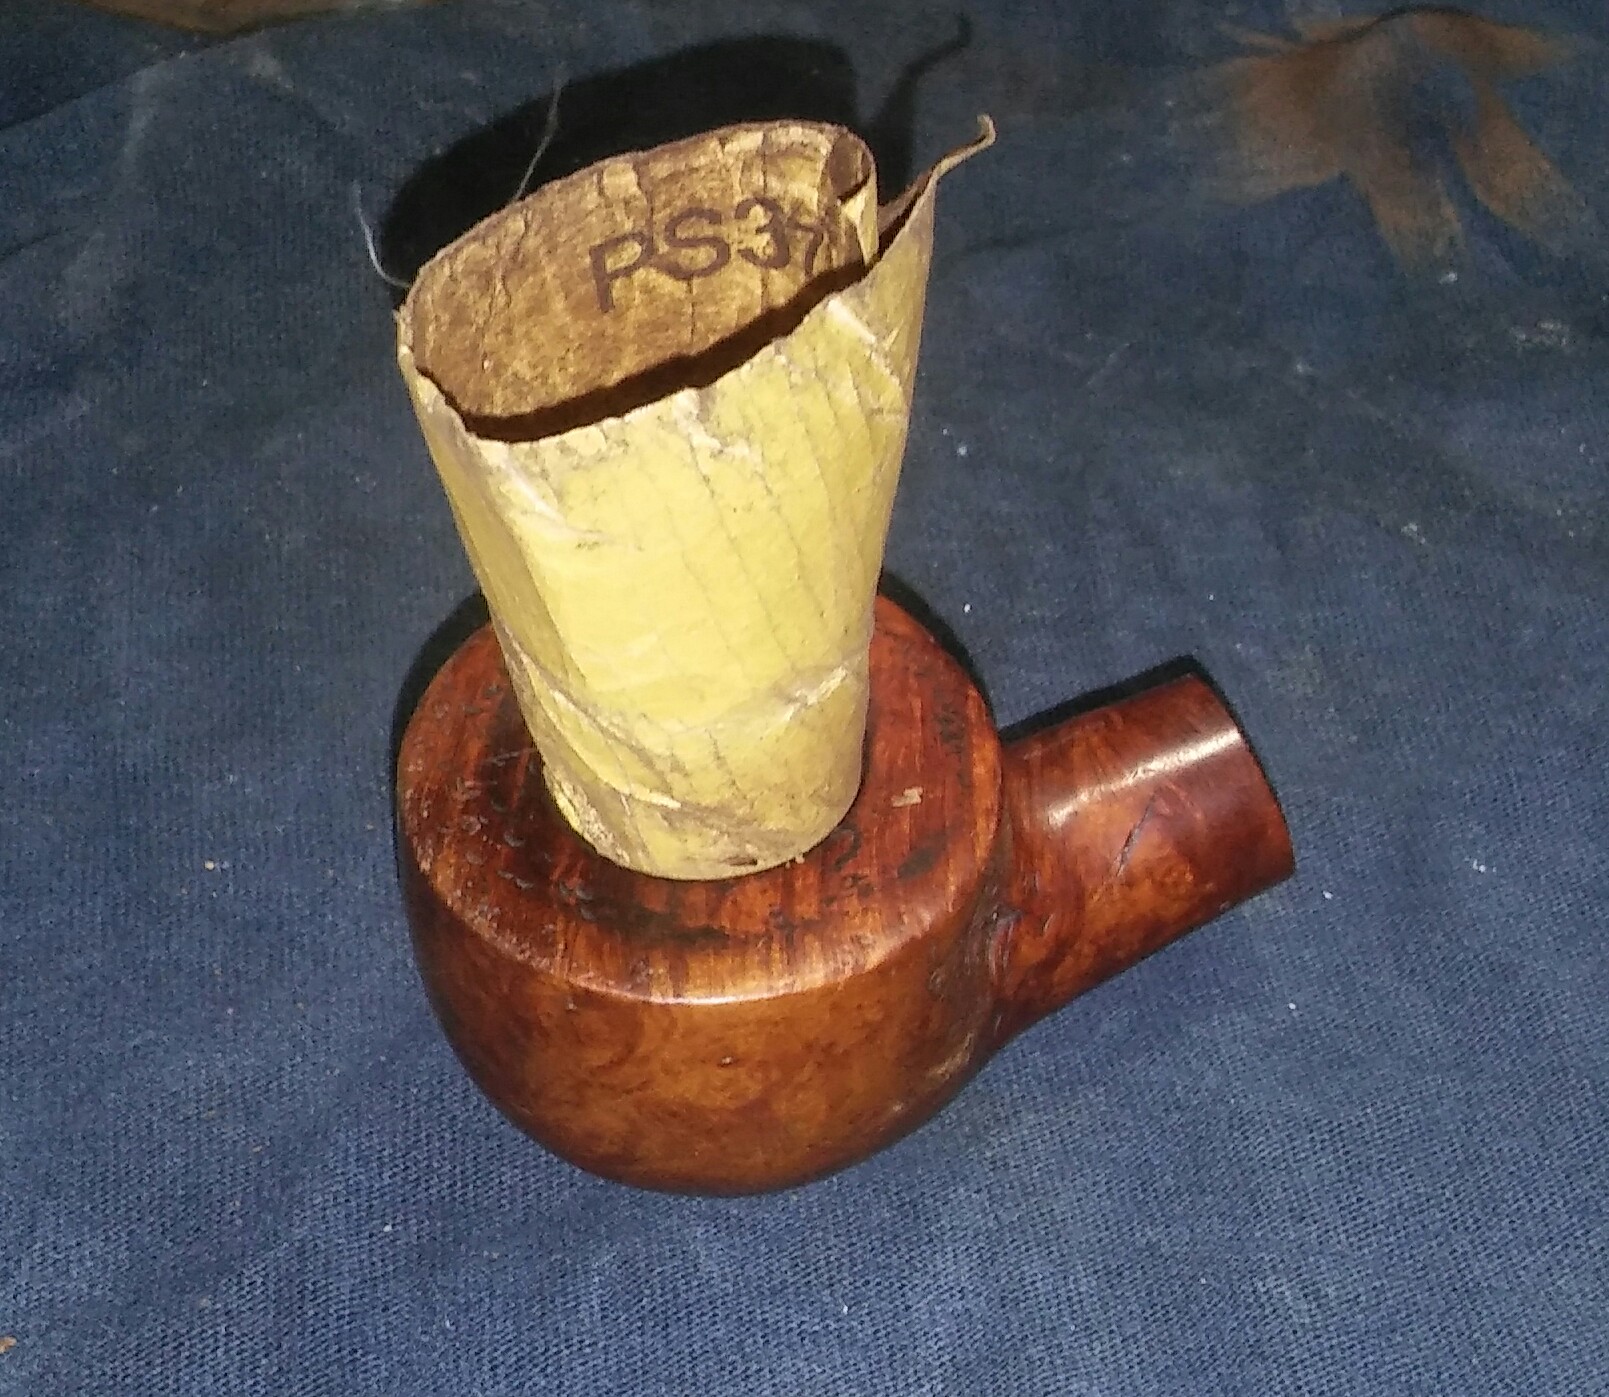
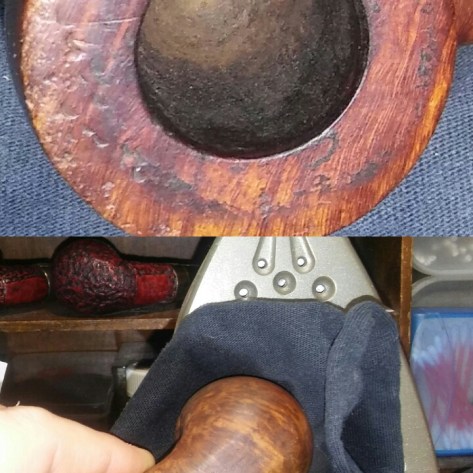
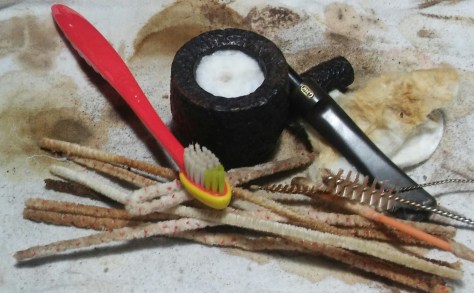
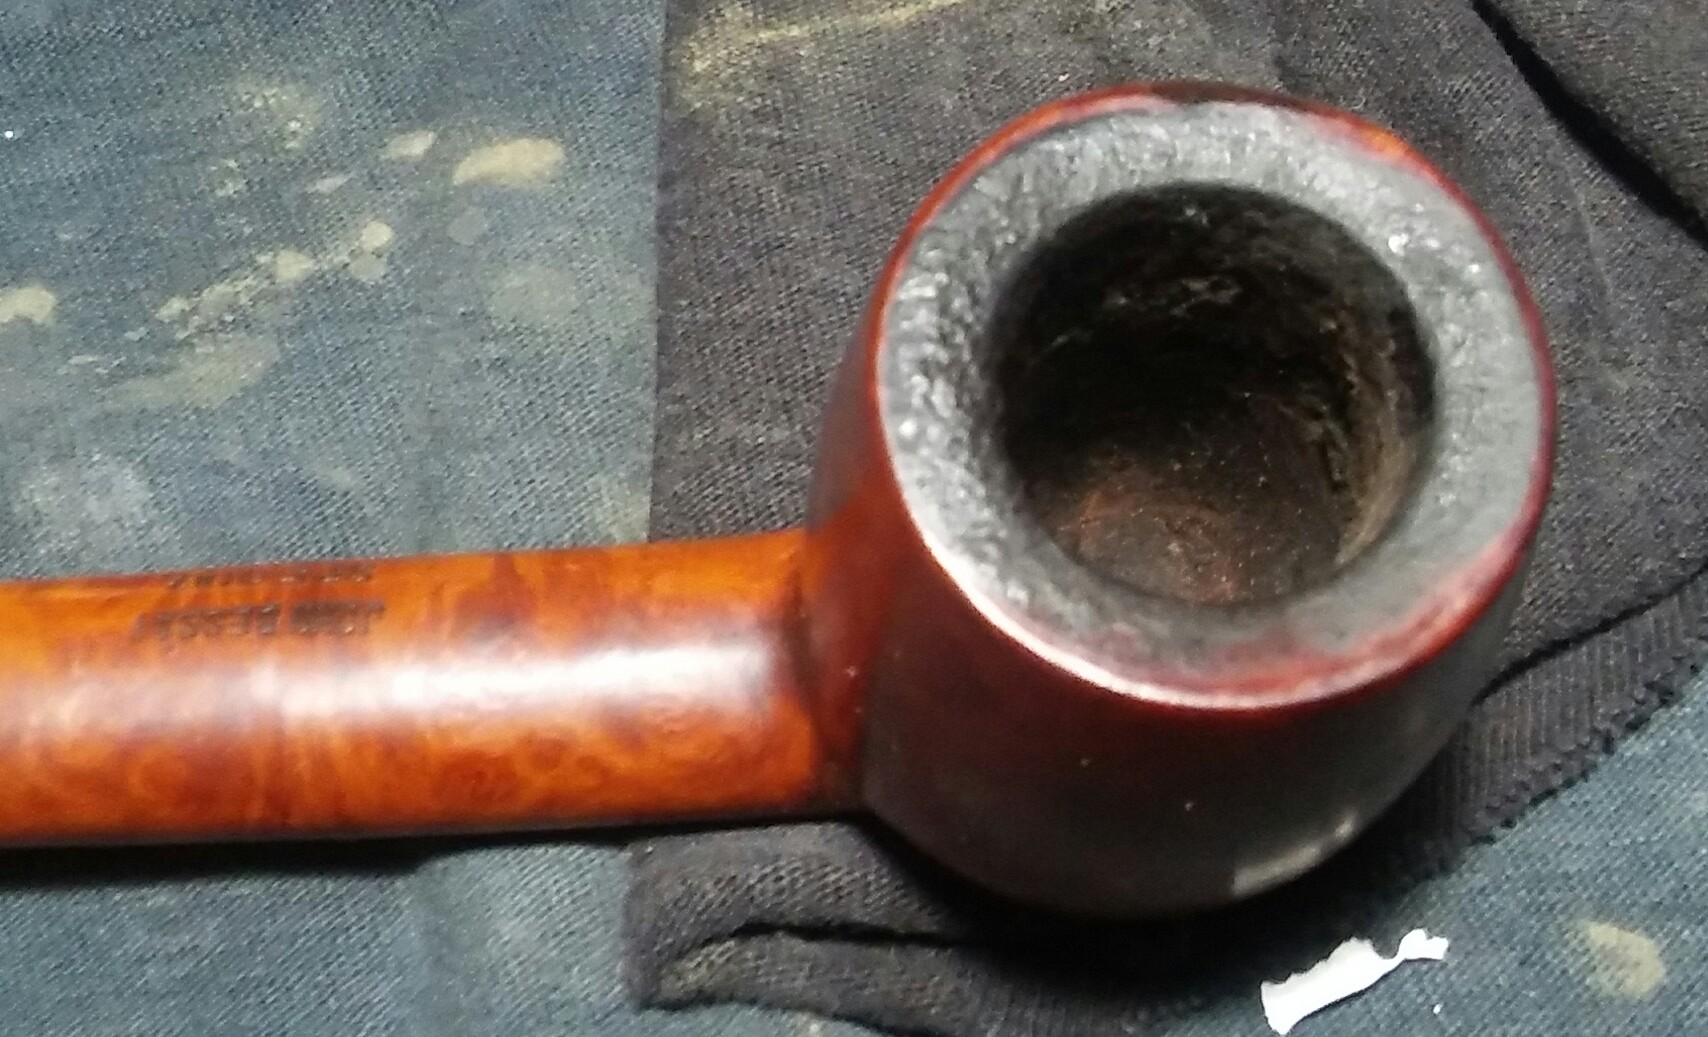
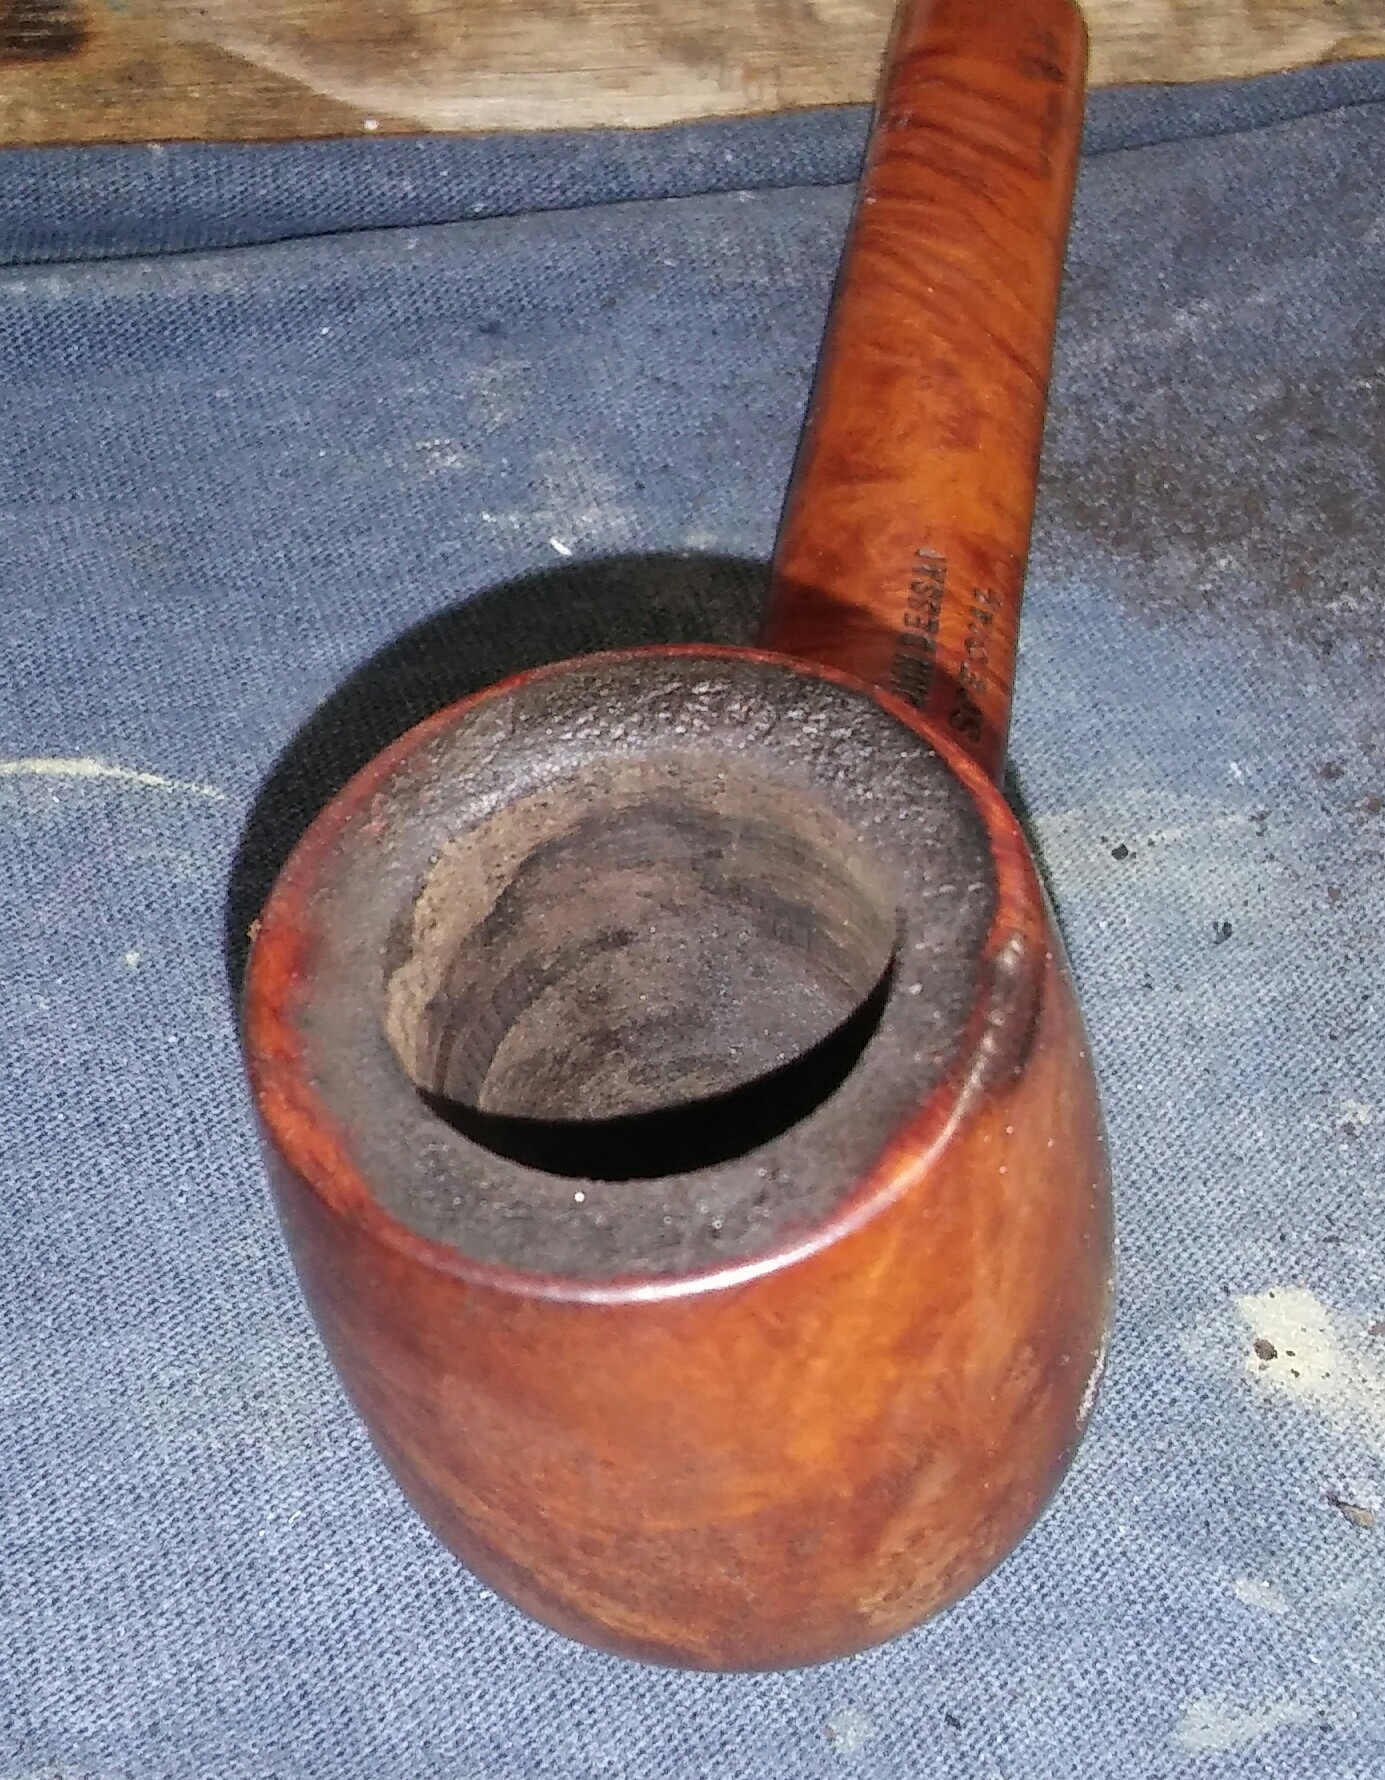
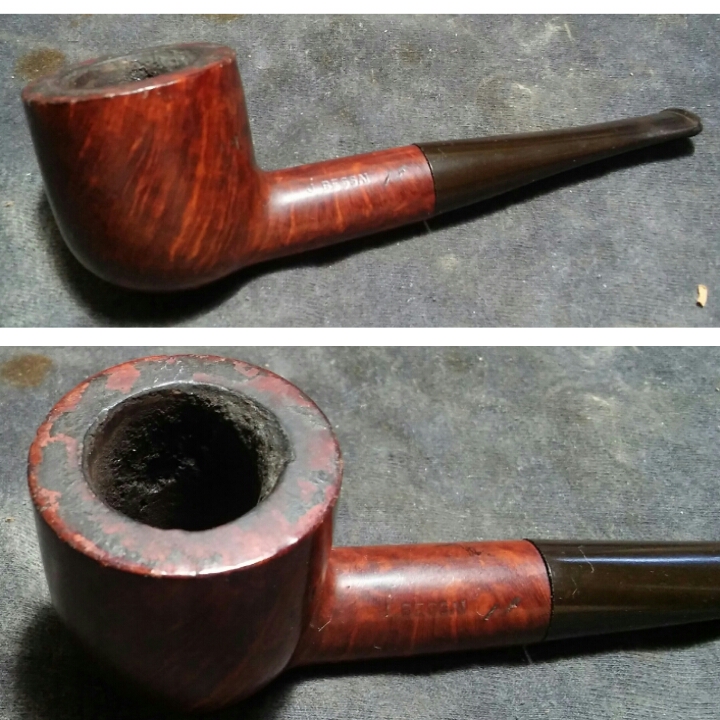
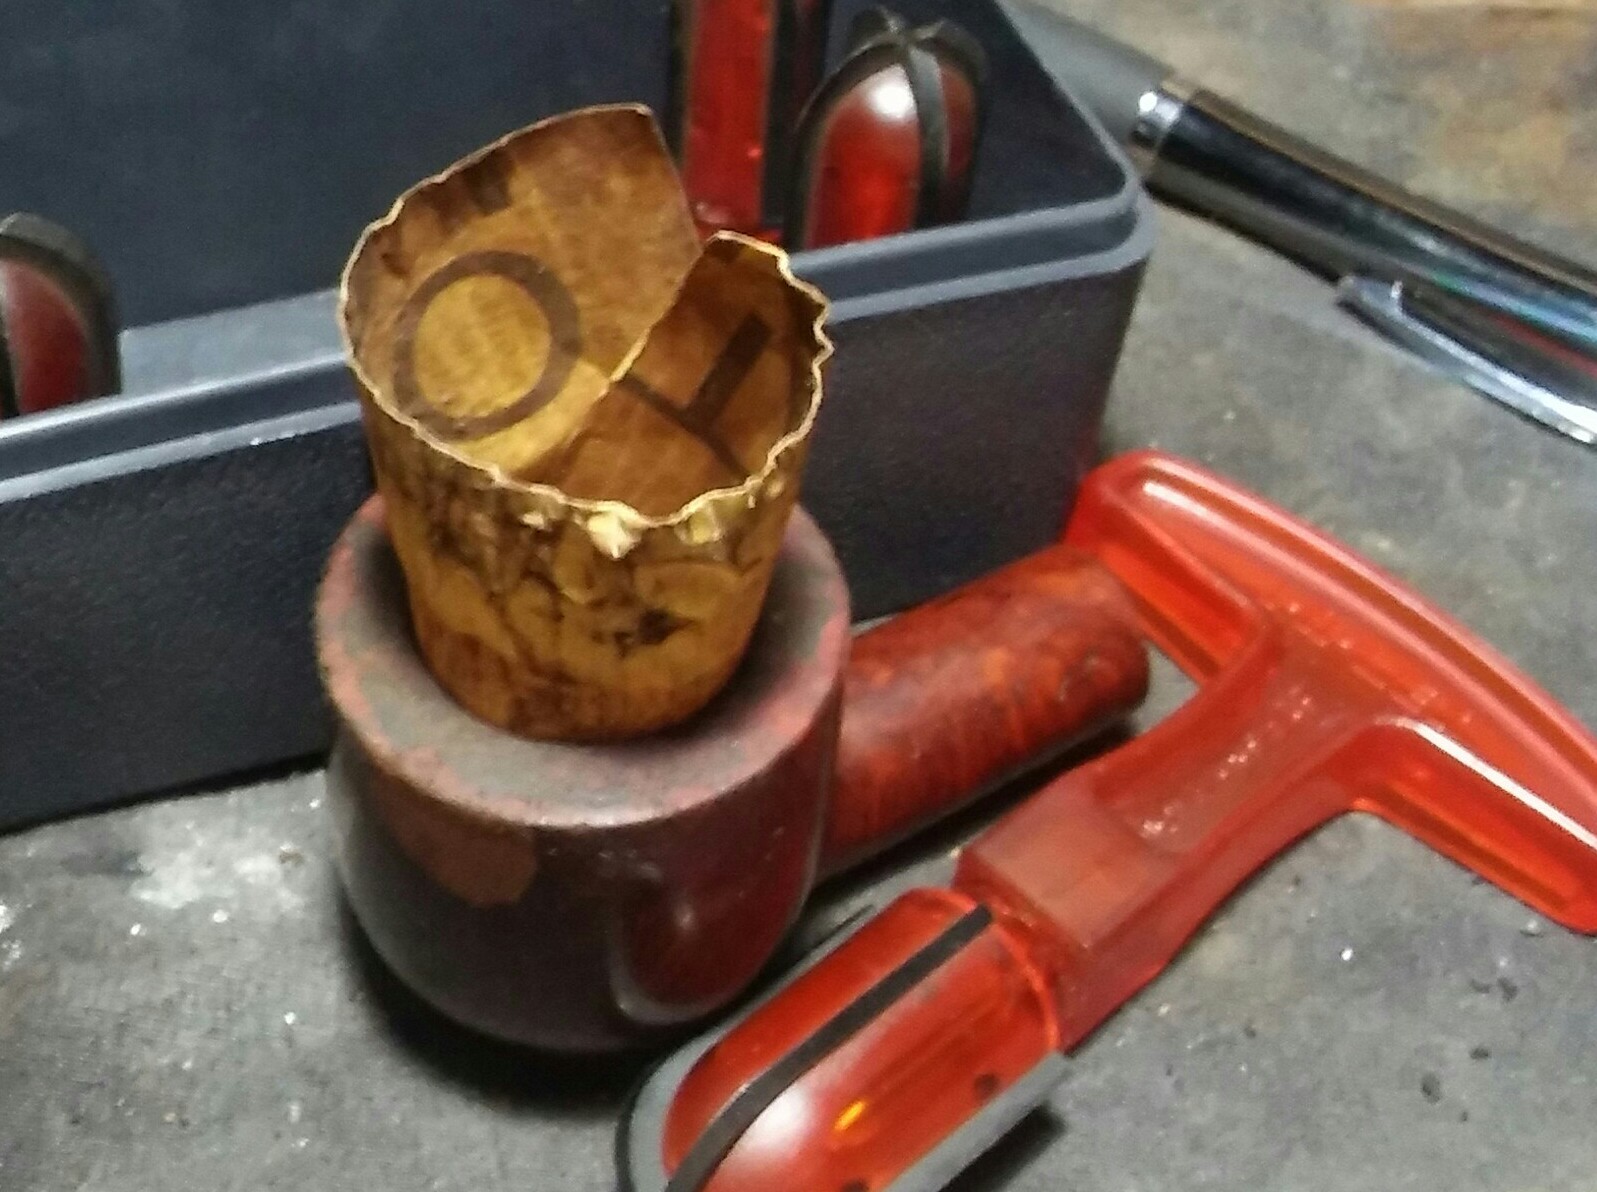
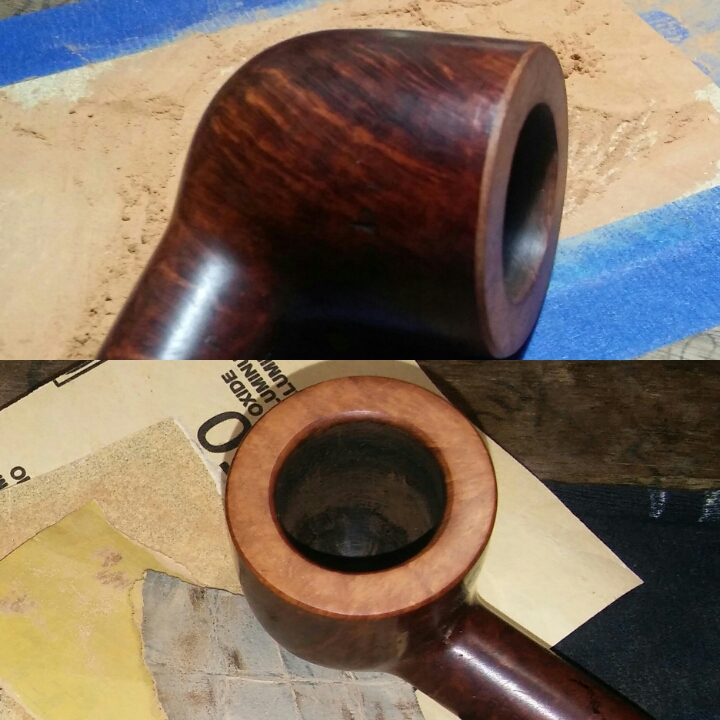
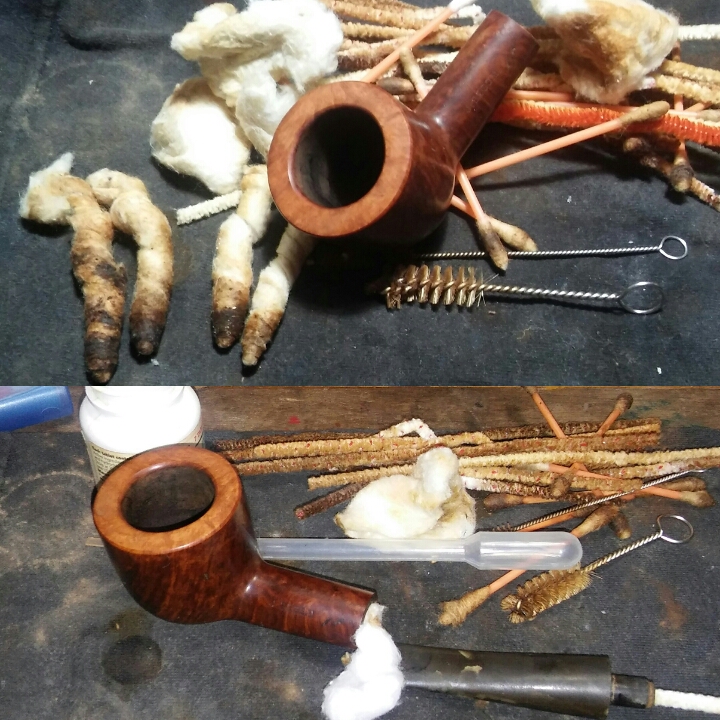
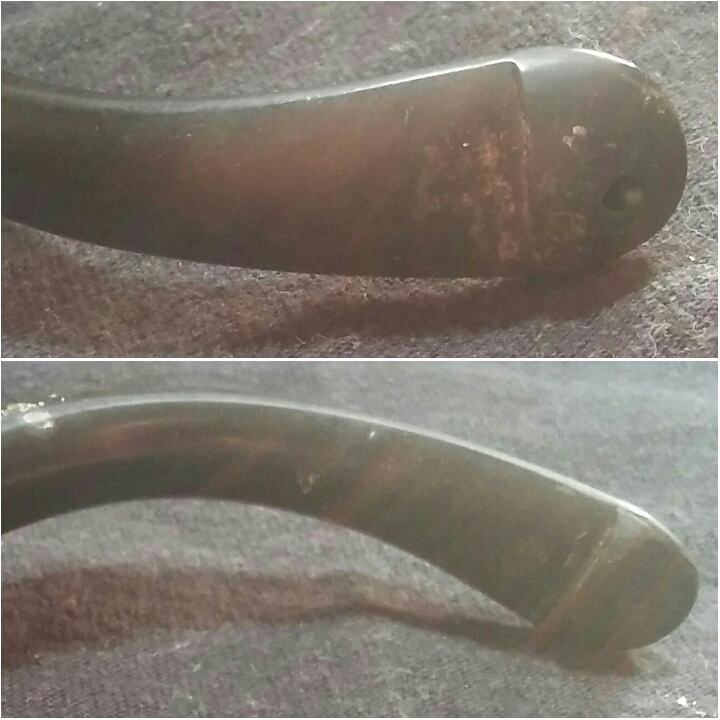
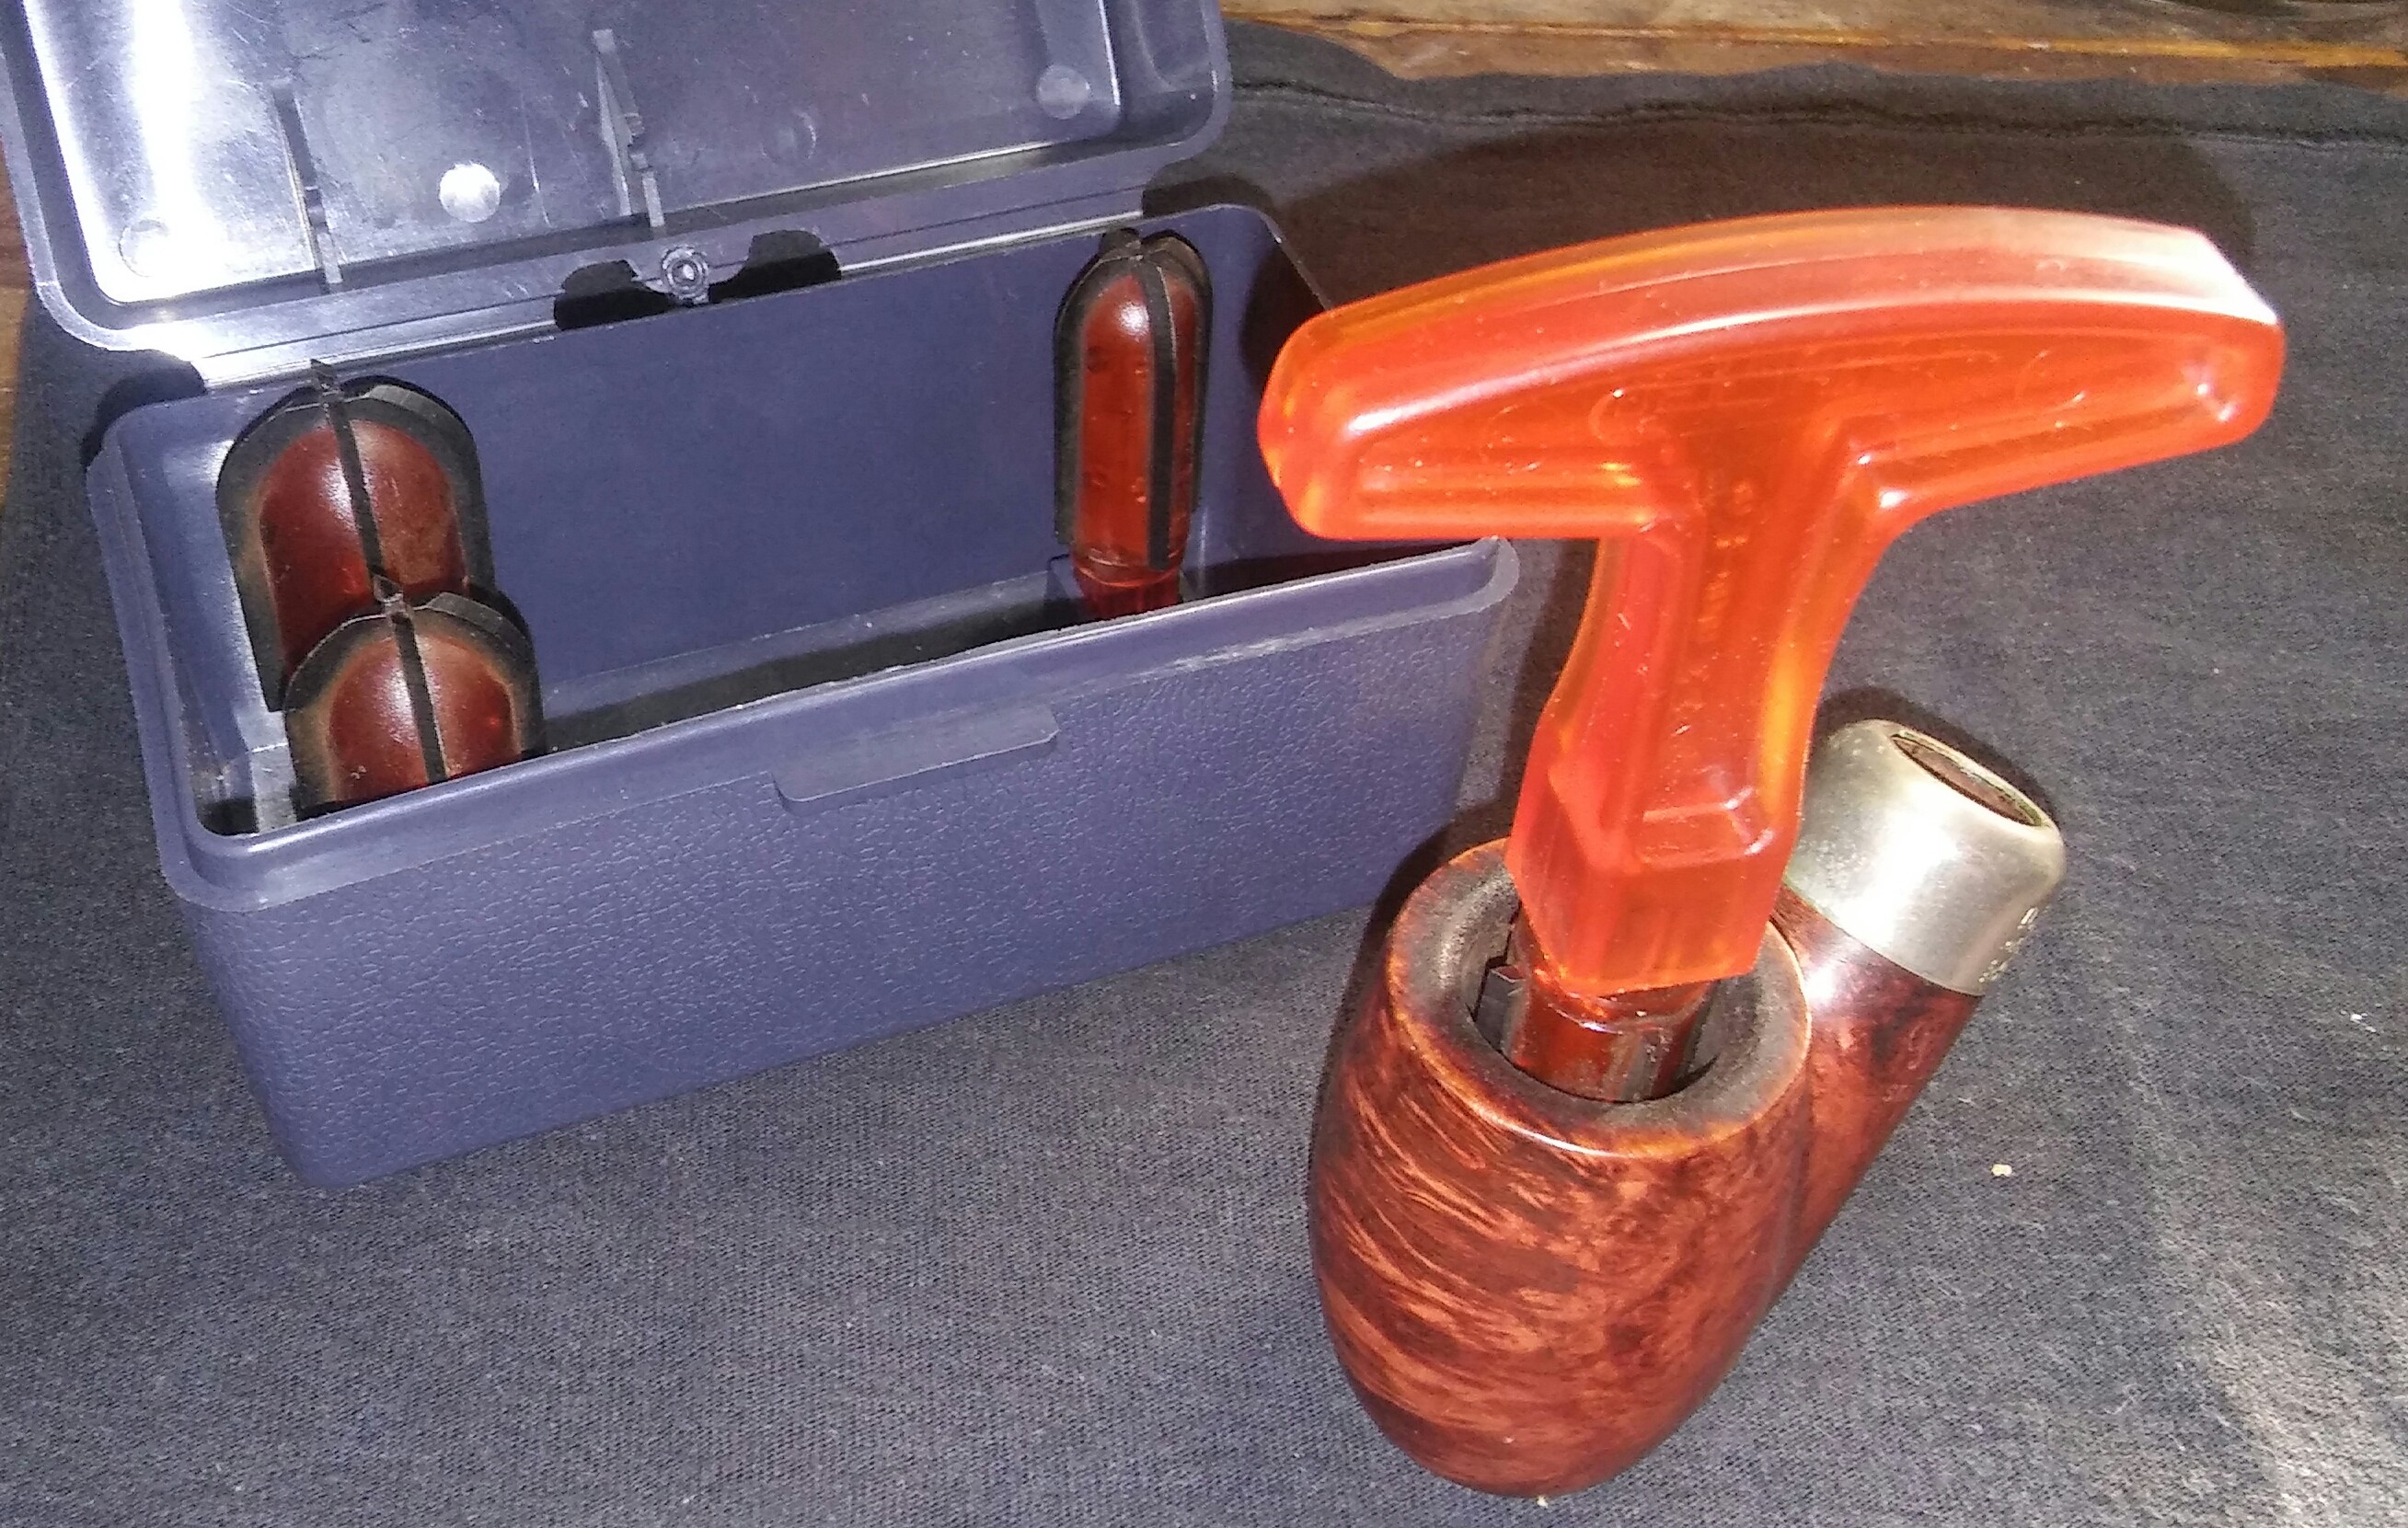
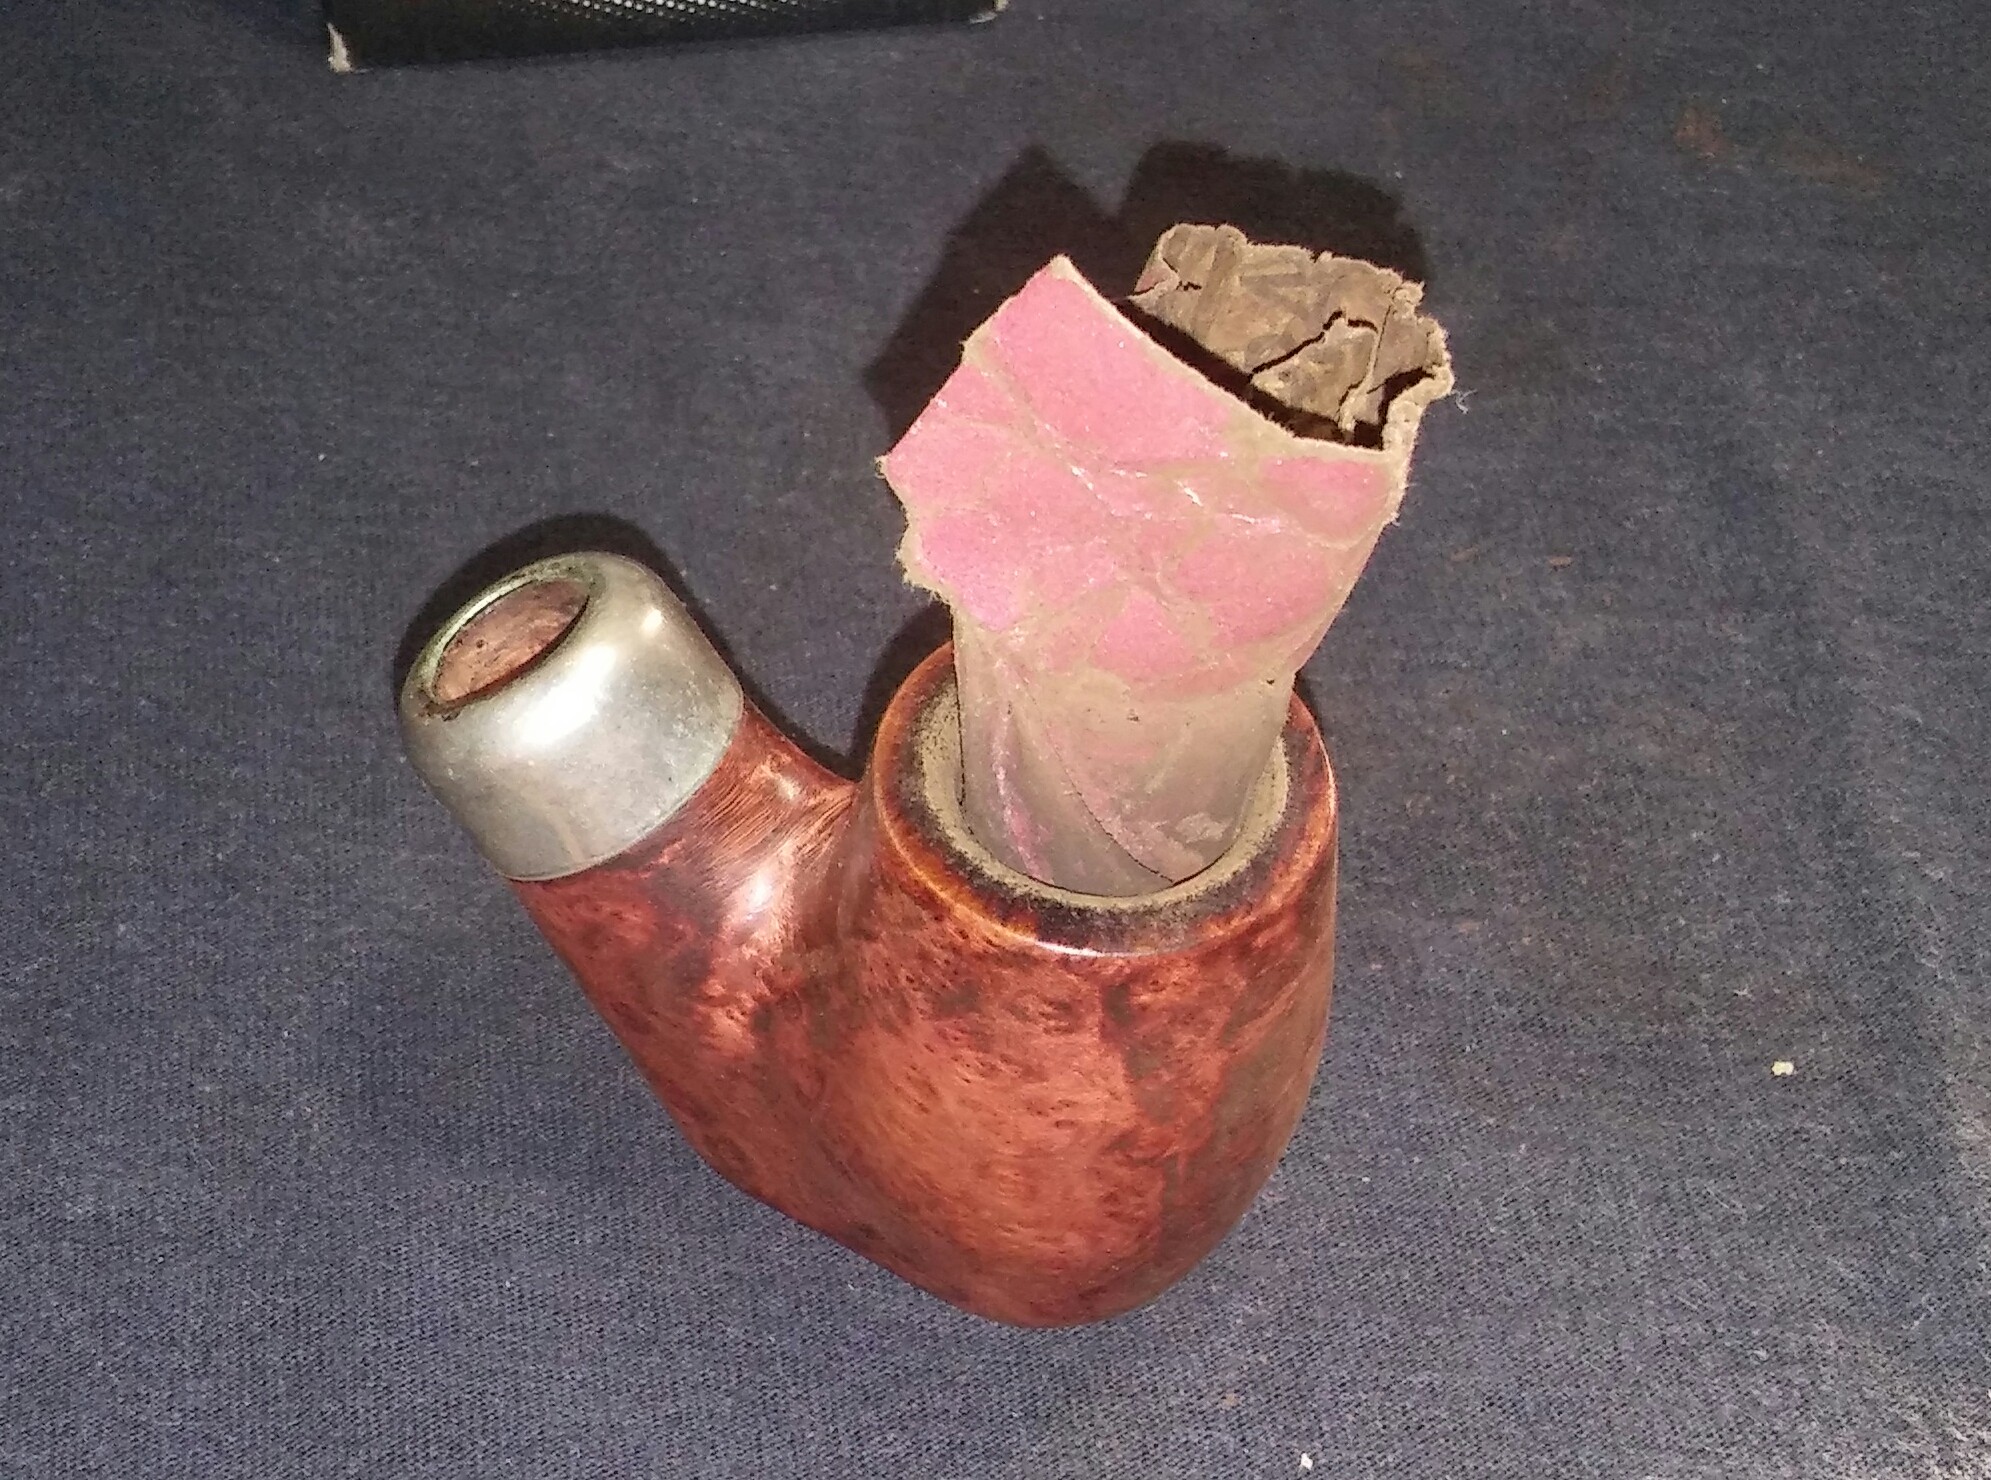
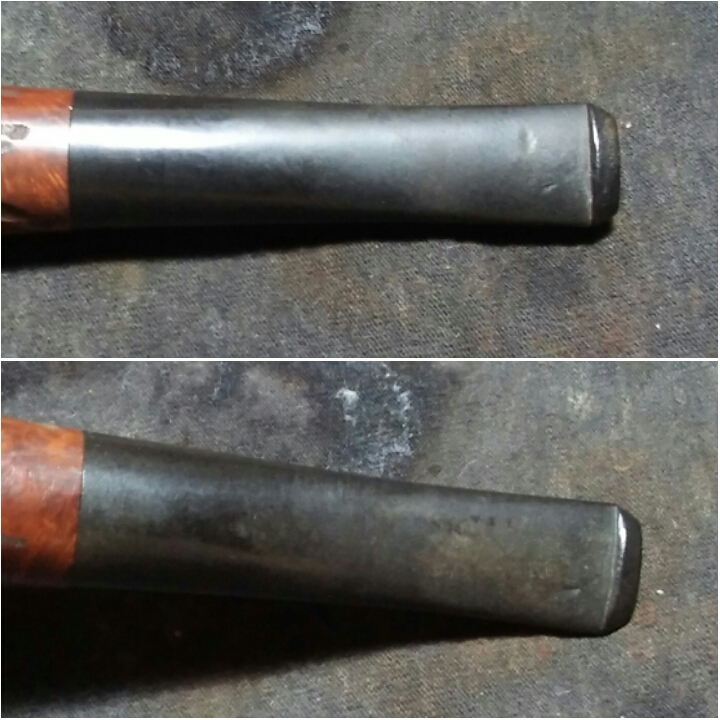
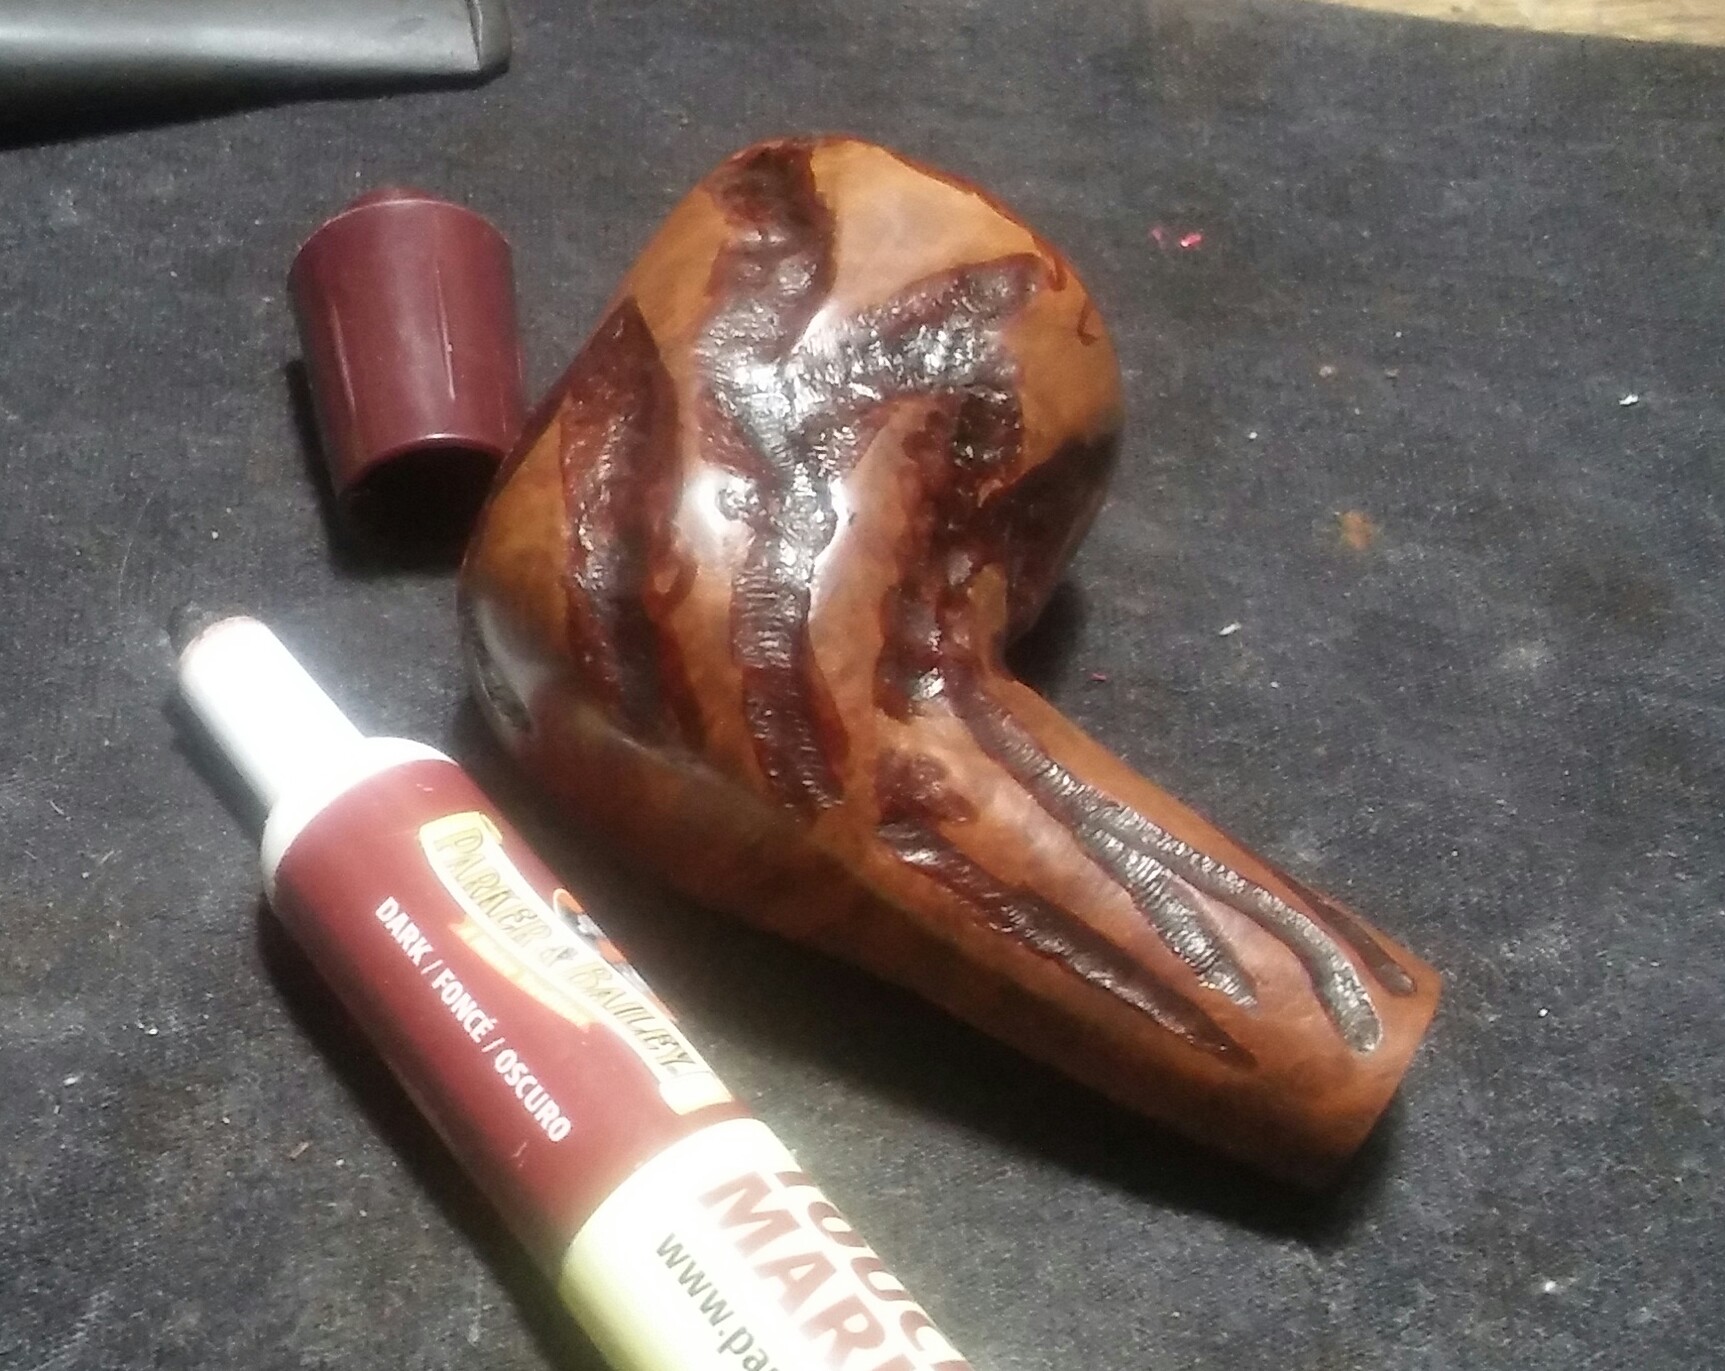
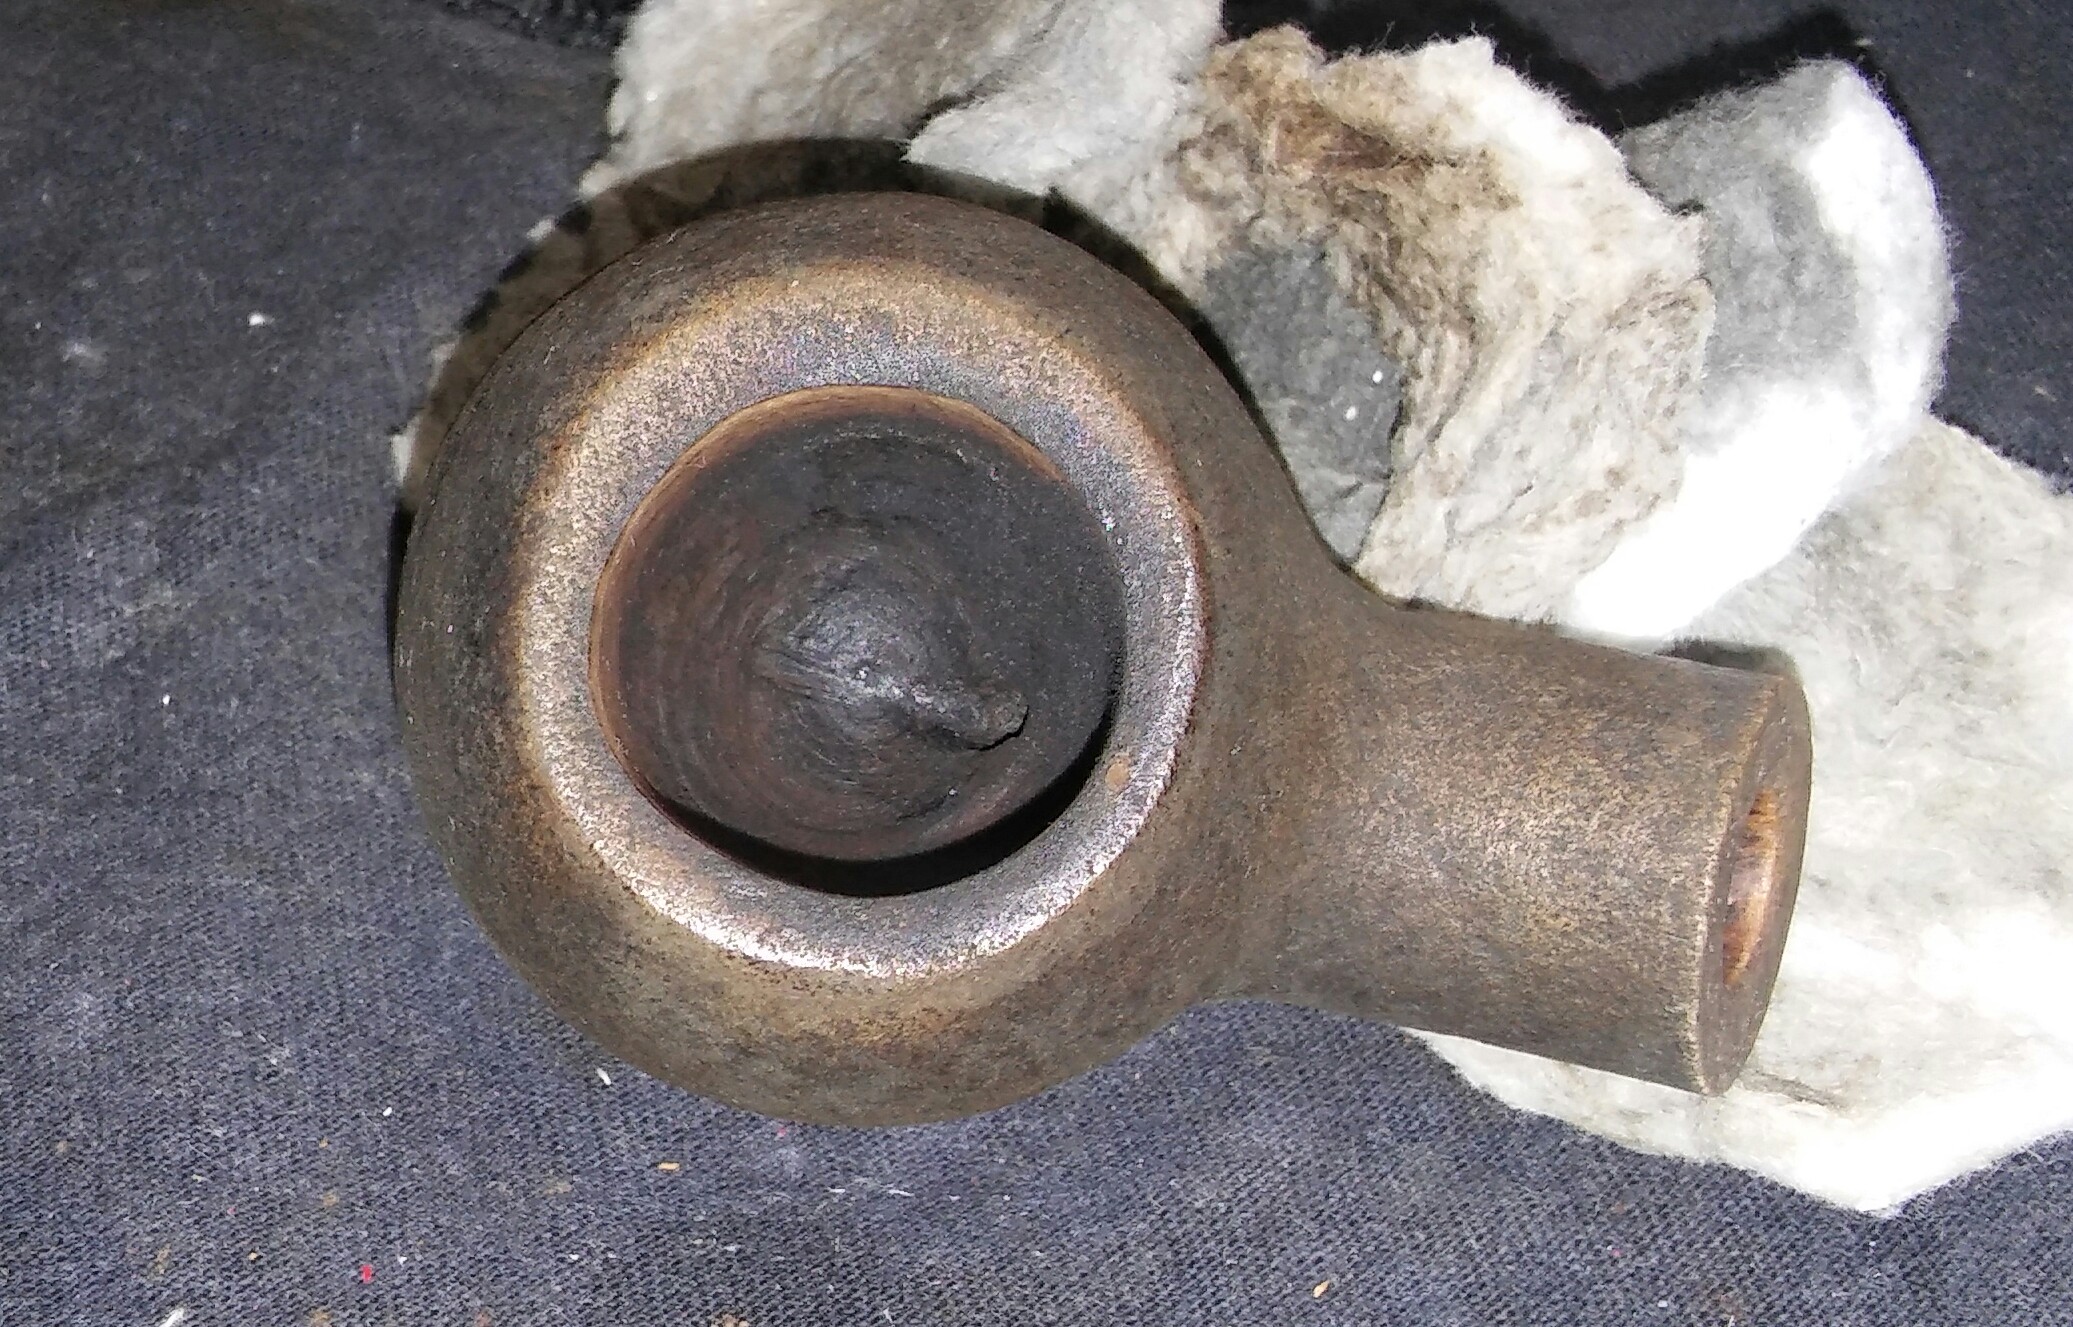
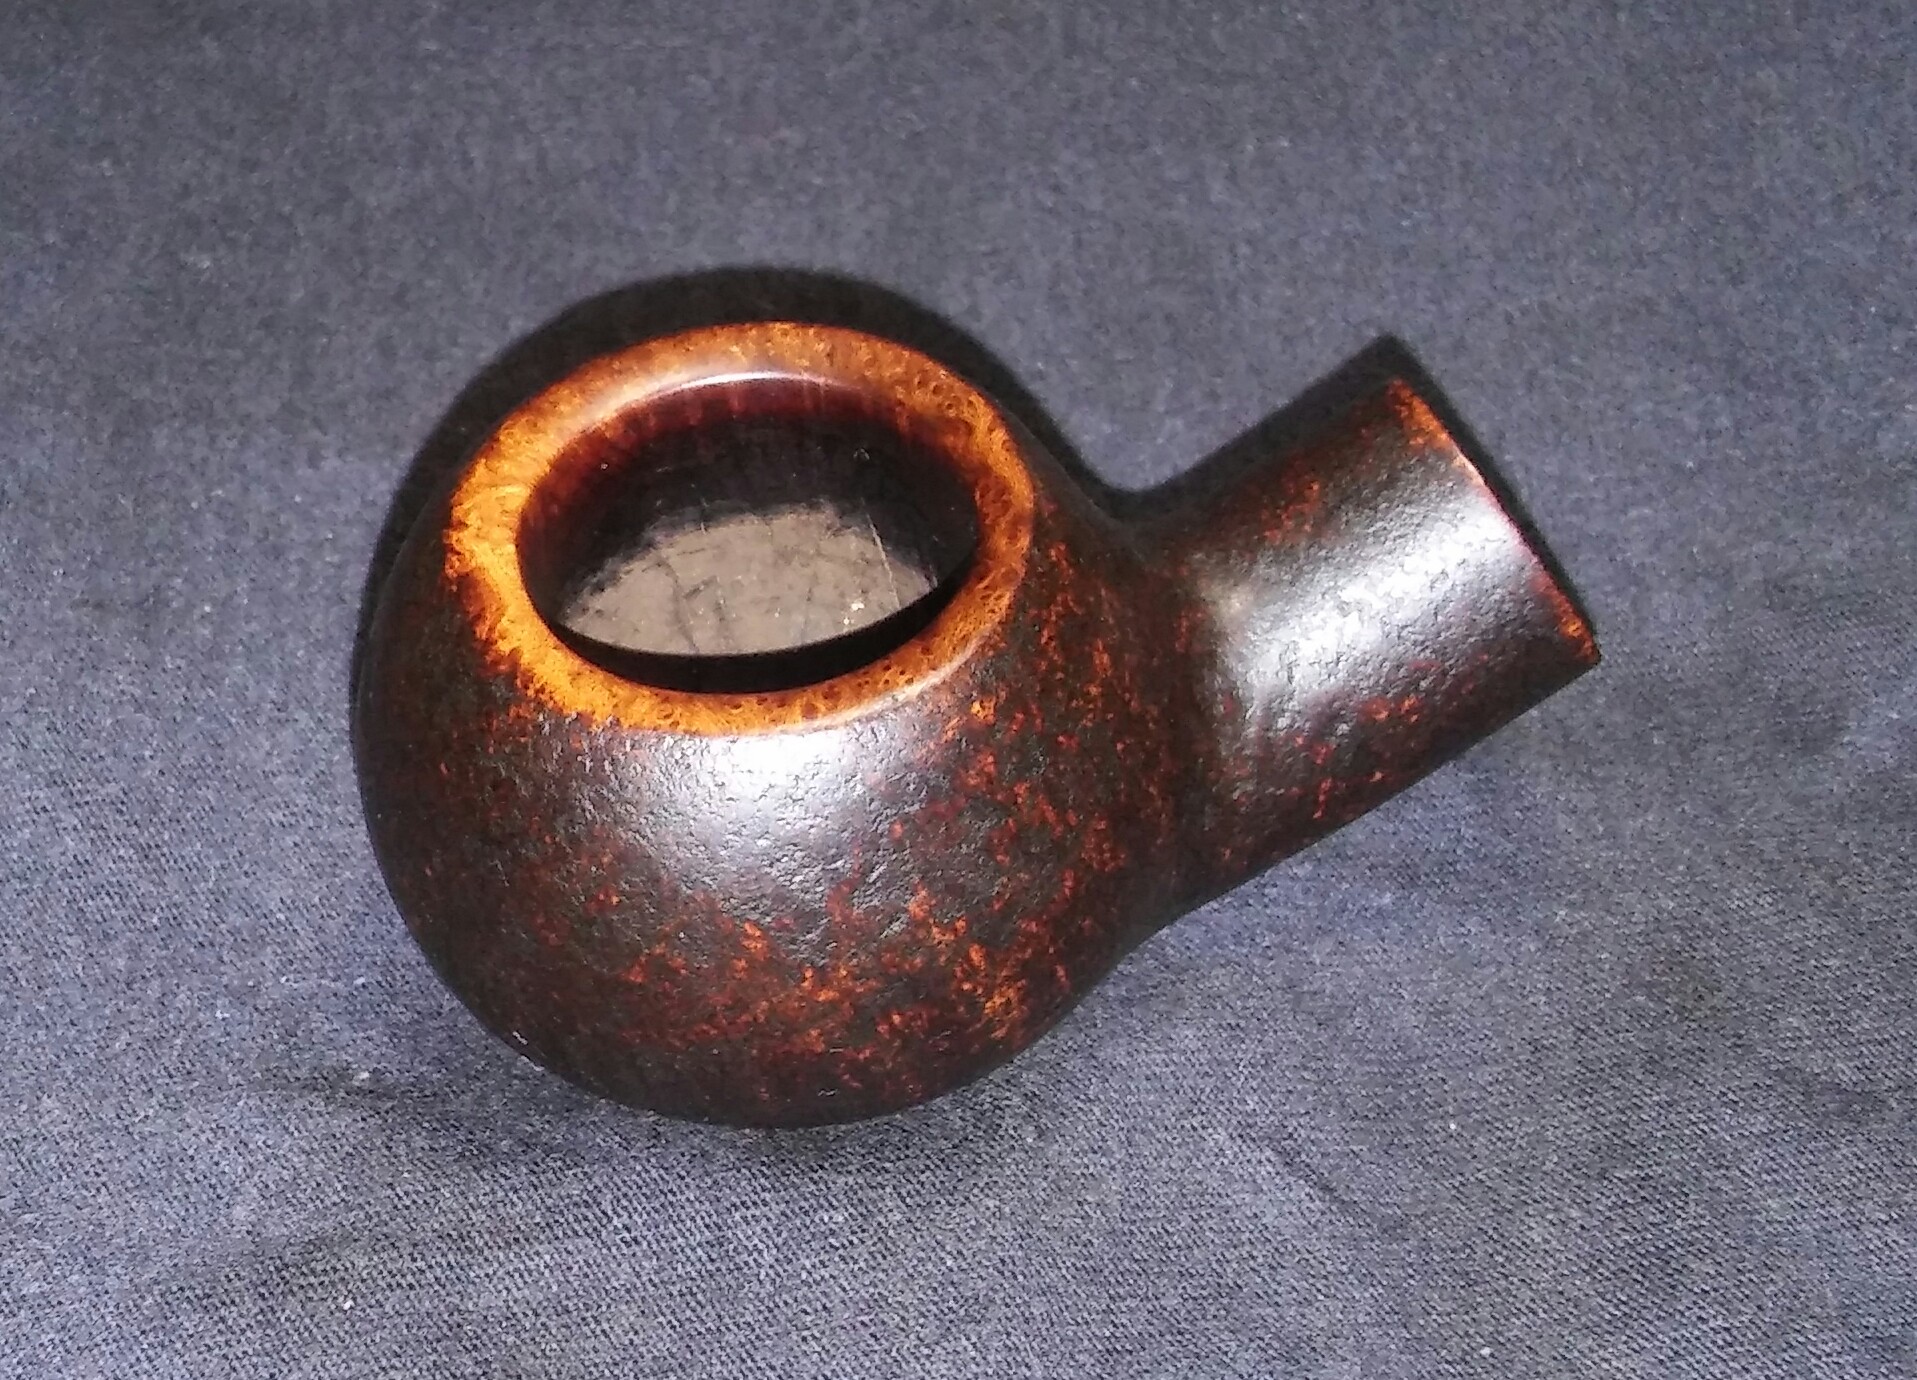
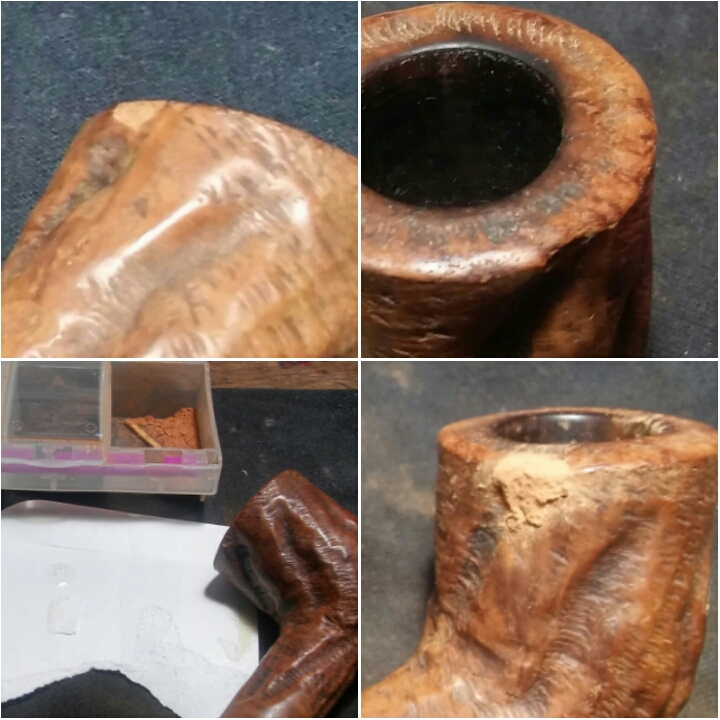
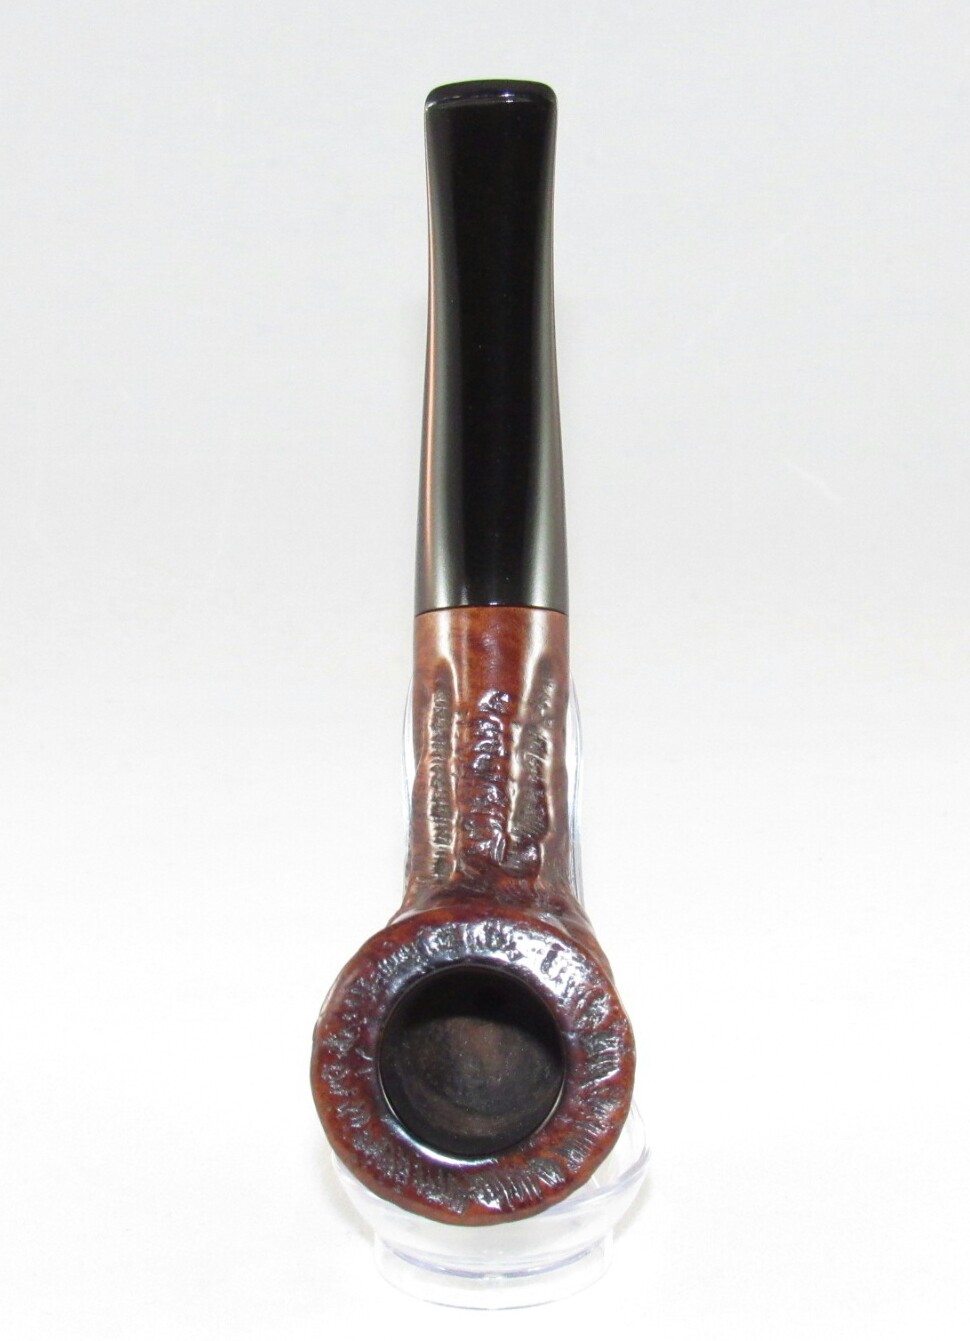
The pipe had been started and stopped a few times since I received it, so the reaming and internal cleaning had already been done previously. The chamber was free of pitting, there were a few tooth impressions and oxidation on the stem.The previous owner had carved a P into the bottom of the stummel. The pipe is for my farther and my daughter calls him poppy so the P is fitting but too tacky for my taste.

PhotoGrid_1464057065927

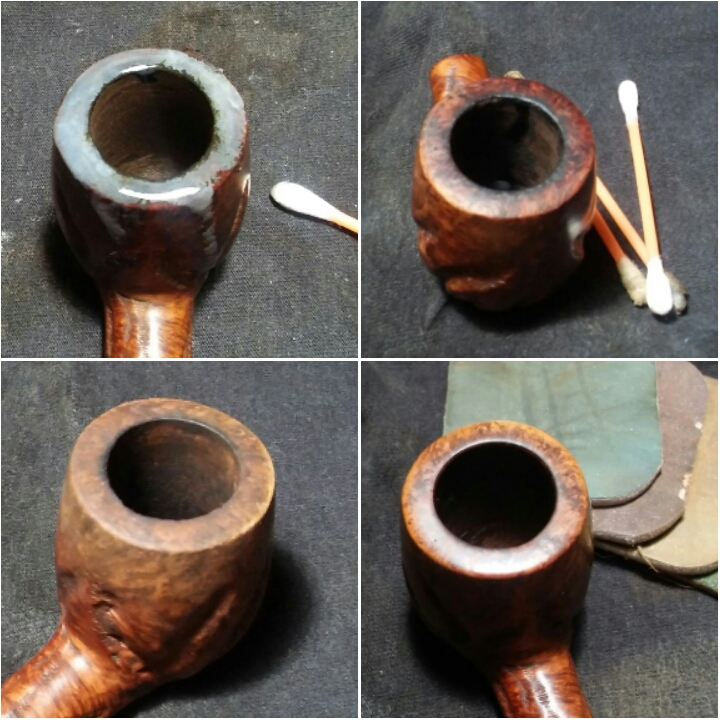
My attention was drawn first to the P caved in the bottom of the stummel,  luckily it wasn’t to deep. Starting with 220 grit sandpaper I removed the bulk of the self carving, then moving to 400, 800 and finished with 1000 grit sandpaper.

PhotoGrid_1464057035541

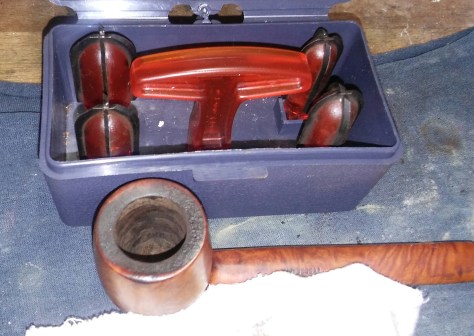
I lightly sanded the stummel with 800 grit sandpaper then gave the stummel a wipe down with an EverClear soaked rag to remove the fine sanding dust.

PhotoGrid_1464057166588

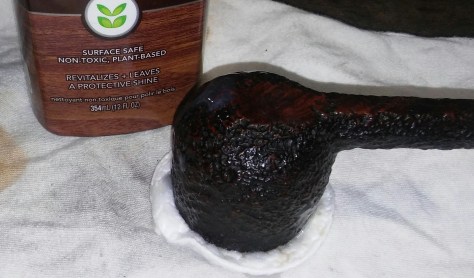
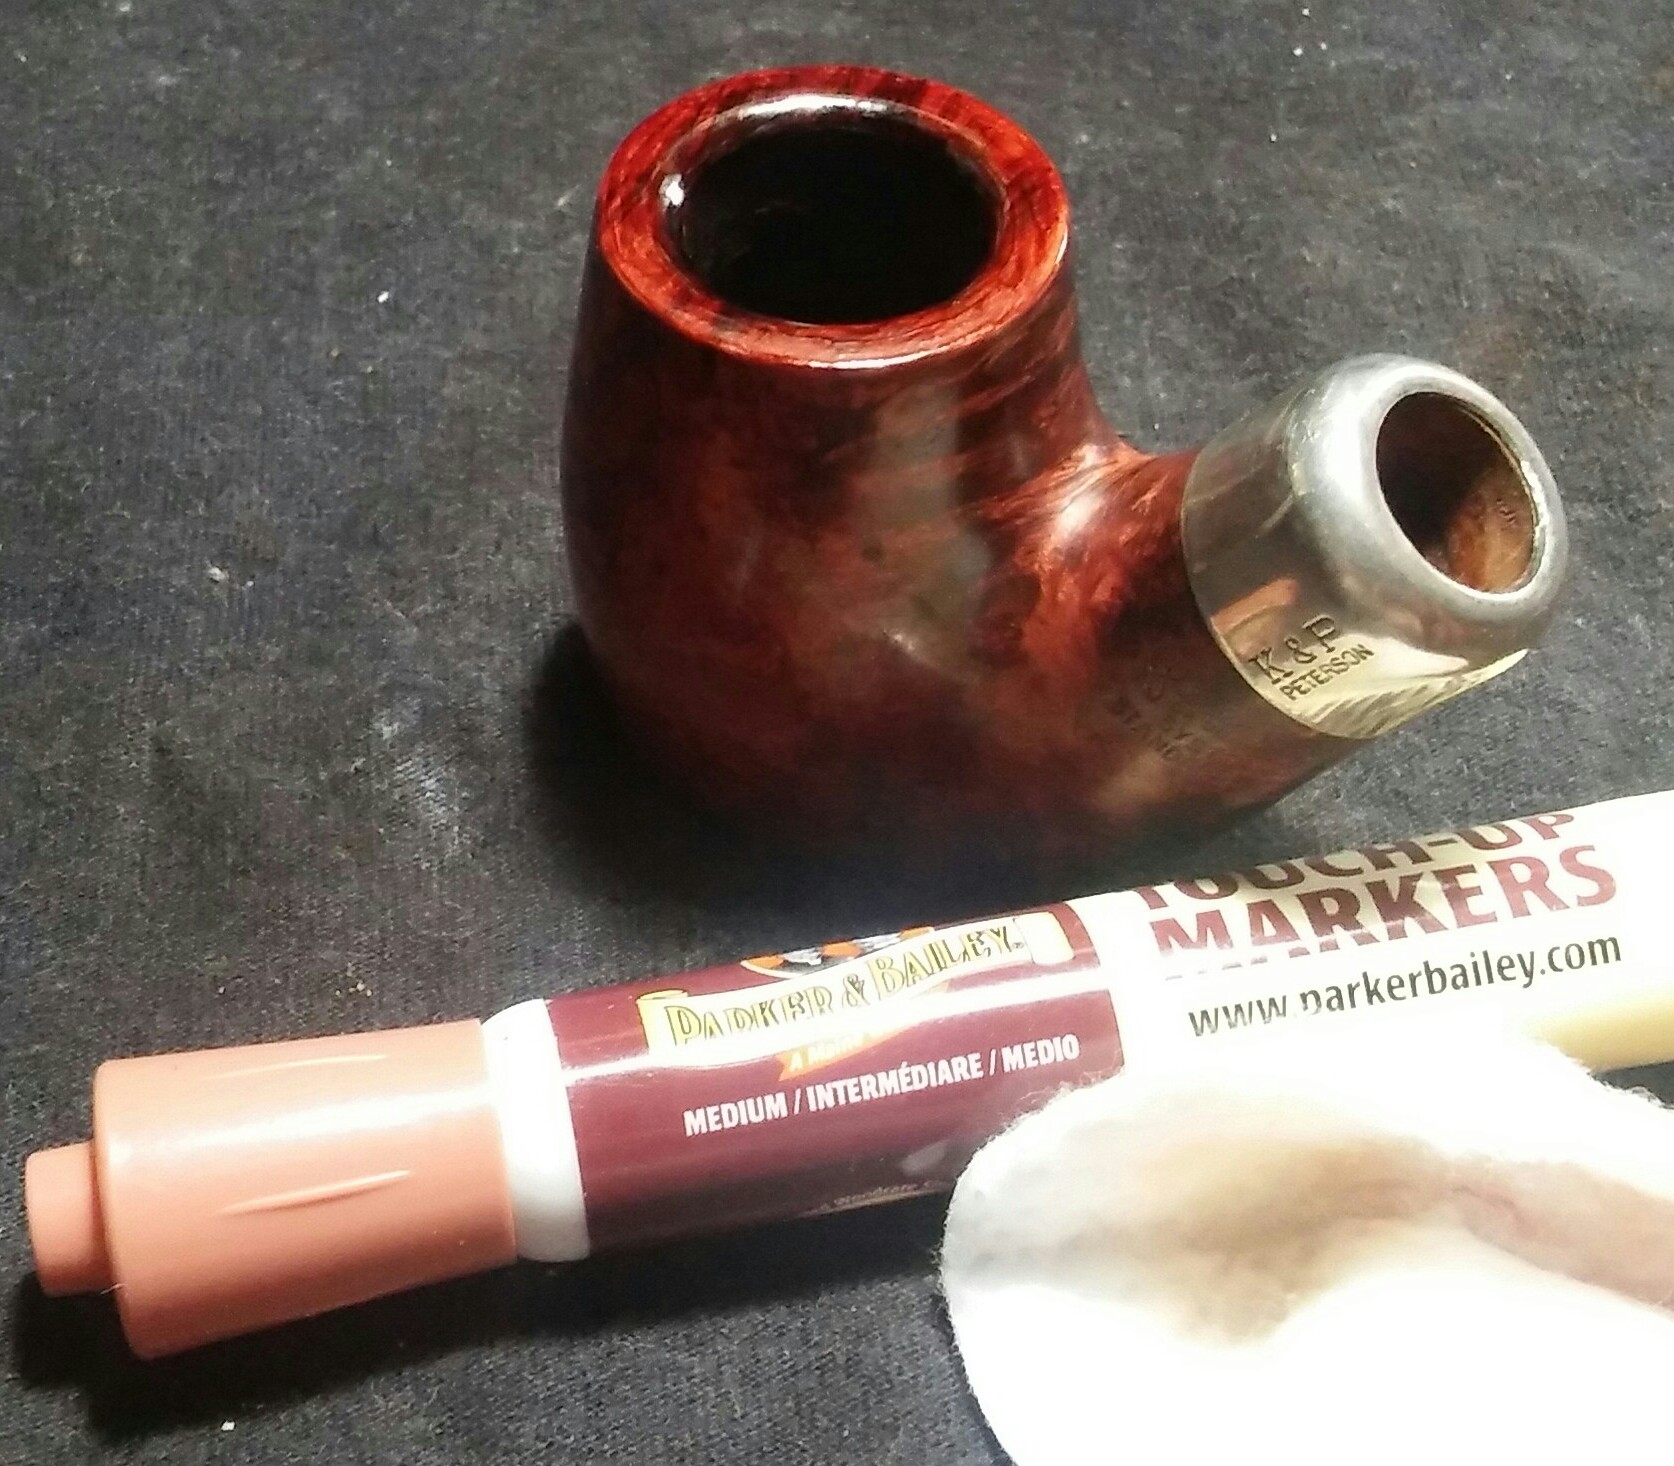
Before hitting the buffer I applied a coat of Howard’s Butcher Block Conditioner , I applied using a Q-Tip then leaving it aside to penetrate, removing the excess with a clean rag.

20160523_212000_HDR~2

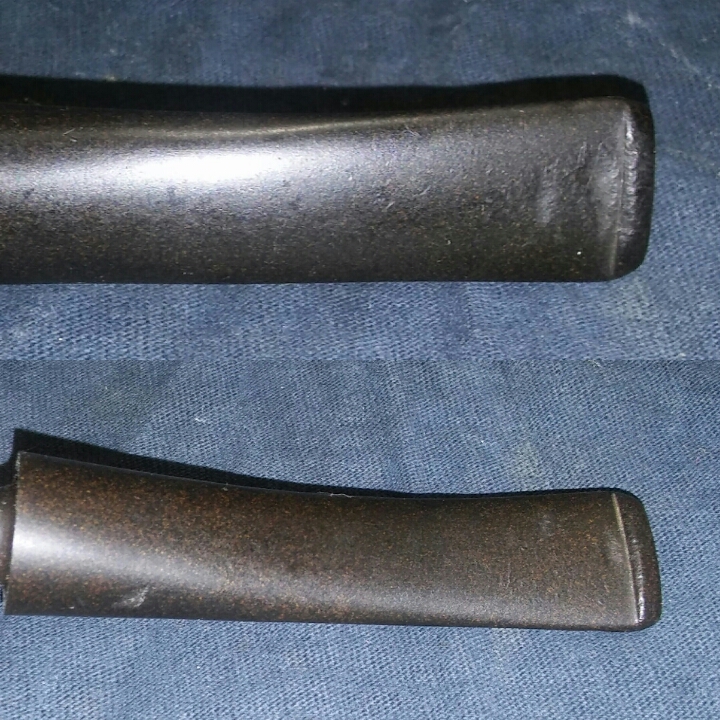
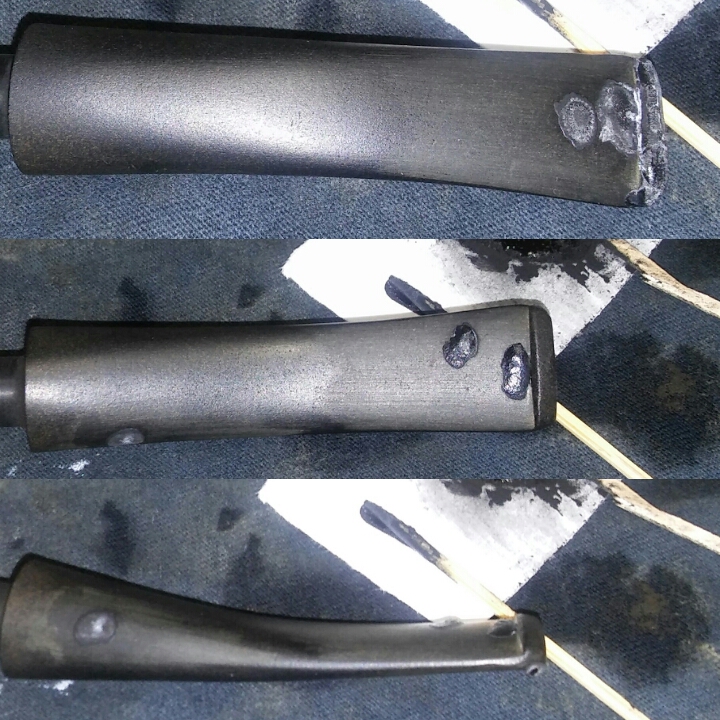
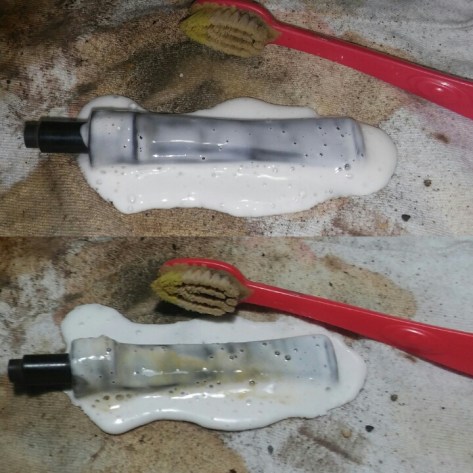
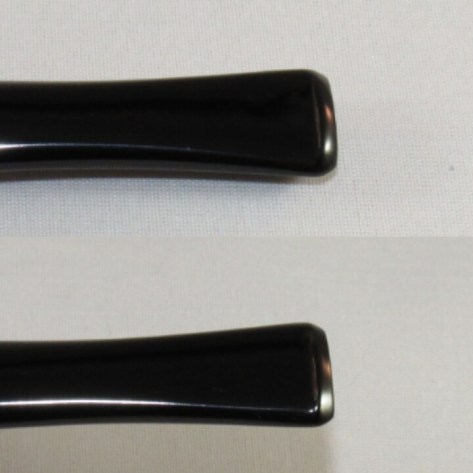
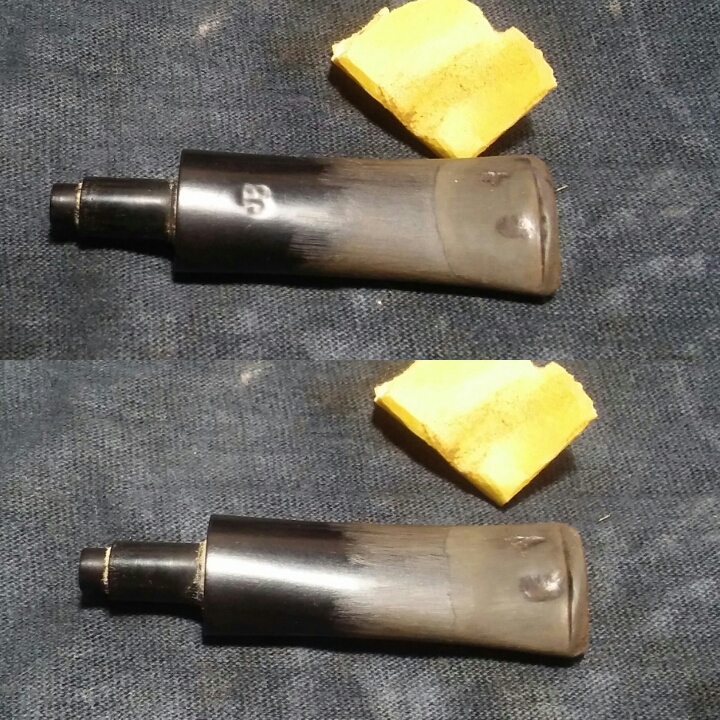
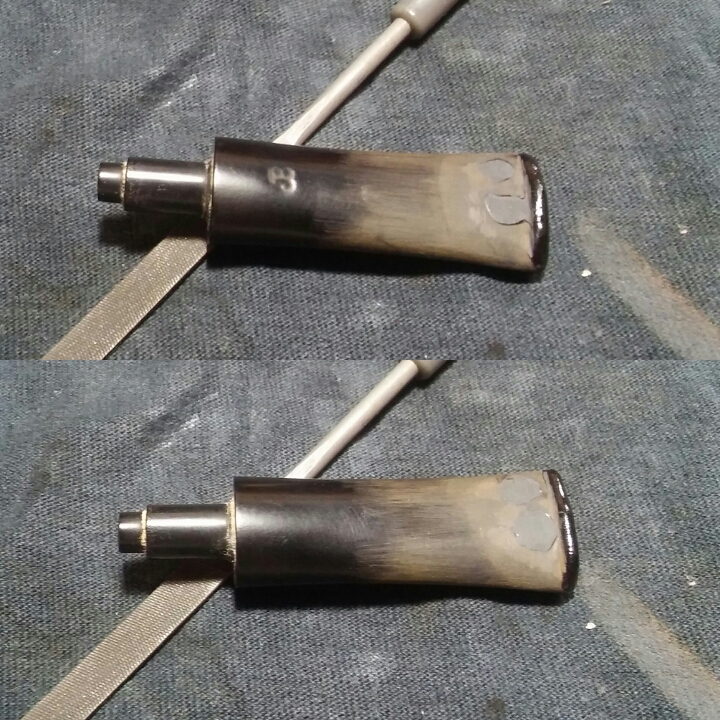
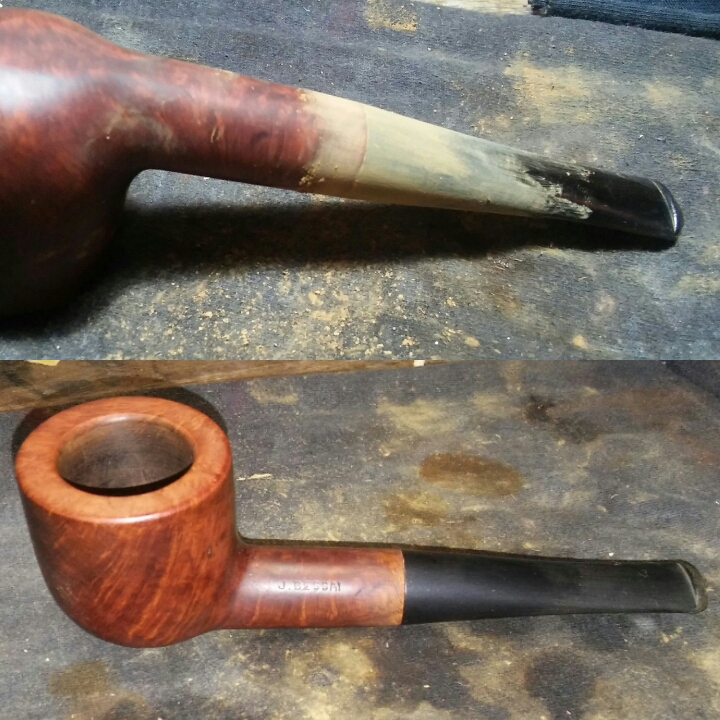
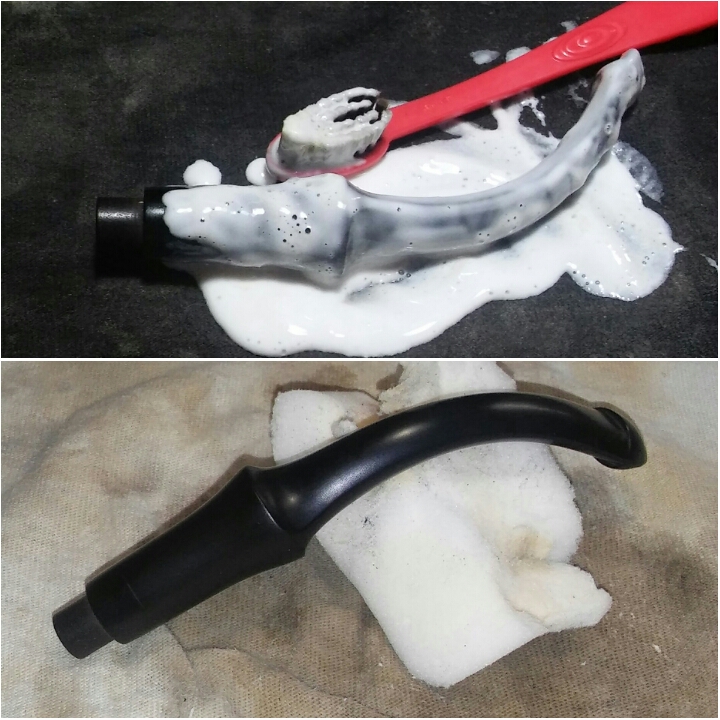
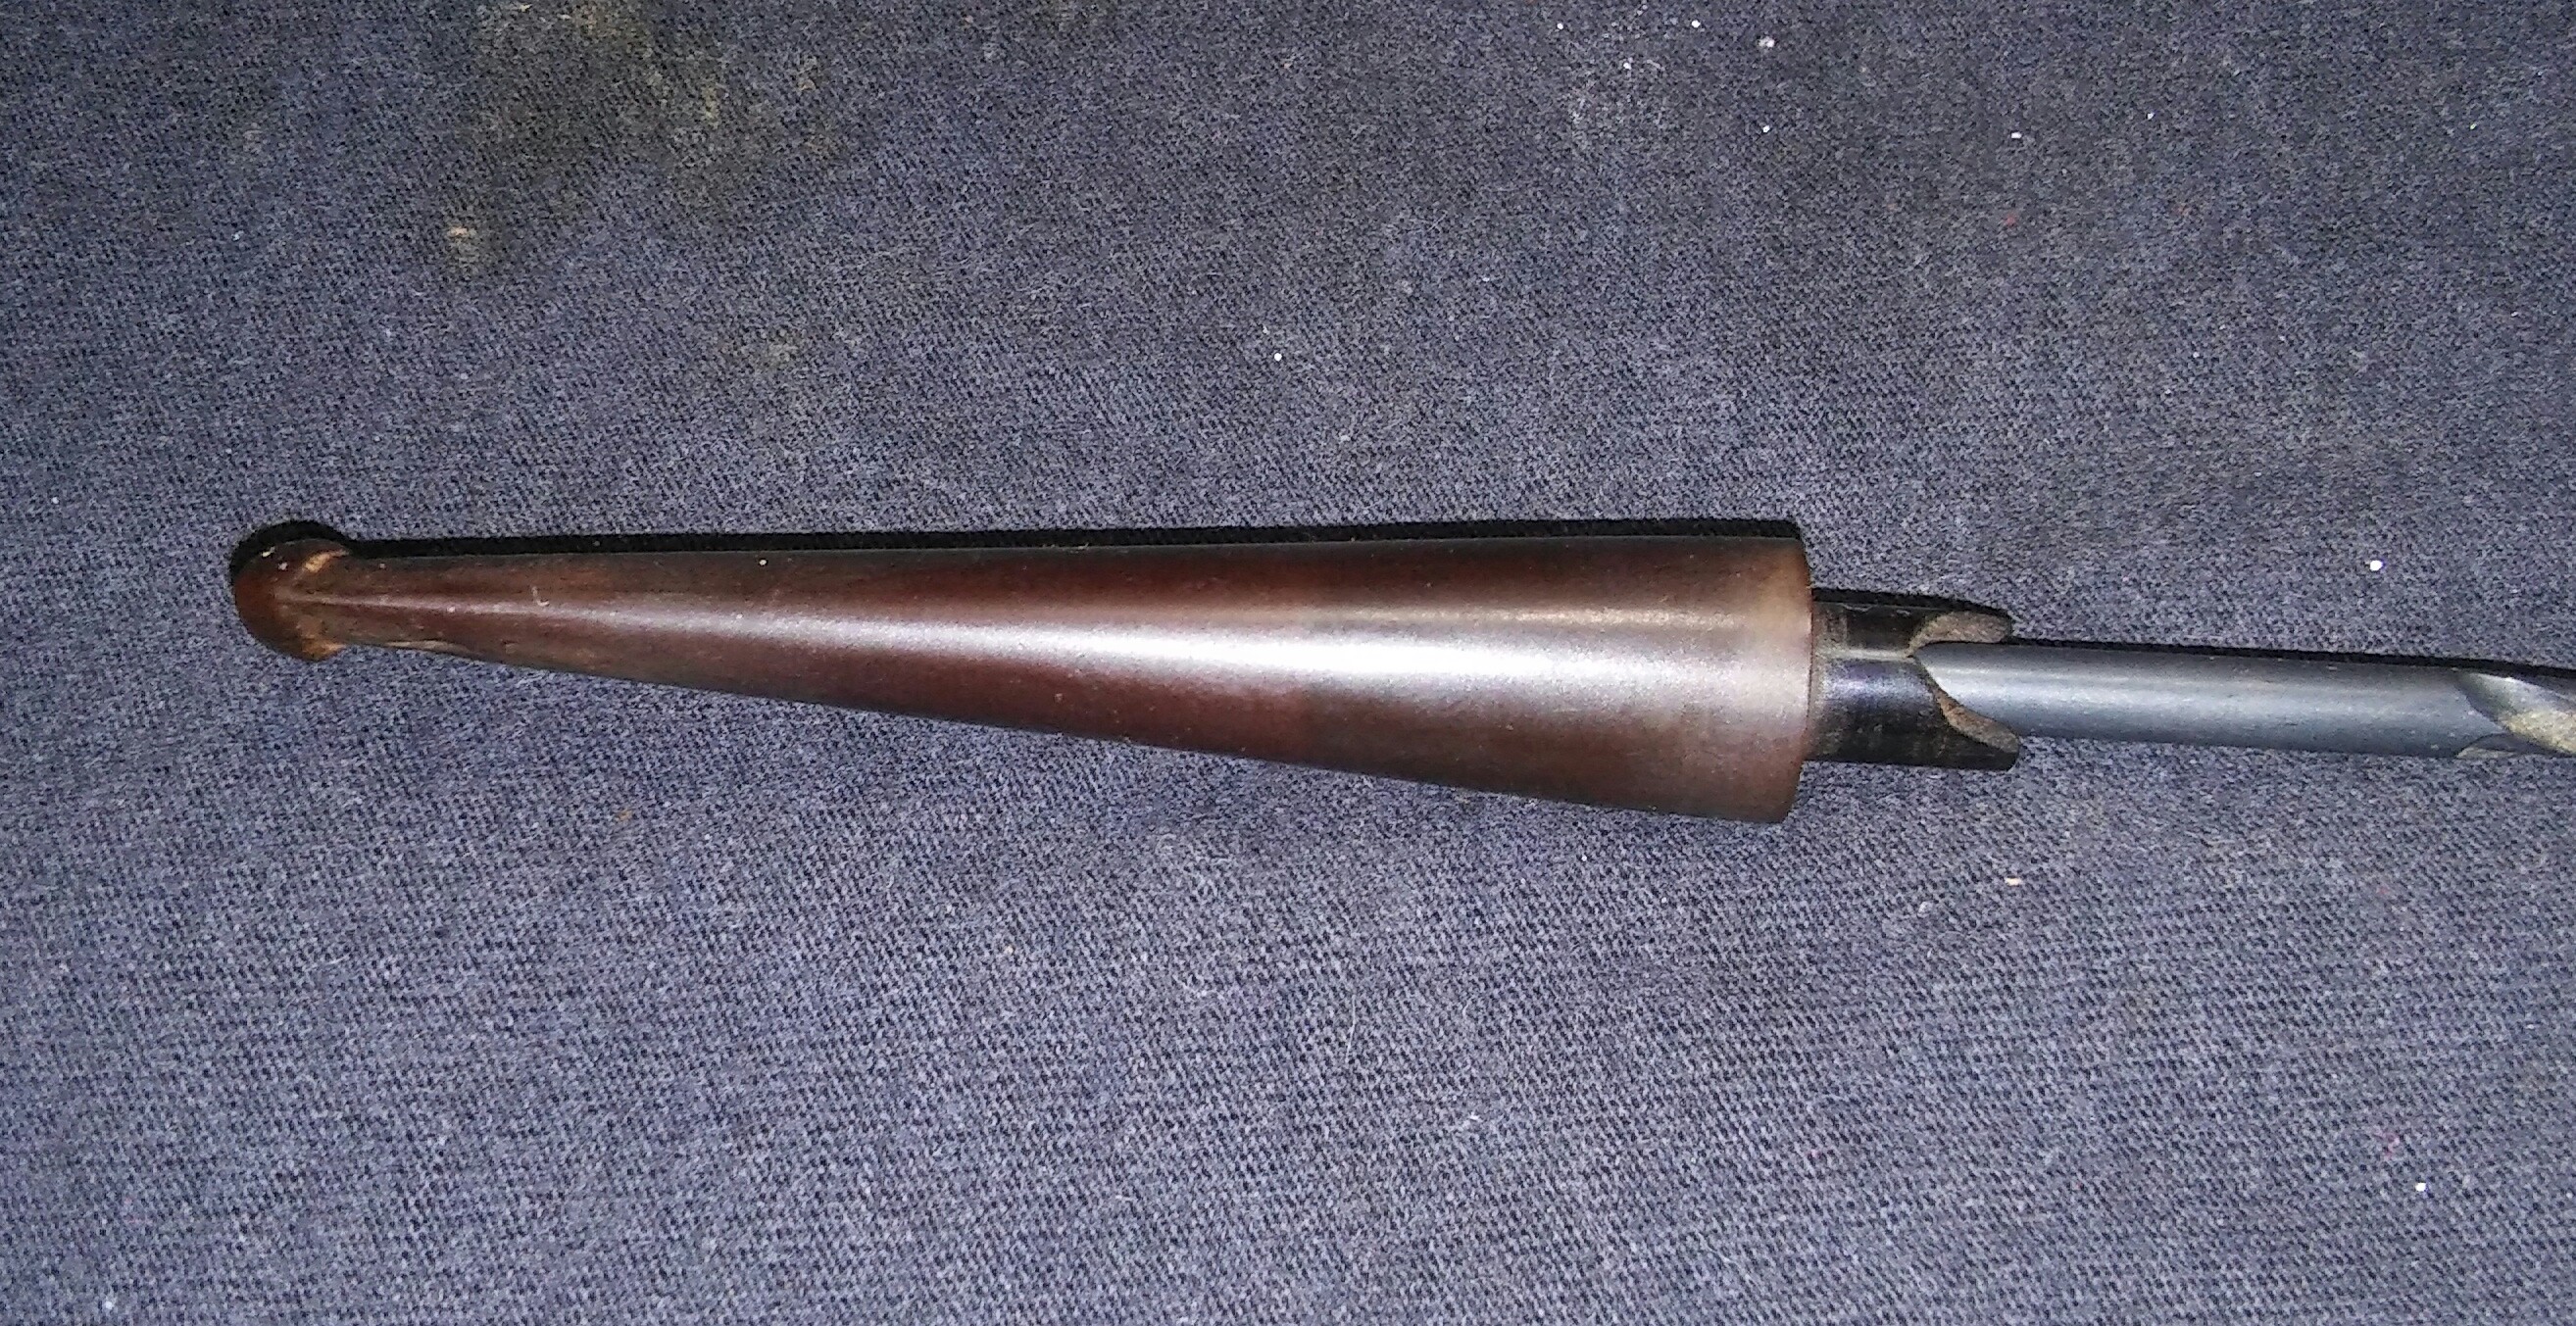
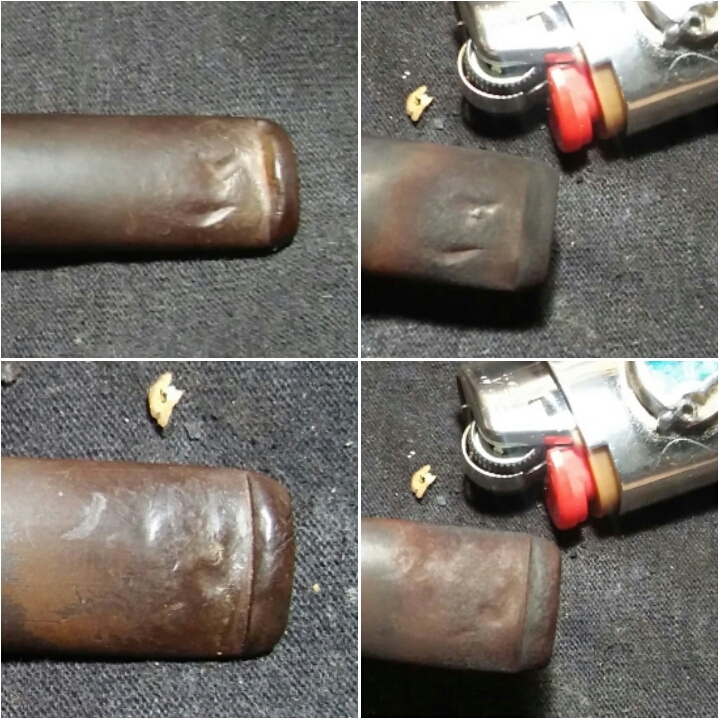
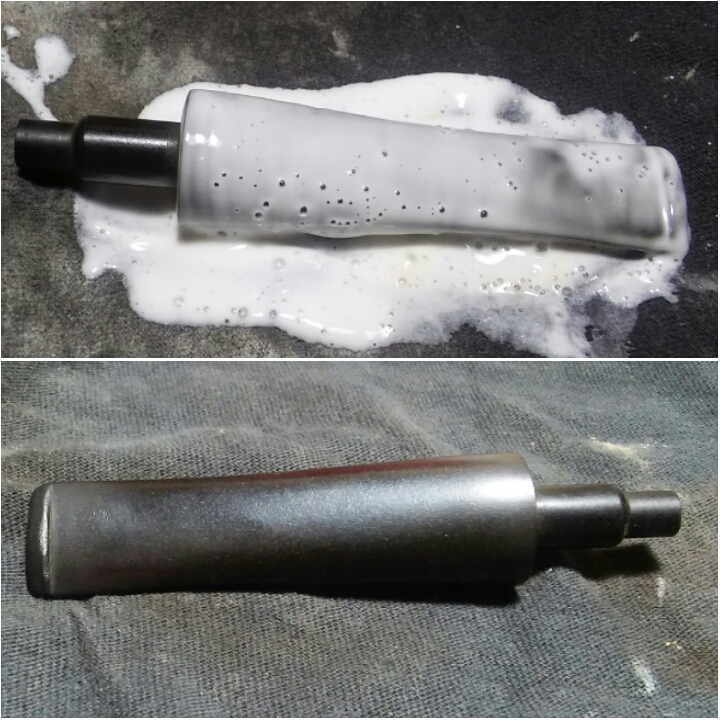
I applied a generous amount of non-bleach Soft Scrub to the stem and  left it aside for the Soft Scrub to soften the oxidation. Once the Soft Scrub turns from white to brownish color its time to scrub vigorously adding more Soft Scrub as needed until all oxidation has been removed, holding the stem under natural light will help to see if all oxidation has been removed.

20160524_231121~2

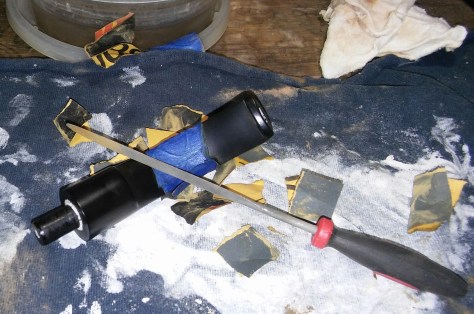
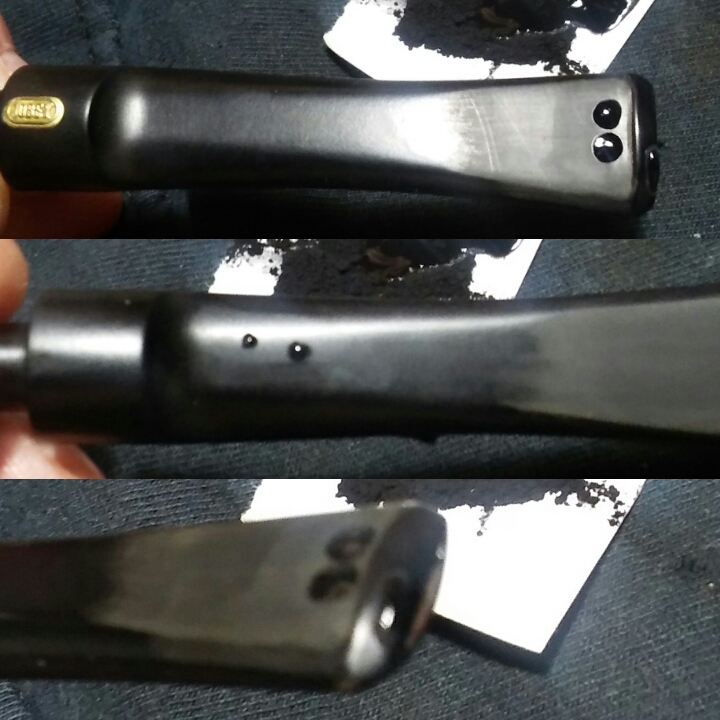
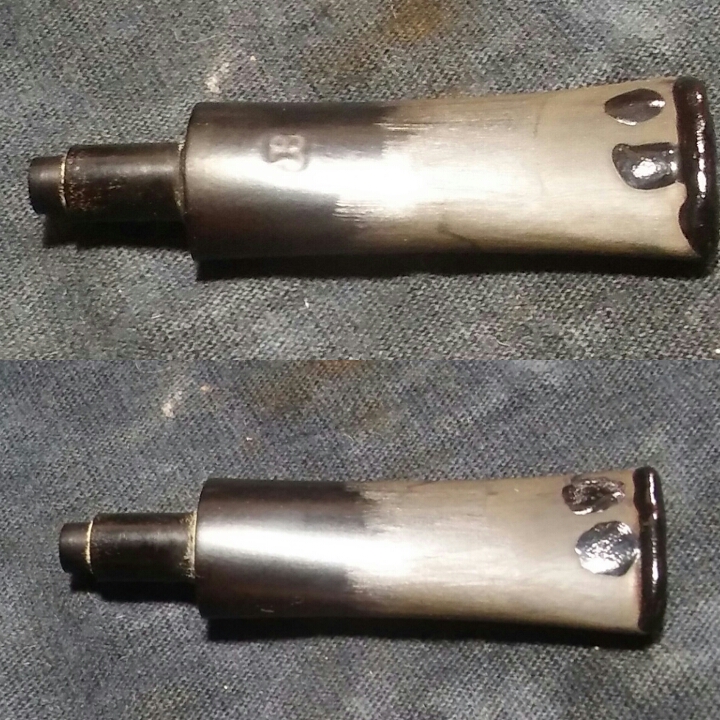
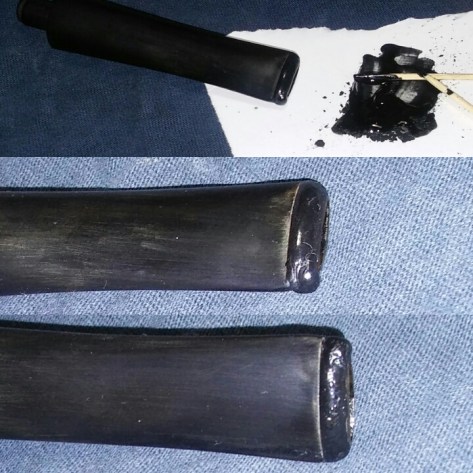
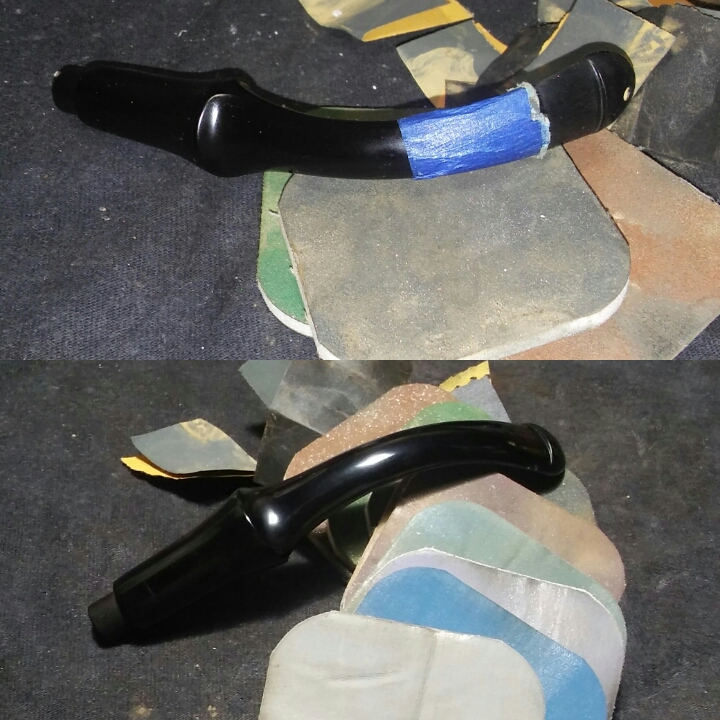
With the oxidation removed I focused on the tooth impressions , the rest of the stem was in good shape so I taped off the bit/lip area of work with blue painters tape so my sanding would remain in this area. I removed the deeper impressions with a flat sided needle file. I removed the rough file marks with 400,800 and 1000 sandpaper wet.

20160525_182554~2

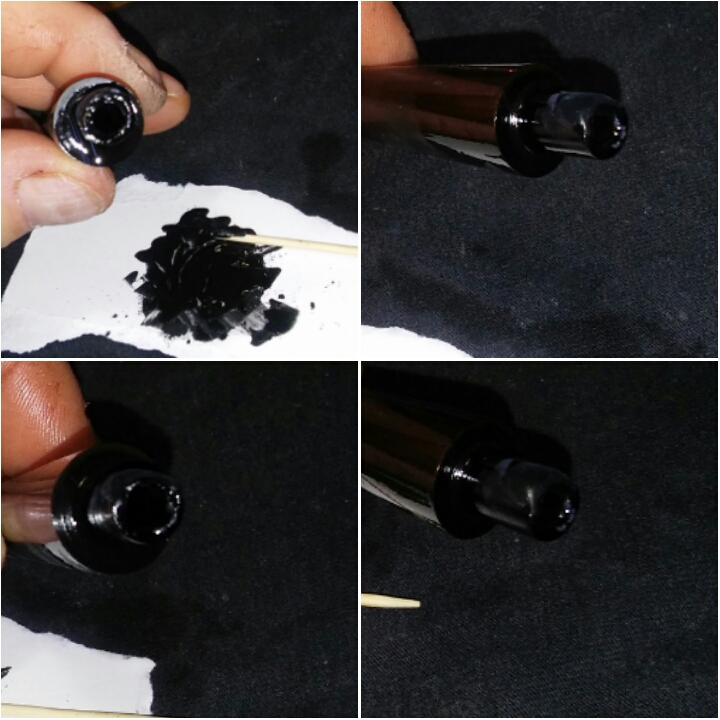
I now ran the stem though the various grits of micro-mesh 1500-2500 wet and 3200-12000 dry ,polishing to a shine.
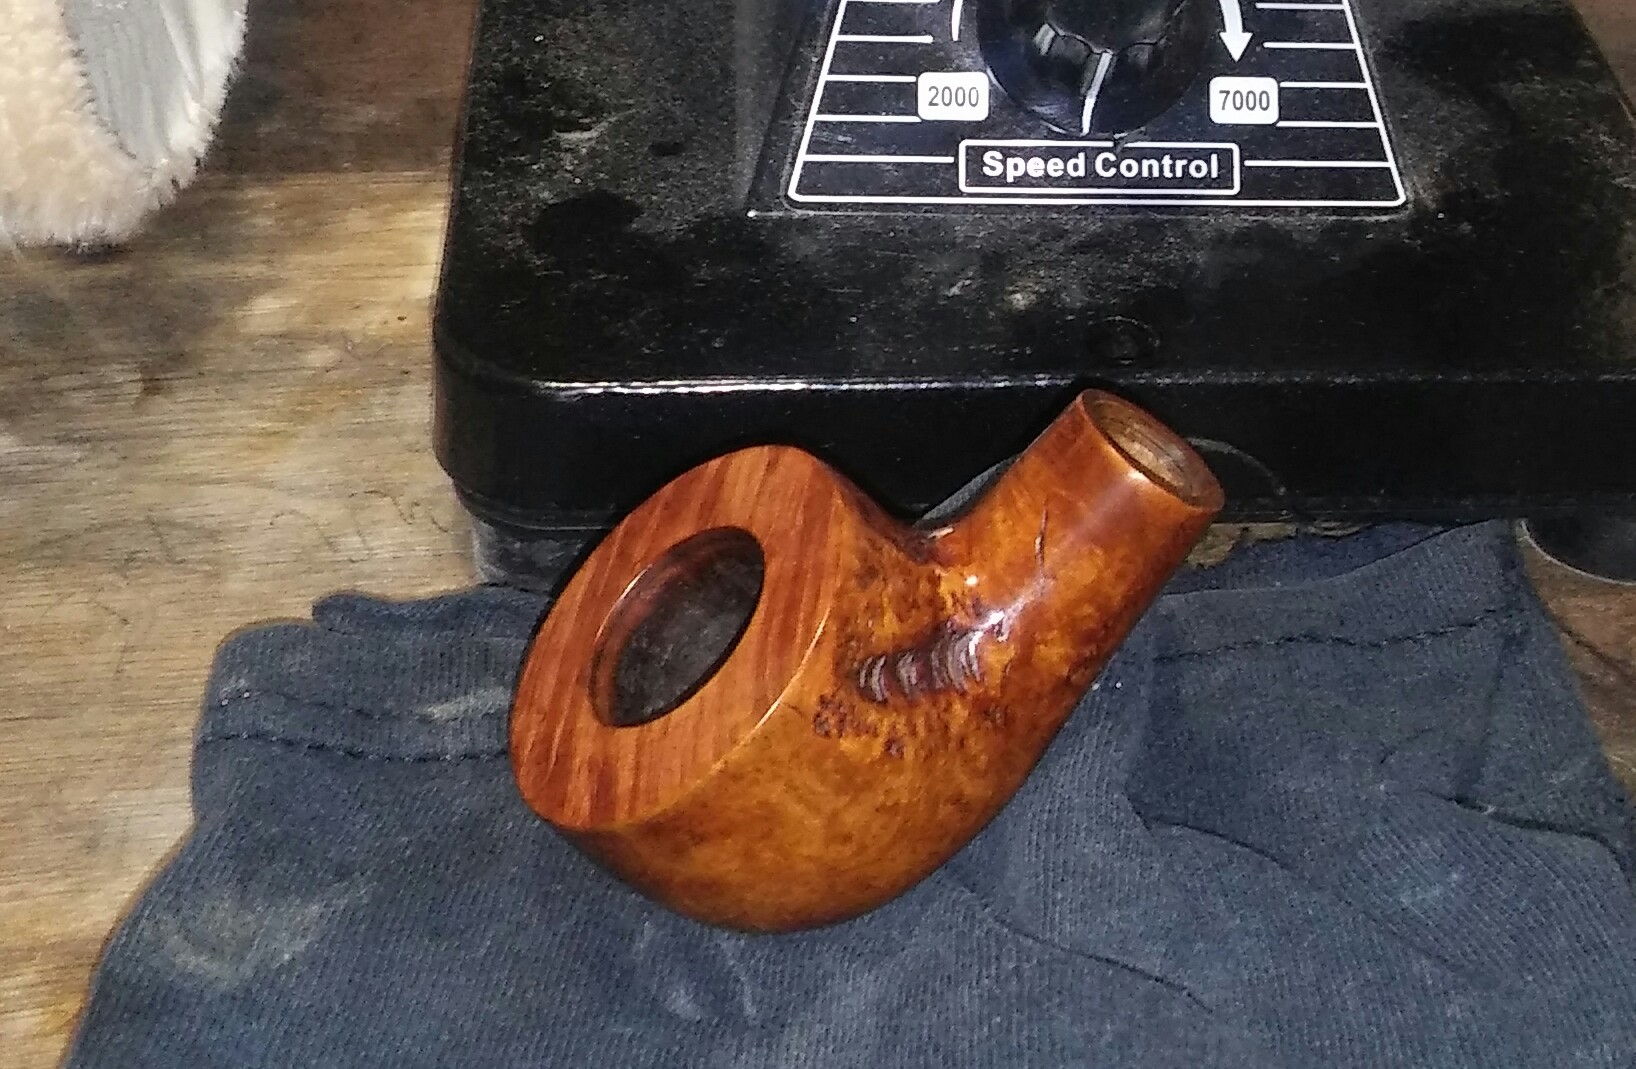
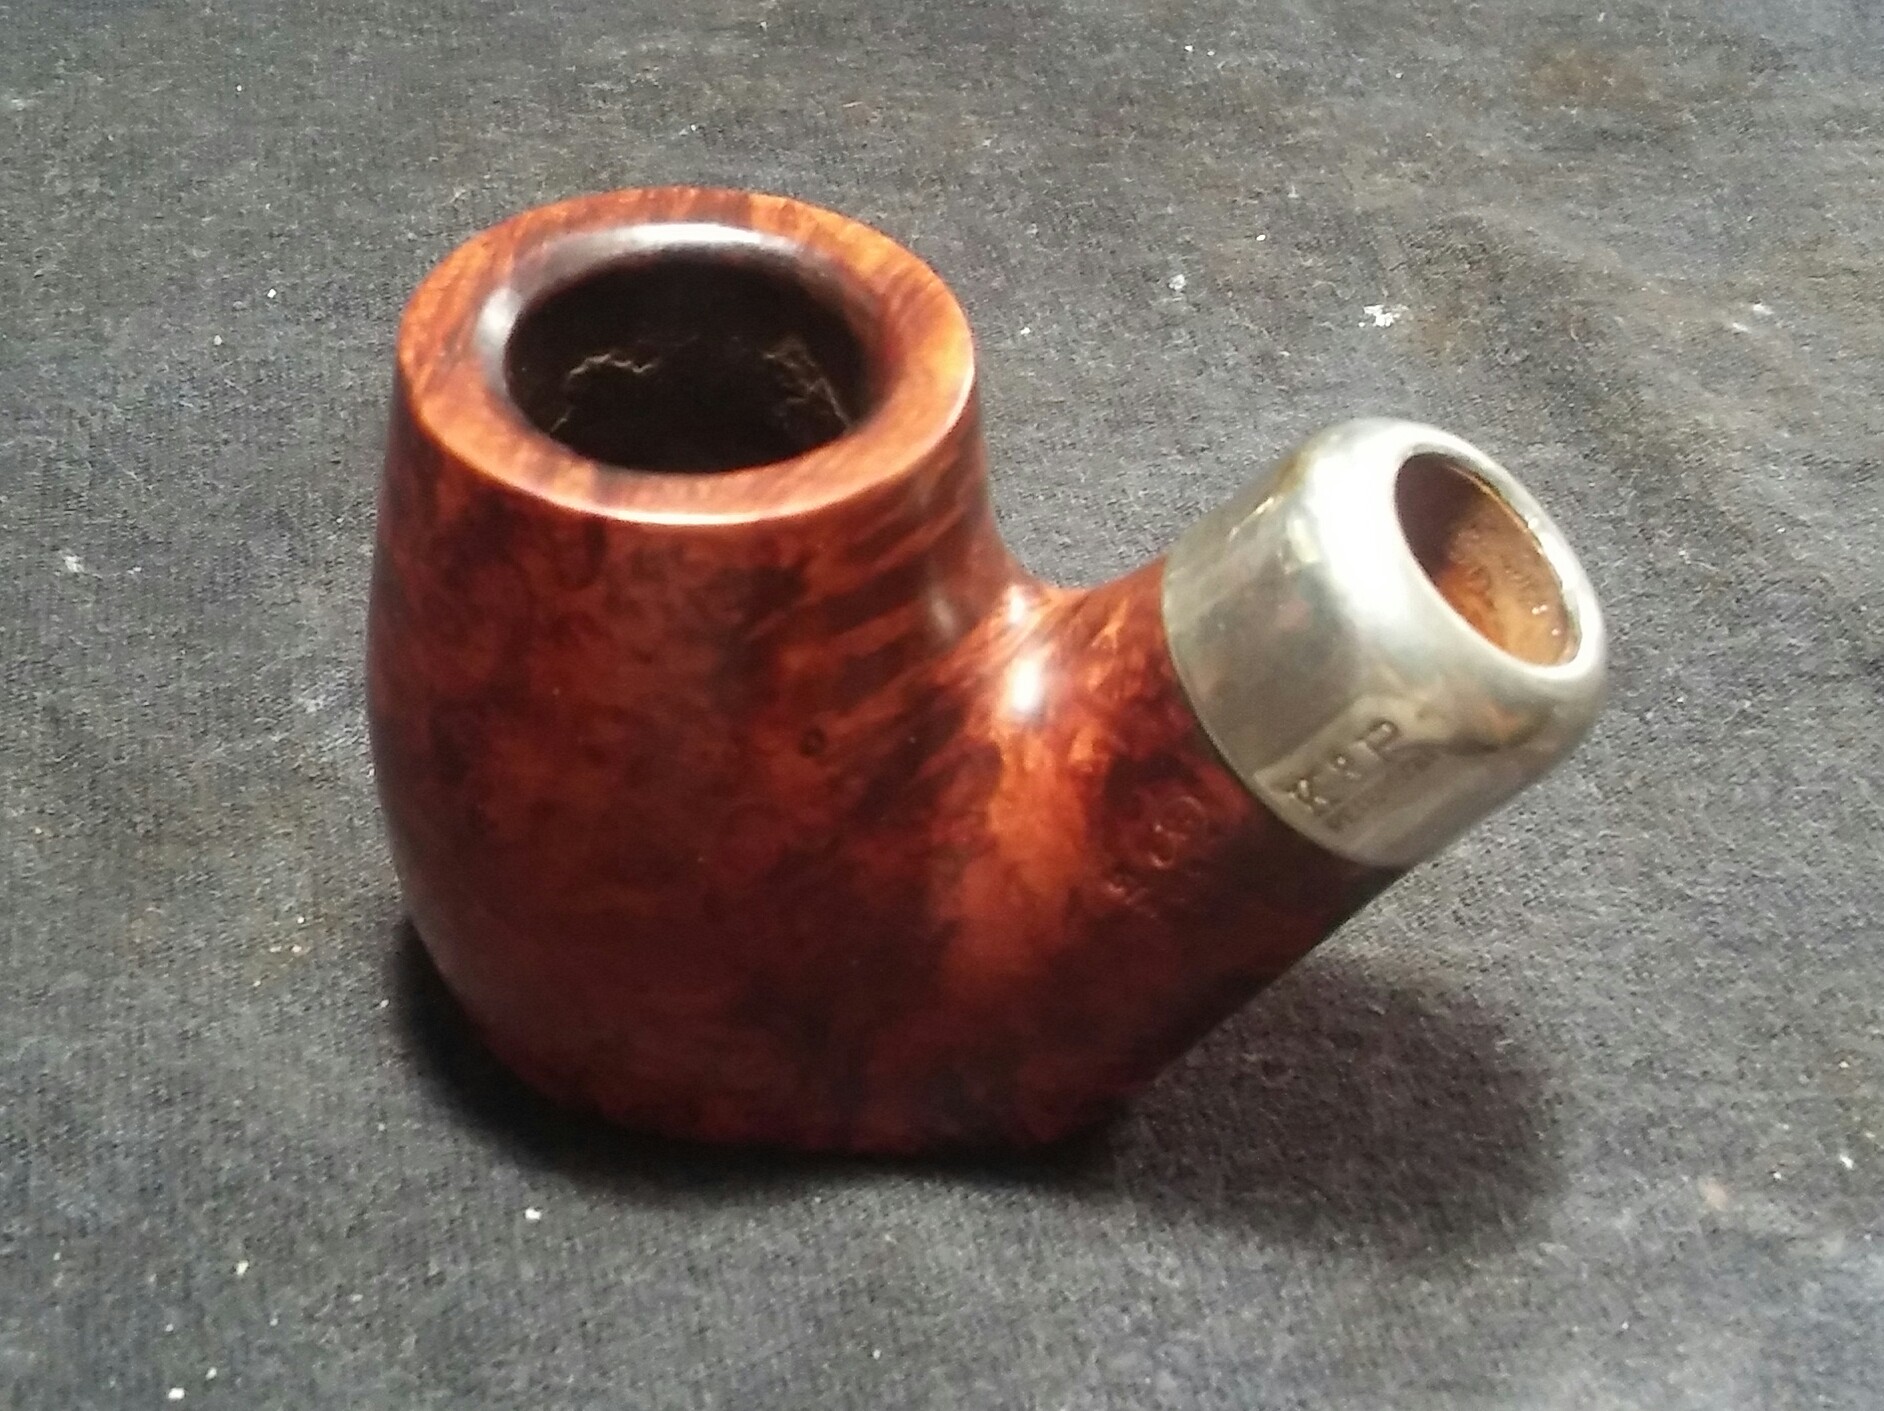
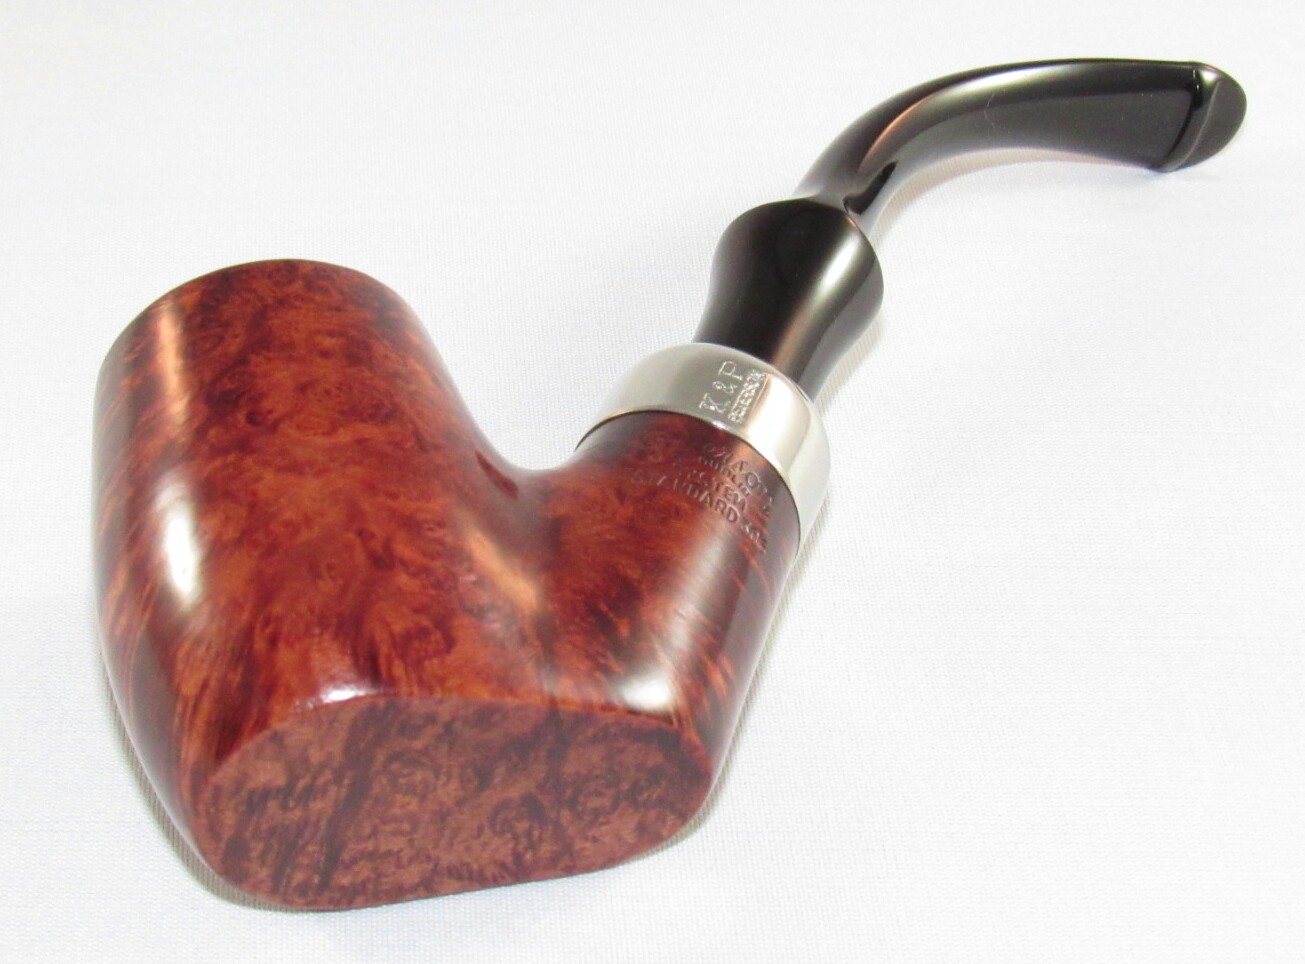
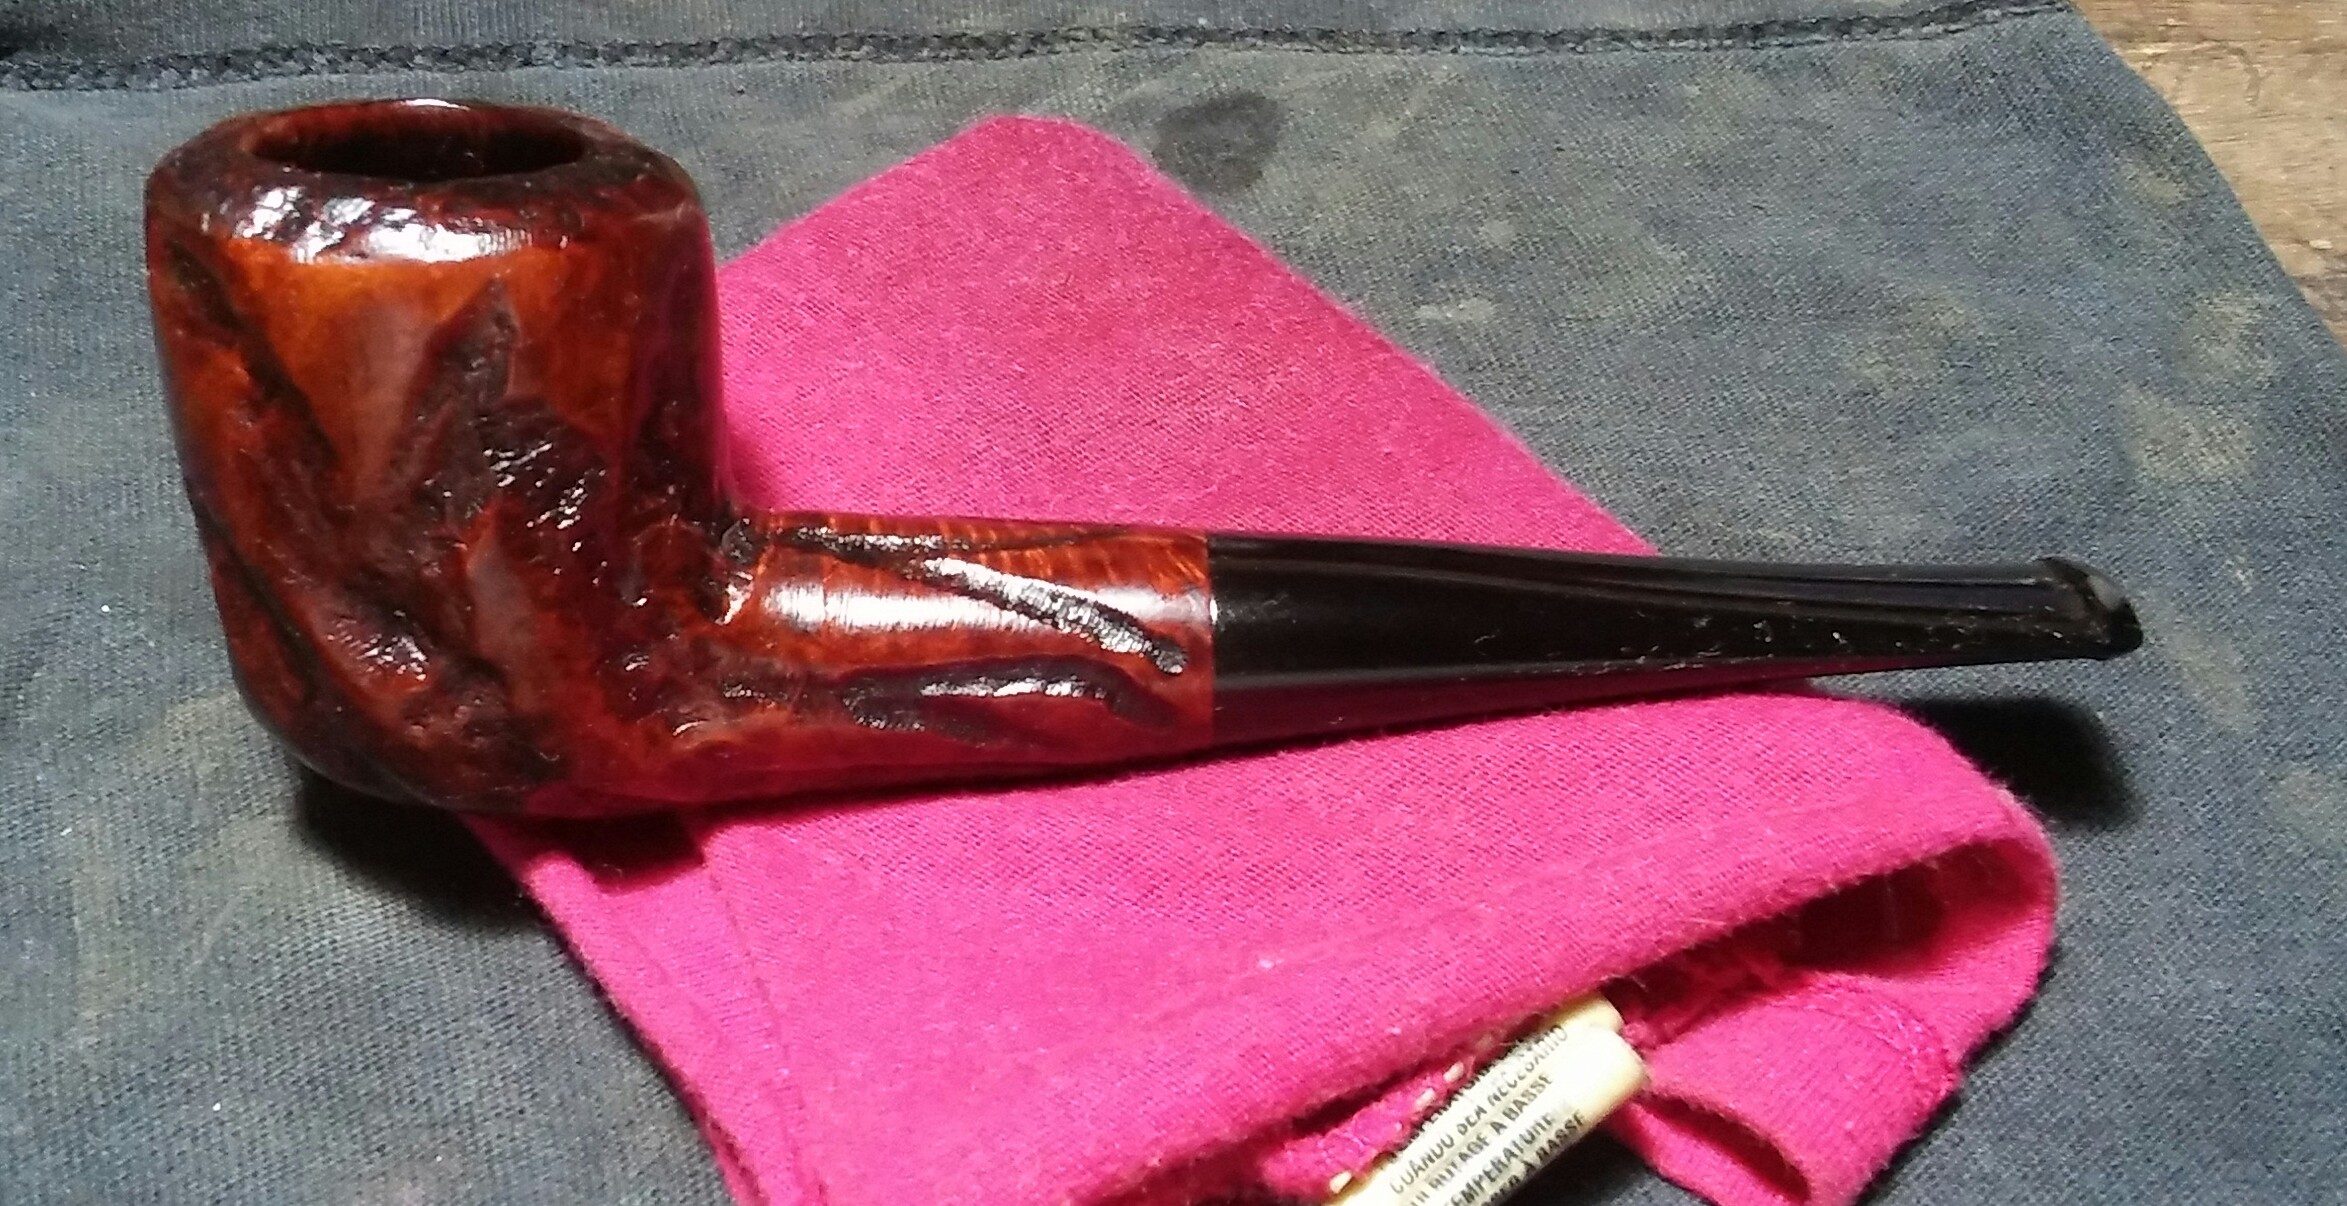
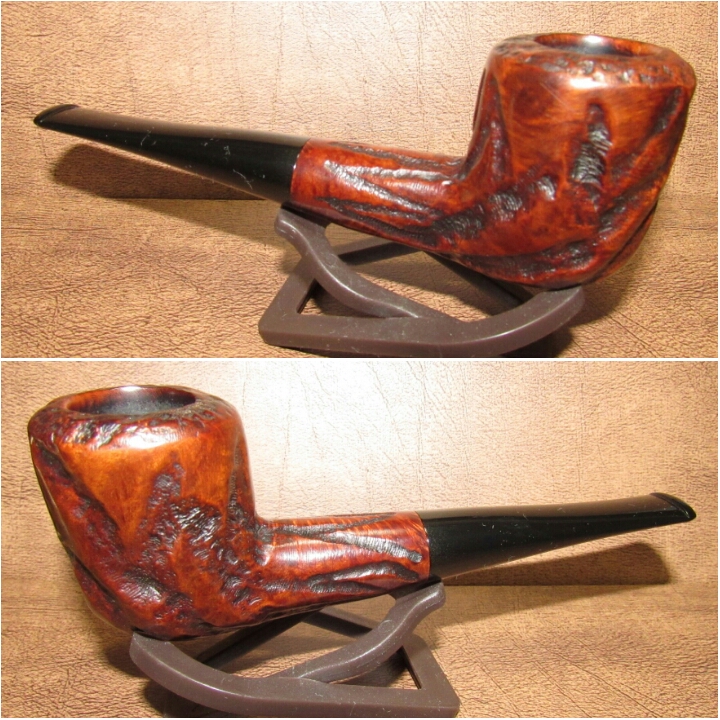
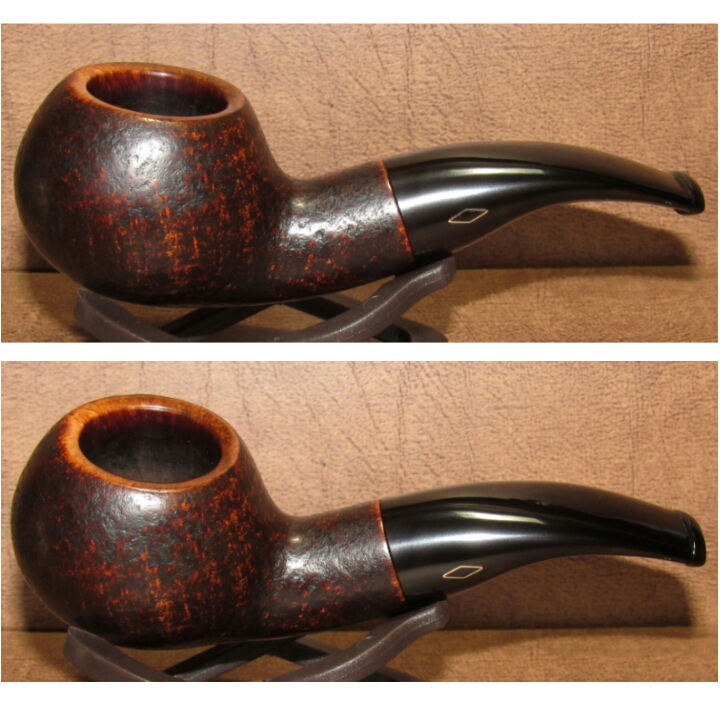
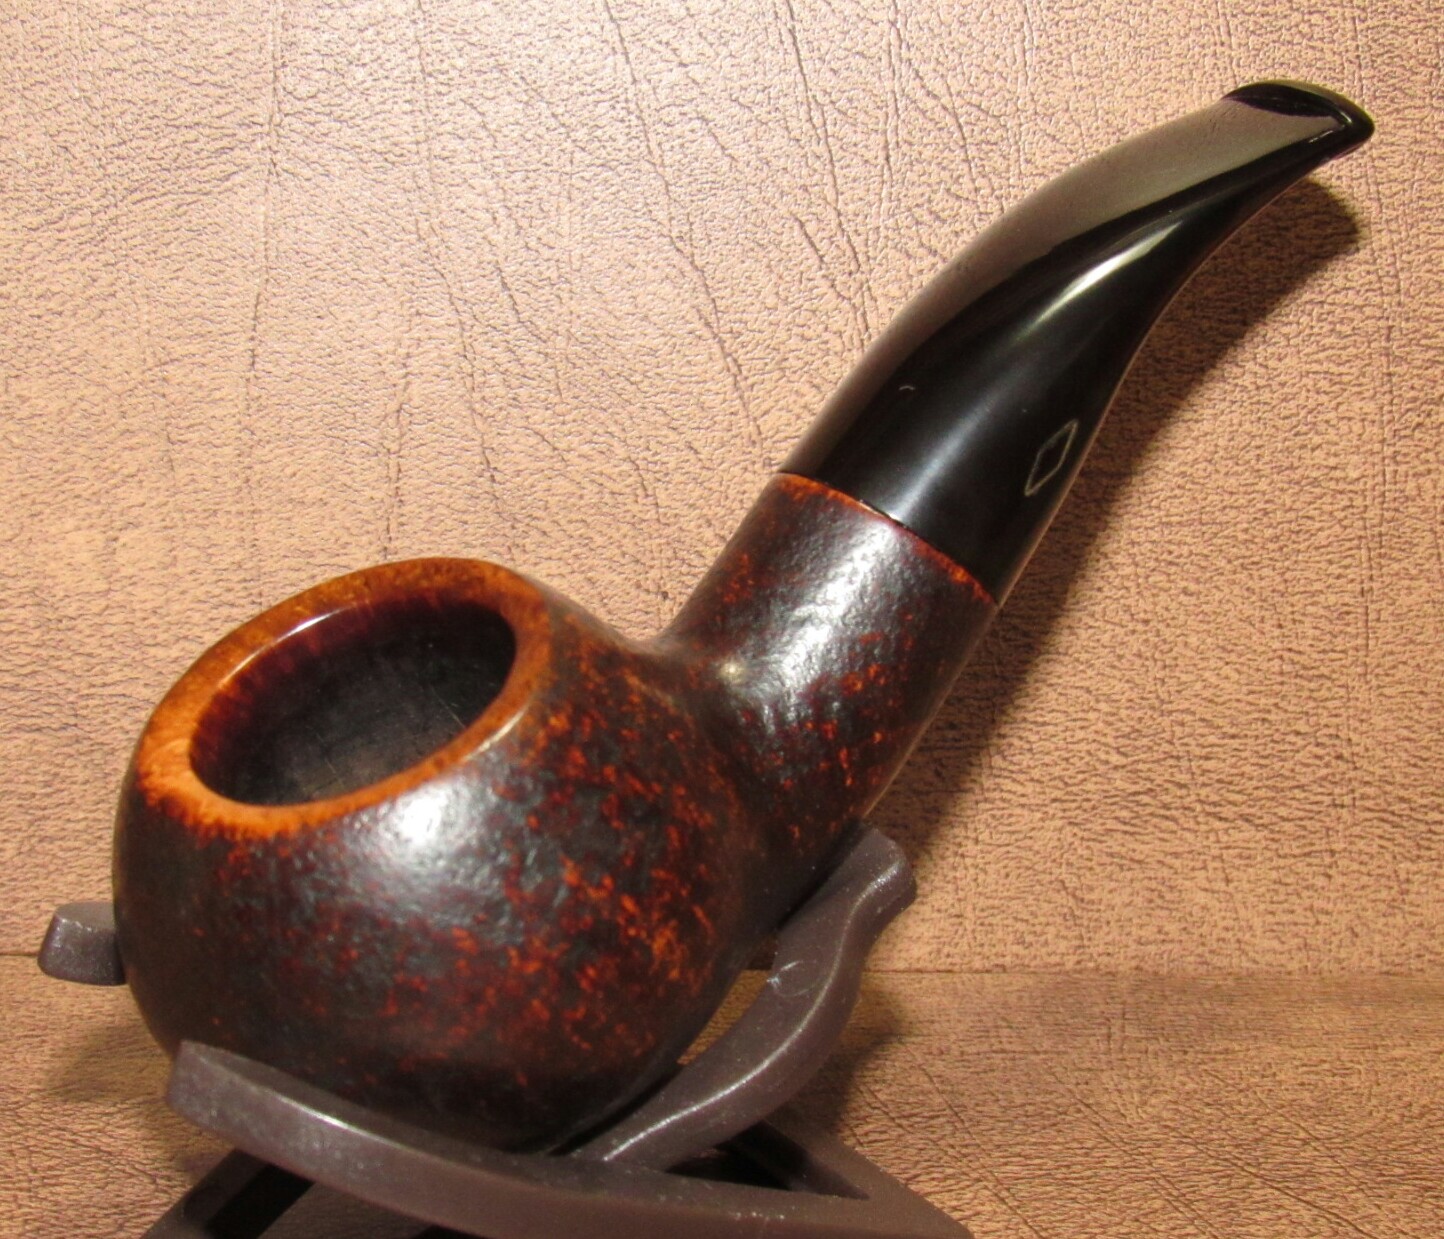
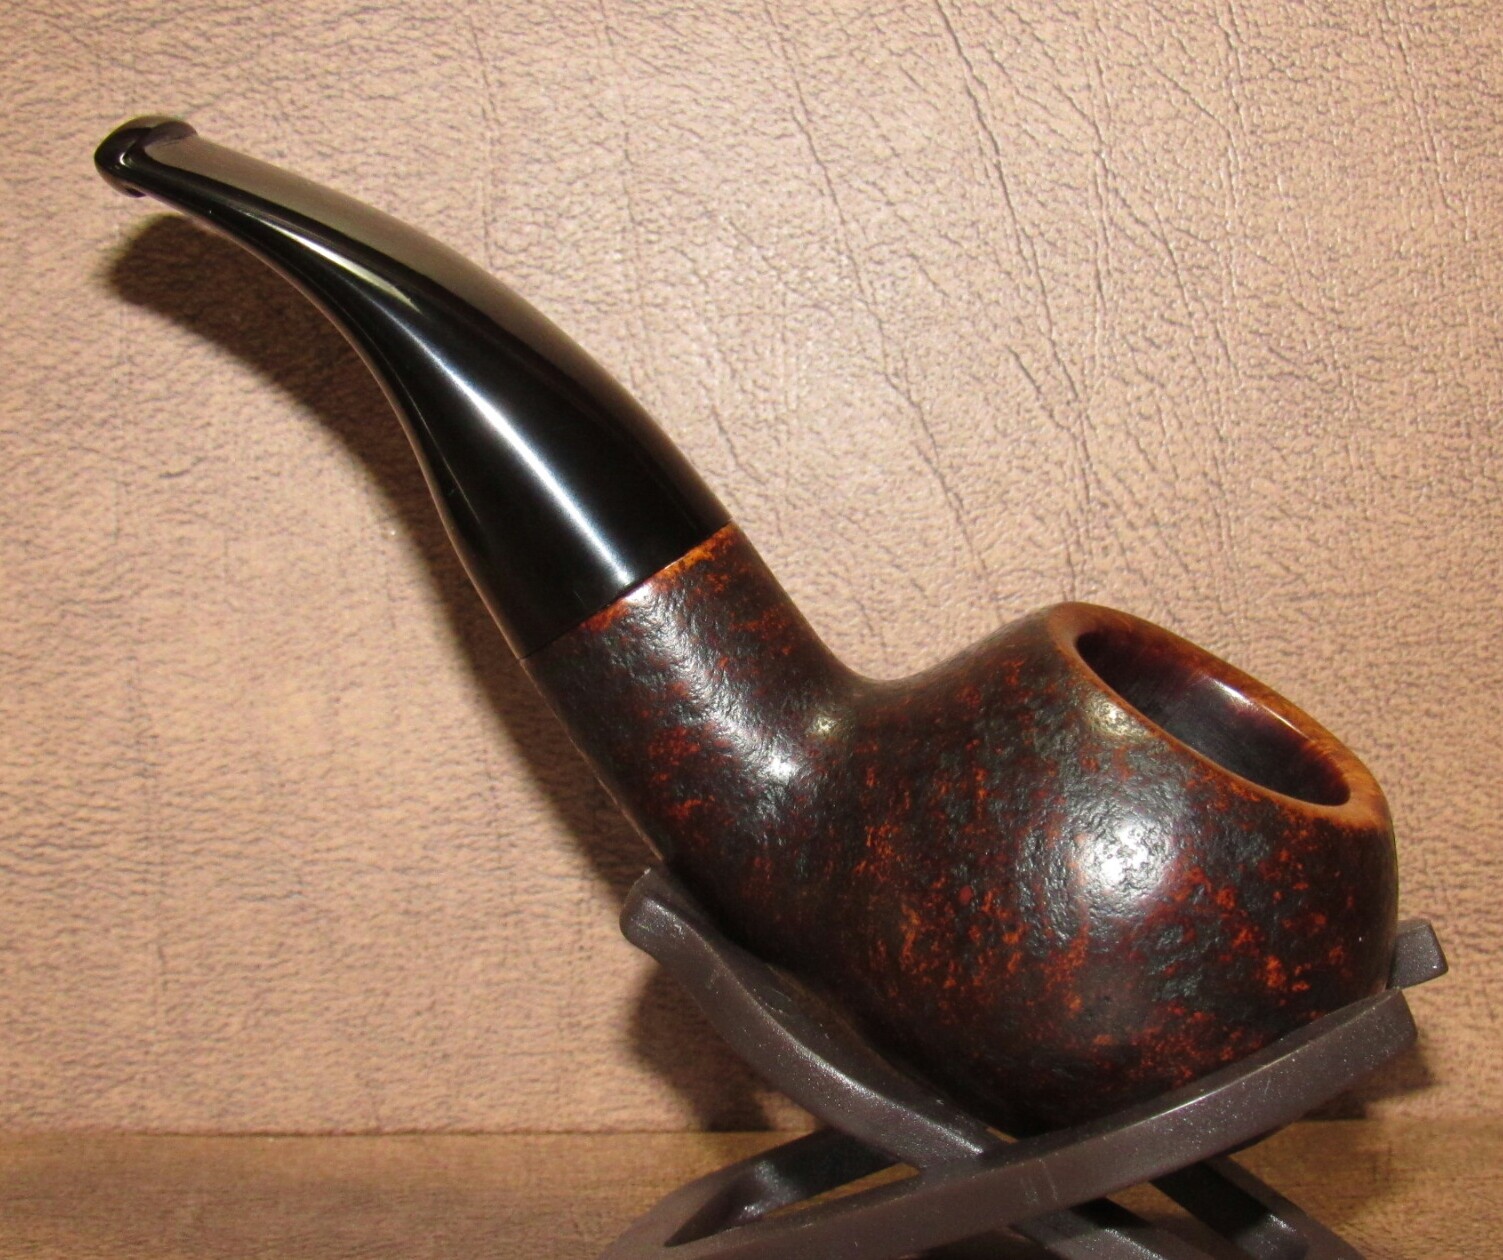
Complete.

20160525202327~220160525202354~220160525202422~220160525202443~220160525202452~220160525202507~2 
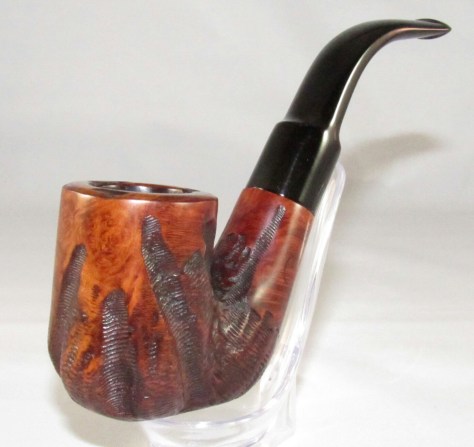
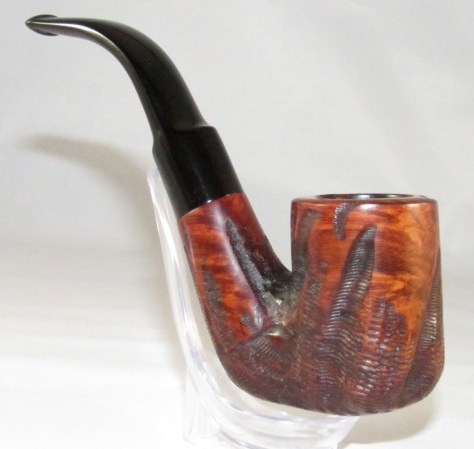
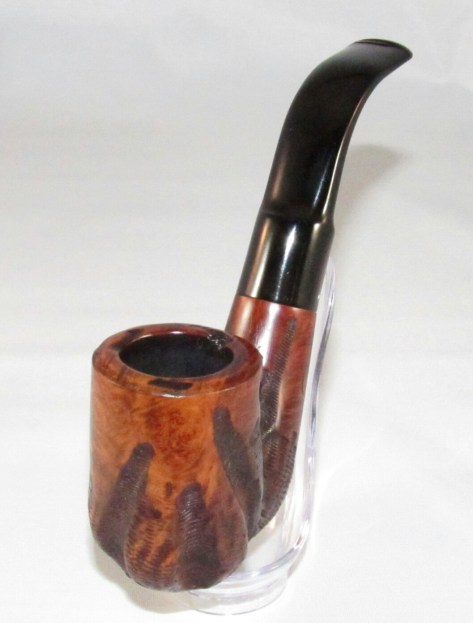
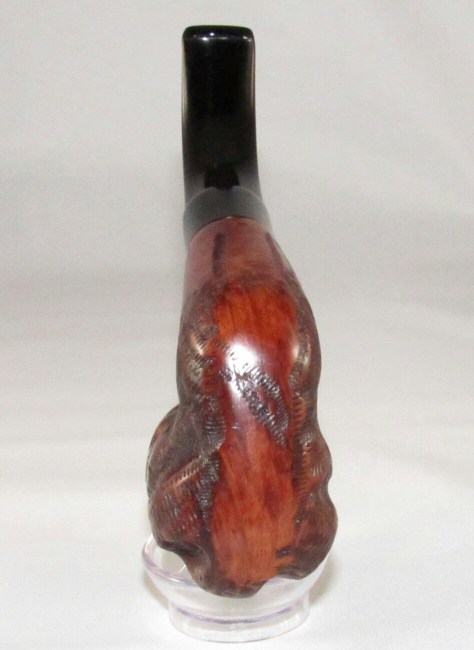
I finished up on the wheel with white diamond , carnauba and a micro-fiber hand buffing. Buffing the stem with blue compound and carnauba.

I’m looking forward to the first smoke.

Thanks for everything Dad.

Thanks For Taking A Look.

Tim-


Custom-Bilt (90% smooth)

Custom-Bilt 

An almost completely smooth Custom-Bilt an oddity I’ve wanted for my collection for some time . I have read of completely smooth Bilts (which I have yet to see or find) and partially rusticated Custom-Bilts,  I’ve seen a few photos of the partially rusticated pipes but never had the chance to get my hands on one. So when this puppy popped up a few weeks ago on EBay at a reasonable price I jumped all over it. Now I won’t go into the history of Tracy Mincer and Custom-Bilt pipes as I have written a few posts on the subject in the past but I must say I’m more and more impressed with each one I receive.

The Restoration. 


PhotoGrid_1462940533916PhotoGrid_1462940783985PhotoGrid_1462940901342PhotoGrid_1462940967560PhotoGrid_1462940484722

The pipe for its age was in pretty good shape, ether it was well taken care of or it has seen little use. The chamber was free of cake and the mortise was fairly clean, the rim was the only issue a little beat up. The stem was oxidized , had a few tooth impressions and a ding in the side of the stem.

20160510_132222~2

The chamber being as clean as it was, it would not need a reaming but just a quick sanding with 400 grit sandpaper to remove a little doddle .

 PhotoGrid_1463355690128

I attempted to steam out the dents in the rim using a household iron and damp rag but the indentations were to deep.

20160510_132924~2

The rim would need to be topped , I tape a sheet of 400 grit sandpaper to my work surface and began sanding the rim until smooth . I then sanded with 800 and 1000 grit sandpaper until I had a mirror finish.

PhotoGrid_1462940732111

I gave the stummel and stem internals a good cleaning using EverClear , shank and mortise brushes , Q-tips , cotton balls and soft/stiff pipe cleaners. I un-roll cotton balls and form a swab then twist it tightly into the mortise , then fill the chamber with a little EverClear and allow the swab to absorb the alcohol. I leave it to sit for for a few minutes to brake up the old tars and oils in the mortise. 20160510_144933~2

Using furniture touch-up markers I re-stained the stummel and freshly topped rim , leaving it aside to dry. I removed the excess stain with an alcohol dampened rag.

20160510_174527~2

Usually I wait till the end to buff the stummel and stem but this one I couldn’t wait to see finished . There are imperfections in the briar , a few pits and places that could have been filled but I decided it gave this particular pipe character.

PhotoGrid_1462940590947

The stem oxidation was the next task, I appalled a generous amount of non-bleach Soft Scrub to the stem and left it aside to penetrate the oxidation . Once the Soft Scrub turns from white to a brownish color its time to scrub vigorously with a rag, adding more Soft Scrub as needed. Holding the stem under natural light will help to see if all oxidation was removed.

PhotoGrid_1463319509662

When I received the pipe the stem and shank fit were off , the briar inside of the mortise was pushed up by the tenon and forming a wall that the tenon could not pass in-turn leaving a gap. Using a half round needle file I removed the excess briar , the fit was better but not flush , I then filed down the tenon edge and rounded it off with 400 grit sandpaper to get the proper fit.

PhotoGrid_1463085601574

I tried to raise some of the tooth impressions with heat to no avail. I mixed thick black CA glue and charcoal powder into a paste and applied it to the stem with a toothpick , hitting it with accelerator to set the glue , leaving it overnight to cure.

PhotoGrid_1463110748375

The next morning after allowing time for the patch to cure I removed the excess glue with a flat needle file.

20160512_203036~2

I removed the file marks with sandpaper starting with 400 grit and ending with 1500 grit sandpaper. I started saving the windows out of selling packages for my stem/shank divider , like the kind in kids toy packaging. Its flexible and seems like I can get a little closer to the end of the stem , closer then I would with a washer.

20160515_163925~2

I now ran the stem though the various micro-mesh pads.

Complete.

PhotoGrid_146334297908420160515165838~220160515165853~2PhotoGrid_1463342908938PhotoGrid_1463342927720

I finished up with white diamond , a few coats of carnauba and a micro fiber hand buff. Buffing the stem with blue compound and carnauba.

Thanks For Taking A Look.

Tim.

Jobey Shellmoor Pot

Jobey Shellmoor

This is second out of the lot of eleven I picked up sometime back. Jobey Pipes they’ve been around for a long time and changed hands a time or two for more info Pipedia they have the history in a click. I couldn’t lock down a precise year for this one but nevertheless shes a beaut, large chambered pot for along smoke, something I look for in a pipe . The pipe itself is stamped on the underside Jobey Shellmoor, Extra, Imported Briar and English Para on the stem.

The Restoration. 

PhotoGrid_146198605665820160428_203152~220160428_203130~220160428_203205~2PhotoGrid_1461985576334

Upon inspection she was a solid pipe nothing too troubling, rim tar, thin cake, stem chatter, impressions, oxidation and this funky inner tube that looked as if someone tried to chew it off. The toughest part would be the inner tube it was glued or epoxied in place.

20160428_204550~2

Starting with my Pipnet reamer and the smallest attachment I began reaming back the old  cake, working my way up to the largest attachment. The chamber was so large that the final attachment could not reach the inner walls, I finished up with 400 grit sandpaper to complete the chamber.

20160428_215918~220160429_210549~2

Next I applied a generous amount of Method Wood For Good polish to the rim and left it upside down on a make-up pad and allowed the polish to penetrate the build-up. Once the polish softened the build-up it was removed with a children’s toothbrush and Q-Tips.At this time I gave the stummel a wipe down with Method polish, a rag and a children’s toothbrush to remove any debris in-bedded in the crags.

PhotoGrid_1461986007856

 I cut off the end of the mangled inner tube with snips and using a 1/8 inch bit tightened in my drills chuck I hand turned the stem until all of the aluminium tube was removed.

20160429_222237~2

I gave the internals of the stummel and stem a good cleaning with EverClear, shank/mortise brushes, Q-Tips and stiff/soft pipe cleaners. Cleaning until the final pipe cleaner came out as it went in.

PhotoGrid_1461986092274

Next I removed the oxidation from the stem using non-bleach Soft Scrub, I applied the Soft Scrub to the stem and left it aside so the Soft Scrub could penetrate the oxidation. Once the the Soft Scrub turns from white to a brownish color its time to scrub vigorously with a rag until the oxidation is removed, applying more Soft Scrub as needed, holding the stem under natural light will help to see if all oxidation was removed.

PhotoGrid_1462502729883PhotoGrid_1462502765537

The tooth impressions would need filling, I sanded the area of the indentations with 400 grit sandpaper and cleaned with an EverClear dampened rag to remove any sanding dust before filling. I mixed thick black CA glue and charcoal powder together to form a paste, then applying it to the impressions with a toothpick, hitting it with accelerator to set the patch. I left it overnight to cure. After allowing time to cure I removed the excess with needle files and sandpaper.

20160509_003123~2

 Before hitting the wheel I ran the stem though the various grits of micro-mesh pads.

Complete.

20160510120632~220160510120758~220160510120840~2PhotoGrid_146289404184420160510121002~2PhotoGrid_1462894067363

I finished her up on the wheel with white diamond, a few coats of carnauba and micro-fiber hand buffing. Buffing the stem with blue compound and carnauba.

Thanks for taking a look.

Tim-

Scoundrels – John Bessai Canadian

12743568_1113167278728461_8755580862501099677_n~2~2

Pipes Scoundrels Pipes.


Way back in February Clint of Pipes Scoundrels sent a huge package out of the blue . We had spoken a month or so before of a pipe that was in need of care but never figured out a plan. In the package a letter where he offered up a trade of sorts skill for skill, I love the barter system. In the package an incredible framed Pen & Ink work, that I watched though his blog come together. I was blown away by his skill and photos online. I had no idea it was coming my way, in person it was even more amazing, beautifully done. Also in the package a couple of Pipe Scoundrels stickers ( he has a killer logo) and three pipes in need of repair/cleaning. A couple John Bessai pipes one Canadian, one Pot and an Iwan Ries a unique shape I wasn’t familiar with. I was excited to get to work , this was the first time I was to work on someone else’s pipes but I got side tracked and side tracked again but finally I had some time to sit and finish, now the three are complete.

Seven inches long, beautiful grain and very comfortable in the hand. That’s the John Bessai Canadian, this was the final pipe I redid for Clint. History of John Bessai (thanks to jguss from pipesmagazine forum)

The Restoration.

20160313_000831~220160313_000813~220160313_000910~220160314_142434~2PhotoGrid_1458076436231

The Canadian was in nice shape, to be honest I was saving the best for last and what I thought would the easiest but I’ve been wrong before. Aside from the deep tooth impressions and a small burn on the side of the rim, the pipe was pretty clean. Light build up on the rim and two spots that would need filling.

20160314_142335~2

Starting with the chamber and my PipNet reamer I took the cake back to a suitable thickness. The like the rest of the pipe the chamber looked good.

PhotoGrid_1458076493788

I applied a generous amount of Method Good For Wood Polish to the rim and left it to penetrate the build up. Once the build up softened it was easily removed with a Q-Tip and make-up pads.

PhotoGrid_1458069733666

I now concentrated on the internals of the stummel and stem. Using EverClear, Make-up pads, Q-Tips, shank brushes and stiff/soft pipe cleaners, cleaning until the last pipe cleaner came out as it went in.

20160315_130058~2

The side of the rim had a small burn, topping was not an option. I didn’t want to  change the shape of the bowl.

20160315_141550~2

Using 800 grit sandpaper I worked at the burnt area until it faded , it wasn’t perfect but better then loosing the shape.

PhotoGrid_1458069582308

There were three pits on the front of the stummel, ether they were never filled or the fill crumbled away over the years. I cleaned the area with a Q-Tip dipped in EverClear and filled the pits with Gorilla Glue and Briar dust. Once the fill dried I the sanded the filled areas flush with 800 grit sandpaper finishing with 1000 grit sandpaper.

PhotoGrid_1458179620053

The stain was faded and after sanding the rim and fill areas it left even lighter areas, the stummel would need to be re-stained.I wiped down the stummel with an EverClear dampened rag and let dry. I mixed Fiebing’s leather dye red and dark brown. I applied the stain with a medium paint brush, hitting it with a Bic lighter to set the stain. I removed the excess stain with an alcohol dampened rag and left it to dry.

PhotoGrid_1458069694692

I removed the stem oxidation using non-bleach Soft Scrub and rag. I applied a generous amount of Soft Scrub to the stem and left it to penetrate the oxidation. Once the Soft Scrub turns from white to a brownish color its time to begin scrubbing vigorously with a rag, applying  more Soft Scrub as needed. Holding the stem under natural light will help to see if all oxidation was removed.

PhotoGrid_1458069477205

I sanded the area of the deep tooth impressions with 400 grit sandpaper, then wiped down the area with an alcohol dampened rag to remove the dust from sanding.

PhotoGrid_1458069549562PhotoGrid_1458069500259

This is were things got interesting, I mixed thick black CA glue and charcoal powder into a paste and applying the paste with a toothpick to the impressions and worn button, as I always do when filling impressions, hitting it with accelerator to set the glue. I left it to cure over night.

PhotoGrid_1458076309157

The next morning after having time to cure I began to shape the new button with needle files and file down the area of the impressions. The patch looked funny as I began removing layers, the patch began to crumble/flake and I started uncovering a ton of bubbles in the patch. So I started over and mixed a new batch of CA glue and charcoal powder. I thought maybe I used the wrong amount of something and it was throwing it off but once again the same bubbles and flaking. I didn’t take photos but I went over this process a few time before I stopped and took a look at my CA glue, the CA glue had separated leaving a thick mass at the bottom of the bottle and a watery thin liquid on top. In the end I ordered a new bottle of CA and moved on. After receiving the new CA glue and sanding the stem completely with sandpaper and the various micro-mesh pads it looked pretty good but there was a slight discoloration at the bit end.

PhotoGrid_1458179691160

Last thing before hitting the buffer was to add the JB back to the stem, my conventional method would be to apply Rub&Buff and simply wipe the excess away leaving a prefect logo but the logo impression was not deep enough. I used a bristle from my boars hair beard brush as a paint brush. I applied white nail polish to the logo using the bristle and left it to dry, unconventional but it came out nice.

Fin.

20160425205143~220160425205210~220160425205312~220160425205346~220160425205234~2PhotoGrid_1461631761711

Finished up on the wheel with white diamond, a few coats of carnauba and a micro-fiber hand buffing. Buffing the stem with blue compound and carnauba.

The last of Clint’s trio and my favorite by far, I myself am searching for a similar pipe. Thanks Clint for the incredible Pen & Ink and giving me the opportunity to work on your pipes. I enjoyed seeing them come back to life.

PhotoGrid_1458190471174~220160425_203026~2

Thank For Stopping In And Taking A Look.

Continue reading Scoundrels – John Bessai Canadian

Scoundrels – John Bessai Pot

12743568_1113167278728461_8755580862501099677_n~2~2

Pipe Scoundrels Pipes.

Way back in February Clint of Pipes Scoundrels sent a huge package out of the blue . We had spoken a month or so before of a pipe that was in need of care but never figured out a plan. In the package a letter where he offered up a trade of sorts skill for skill, I love the barter system. In the package an incredible framed Pen & Ink work, that I watched though his blog come together. I was blown away by his skill and photos online. I had no idea it was coming my way, in person it was even more amazing, beautifully done. Also in the package a couple of Pipe Scoundrels stickers ( he has a killer logo) and three pipes in need of repair/cleaning. A couple John Bessai pipes one Canadian, one Pot and an Iwan Ries a unique shape I’m not familiar with. I was excited to get to work , this was the first time I was to work on someone else’s pipes but I got side tracked and side tracked again but finally I had some time to sit and finish, now the three are complete.

My plain was to write a little something on the history of Bessie pipes but as it has it some else has already done the work and a much better job then I would have. History of John Bessai (thanks to jguss from pipesmagazine forum) Classic Pipe Shops from years gone by in America – pipes and tobaccos and their influence, a well written and informative post. I will say the shop, The John Bessai Pipe Clinic was run between 1909-1993 at 35 Colonial Arcade in Cleveland Ohio.

The Restoration. 

PhotoGrid_1458180163825PhotoGrid_1458180192182PhotoGrid_1458180216926PhotoGrid_1458076975648

She was in need of help, an ill fitting replacement stem that was oxidized and had a couple of impressions, chunky crumbling cake, a few fills and a rim that was smacked around a bit, but I’m not afraid of a little work.

20160226_215905~2~2

Starting with the stummel  and my PipNet reamer I removed the old cake and took the chamber back to briar. The chamber was in descent shape aside from a small burn/defect at the top of the draught hole, I will address this a little further down.

20160227_000639~2

I cleaned up the rim with Method Good For Wood Polish and could now see the damaged rim better. The photo is poor but the top of the chamber/rim was reamed in the past with what I’m guessing  was a pocket knife, the edges of the rim were nicked up and missing small chunks of briar.

PhotoGrid_145818038730820160227_165249~2

Using needle files and sand paper I began to reshape the rim. First by topping the rim, I taped down 400 grit sand paper and topped the bowl. Next using needle files I reshaped the inner rim removing the file marks with 400 grit sandpaper. I finished the rim with 800 & 1000 grit sandpaper.

PhotoGrid_1458180304487

Using EverClear I ran a retort to loosen up the old tars, oils and tobacco.

PhotoGrid_1458180538186

I now gave the stummel and stem internals a good cleaning, using EverClear, shank brushes, mortise brush, Q-Tips, cotton-balls and stiff/soft pipe cleaners. I unrolled cotton-balls, twist them into a swab and turn them tightly into the mortise. I then add EverClear to the chamber and allow the swab to soak up the alcohol, I would repeat this process a few time until the swab comes out clean. I cleaned the stem and draught with stiff/soft pipe cleaners working until my final pipe cleaner comes out as it when in.

20160227_231329~2

There were a few dents on the stummel, using a household iron set to medium heat and a damp rag I would steam out the dents. By dampening the rag and covering the dents to be steamed out and placing the stummel to the heated iron, I would repeat this process a few times until I was satisfied all imperfections had risen .

PhotoGrid_1458180802933

There were a few fills that stood out and would have to be removed. Using a X-Acto knife and Method Wood polish, to soften the fill, I removed the old brightly colored filler. I cleaned the area to be refilled with an alcohol dampened Q-Tip. I now filled the pits with briar dust and Gorilla Glue and allowed it to dry. Once the new fill had time to dry I sanded the areas first with 800 grit sandpaper and finishing with 1000 grit sandpaper.

PhotoGrid_1458180941590

Now the stem, I applied a generous amount of non-bleach Soft Scrub, leaving it aside to allow the Soft Scrub to penetrate the oxidation. Once the Soft Scrub turns form white to a brownish color its time to scrub vigorously with a rag, scrubbing until all the oxidation has been removed. Holding the stem in natural light will allow you to see if all the oxidation was removed.

PhotoGrid_1458180475151

Now the ill fitting replacement stem, the tenon fit snug but the stem and shank had a poor fit, the stem was a bit larger then the shank. Starting with 220 grit sandpaper I sanded down the stem until a uniform fit between shank and stem was achieved.At this time I removed any tooth impressions and sanded the entire stem and the end of the shank with 400 grit sandpaper. I went back in with a brown touch up stain marker and re-stained the shank and fill areas. At this time I took care of the missing chunk at the top of the draught, mixing ash with a little water to make pipe mud I filled the missing spot with the mud and allowed it to harden. I checked before sending it off to Clint and the repair was solid.

20160312_121329~2

The button had an odd indentation and was worn down.

PhotoGrid_1458077053349

I mixed thick black CA glue and charcoal powder together to make a paste, using a toothpick I applied the paste to the button hitting it with accelerator to set the glue.

20160312_145518~2

Using needle files and sandpaper I began to shape a new button.

20160312_201954~2

Now I ran the stem thought the various girts of sandpaper and micro-mesh. Starting with 800 grit sandpaper wet, 1000 grit paper wet, 1500 grit paper wet, 1500 micro-mesh wet, 1800 mesh wet, 2000 grit sandpaper wet, 2400 mesh wet. Then the remaining micro-mesh pads dry 3200-12000.

Complete.

20160425204642~220160425204741~220160425204848~220160425204917~220160425204756~2

I finished up on the wheel with white diamond, a few coats of carnauba and a micro-fiber hand buffing. Buffing the stem with blue compound and a few coats of carnauba.

Thanks again Clint the pipes were a pleasure to work on, a nice change from my Custombilt craze . 

PhotoGrid_1458190471174~220160425_203026~2

Thanks for taking a look.

Tim.


Peterson System Standard 306

Screenshot_2016-01-21-21-34-52~2

 This is the first of eleven pipes I recently acquired. The Peterson System Standard 306 is the first sitter in my small Peterson collection. I am unsure of its age as it does not have a made in or hallmarks, which I found odd as all my other Petes have some sort of way to date them. The only markings on the pipe is Peterson of Dublin System Standard 306 and K&P Peterson on the band.
As Received.


20160223_081032~220160223_080952~220160223_080944~220160223_081050~2PhotoGrid_1456276037968

Over all in pretty descent shape, the stem was oxidized and a few tooth impressions. The chamber had an uneven crumbling cake and the rim was built up with old tar/oils, there is also charring around the inside edge of the rim. The finnish was worn and tired and one small spot of filler. The biggest hurdle was the Lakeland ghost.

20160223_081648~220160223_081920~2

I started with the stummel and my Pipnet Reamer. Starting with the smallest attachment and working up to the second largest, I brought the chamber back to briar, it was free of burn or pitting. I smoothed things out with 400 grit sandpaper wrapped around a finger .

PhotoGrid_1456276847786

Next I could tackle the caked and charred rim. I applied a generous amount of Method Good For Wood Polish to the rim and set it aside to penetrate the build-up for a few minutes. Using Q-tips I removed the rim build-up, I would repeat this process a few times to remove all the debris. After the build-up was removed the rim darkening was still present, using worn micro-mesh I was able to fade most of the darker spots of the rim.

PhotoGrid_1456276703846

Next I gave the internals a good cleaning. Using EverClear, shank brushes, Q-tips and stiff/soft pipe cleaners. Cleaning until the last pipe cleaner came out as it went in. I now filled the chamber and mortise with cotton balls and added EverClear until the cotton balls were saturated and set it aside for a few hours to absorb the tars and oils. The Lakeland ghost would not give up, the stummel was left over night  with EverClear and cotton balls and hopefully did the trick.

PhotoGrid_1456276643670

My attention now turned to the oxidized stem. I applied non-bleach Soft Scrub to the stem with a children’s toothbrush and left it aside to penetrate the oxidation. Once the Soft Scrub turns from white to a brownish color its time to introduce the old elbow grease and scrub vigorously with a rag until the oxidation is removed. I finished up with a damp Magic Eraser to remove the leftover oxidation.

PhotoGrid_1456276798588

With the oxidation removed I could begin removing the impressions at the bit. I tapped off the stem with blue painters tape just before the P-lip so my rough sanding would remain in one area, the rest of the stem would not need as abrasive grit. Starting with 400 grit sandpaper wet I removed the deep impressions, then working through 800, 1000 grit sandpaper wet, 1500, 1800 micro-mesh wet, 2000 grit sandpaper wet and finally 2400 micro-mesh wet until smooth. Before sanding with the finial six micro-mesh pads I removed the painters tape and dry sanded the entire stem 3200-12000.

PhotoGrid_1456276094304

There was one small spot of filler that would need to be removed. To remove I used Method Good For Wood Polish, an X-ACTO knife and a Q-tip, I applied a small amount of the polish with a Q-tip to the filler and left it aside to soften up. Once softened I removed the filler with the X-ACTO knife, I then cleaned the area with a Q-tip and EverClear to remove any oils or debris. I filled the pit with Gorilla Glue and briar dust and allowed it to dry. Once dry I sanded the area with worn micro-mesh until the repair was flush.

20160223_133249~2~220160223_134138~2

The rim and filler spot was left lighter after sanding with  the micro-mesh, using a touch up marker I  was able to blend the faded rim and filler spot into the rest of the finnish. Coloring in the rim and filler spot with the marker allowing to dry and removing the excess with an alcohol dampened rag. In the end I could not exserminate the Lakeland ghost completely but with smoking it will likely dissipate.

Complete.

20160224145519~220160224145634~220160224145641~220160224145909~220160224145653~220160224145823~220160224145836~2

I finished up on the wheel with white diamond, a few coats of carnauba and a microfiber hand buffing. Buffing the stem with blue compound.

Thanks For Taking A Look.

Custom-Bilt Dublin ( Mincer Years )

20151009_1027472_zpsuvvs9drj~2

The last of my medium Custom-Bilt refurbs . I have always enjoy the Dublin shape and in the Custom-Bilt carving it looks even better.
As Received.


20160208_005111~2PhotoGrid_1455109004929PhotoGrid_1455108966955

She was in well-loved condition, chatter, a couple of deep tooth impressions, rim tar and char and the nomenclature was worn to almost non-existent. The tell tail Custom is all that’s left .

20160216_174613~2

The chamber was pre-reamed by the previous owner/seller, I smoothed things out with 400 grit sandpaper wrapped around a finger. The chamber was free of damage.

20160208_004922~2~2

Next I tackled the caked rim I applied a generous amount of Method Good For Wood Polish to the rim with a Q-tip and allowed it to penetrate for a few minutes, removing the build-up with Q-tips and makeup pads. I would repeat this process a few times.

20160216_181101~2

The internals needed attention. Using EverClear, Q-tips , shank brushes and stiff soft pipe  I cleaned the internals of the mortise and chamber ,until the pipe cleaners came out as they went in.

20160216_181436~2

Using an alcohol dampened makeup pad, I wiped down the stummel to remove the dirt and debris.

20160216_182835~220160216_202114~2

With the stummel clear of dirt and grime, I used a dark touch up marker to highlight the deep gouges, removing the excess with an alcohol dampened makeup pad. I could now move on to the stem

20160217_030058~2

I applied non-bleach Soft Scrub to the stem with a children’s toothbrush and left it aside to allow the Soft Scrub to penetrate the oxidation. Once the Soft Scrub turns from white to a brownish color its time to scrub vigorously with a rag until the oxidation is removed.

PhotoGrid_1455787686198

After the removal of the oxidation there were deep tooth impressions left. I attemped to raise some of the impressions with heat( moving the lighter at all times never leaving it in one spot too long ) to no avail. Instead they would need to be filled.

PhotoGrid_1455787598582

Using thick black CA glue and activated charcoal powder I made a paste. I roughly sanded the area to be repaired with 400 grit sandpaper then wiped down with EverClear. I applied the paste with a toothpick to the impressions and hit it with accelerator to set the repair, I applied pressure with my finger to the patch pressing it into the impression just before it set. I now left it aside to cure overnight.

PhotoGrid_1455787625977

The following morning I began sanding the repair with 400 grit sandpaper wet , with the patch blended into the stem I could move on to the various grits of sandpaper and micro-mesh pads.

20160219_012636~2

Using a washer between the stummel and stem to keep my sanding in one area, I now ran the stem through the various grits of sandpaper and micro-mesh pads starting with 800 grit sandpaper wet, 1000 grit sandpaper wet, 1500 mesh wet, 1800 mesh wet, 2000 grit sandpaper wet and 2400 mesh wet , then 3200- 12000 micro-mesh dry.

20160219_013135~2

Before hitting the wheel I applied Howard’s Butcher Block Conditioner with a rag and let it penetrate for a few minutes, removing the excess with a clean rag.

Complete

20160221045755~220160221050041~220160221050052~2PhotoGrid_1456042153759PhotoGrid_1456042138342

I finished up on the wheel with white diamond, a few coats of carnauba and a microfiber hand buffing. Buffing the stem with blue compound.

Thanks For Taking A Look.


Brebbia Clean Up

Screenshot_2016-02-20-05-12-10~2~2

Happy International Pipe Smoking Day to all my friends, readers and fellow bloggers. For the day I wanted something new, well new to me . She came in on Friday just in time for a Saturday puff. The Brebbia Fat Bob is a pipe I’ve been in search of in my price range for two year’s. Now I’m unsure if that’s what I have here but if it’s not it’s a close match. The pipe itself is unmarked but the stem has the Brebbia inlay. I have seen other unmarked Brebbia’s in the past made for private B&M’s.
As Received

PhotoGrid_1455960948669

I got a little ahead of myself with this refurb and began working without stopping to take before and after photos, the photo above is from the auction. It was listed as clean and ready to smoke apparently my standard’s are a little higher than others. The pipe was badly reamed ( out of round ) and the chamber had the start of a burn out. The chamber and mortise were still holding tars and oils, the black finish was worn in spots. The stem on the other hand was spotless.

20160220_010819~220160220_010829~2

The above two photos are of the rim and chamber burn. The right side of the rim was thicker then the left side and the chamber was reamed into an oblong shape. I had already begun removing the worn finish in my excitement starting with EverClear and then moving to acetone, I would normally ream the chamber first.

20160220_012636~2

The chamber was reamed by the seller for the most part back to briar exposing the burn in the right side of the chamber. I sanded the chamber instead of reaming with 220 grit sandpaper and then 400 grit sandpaper, sanding the right side of the chamber and removing the burnt area completely. There was more than enough chamber thickness to do so.

20160220_010851~220160220_013855~2

Next I moved onto the uneven rim. Using a round side needle file and 220/400 grit sandpaper I began reshaping the rim.

20160220_021526~2

I decided the rim would pop more if it were smooth and natural, I sanded the rim with 400 grit sandpaper and finished with 800 grit sandpaper.

20160220_023718~2

I now cleaned the internals of the chamber, mortise and stem with EverClear, Q-tips, shank brushes and stiff soft pipe cleaning until the pipe cleaners came out as they went in.

20160220_024348~2

 With the old Finnish removed I re-stainded the stummel with dark brown Fiebing’s leather dye hitting with a lighter to set the set the stain. Now this is where I got over focused and did not take photos of my process. I removed the excess stain with an alcohol dampened rag and then sanded the high spots to lighten the stain, leaving the darker stain in the lower blasted areas of the stummel, wiping the stummel down with an alcohol dampened rag once more .

20160220_033252~2

I gave the stummel a coating of Howard’s butcher block conditioner before hitting the wheel, removing the excess with a clean rag.

Ready For IPSD

20160221014451~2PhotoGrid_145603064681720160221013545~220160221013504~220160221013611~2PhotoGrid_1456030663453

Finished her up on the wheel with white diamond, a few coats of carnauba and a microfiber hand buffing. Buffing the stem with blue compound.

Now with a beautiful 54 degree February afternoon in N.Y. I’ll sit and enjoy my work and celebrate my wife’s birthday as well. Keep your chambers full and your hearts happy.
“May your matches always light and your tongue never bite”

Custom-Bilt Billiard

PhotoGrid_1454484691598~2
Many of the Custom-Bilt pipes in my collection are on the larger side but lately the medium size Bilts have caught my eye. This billiard is the first I’ve seen and I couldn’t wait to see her finished.
As Received.
20160205_232622~2~2PhotoGrid_1454785733634PhotoGrid_145478579667320160205_225510~2
She was in rough shape when I received her.  Most disappointing was the cracked tennon,  thankfully it still had its little rubber filter insert and I thought it might be salvageable.  The bit had deep tooth impressions that almost punched through. The button was worn down and the stem was oxidized. The rim was caked with dirt,oils and char. The chamber had a thick crumbling cake and the mortise was plugged with old tobacco and tars.
20160205_233122~2
I started with my Pipnet Reamer and the smallest attachment working up to the second largest, finishing up with 400 grit sandpaper wrapped around a finger. The chamber was well-preserved from the thick cake.
20160205_233117~2PhotoGrid_1454786184020
Next I tackled the caked rim. I applied a generous amount of Method Good For Wood Polish to the rim and set it aside to penetrate the build-up for a few minutes removing the build-up with Q-tips , I would repeat this process a few times. After the removal of the rim build-up There were a few dings in the rim. Using a household iron on medium high/ heat and a damp rag I steamed out the imperfections working in intervals until the imperfections were almost gone. I finished up with worn micro-mesh until the rim was free of darkening and dings.
PhotoGrid_1454786065688
Next was the cracked tennon, I fit The opposite end of a 3/16 inch drill bit into the tennon, making sure I had a tight fit.I mixed thick black CA Glue and activated charcoal power into a paste I then applied a generous amount of chapstick to the drill bit end so the CA Glue would not adhere to the bit but would adhere to the tennon only. I applied a thin layer of the CA Glue mixture to bridge the gap where the missing tennon piece was , hitting it with accelerator to set up the glue, I removed the drill bit at this time.
20160205_230850~2
With the drill bit removed I now applied several layers of the CA Glue mixture to build up the missing section of the tennon, spraying with accelerator in between each layer I added, until I had a close match to thickness of the existing tennon.
PhotoGrid_1454785928195
Once my thickness goal was reached I left the tennon to cure for a few hours. After curing I worked the new tennon with needle files carefully removing the excess glue until I had a close match to the remaining section of the tennon.
PhotoGrid_1454786110861
I now worked the new tennon with 400 grit sandpaper until I had a close fit between mortise and tennon, making my finishing adjustments with 1000 grit sandpaper until I had a snug fit between mortise and tennon. I then re-worked the inner of the tennon with a round needle file and rolled-up 1000 grit sandpaper so I could re-fit the rubber filter insert.
PhotoGrid_1454785701337
This Custom-Bilt had two spots of pretty visible filler. Using Method Wood For Good Polish to soften up the filler and a X-ACTO knife, I removed the filler.
PhotoGrid_1454786256072
I cleaned the area to be repaired with EverClear and Q-tips. I filled the pits with Gorilla Glue and briar dust and left aside to dry. Once dry I removed the excess glue and dust with worn micro-mesh until the repair disappeared into the rustication.
20160206_015445~2
I used a  dark furniture marker to darken the rusticated area’s of the stummel to further guarantee my repair would stay hidden.
20160206_033127~2
With the outer of the stummel complete I moved to the internals, cleaning the mortise and chamber with EverClear, Q-tips, shank brushes and stiff/soft pipe cleaners, cleaning until the last pipe cleaner came out as it went in.
PhotoGrid_1454787172750
I attempted to raise some of the deep tooth impressions with heat, some of the button raised but most of the impressions would still have to be filled.
PhotoGrid_1454831257785
Next the stem oxidation, I applied a generous amount of non-bleach Soft Scrub to the stem with a children’s toothbrush and left it aside to penetrate the oxidation. Once the Soft Scrub turns from white to a brownish color its time to scrub vigorously with a rag until the oxidation is removed.
PhotoGrid_1454830754816
The deep tooth impressions had to be repaired, I roughly sanded the area of repair with 400 grit sandpaper and wiped down with EverClear. I mixed thick black CA Glue and activated charcoal power into a paste .
PhotoGrid_1454830822289
I applied the paste to the impressions and worn button using a toothpick hitting it with accelerator to set the patch, I set the stem aside now to cure overnight. The following morning after the paste had time to cure, I used needle files and sandpaper to remove the excess glue until I had a uniformed shape.
20160207_022716~2
I sanded the entire stem with 400 grit sandpaper wet to remove the file marks and then moved on to the various grits of sandpaper and micro-mesh. 1000 grit sandpaper wet, 1500 mesh wet, 1800 mesh wet, 2000 grit sandpaper wet and 2400 mesh wet. Runing though the remaining micro-mesh pads dry 3200-12000.
20160207_022757~2
My final step for all my Custombilt pipes is to apply Howard’s butcher block conditioner to the stummel before buffing. I apply Howard’s butcher block conditioner with a rag and allow it to penetrate for a few minutes hand buffing off the excess with a clean rag.
Complete.

PhotoGrid_145493984631720160208104845~220160208104522~220160208104240~220160208104306~220160208104315~2

I finished her up on the wheel with white diamond, a few coats of carnauba and a microfiber hand buffing Buffing the stem with blue compound.
Thanks For Taking A Look.

CUSTOM-BILT / CUSTOMBILT CRAZY

PhotoGrid_1454654935825
    Collecting focus- everyone needs one, right ? I’ll be the first to admit I might have a problem, but when I first started I had no direction, just buying up lots of estate pipes Willy Nilly. Two years ago I had over 300 hundred pipes, a few of them Custombilt ( before the bug really bit ) but nothing to right home about, nothing eye-catching, no real attachment. So my first step was to unload the clutter, donating and selling off what didn’t belong. I’ve never been a fan of dainty pipes, I’m a big guy and well it just looks silly, its kinda like
Screenshot_2016-02-05-02-48-10~2
So smaller pipes would go first. What was left was starting to grab me. My introduction into large pipes began with Ropp cherrywood pipes, the rustic look originally sold me, being from the Adirondacks it seemed fitting but with time things loosened up at the shank and bowl. I have one un-somoked large cherrywood Ropp left. Than came Tom Howard and B P Jum  pipes, this was the turning point, large and interesting, fit my face pipes. The only draw back was the overuse of filler in both Howard’s and Jum pipes, riddled like bullet holes. Then finely Custom-Bilt it was like being a kid again I couldn’t resist large, ugly and roughly carved. I had to get them all, each one no mater how closely they resemble one another are completely different. The next few refurbs will be Custombilt pipes as I have many waiting in line to be revived. I need to take photos of my complete collection, I’m not really sure how many I have at this point. 
Heres one more.
20160131_161217~2~2PhotoGrid_1454296771399PhotoGrid_1454296807572PhotoGrid_1454296785367
Overall she was in good condition,  uneven cake, a chip out of the side of the bowl, stem oxidation and faded finish.
PhotoGrid_1454643557763
I started with my Pipnet Reamer and the smallest attachment and working up to the second largest. The chamber was free of burn out or pitting, I smoothed things out with 400 grit sandpaper wrapped around a finger.
PhotoGrid_1454643587961
With the chamber reamed I moved to the rim build up, the rim was built up with tars and char. I applied a generous amount of Method Good For Wood Polish to the rim and set aside to penetrate the build-up for a few minutes. Using Q-tips I removed the build-up, I would repeat this process a few times.
20160204_133121~220160204_145542~2
To remove the char and darkening I used worn micro-mesh until the rim darkening was faded. I now cleaned the internals of the stummel and stem with EverClear, Q-tips, shank brushes and stiff/ soft pipe cleaners. Cleaning the mortise and chamber until the pipe cleaners came out as they went in
20160204_134801~2
I gave the stummel an alcohol wipe down with EverClear and makeup pads to remove the dirt and debris
PhotoGrid_1454643494800
The chip in the side of the bowl would be repaired with Gorilla Glue and briar dust. I cleaned the area of repair with EverClear, Q-tips and let dry. I filled the crack with Gorilla Glue and briar dust and allowed it to dry, I removed the excess glue and dust with worn micro-mesh.
20160204_171320~2
I stained the repair patch with a dark furniture marker allowed it to dry and removed the excess stain with an alcohol dampened rag.
PhotoGrid_1454643517737
Now for the stem oxidation, I applied a generous amount of non-bleach Soft Scrub to the stem with a children’s toothbrush and set aside to penetrate the oxidation.Once the Soft Scrub turns from white to a brownish color its time to introduce the old elbow grease and scrub vigorously with a rag until the oxidation is removed.
20160204_204435~2
With the oxidation removed I could now run it though the various grits of sandpaper and micro-mesh pads. 1000 grit sandpaper wet, 1500 mesh wet, 1800 mesh wet, 2000 grit sandpaper wet and 2400 mesh wet. The remaining micro-mesh pads dry 3200-12000.
20160204_172639~2
I don’t typically stain my Custom-Bilt pipes but I thought I’d give it a go. Using a dark furniture marker for the rusticated area’s of the stummel and a lighter color marker for the rest of the stummel, removing the excess stain with an alcohol dampened rag.

Complete.

PhotoGrid_145493981620420160208104819~220160208104553~220160208104627~220160208104706~2

Finished her up on the wheel with white diamond, a few coats of carnauba and a microfiber hand buffing Buffing the stem with blue compound.
Thanks For Taking A Look.