Tag Archives: tooth impressions

Scoundrels – John Bessai Canadian

12743568_1113167278728461_8755580862501099677_n~2~2

Pipes Scoundrels Pipes.


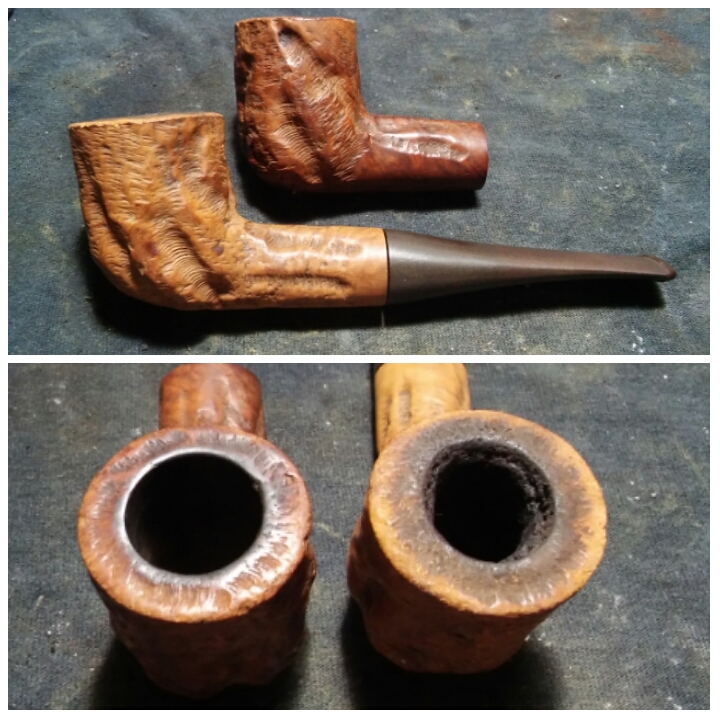
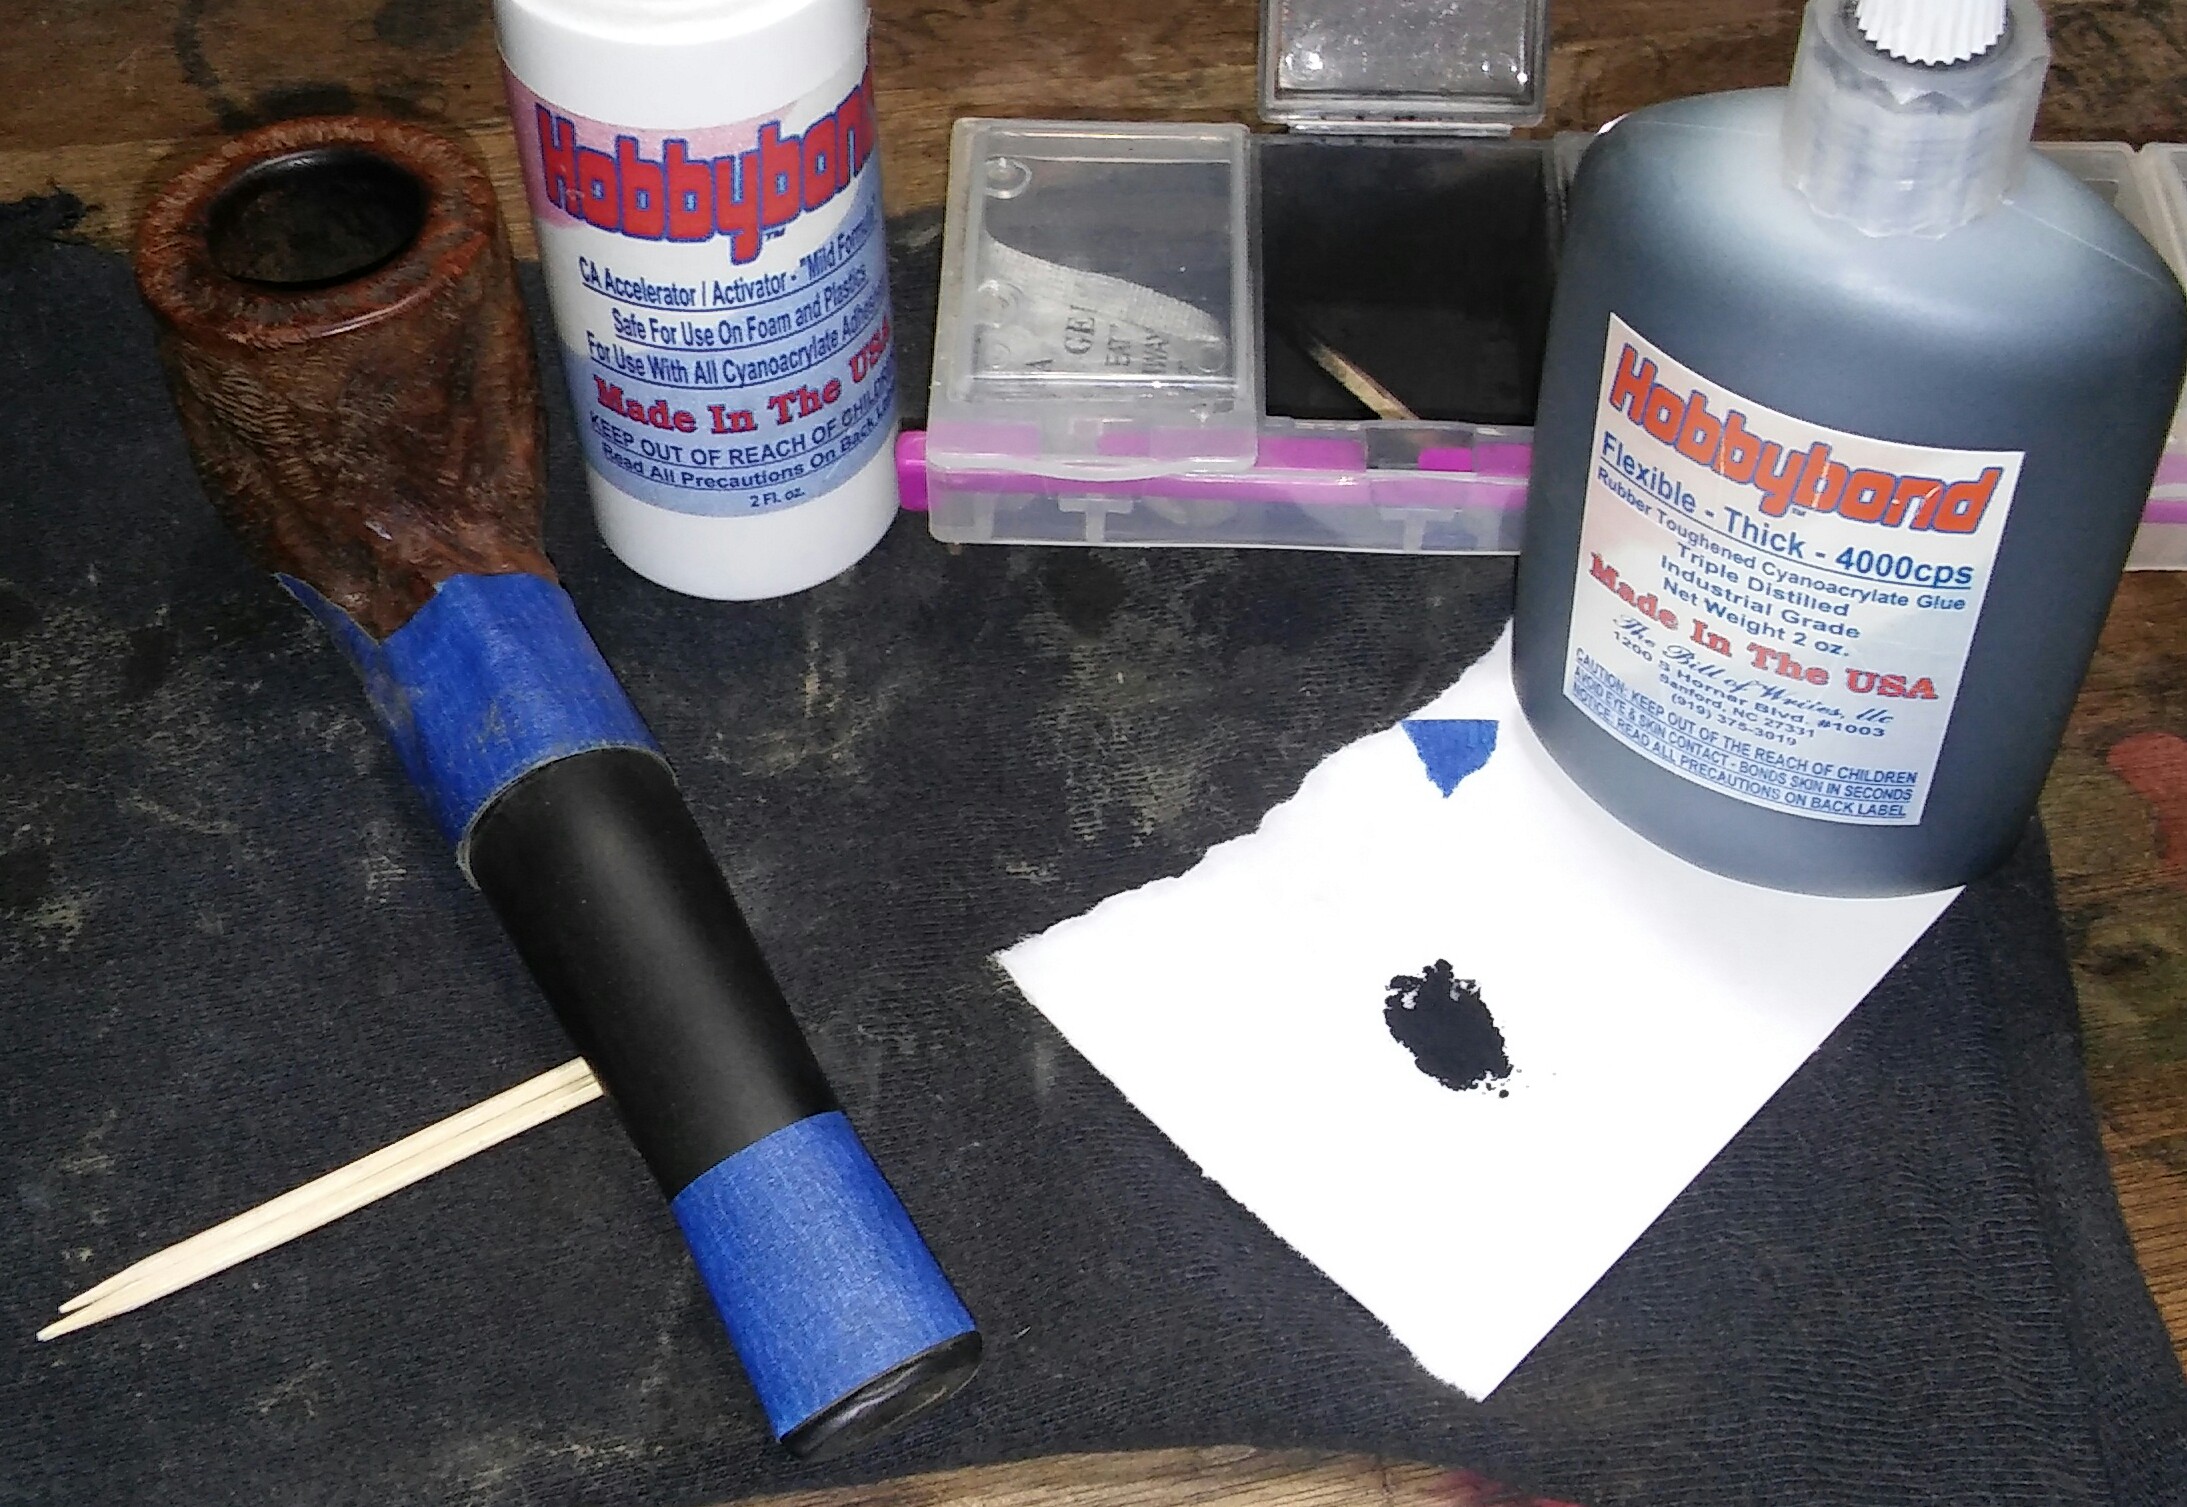
Way back in February Clint of Pipes Scoundrels sent a huge package out of the blue . We had spoken a month or so before of a pipe that was in need of care but never figured out a plan. In the package a letter where he offered up a trade of sorts skill for skill, I love the barter system. In the package an incredible framed Pen & Ink work, that I watched though his blog come together. I was blown away by his skill and photos online. I had no idea it was coming my way, in person it was even more amazing, beautifully done. Also in the package a couple of Pipe Scoundrels stickers ( he has a killer logo) and three pipes in need of repair/cleaning. A couple John Bessai pipes one Canadian, one Pot and an Iwan Ries a unique shape I wasn’t familiar with. I was excited to get to work , this was the first time I was to work on someone else’s pipes but I got side tracked and side tracked again but finally I had some time to sit and finish, now the three are complete.

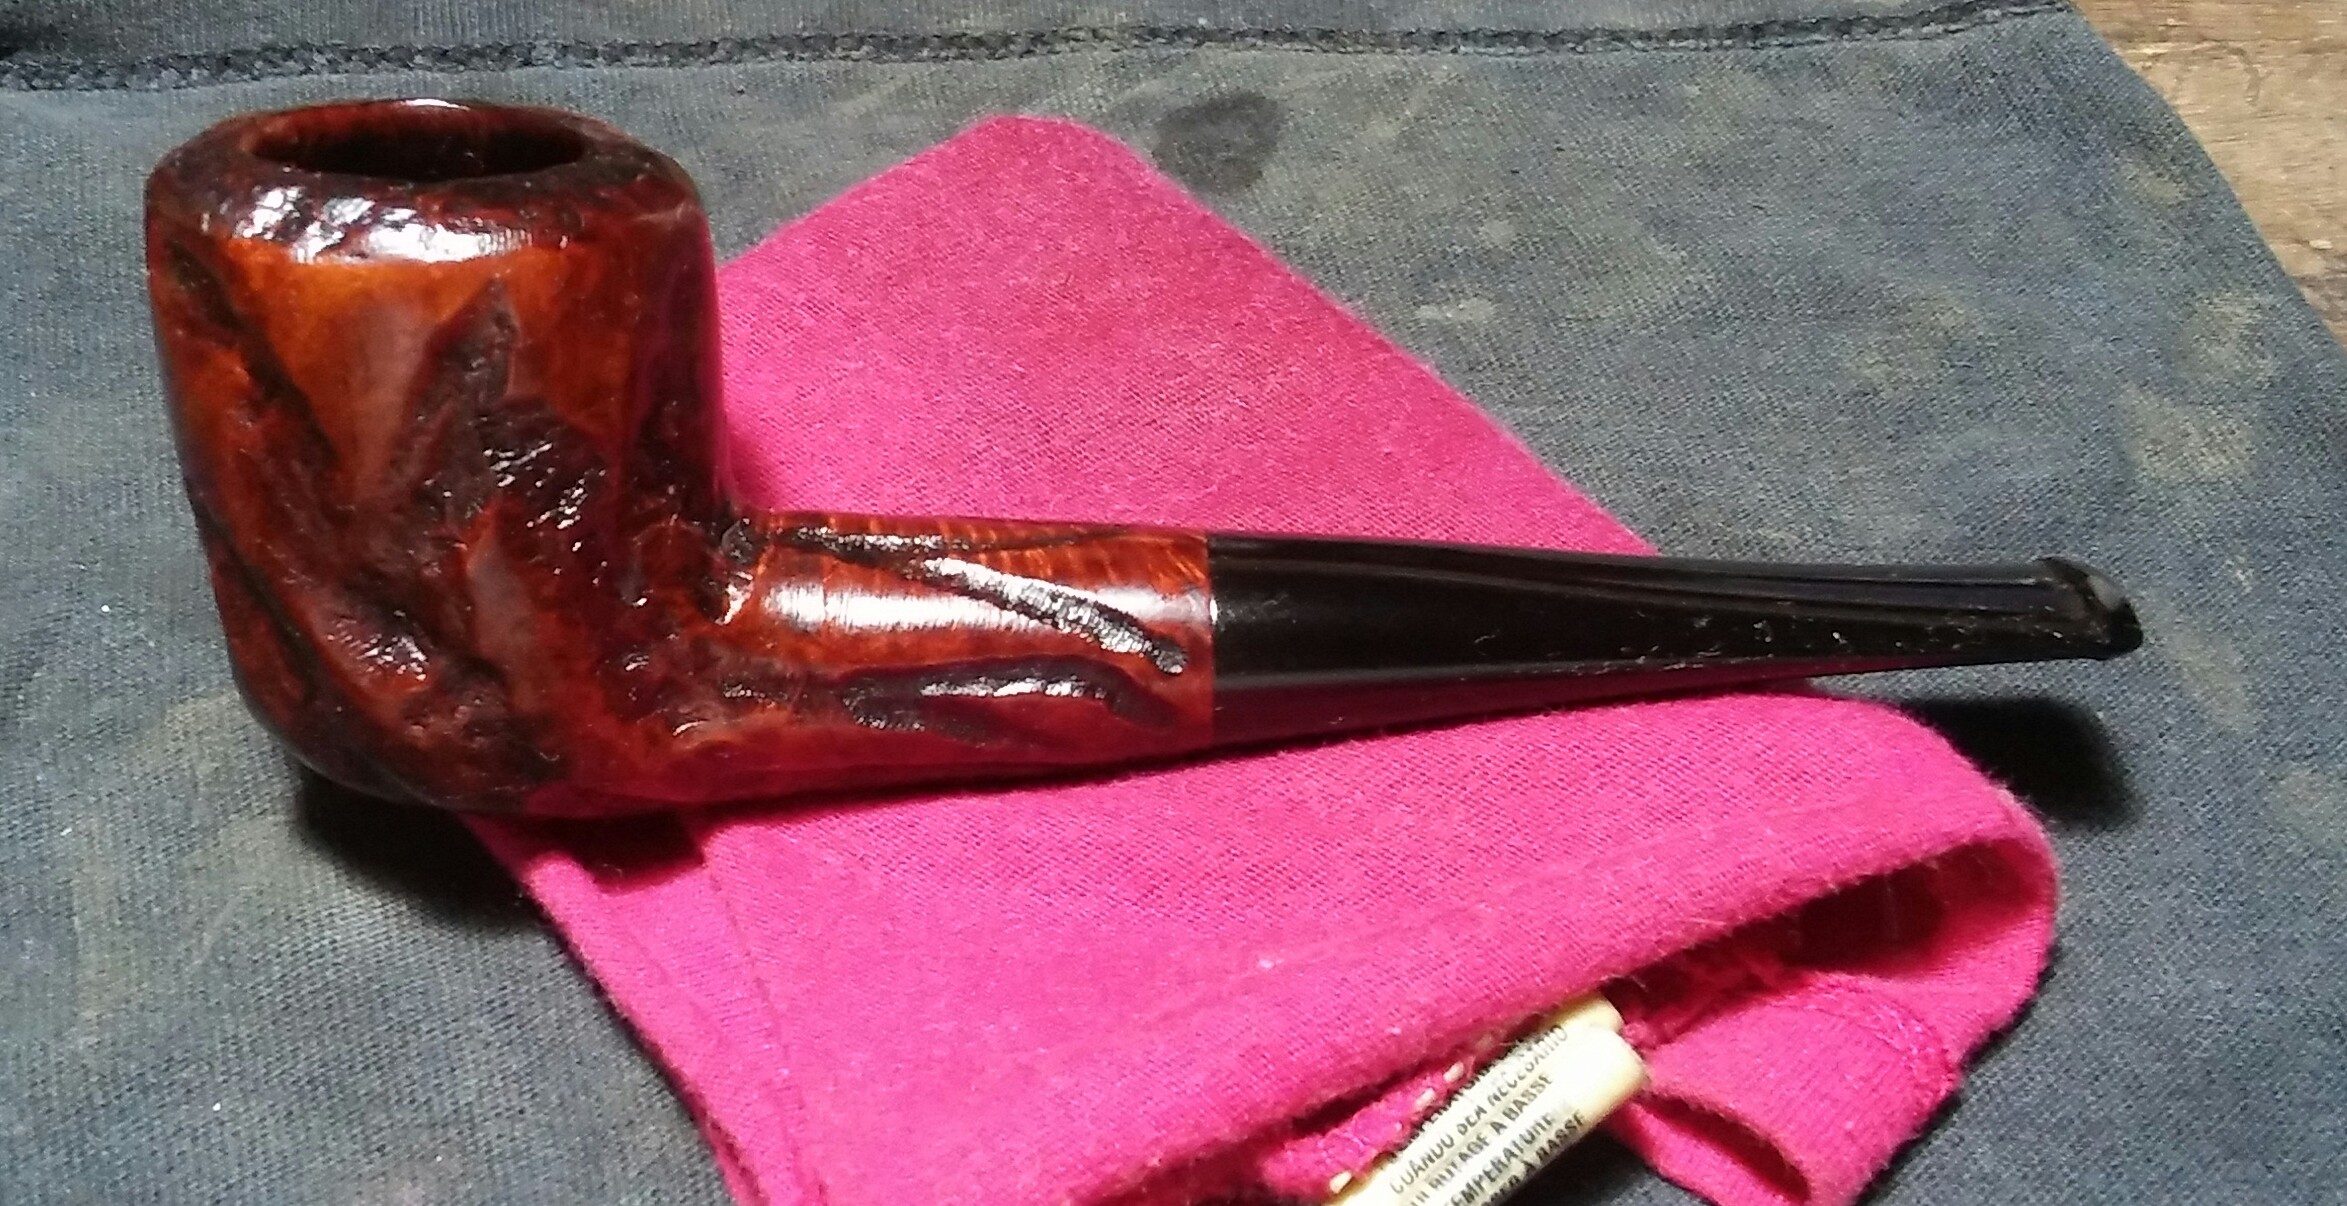
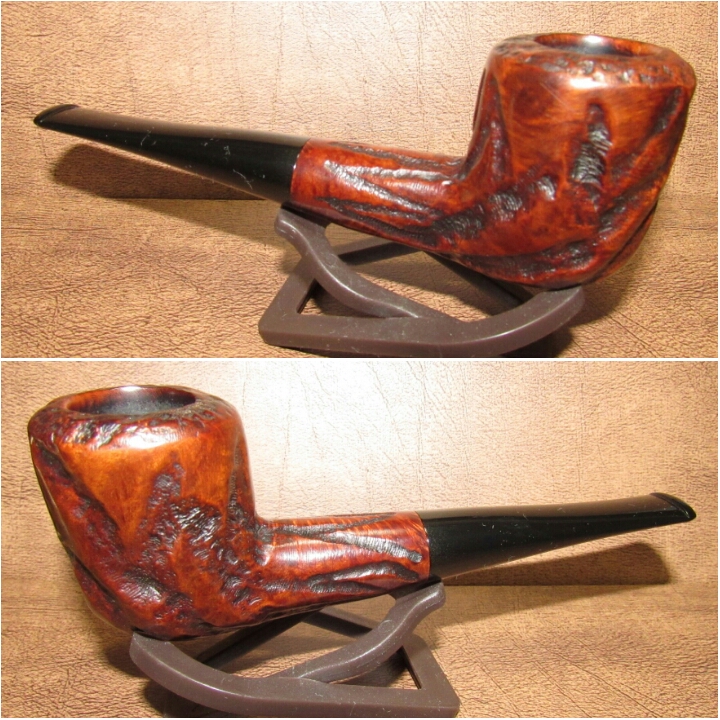
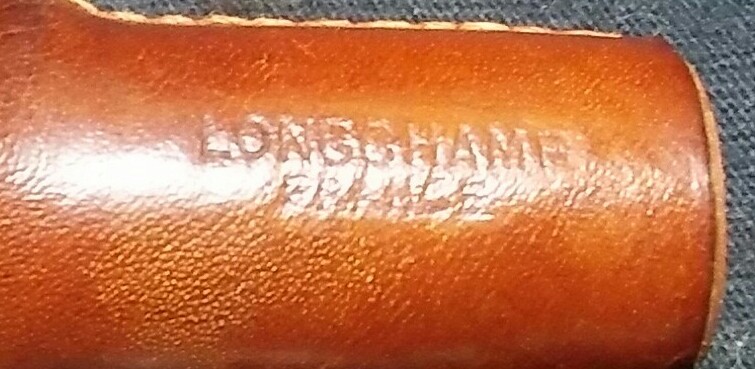
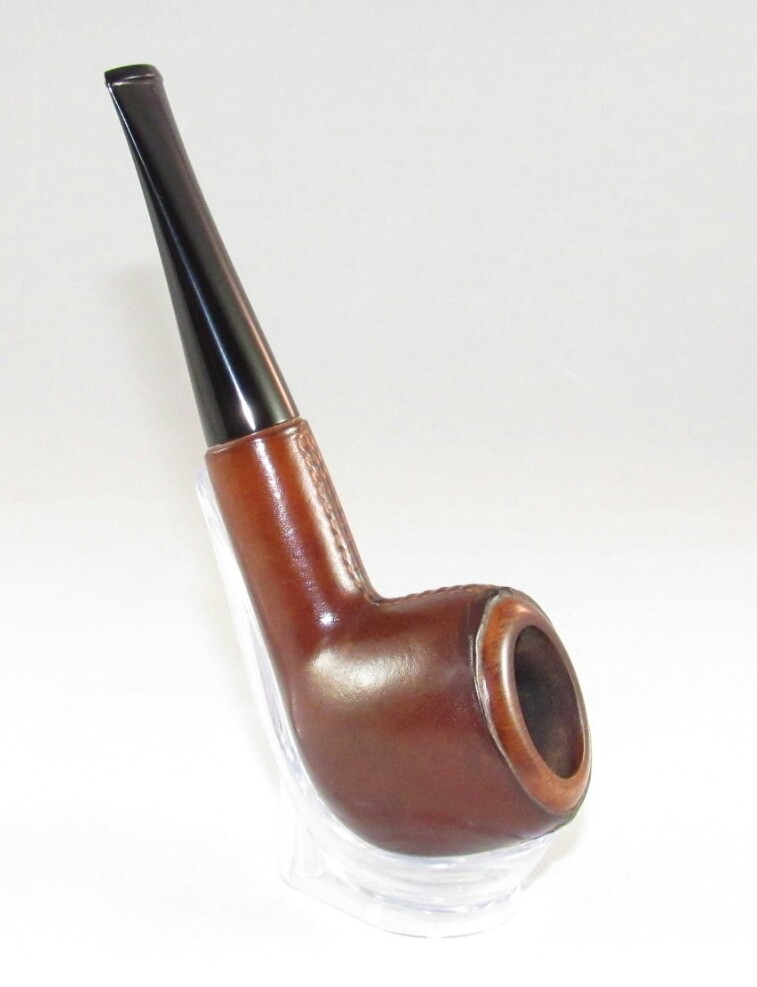
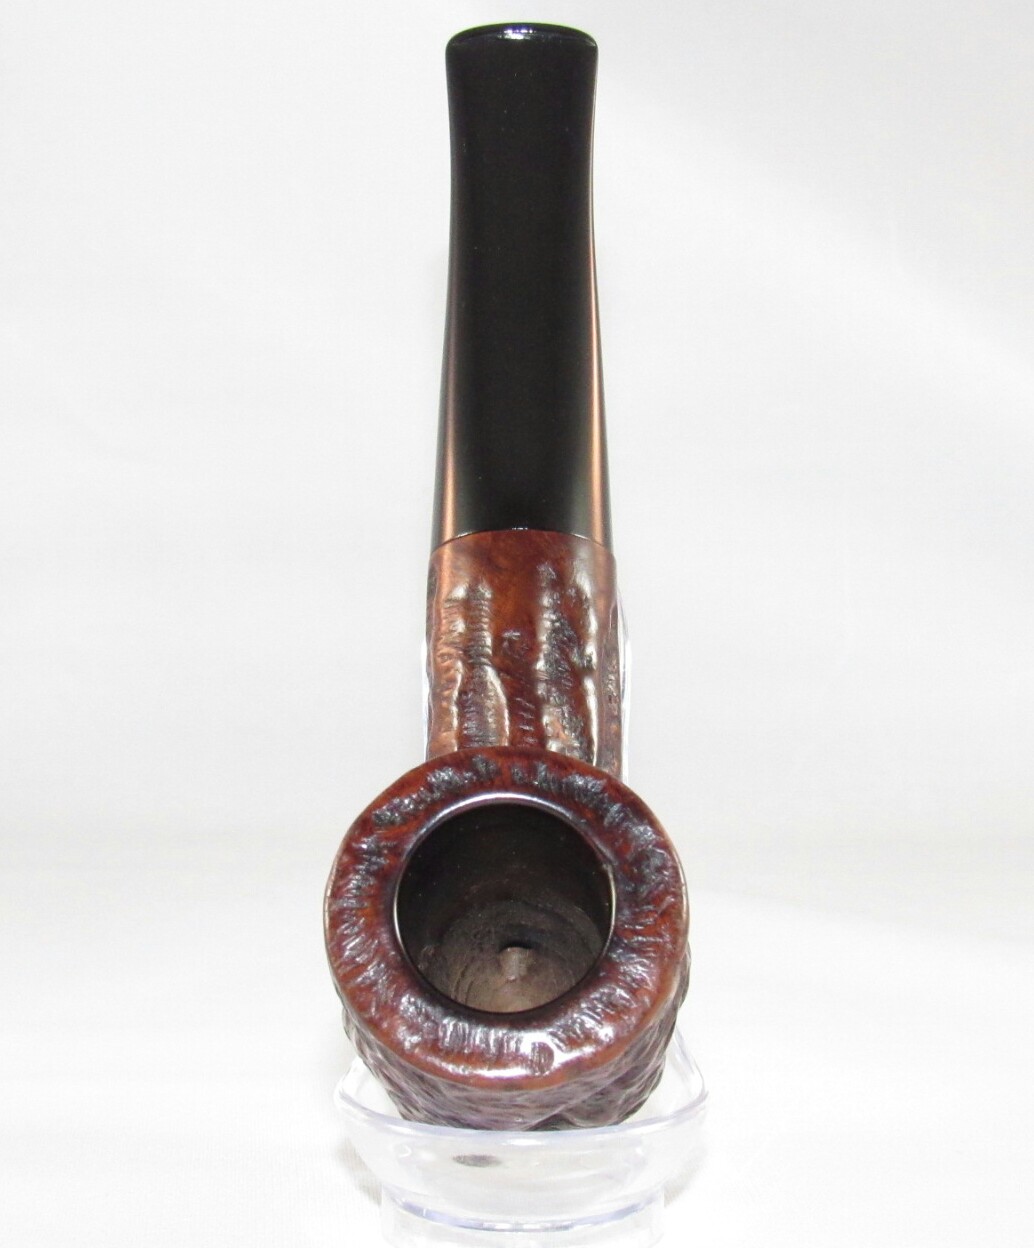
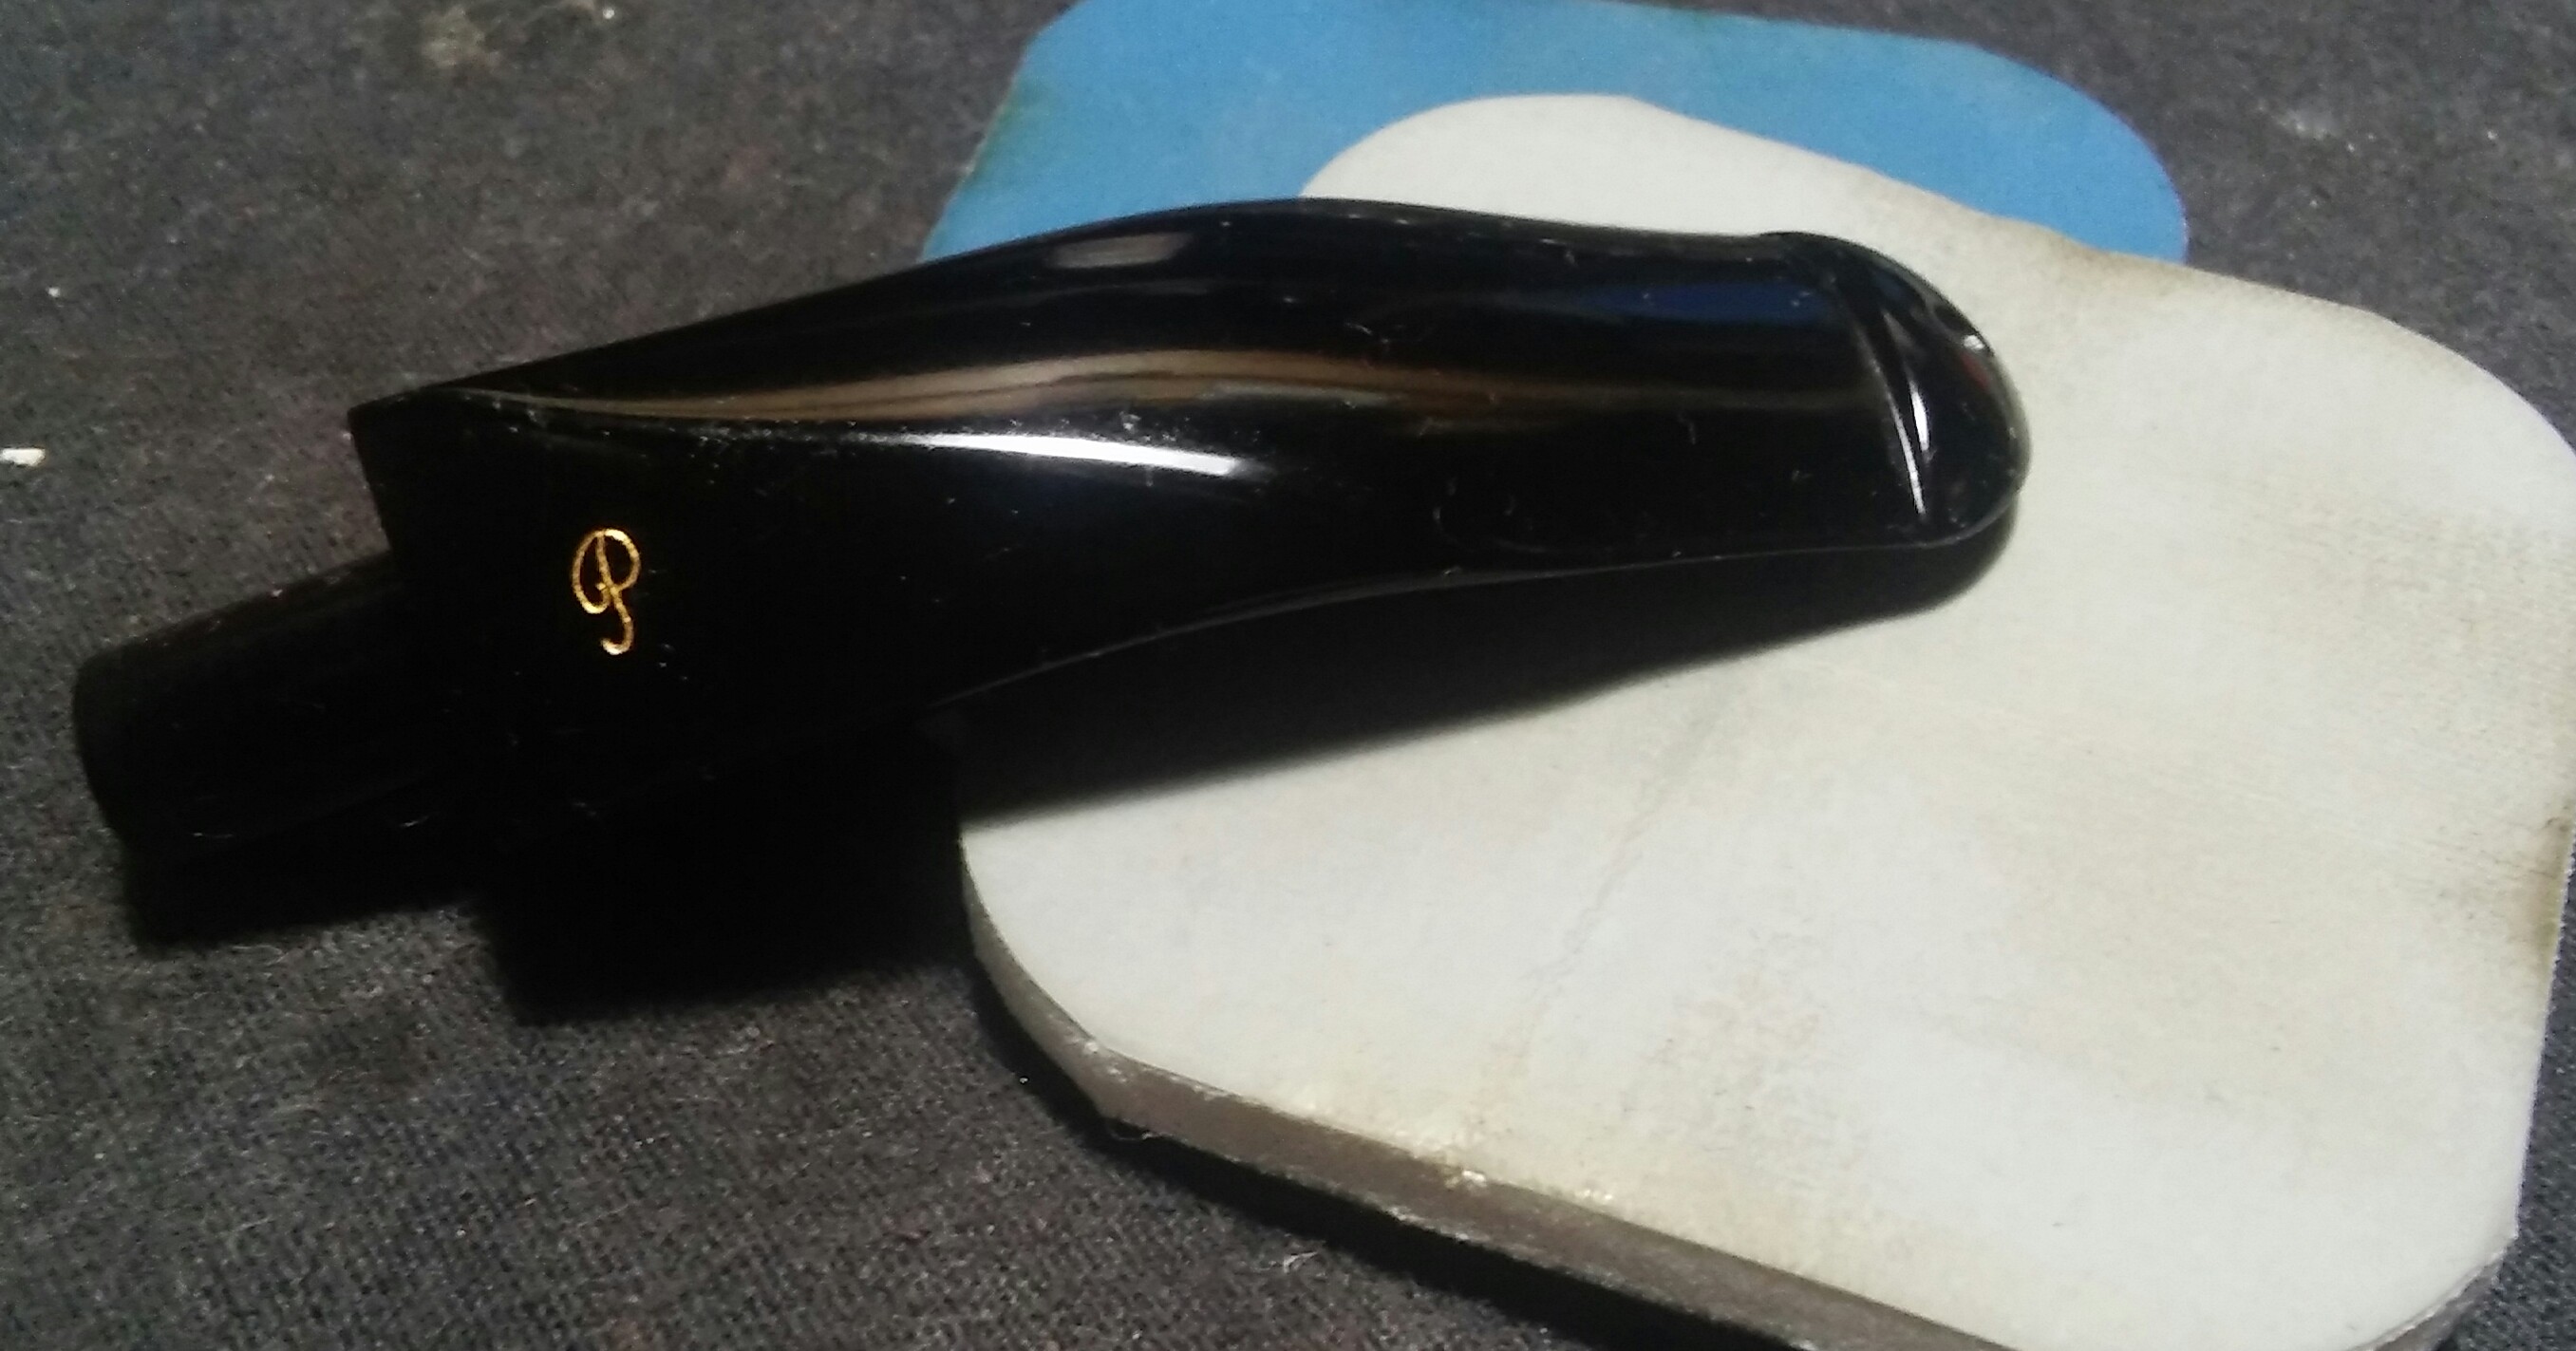
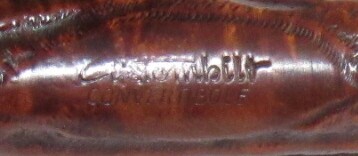
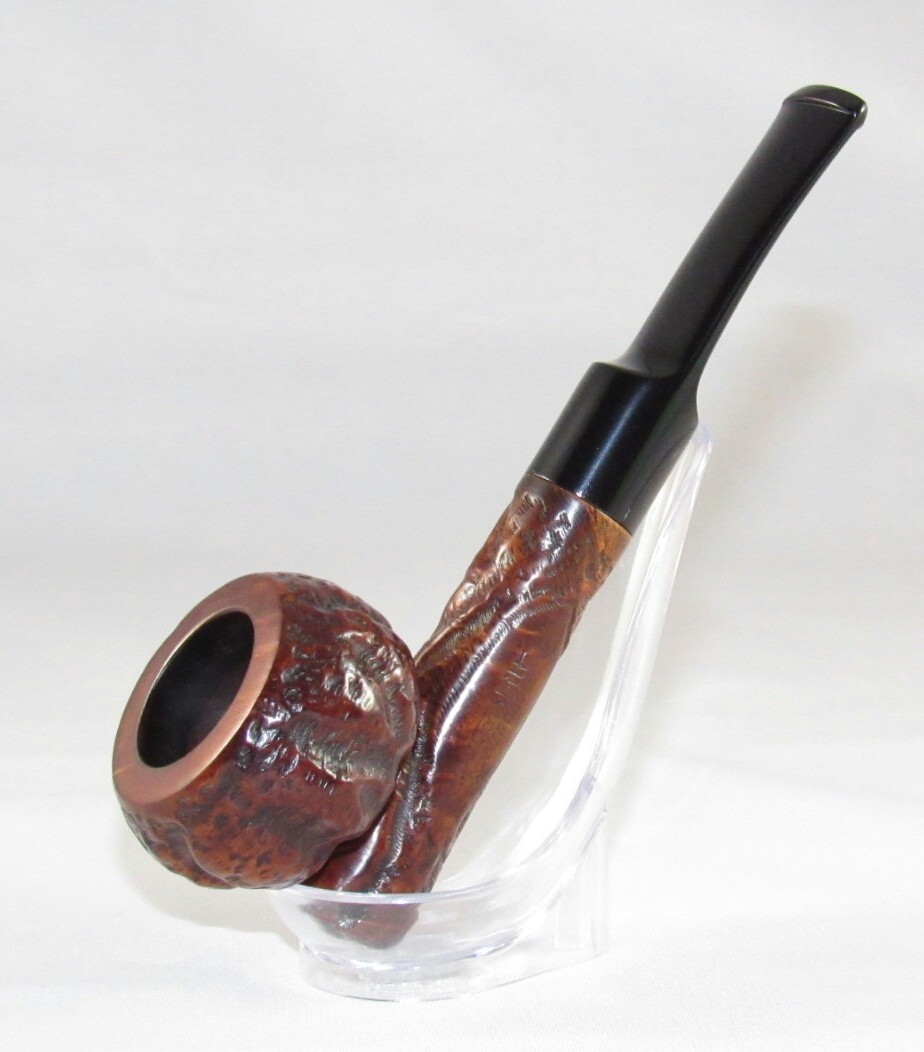
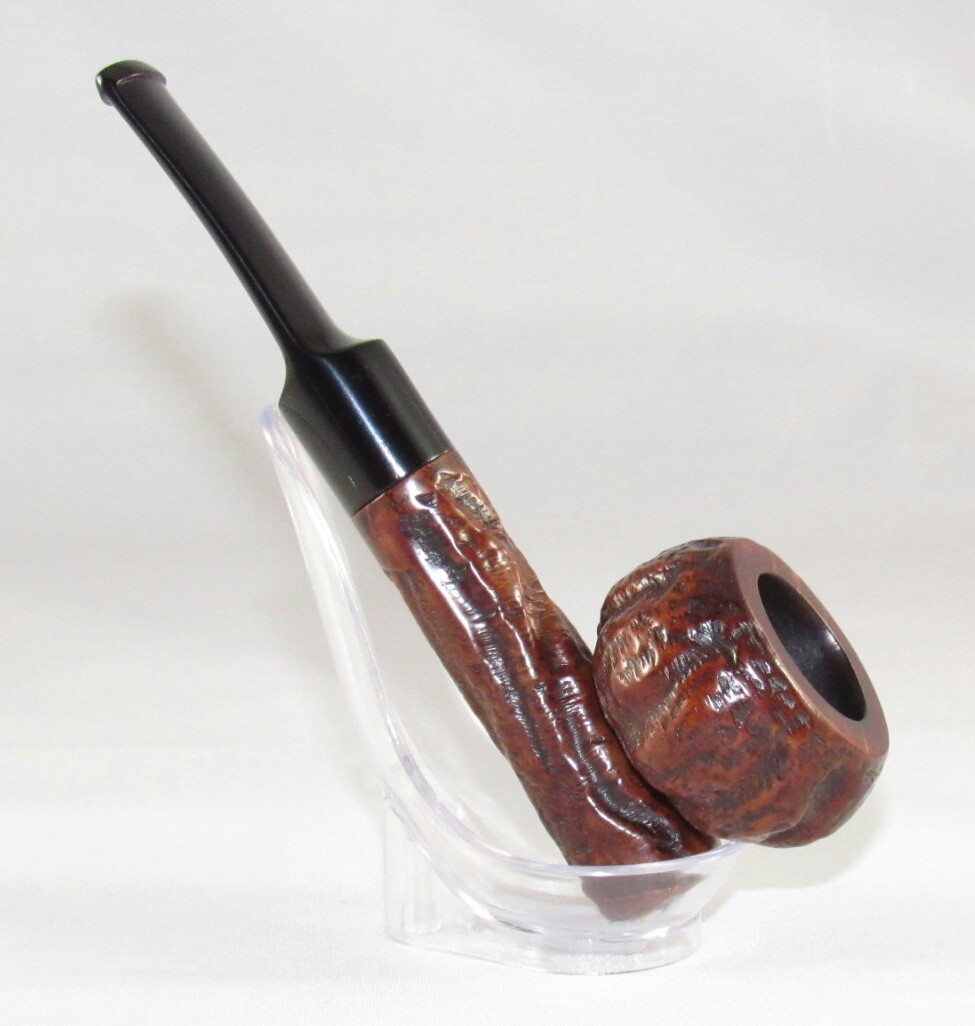
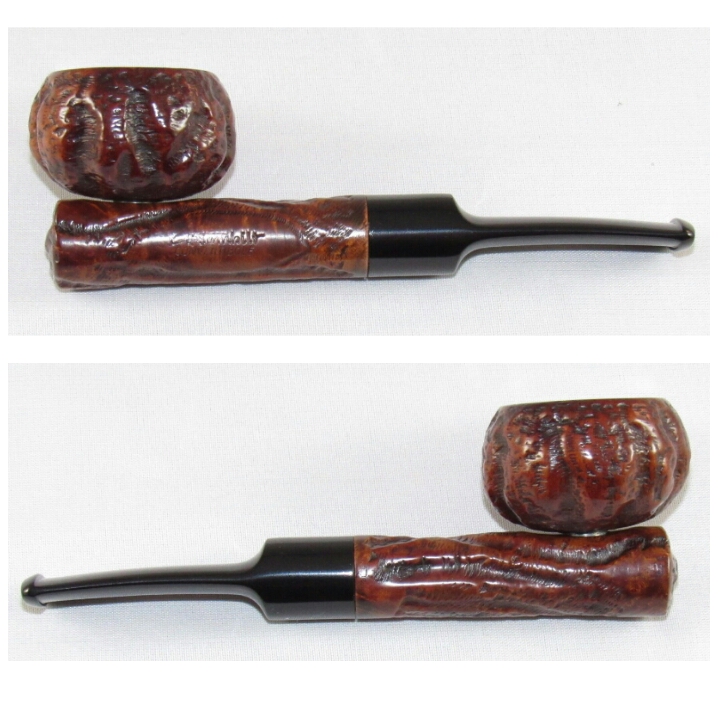
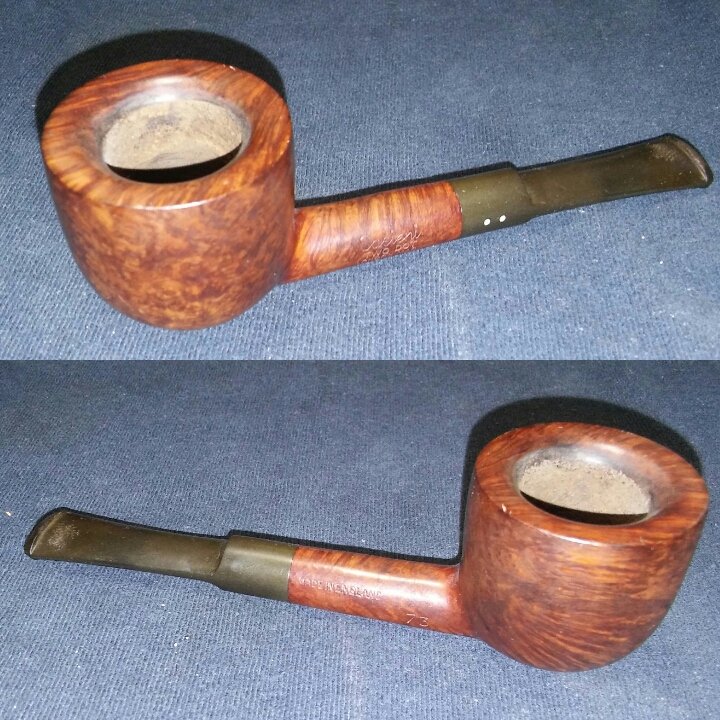
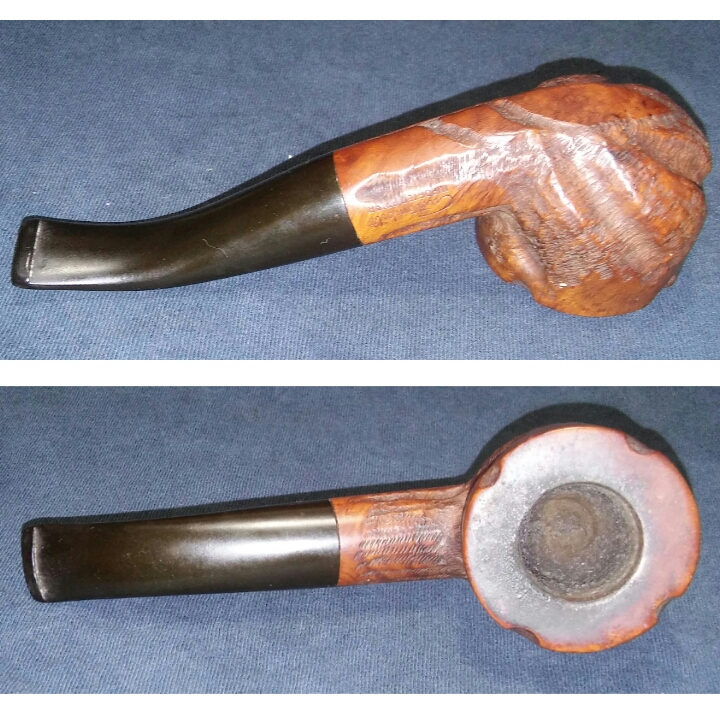
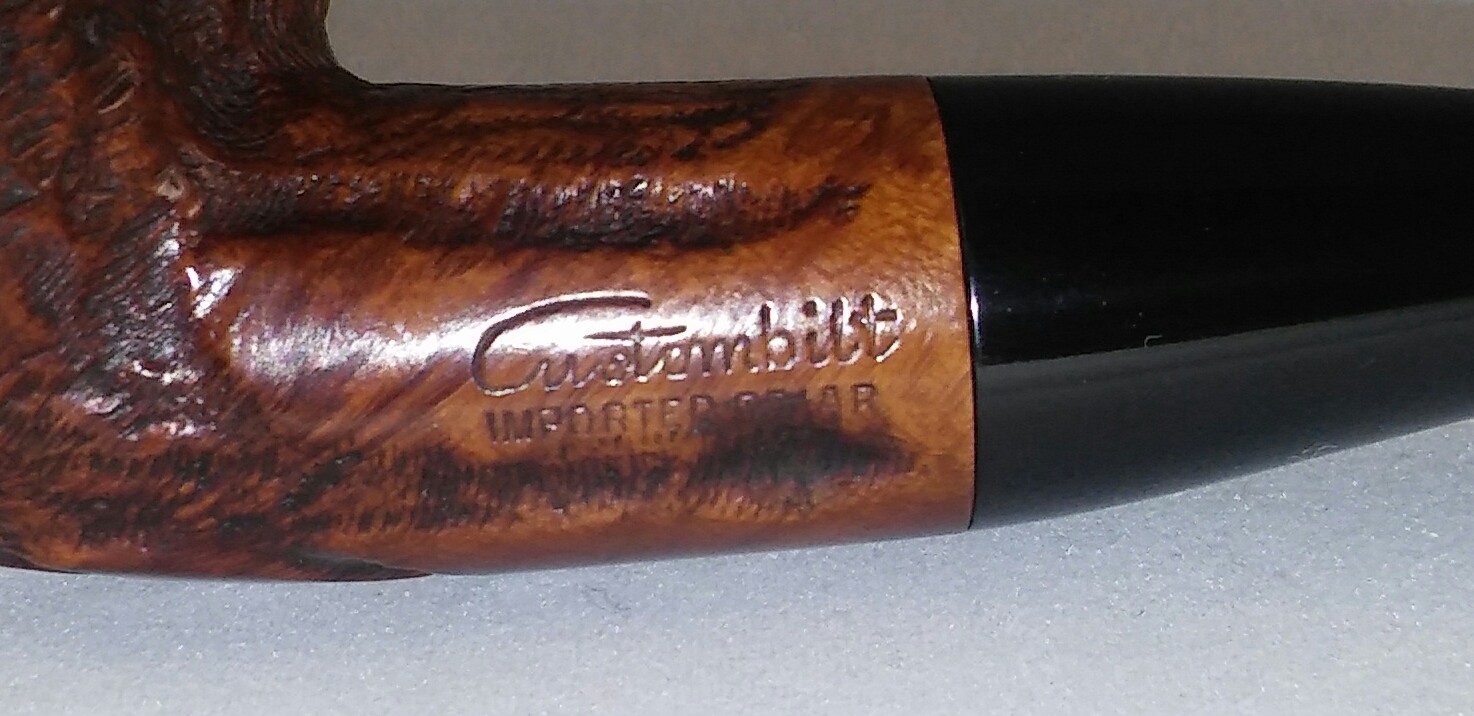
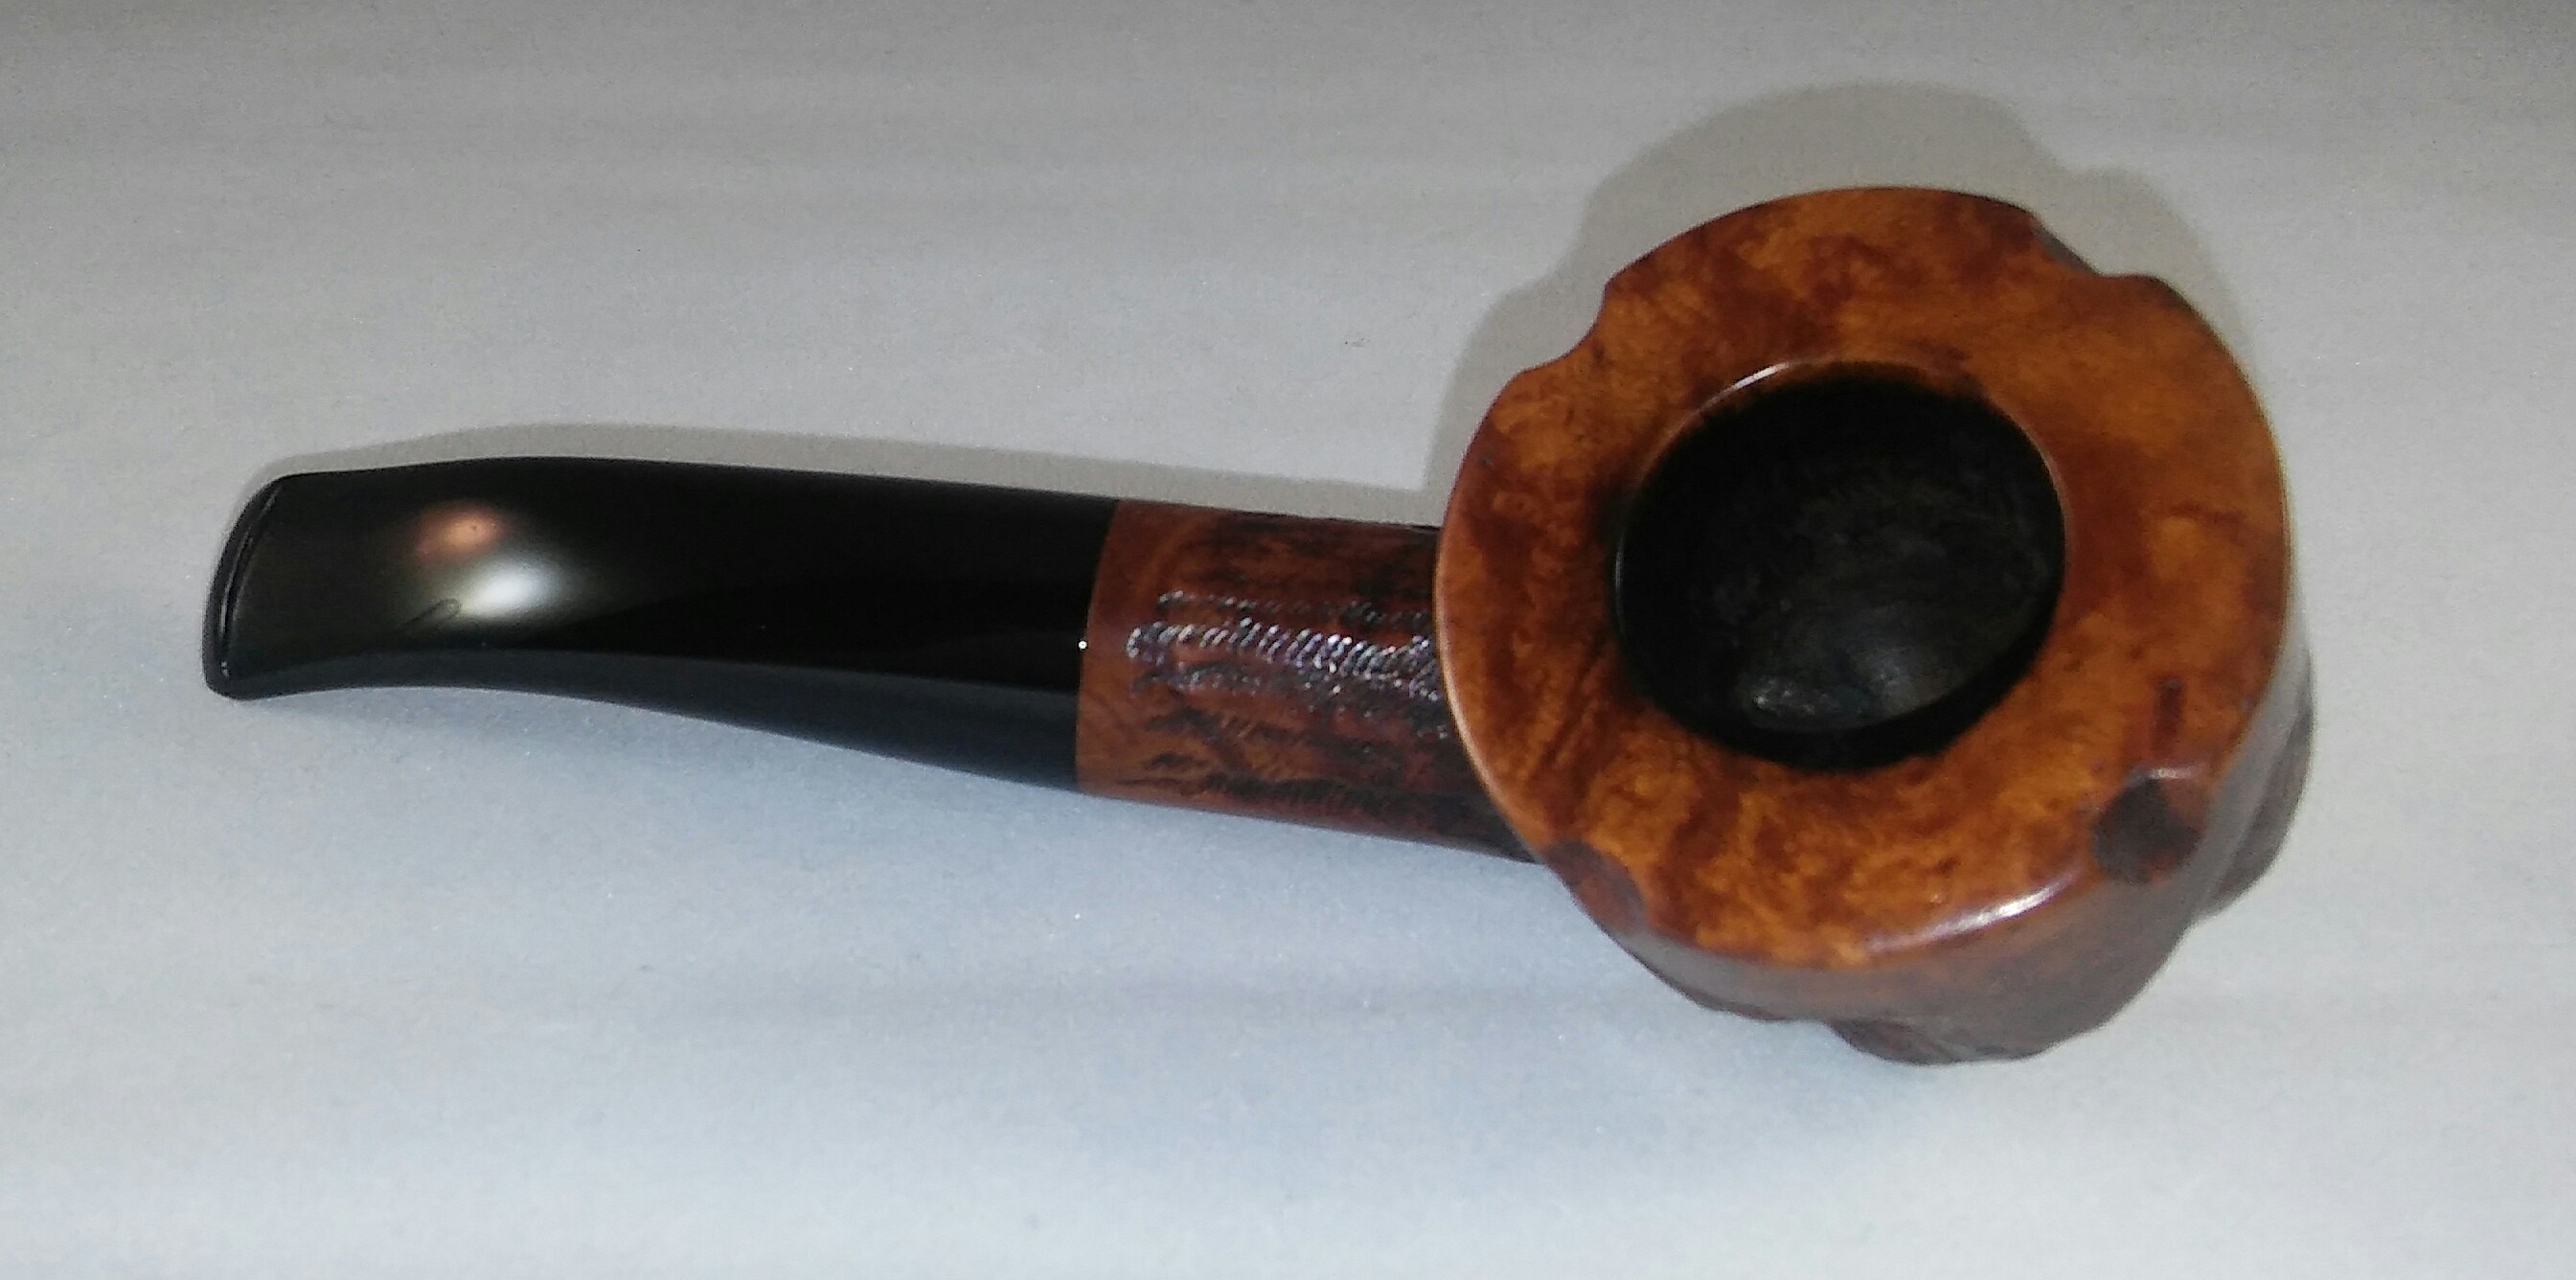
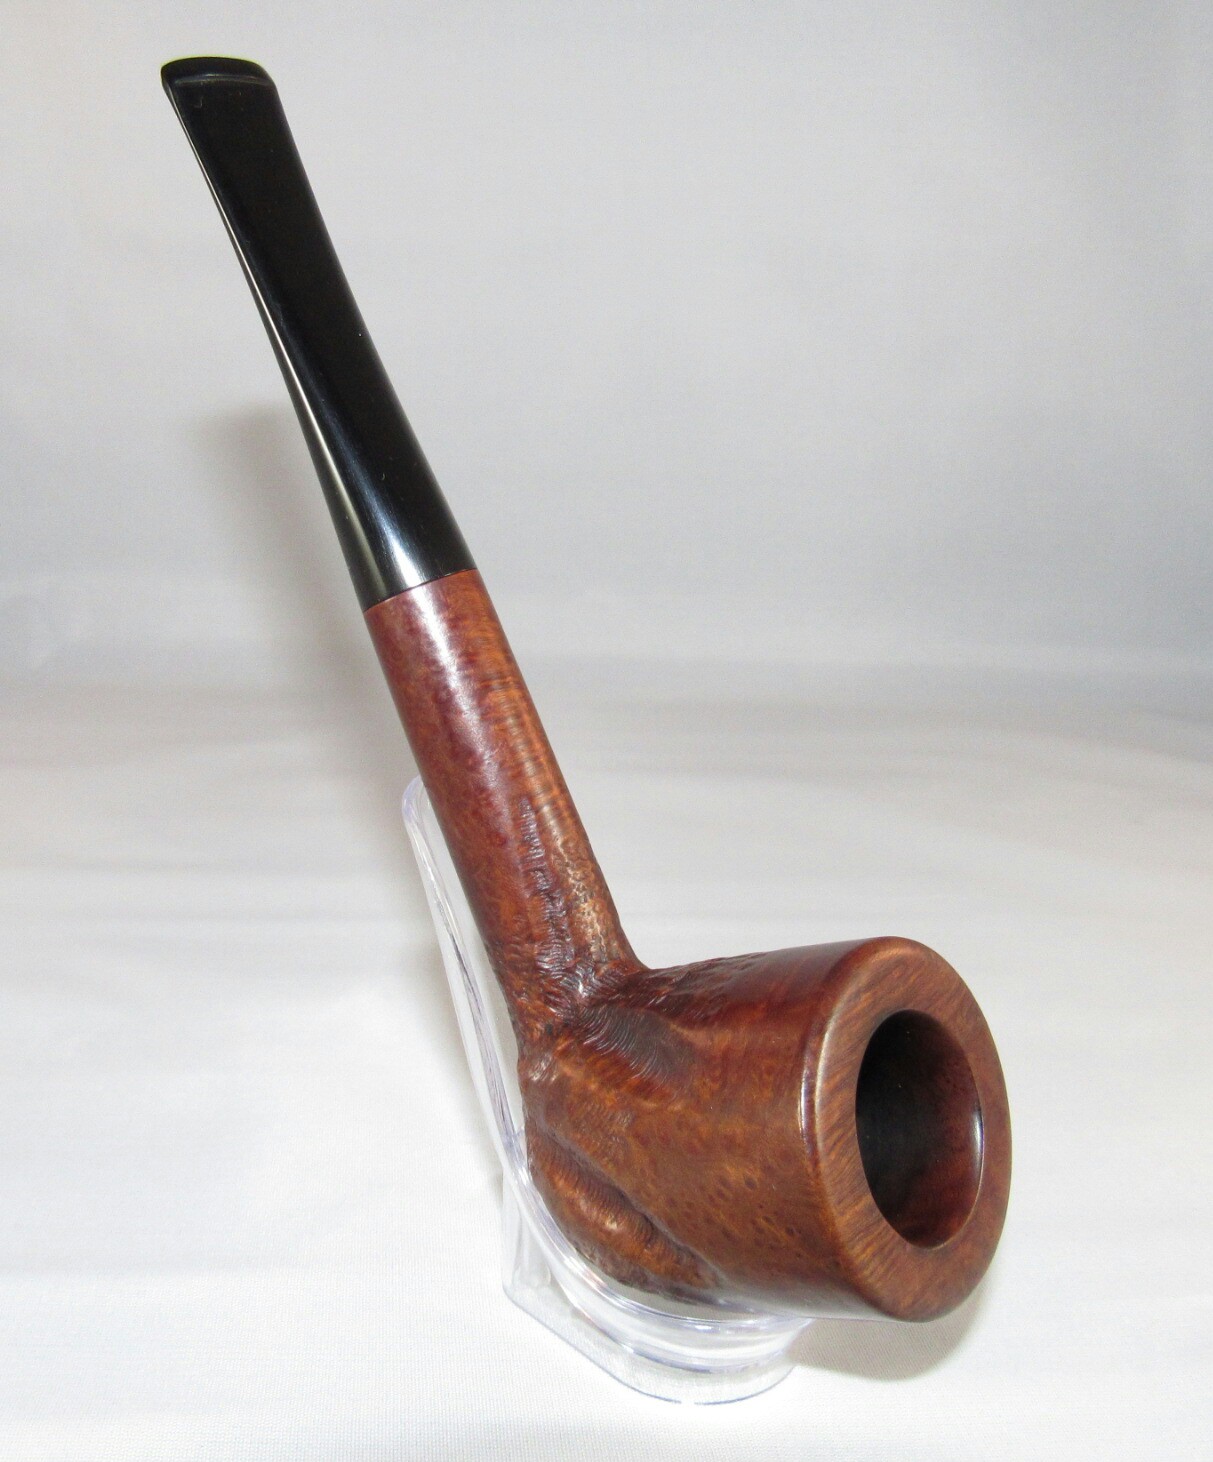
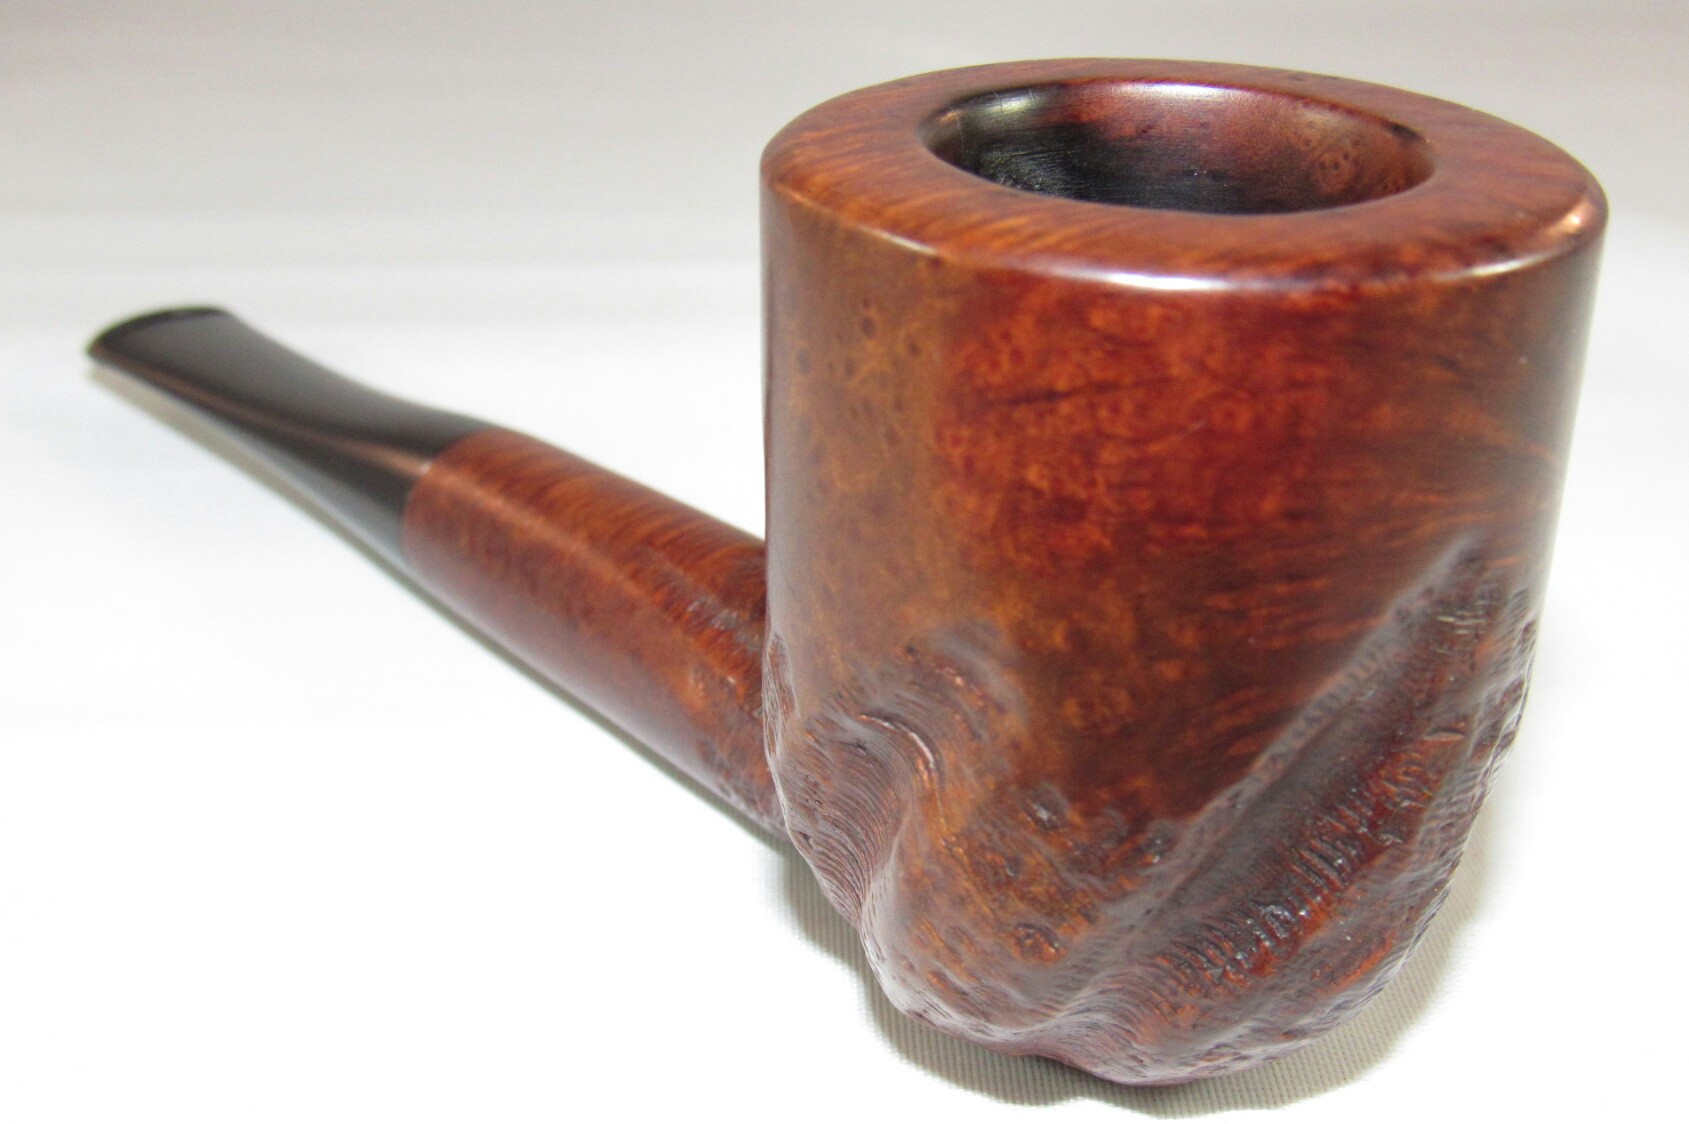
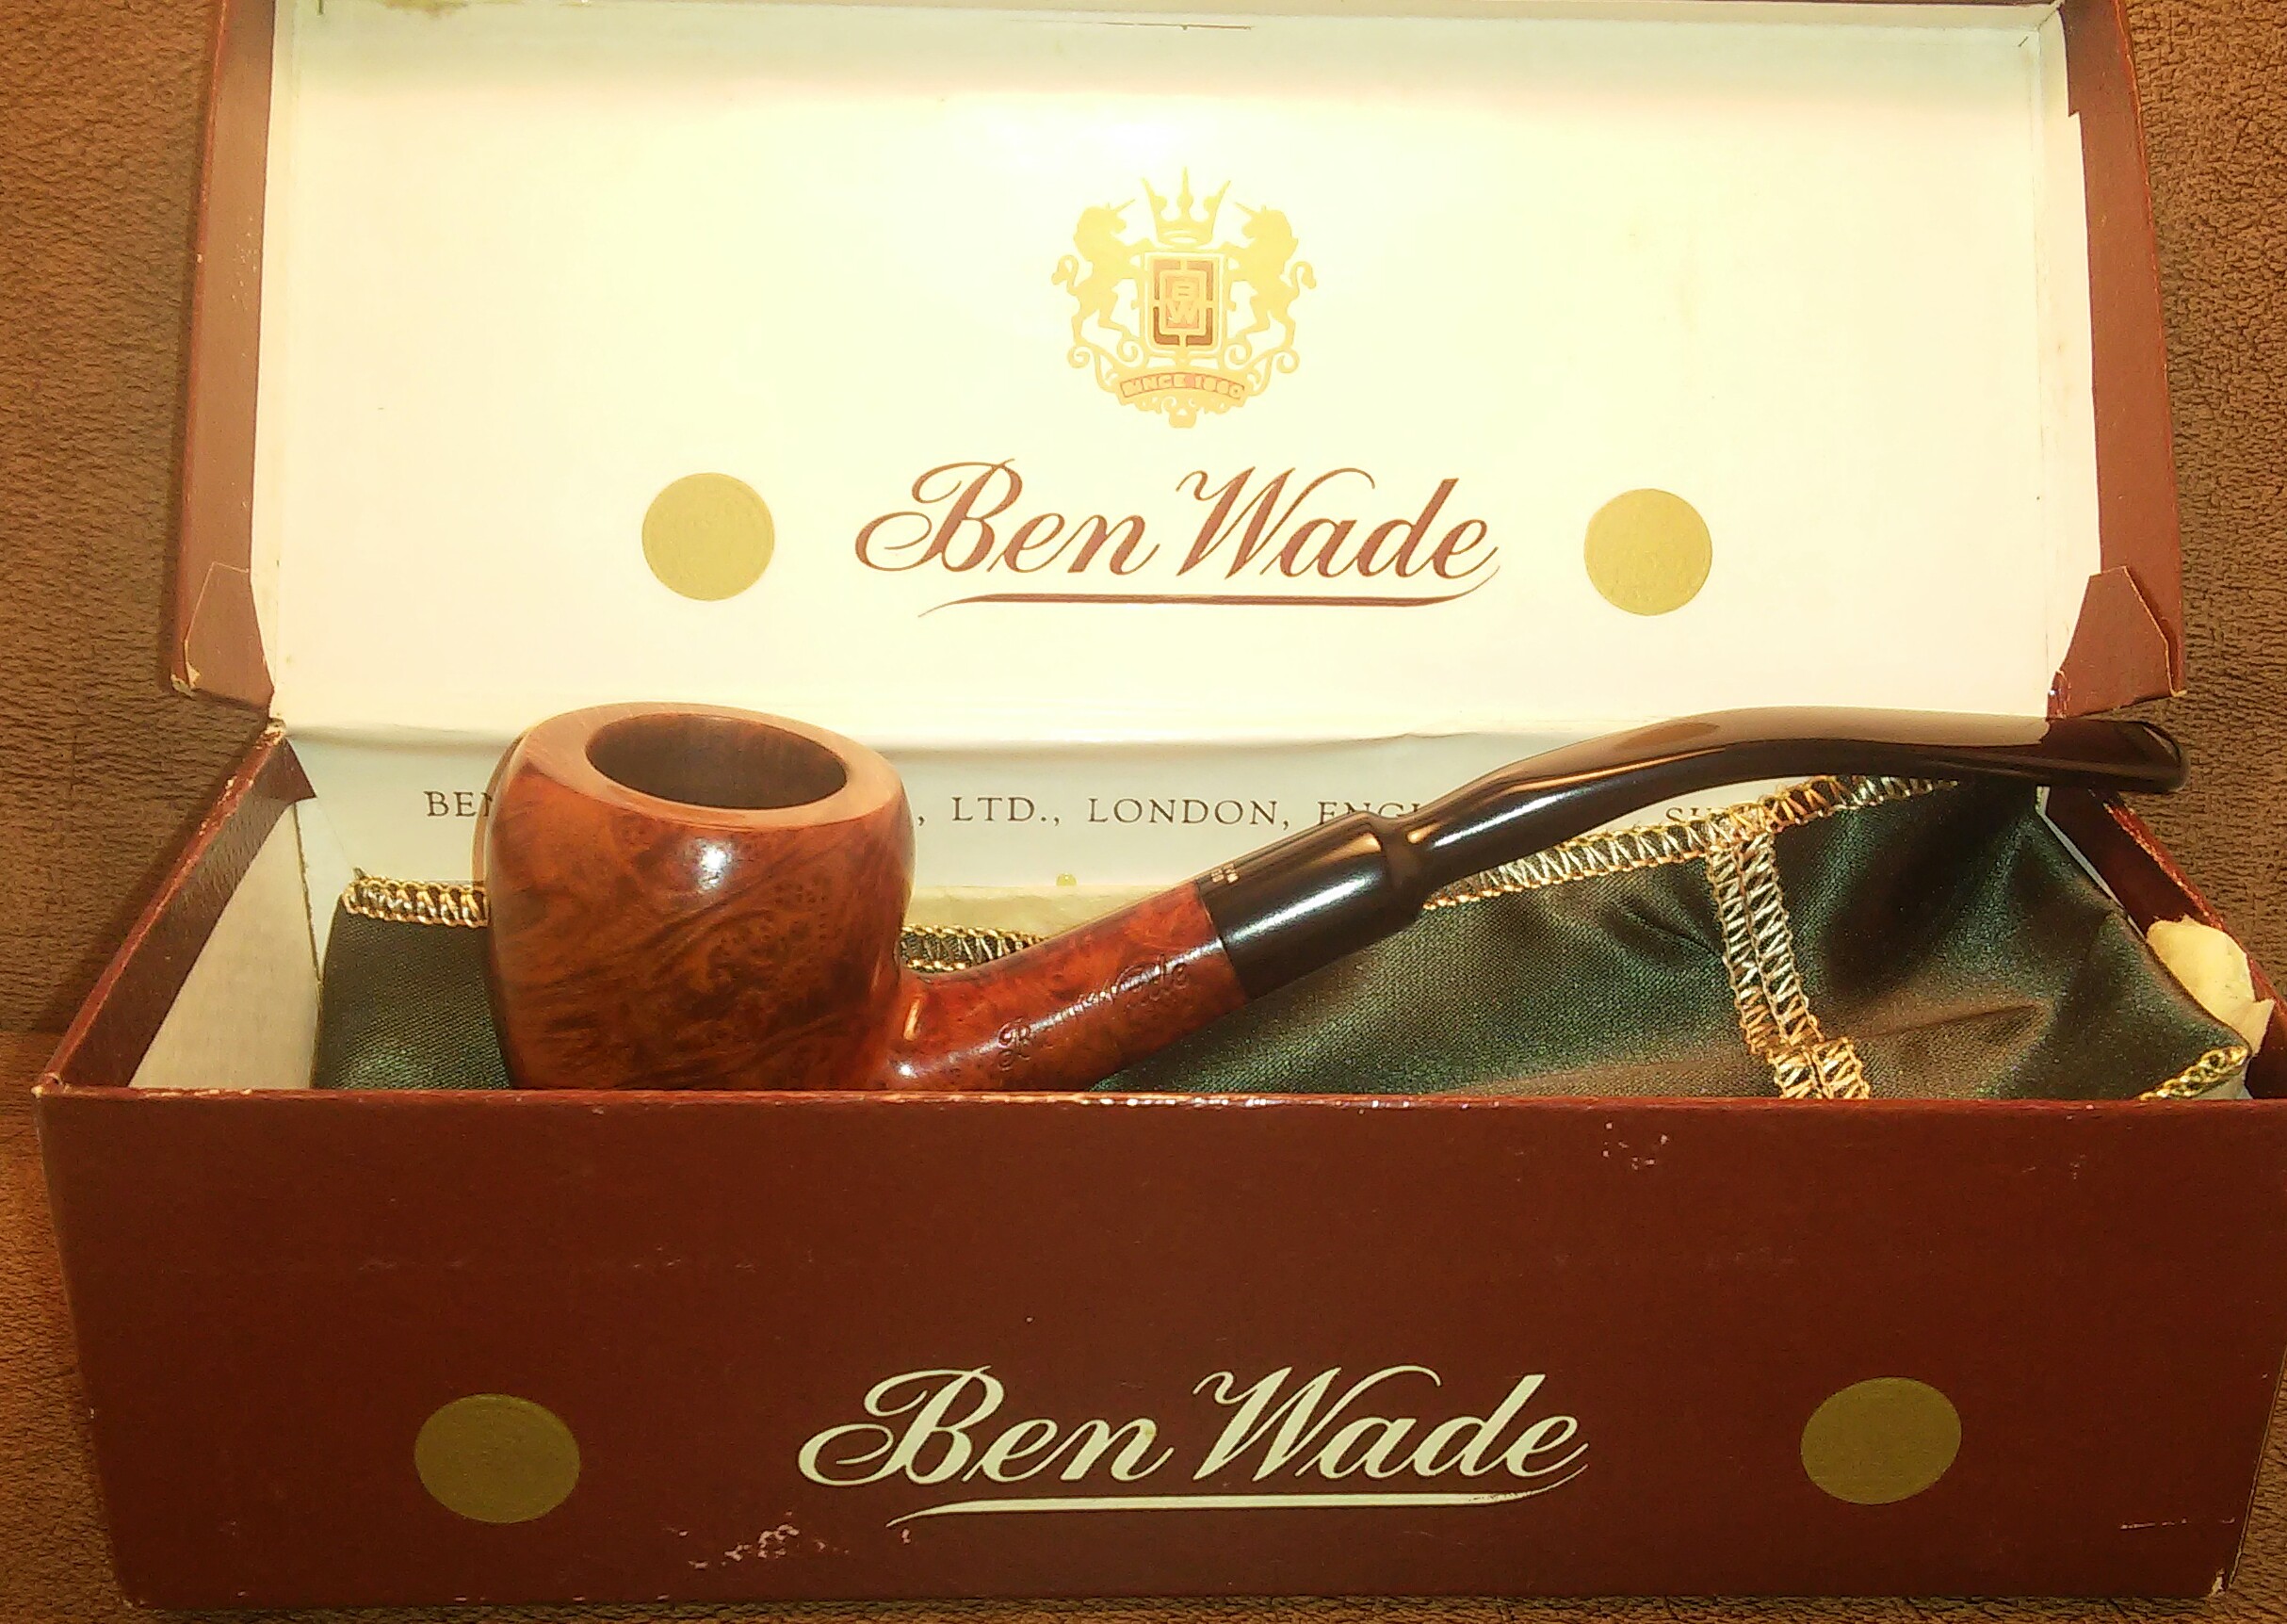
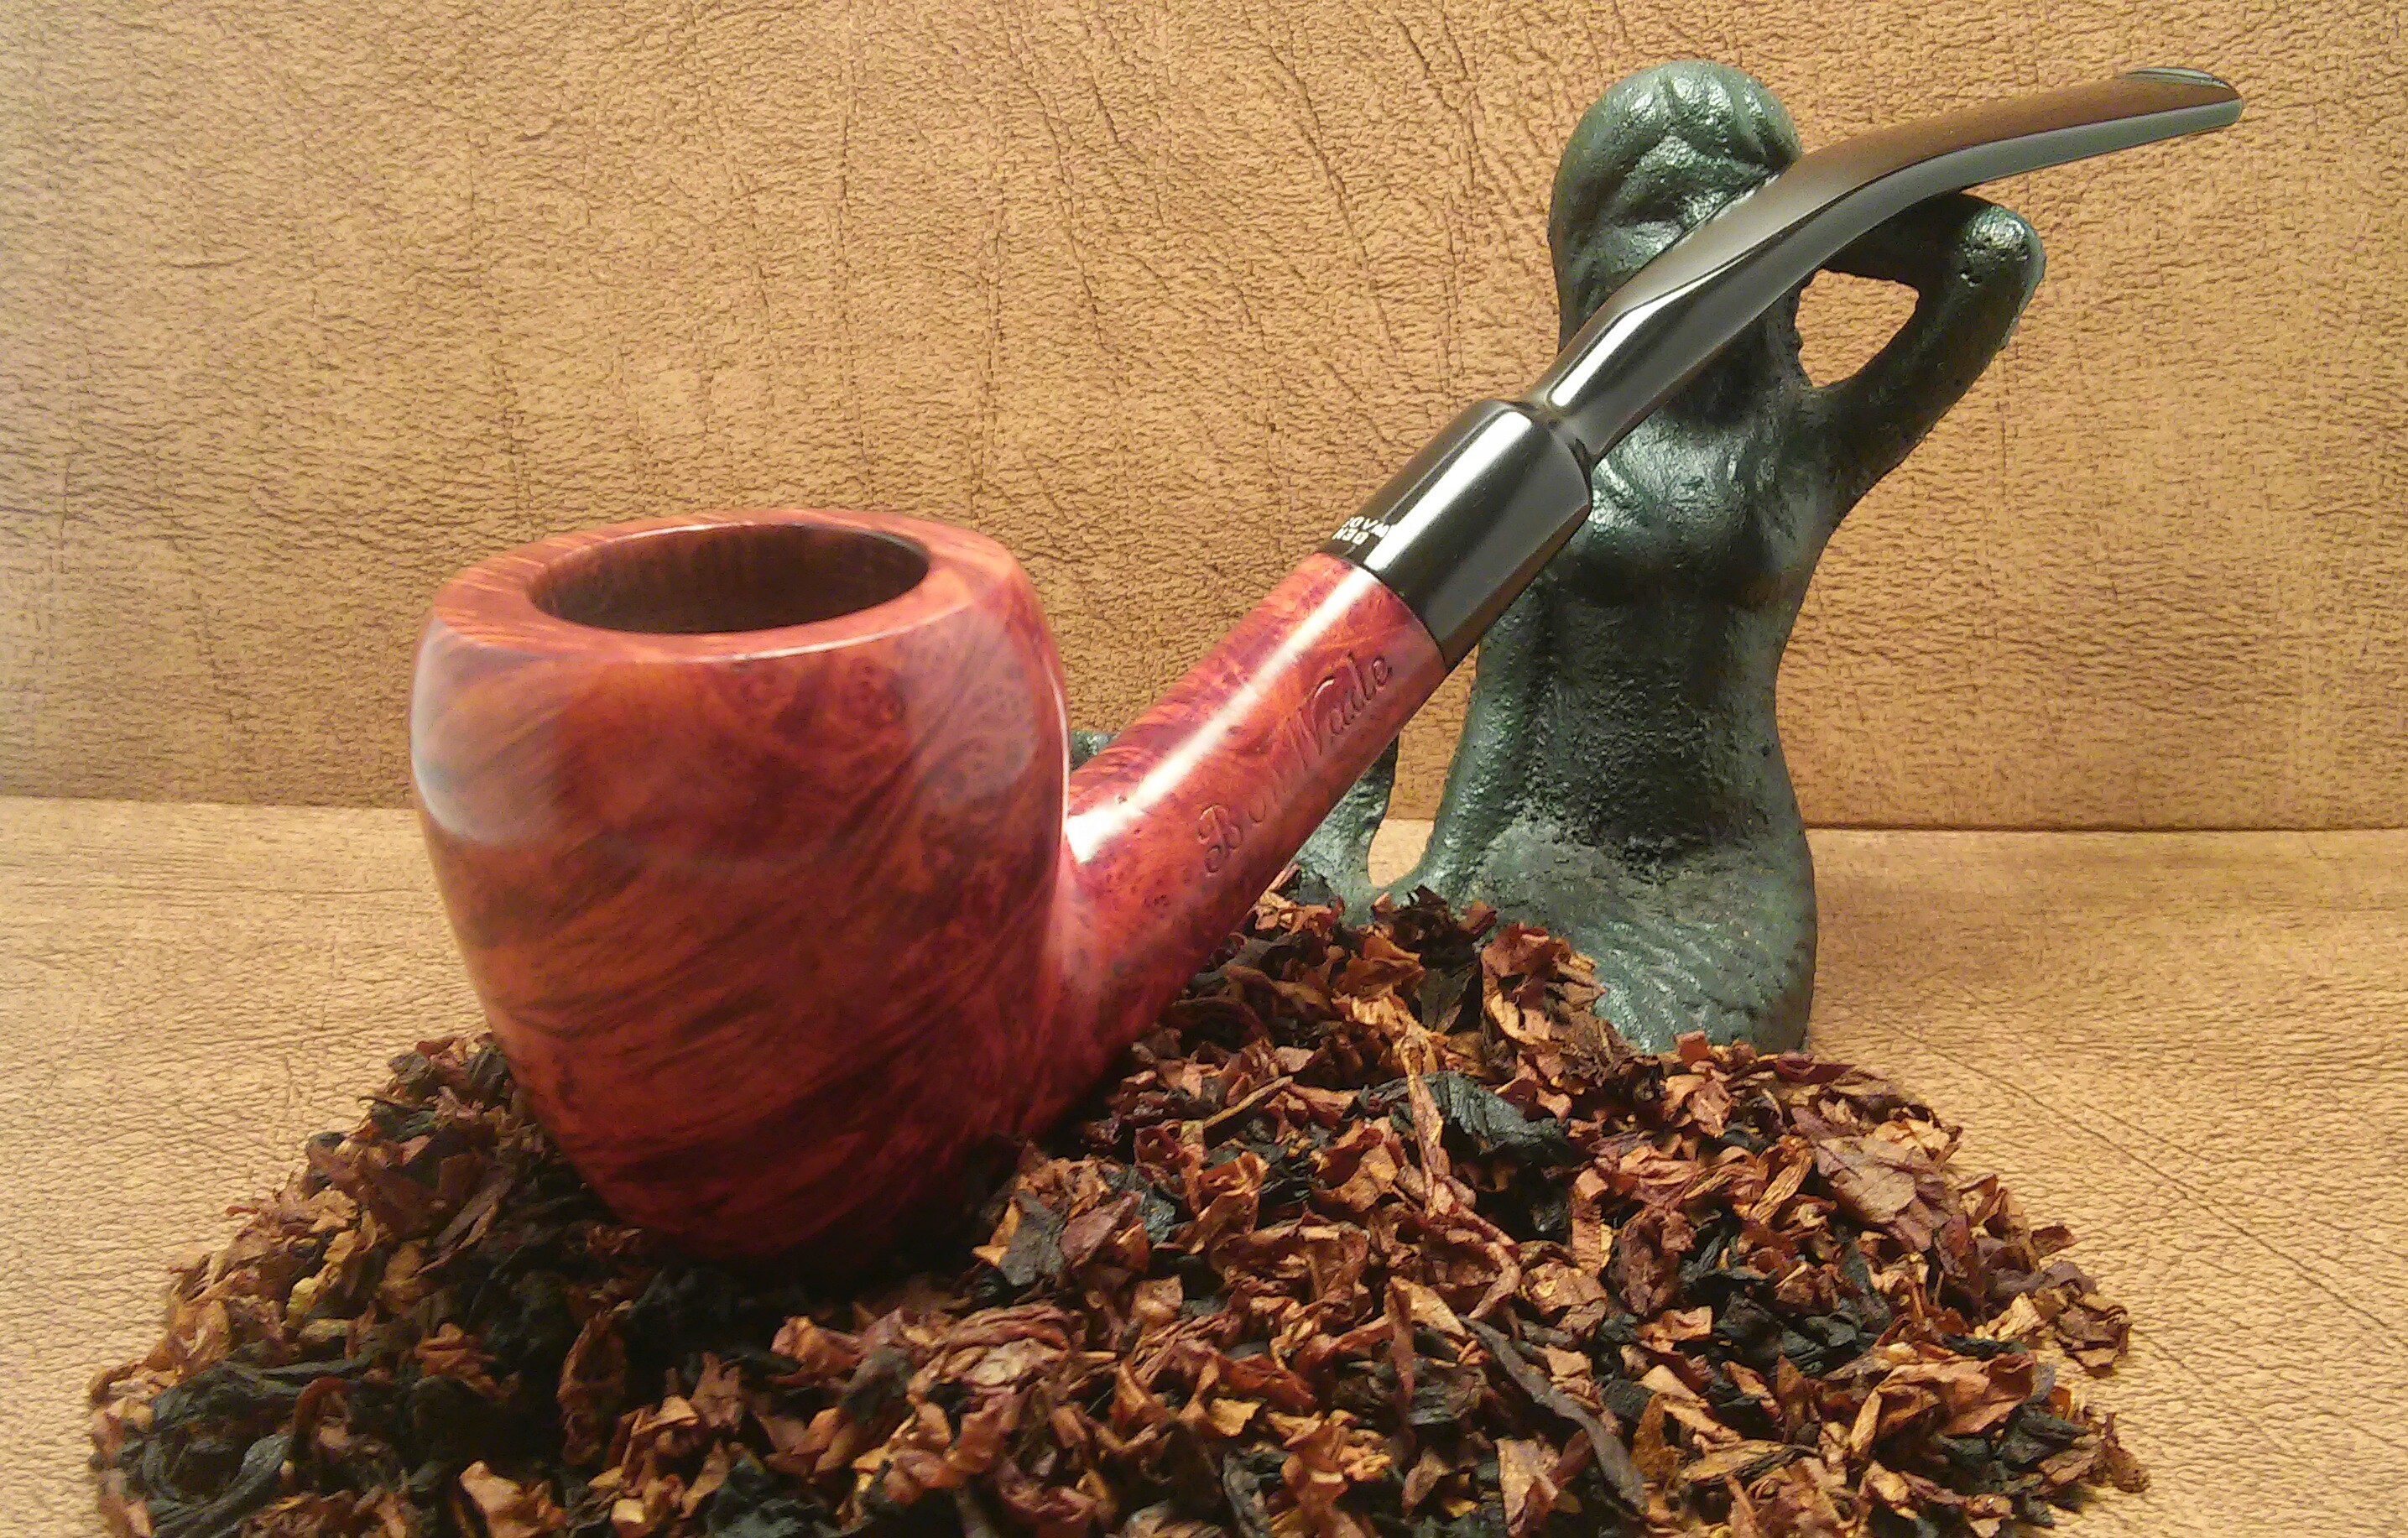
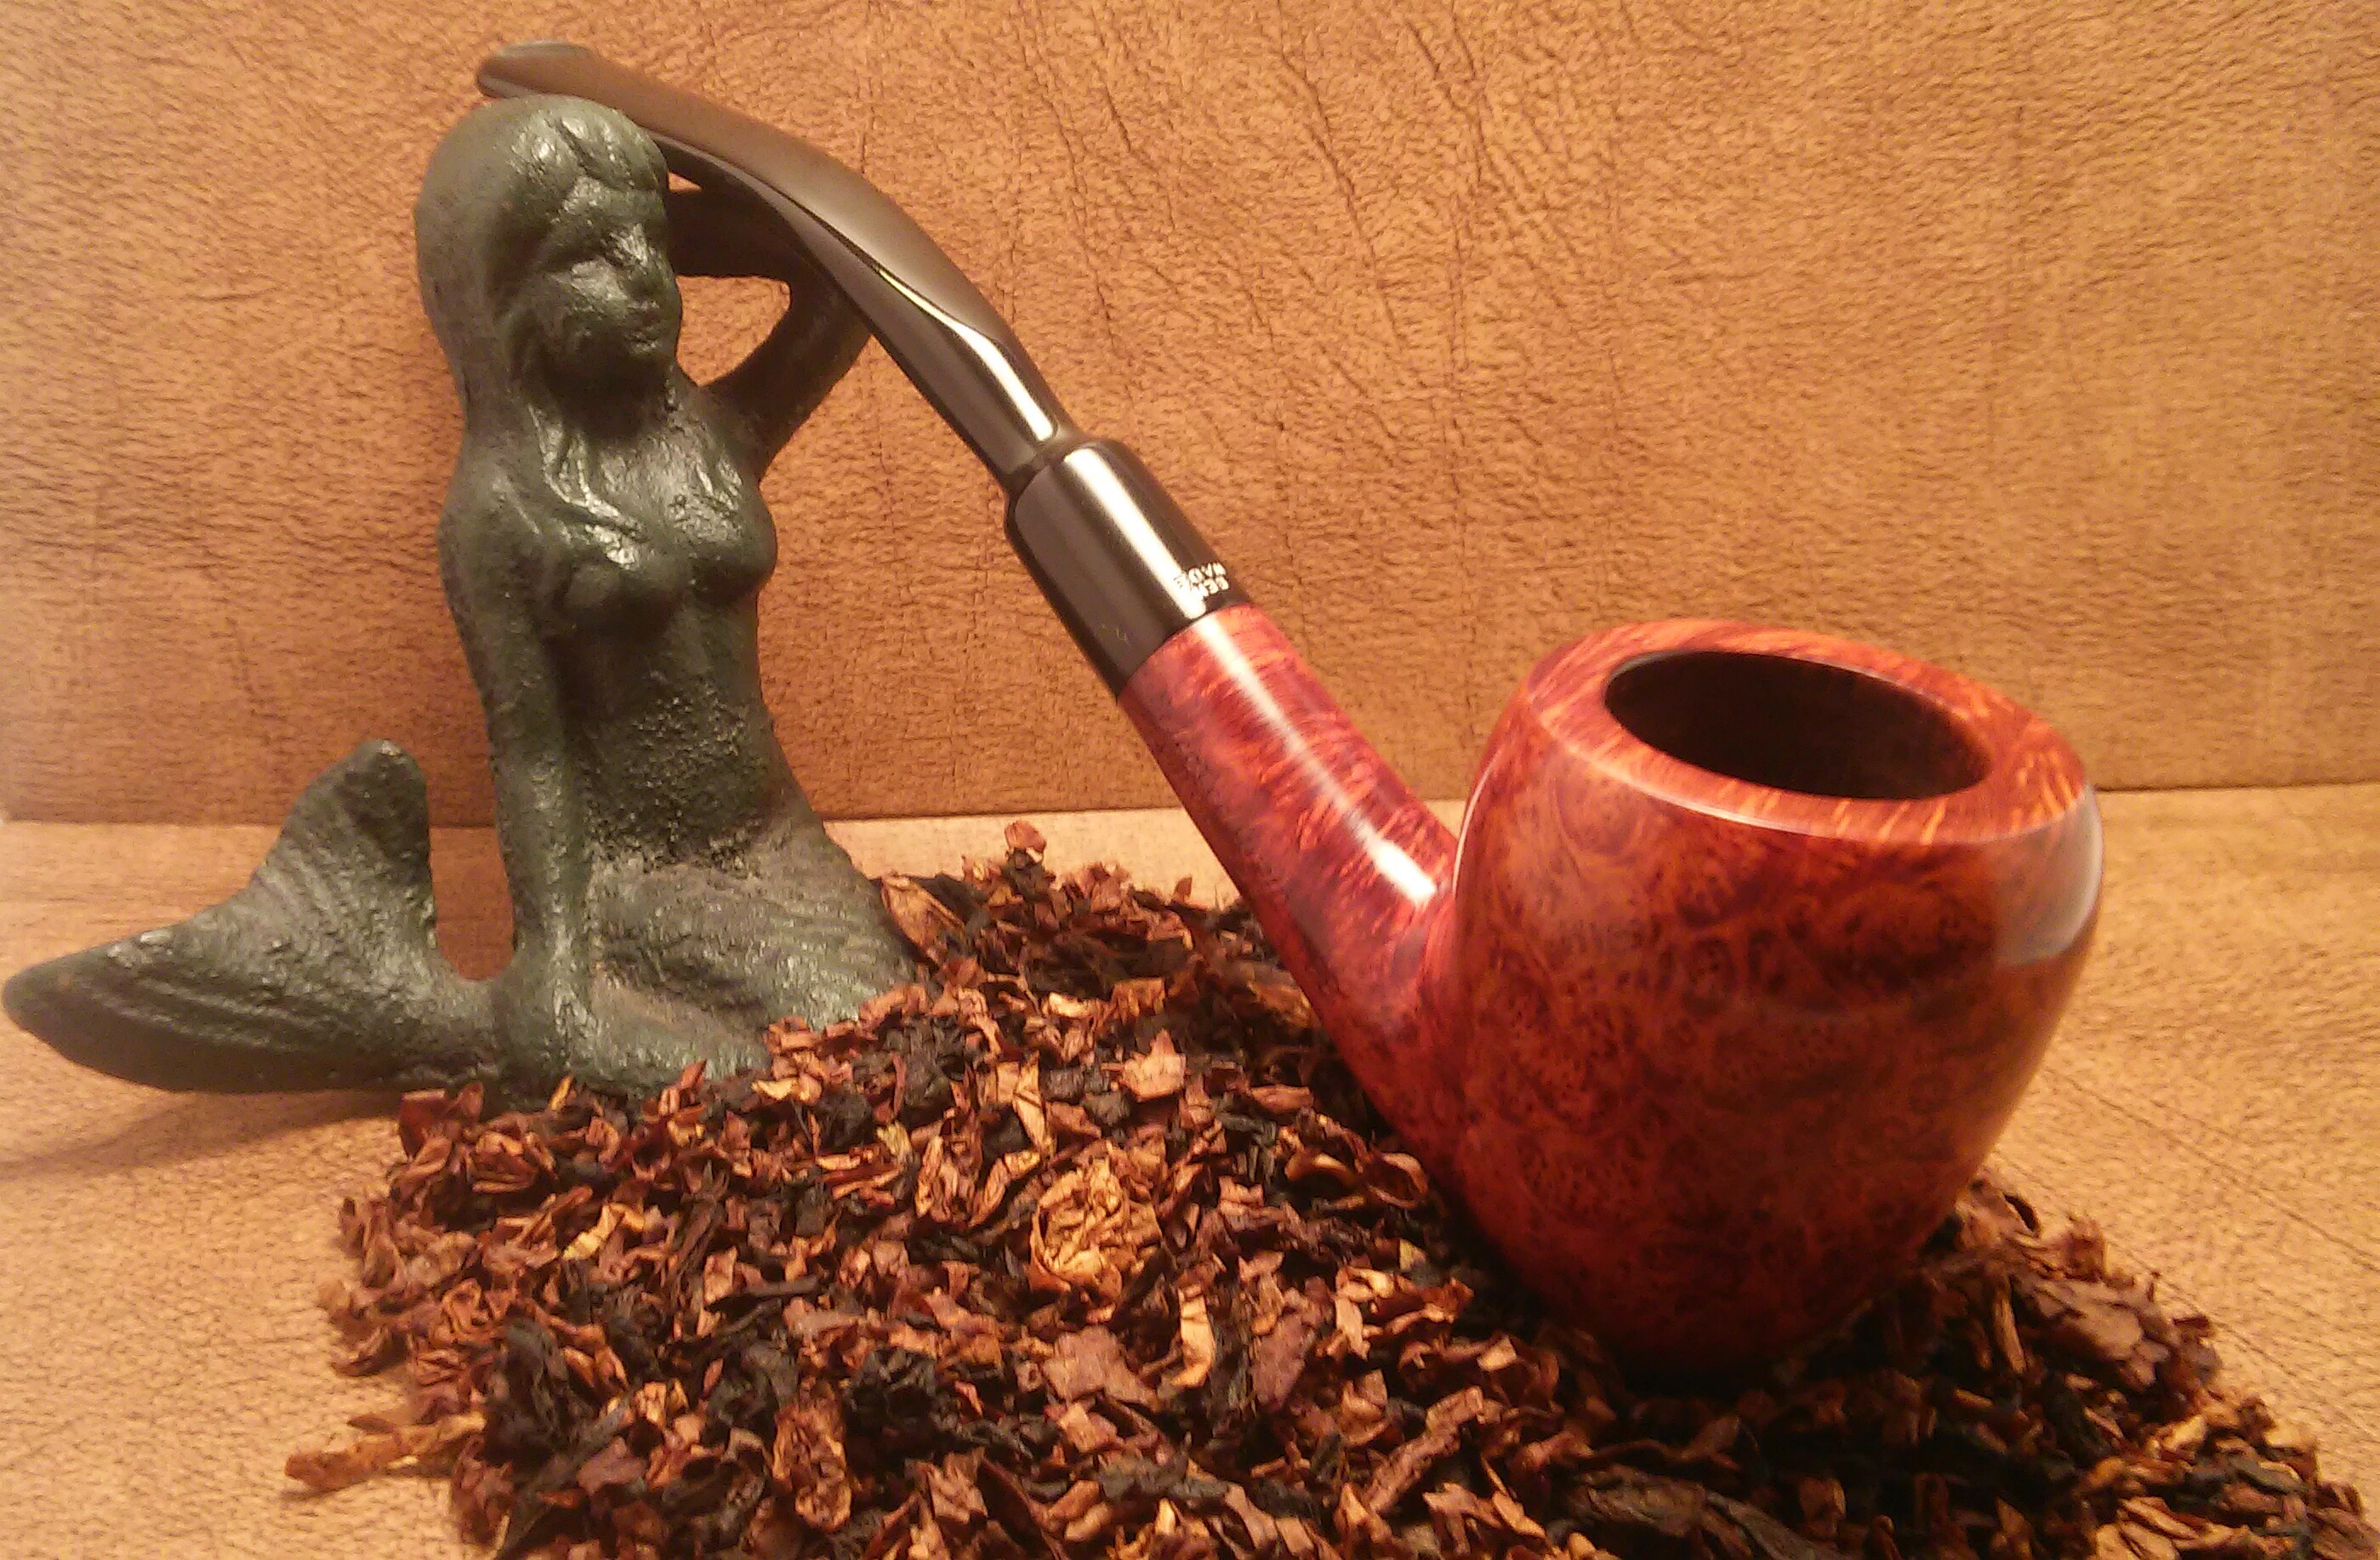
Seven inches long, beautiful grain and very comfortable in the hand. That’s the John Bessai Canadian, this was the final pipe I redid for Clint. History of John Bessai (thanks to jguss from pipesmagazine forum)

The Restoration.

20160313_000831~220160313_000813~220160313_000910~220160314_142434~2PhotoGrid_1458076436231

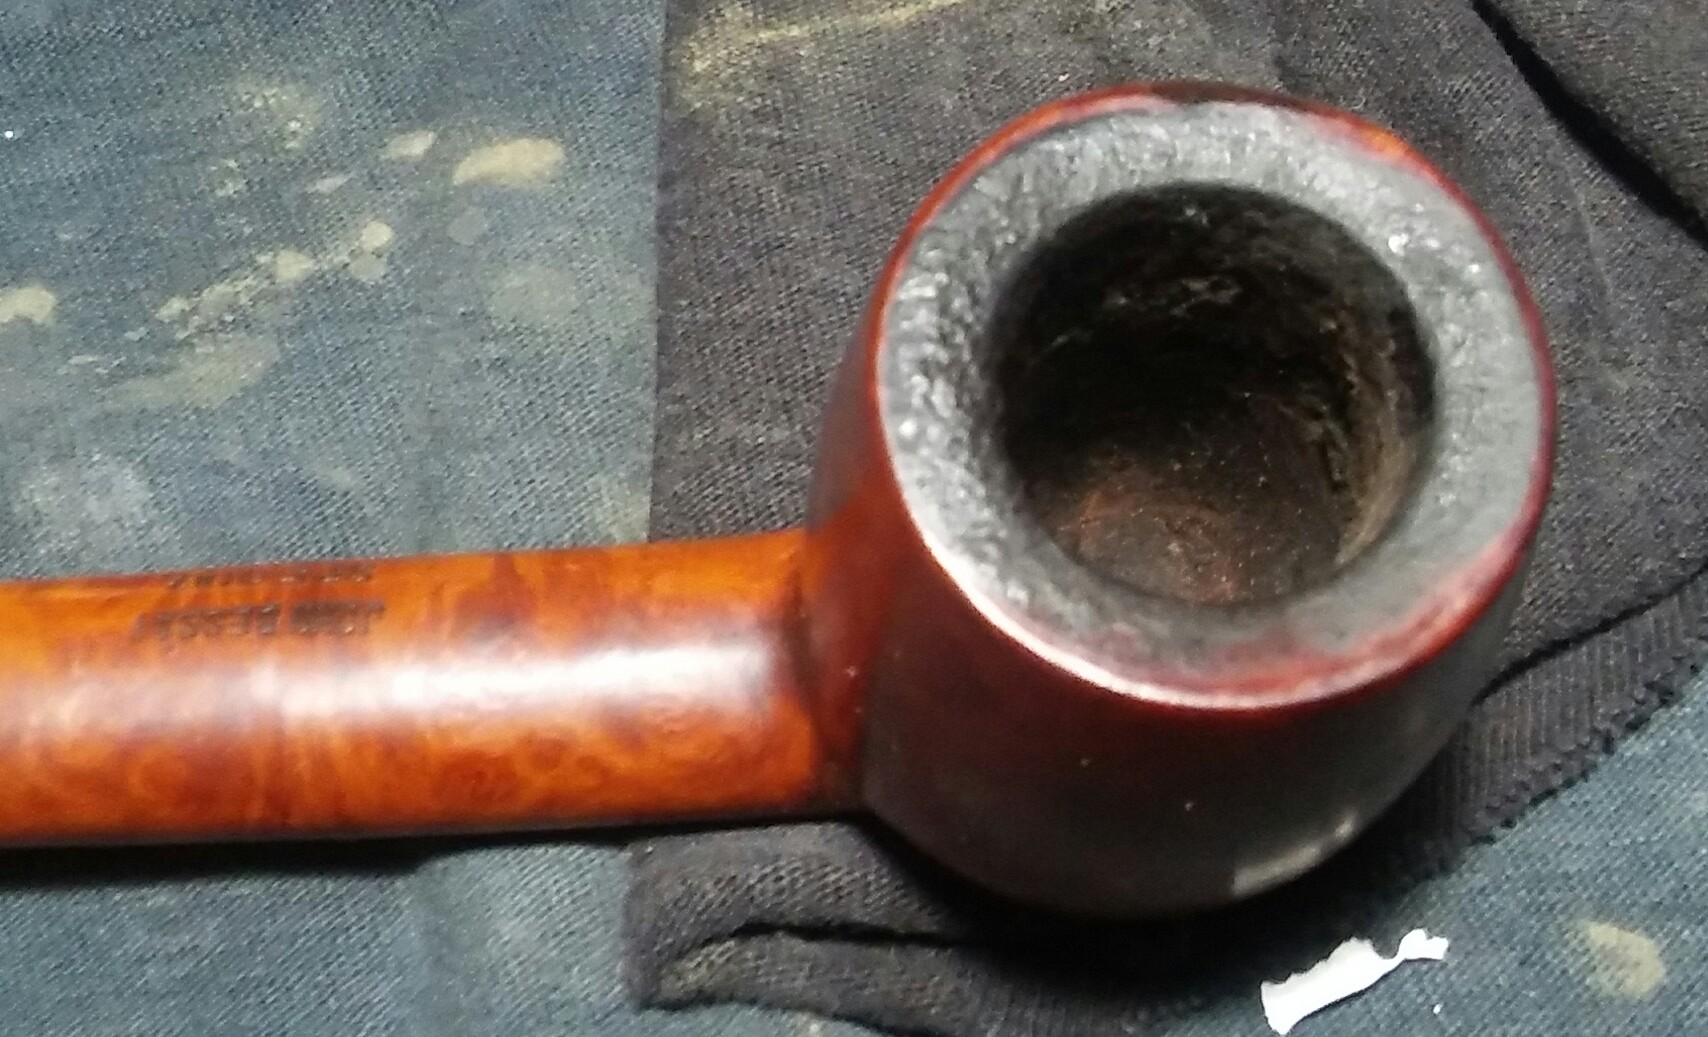
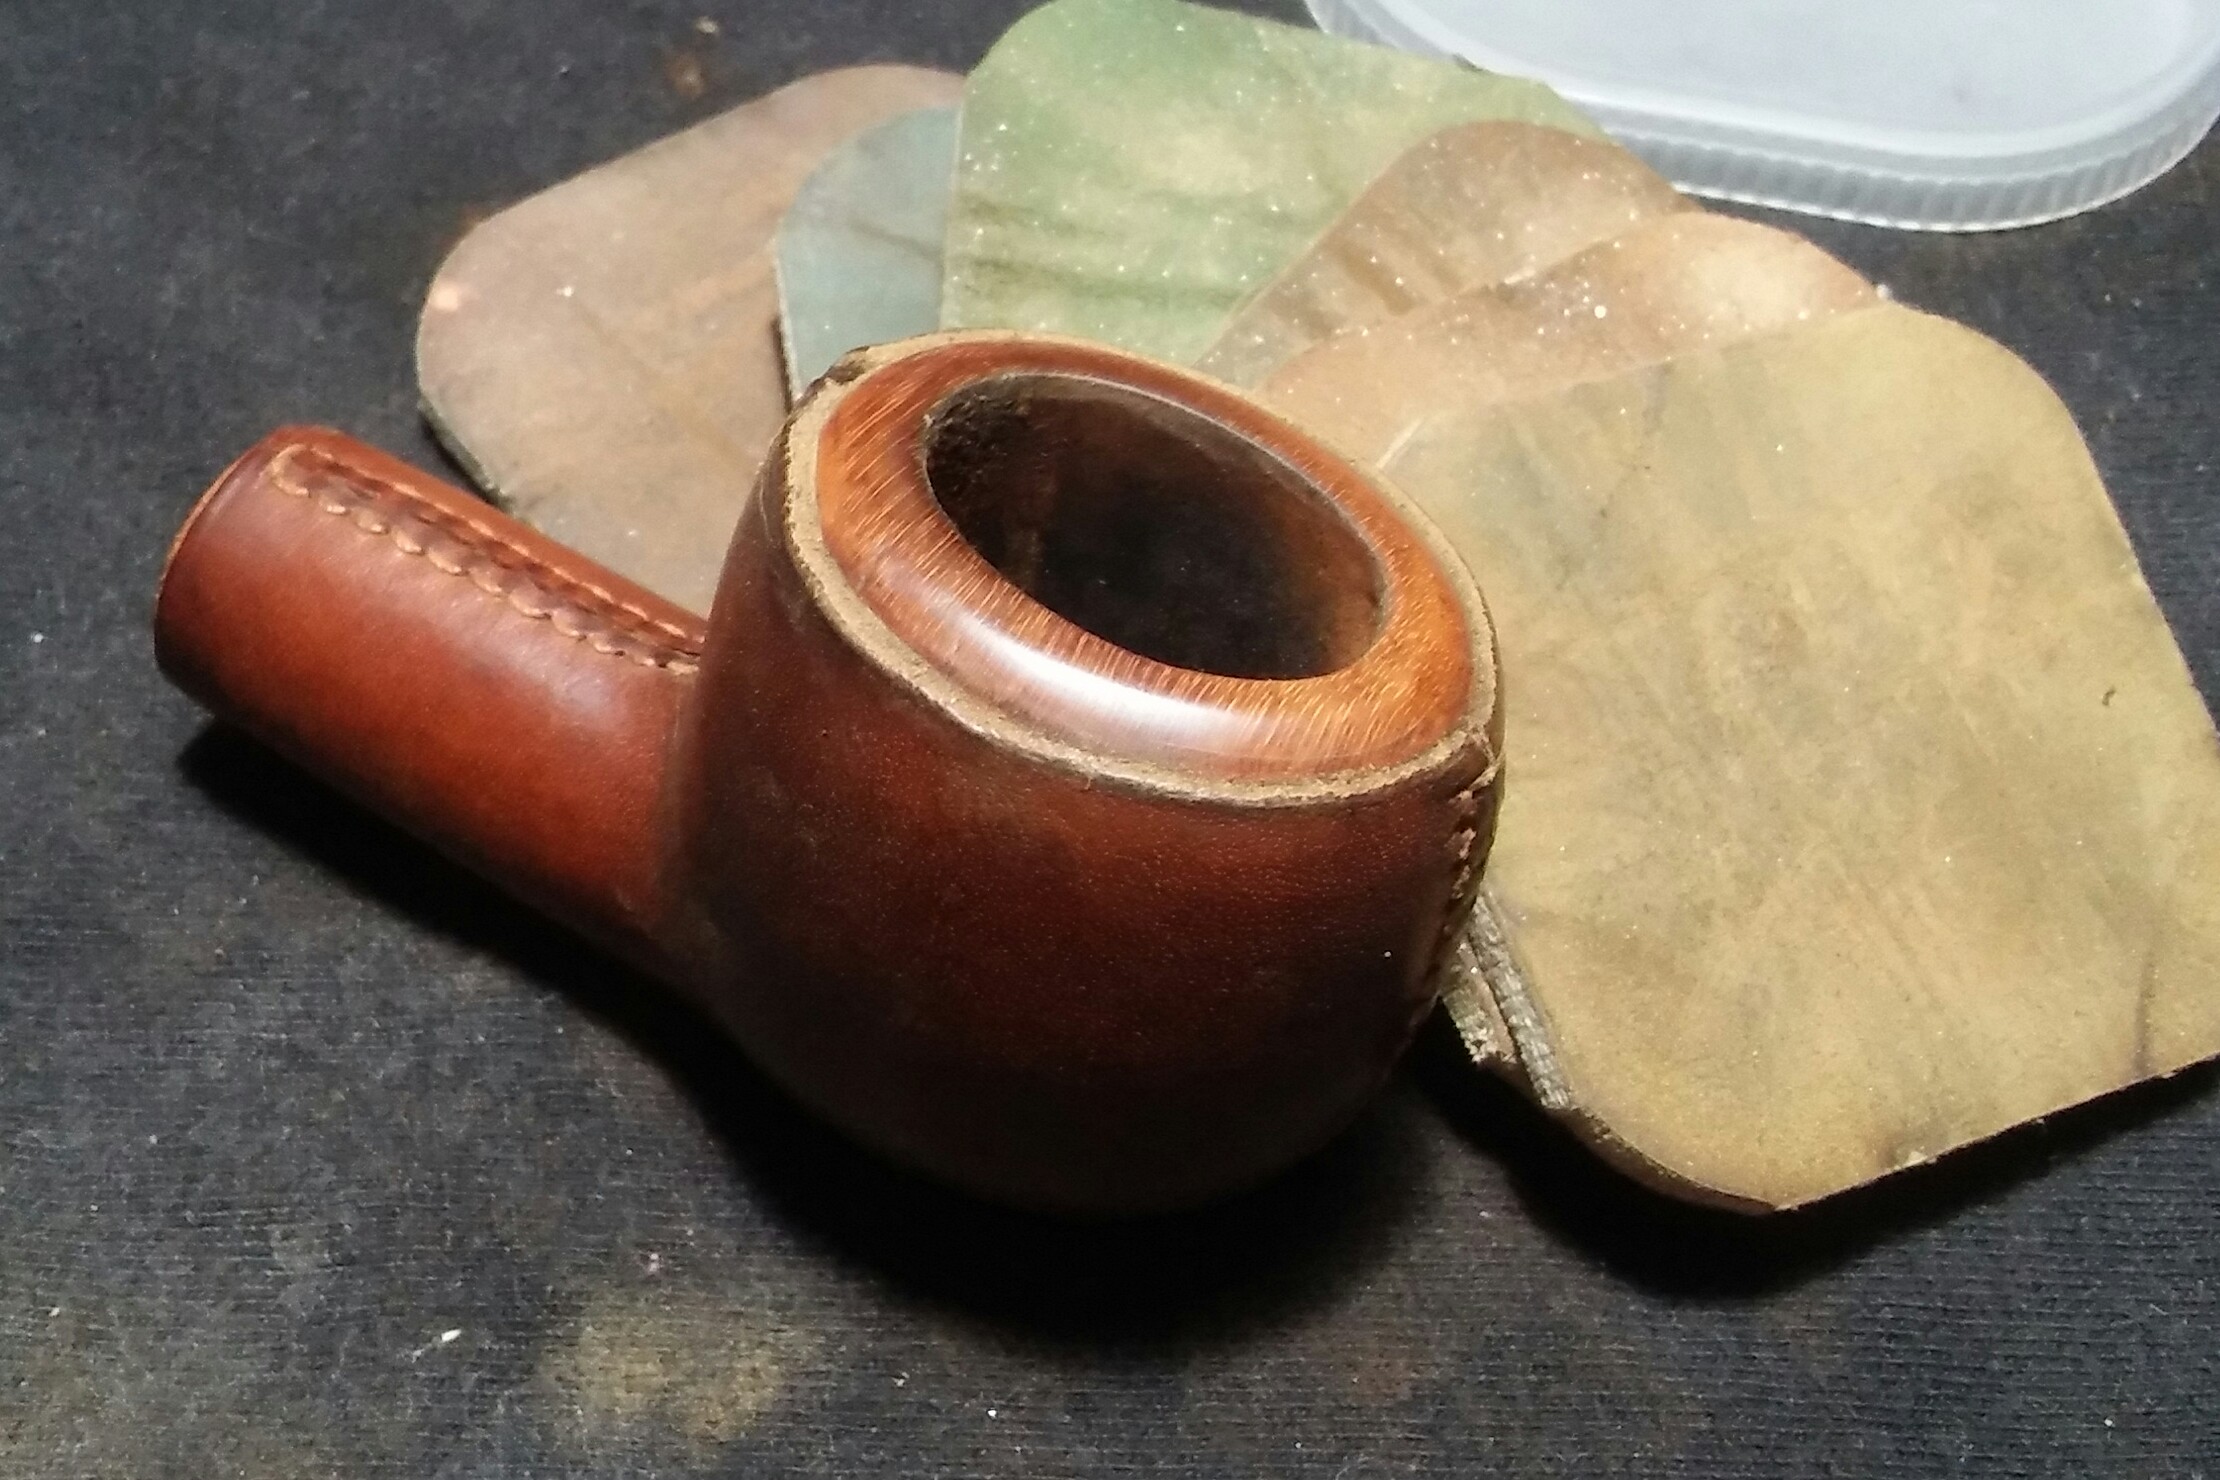
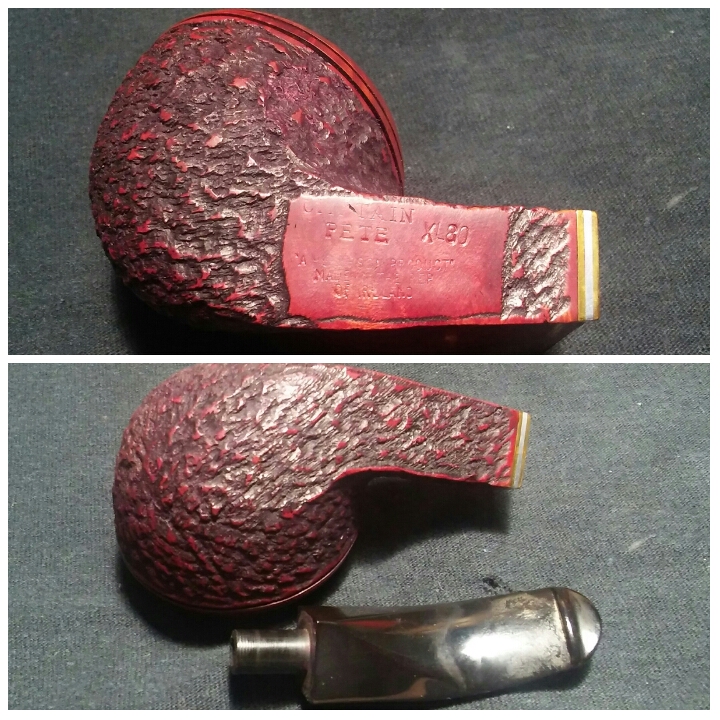
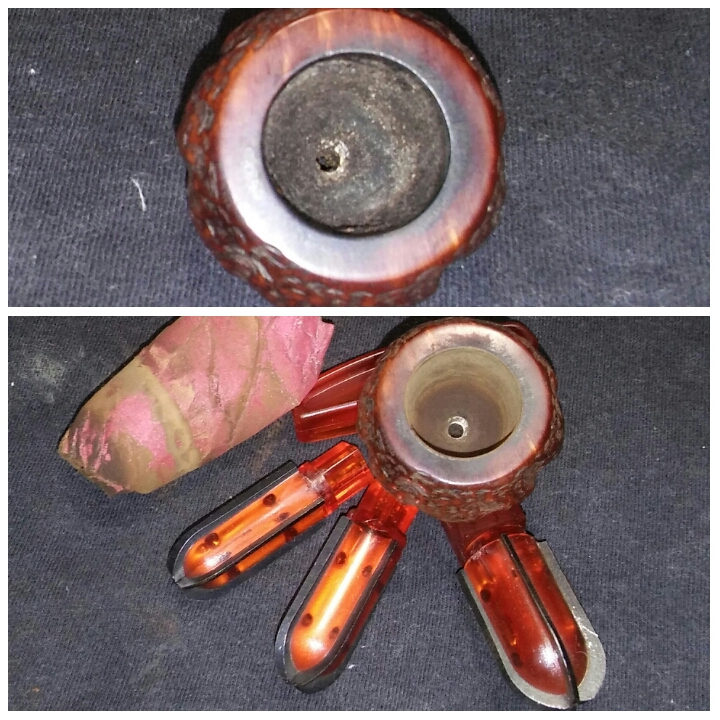
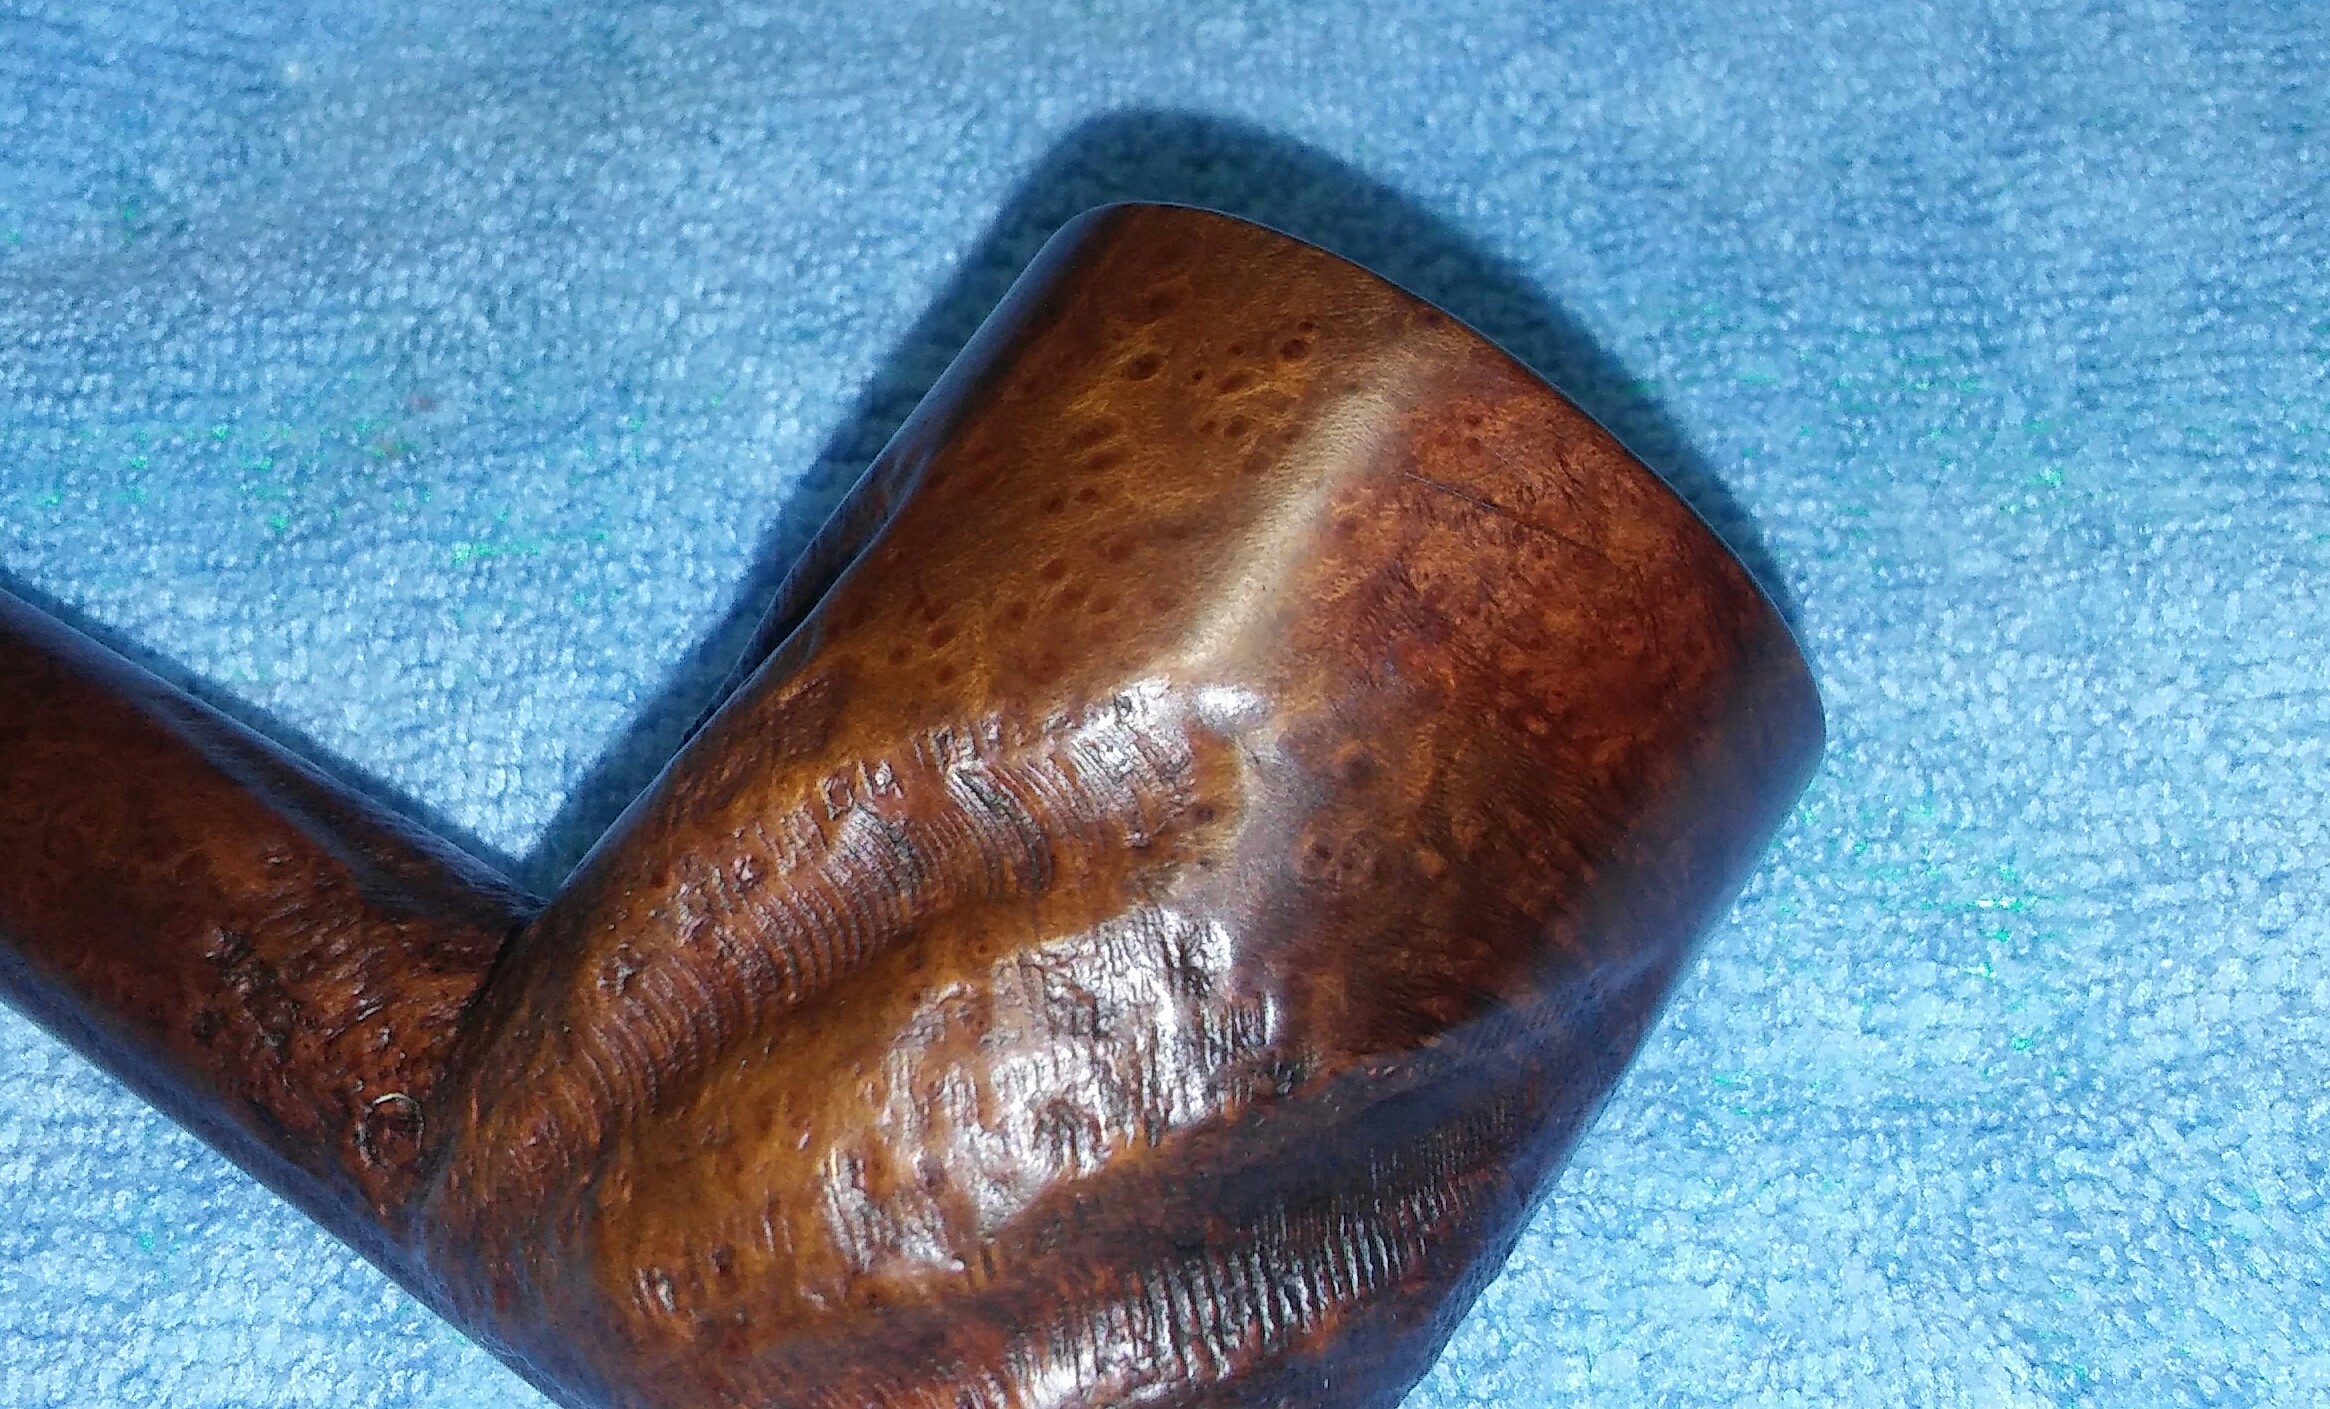
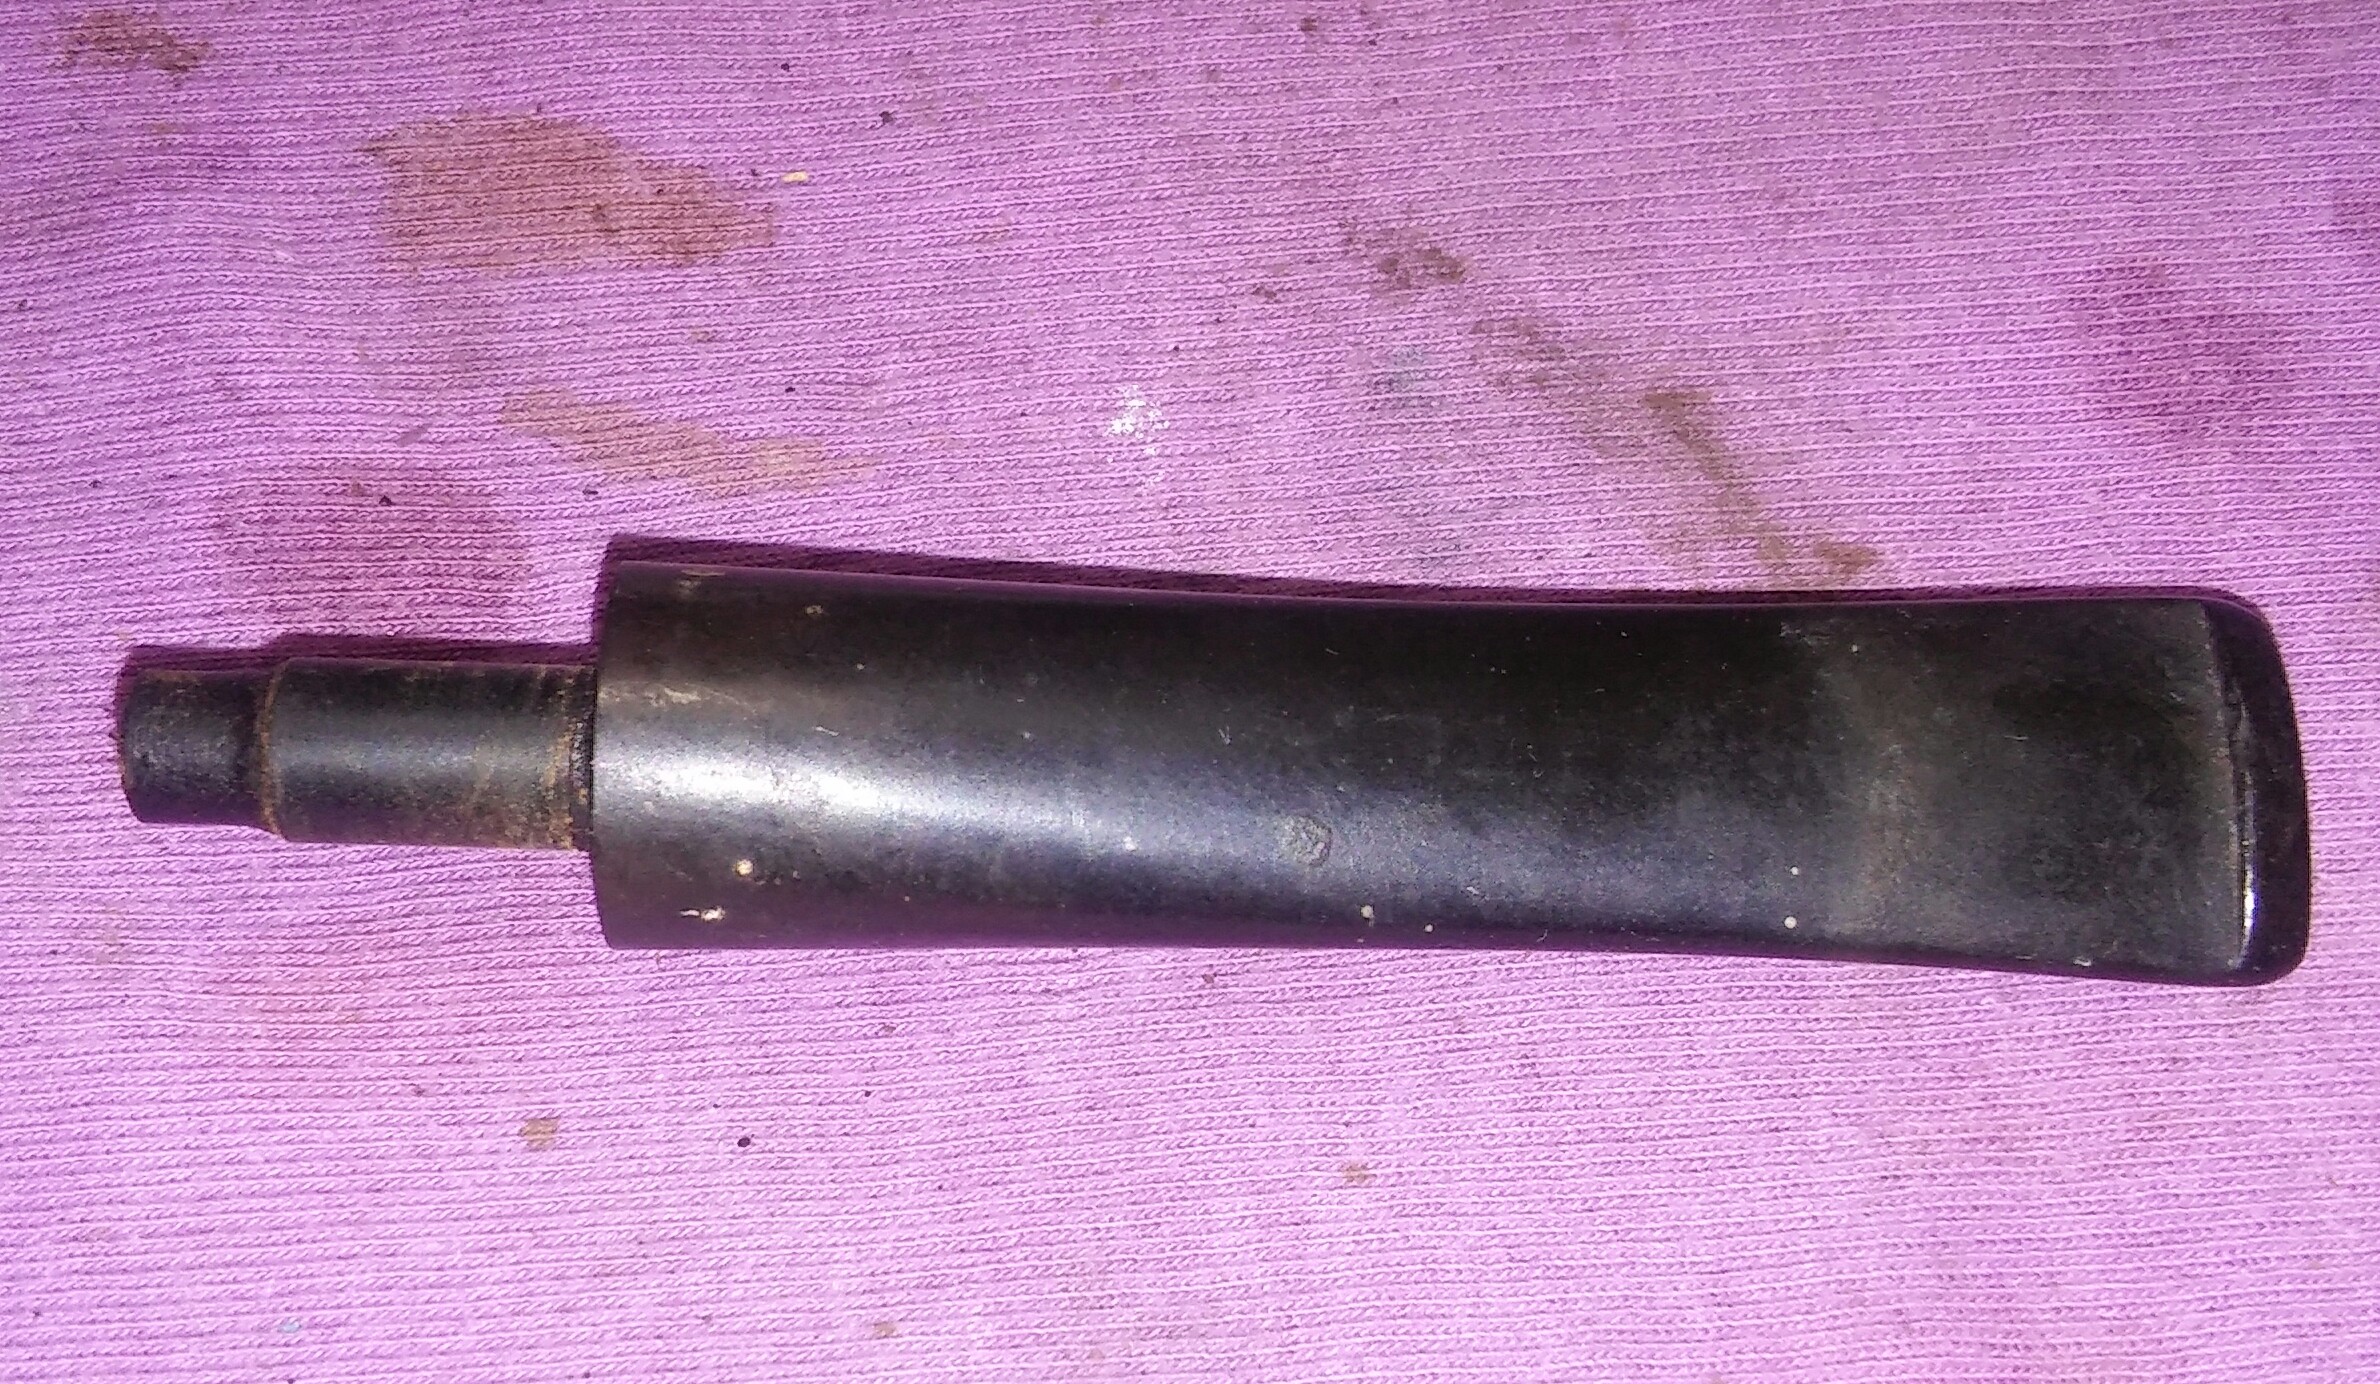
The Canadian was in nice shape, to be honest I was saving the best for last and what I thought would the easiest but I’ve been wrong before. Aside from the deep tooth impressions and a small burn on the side of the rim, the pipe was pretty clean. Light build up on the rim and two spots that would need filling.

20160314_142335~2

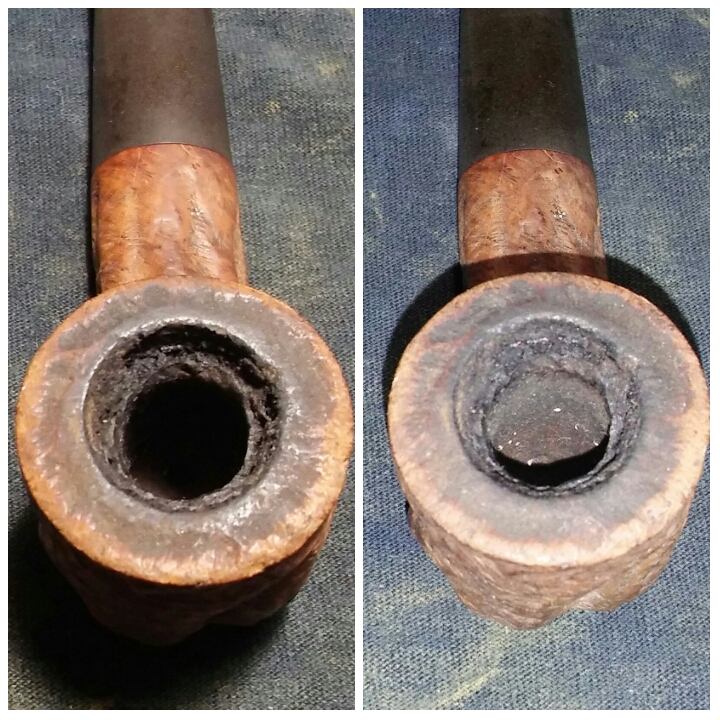
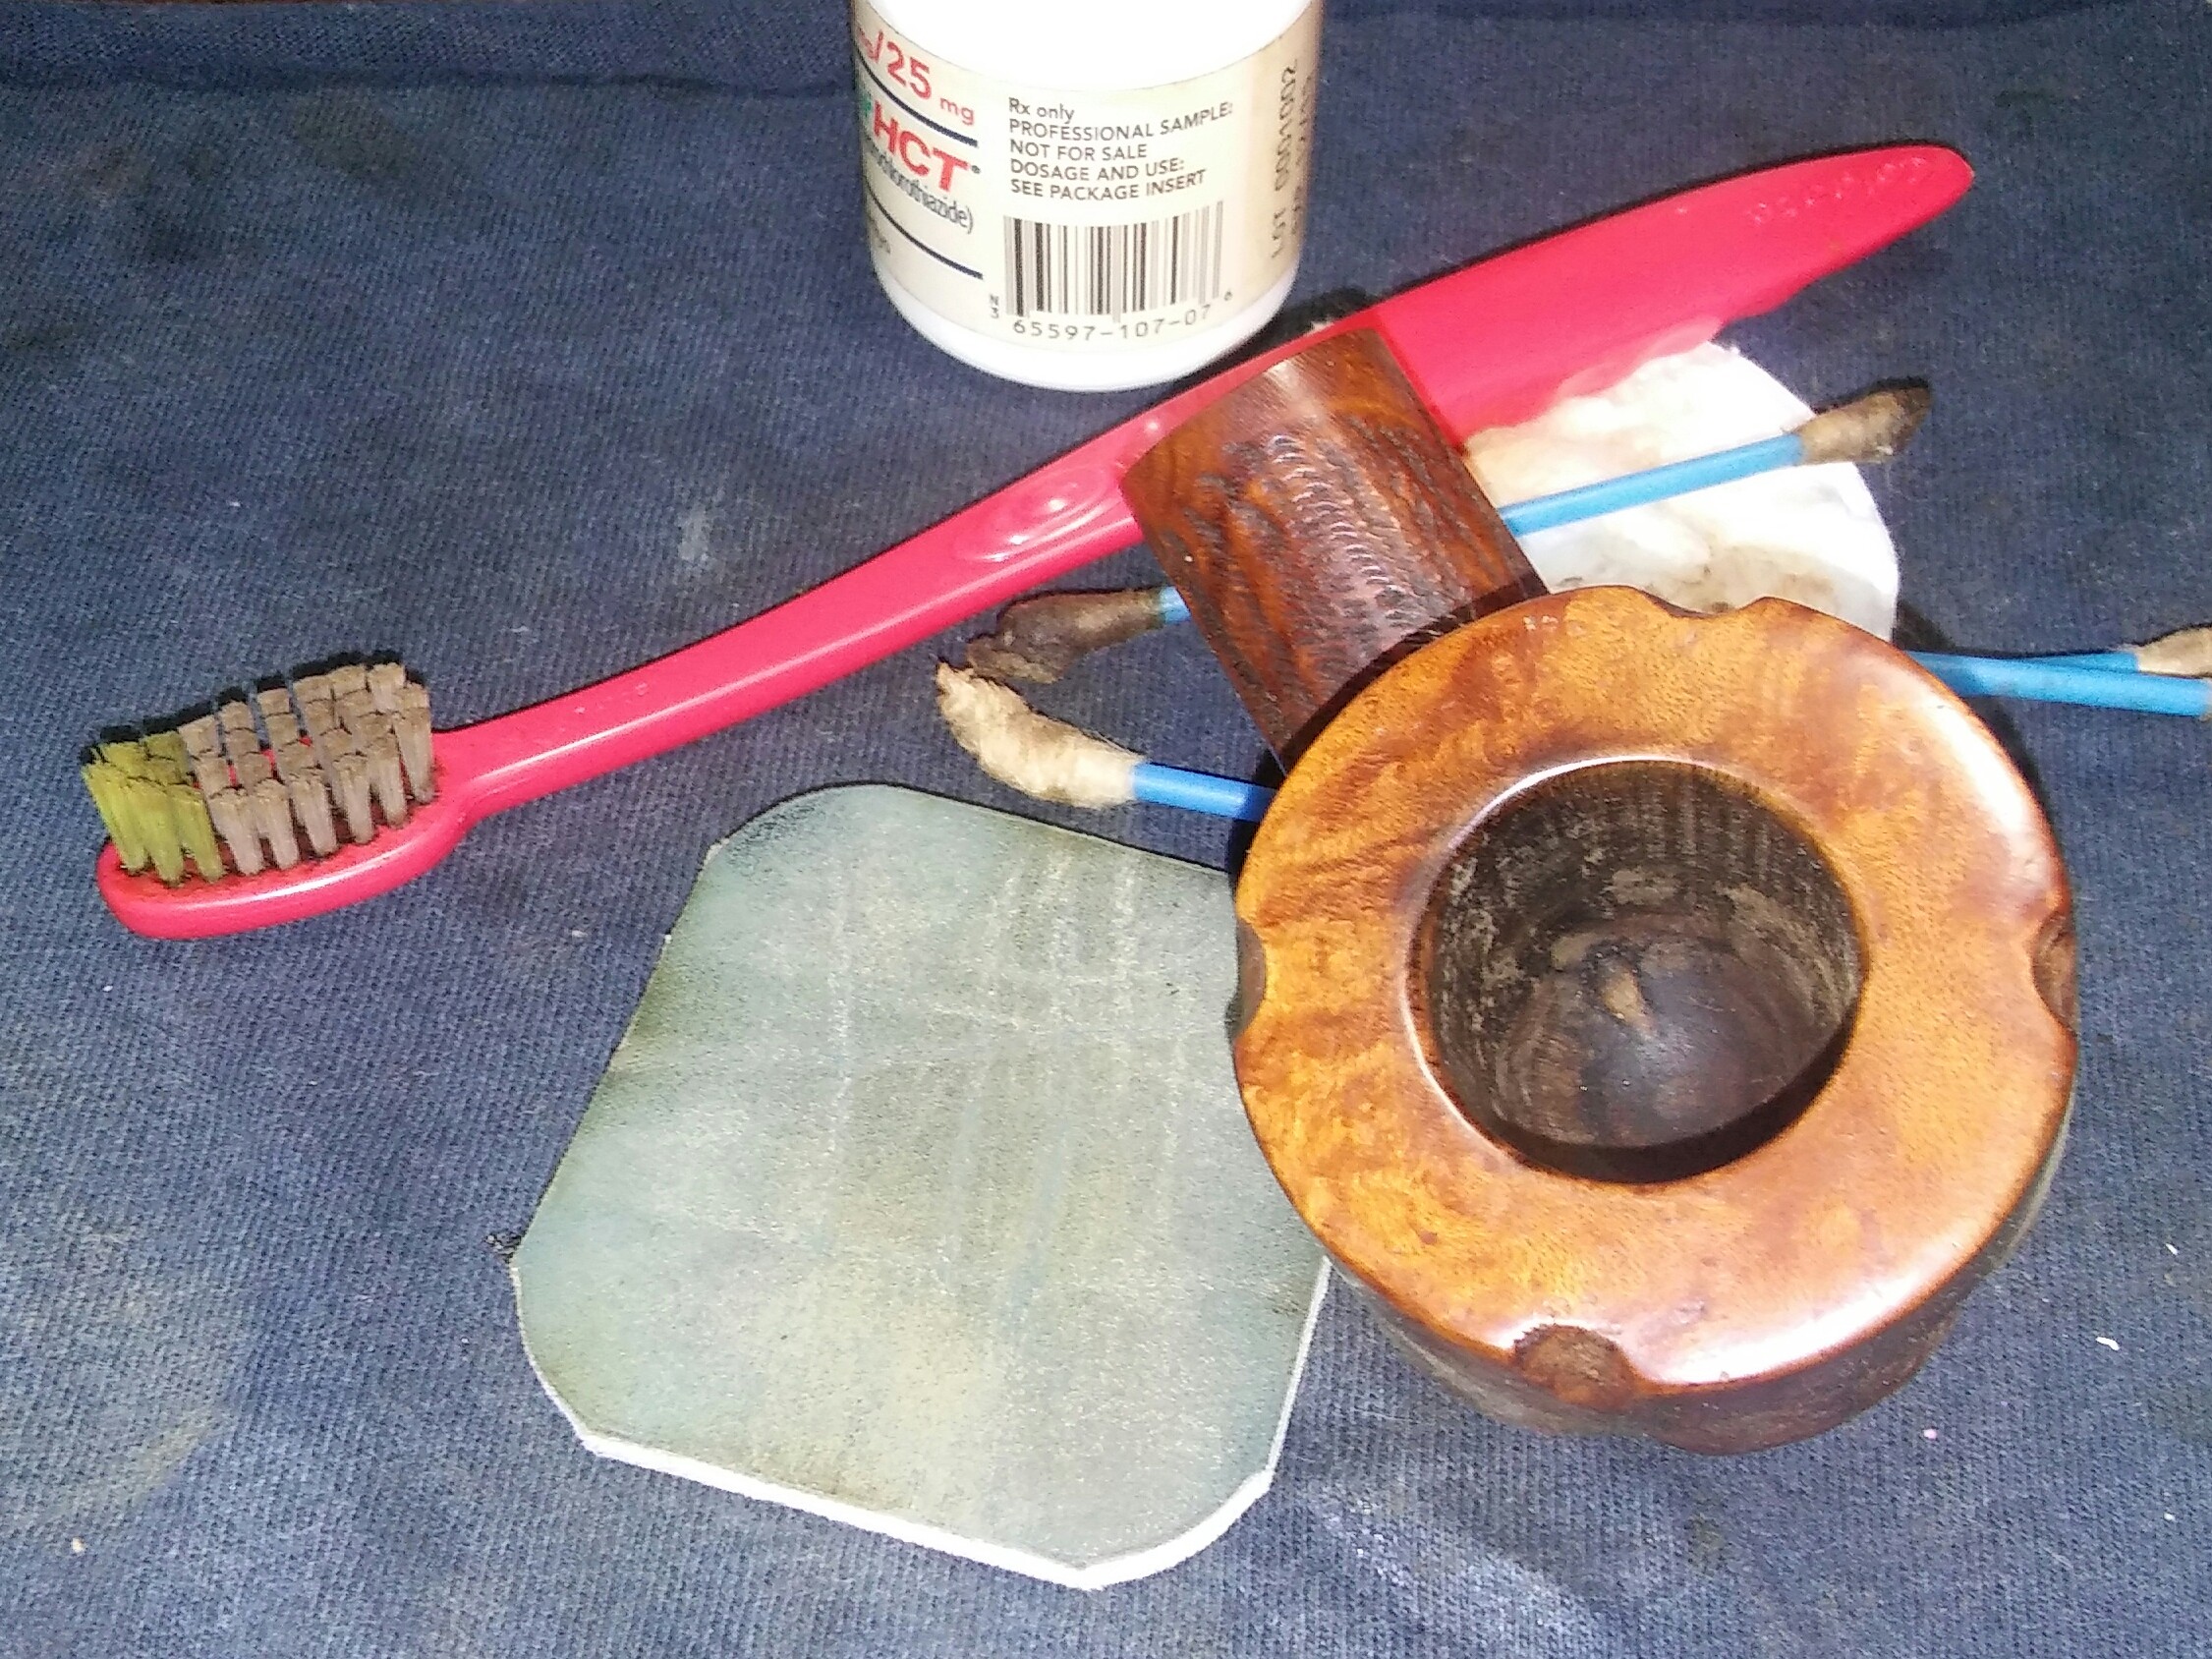
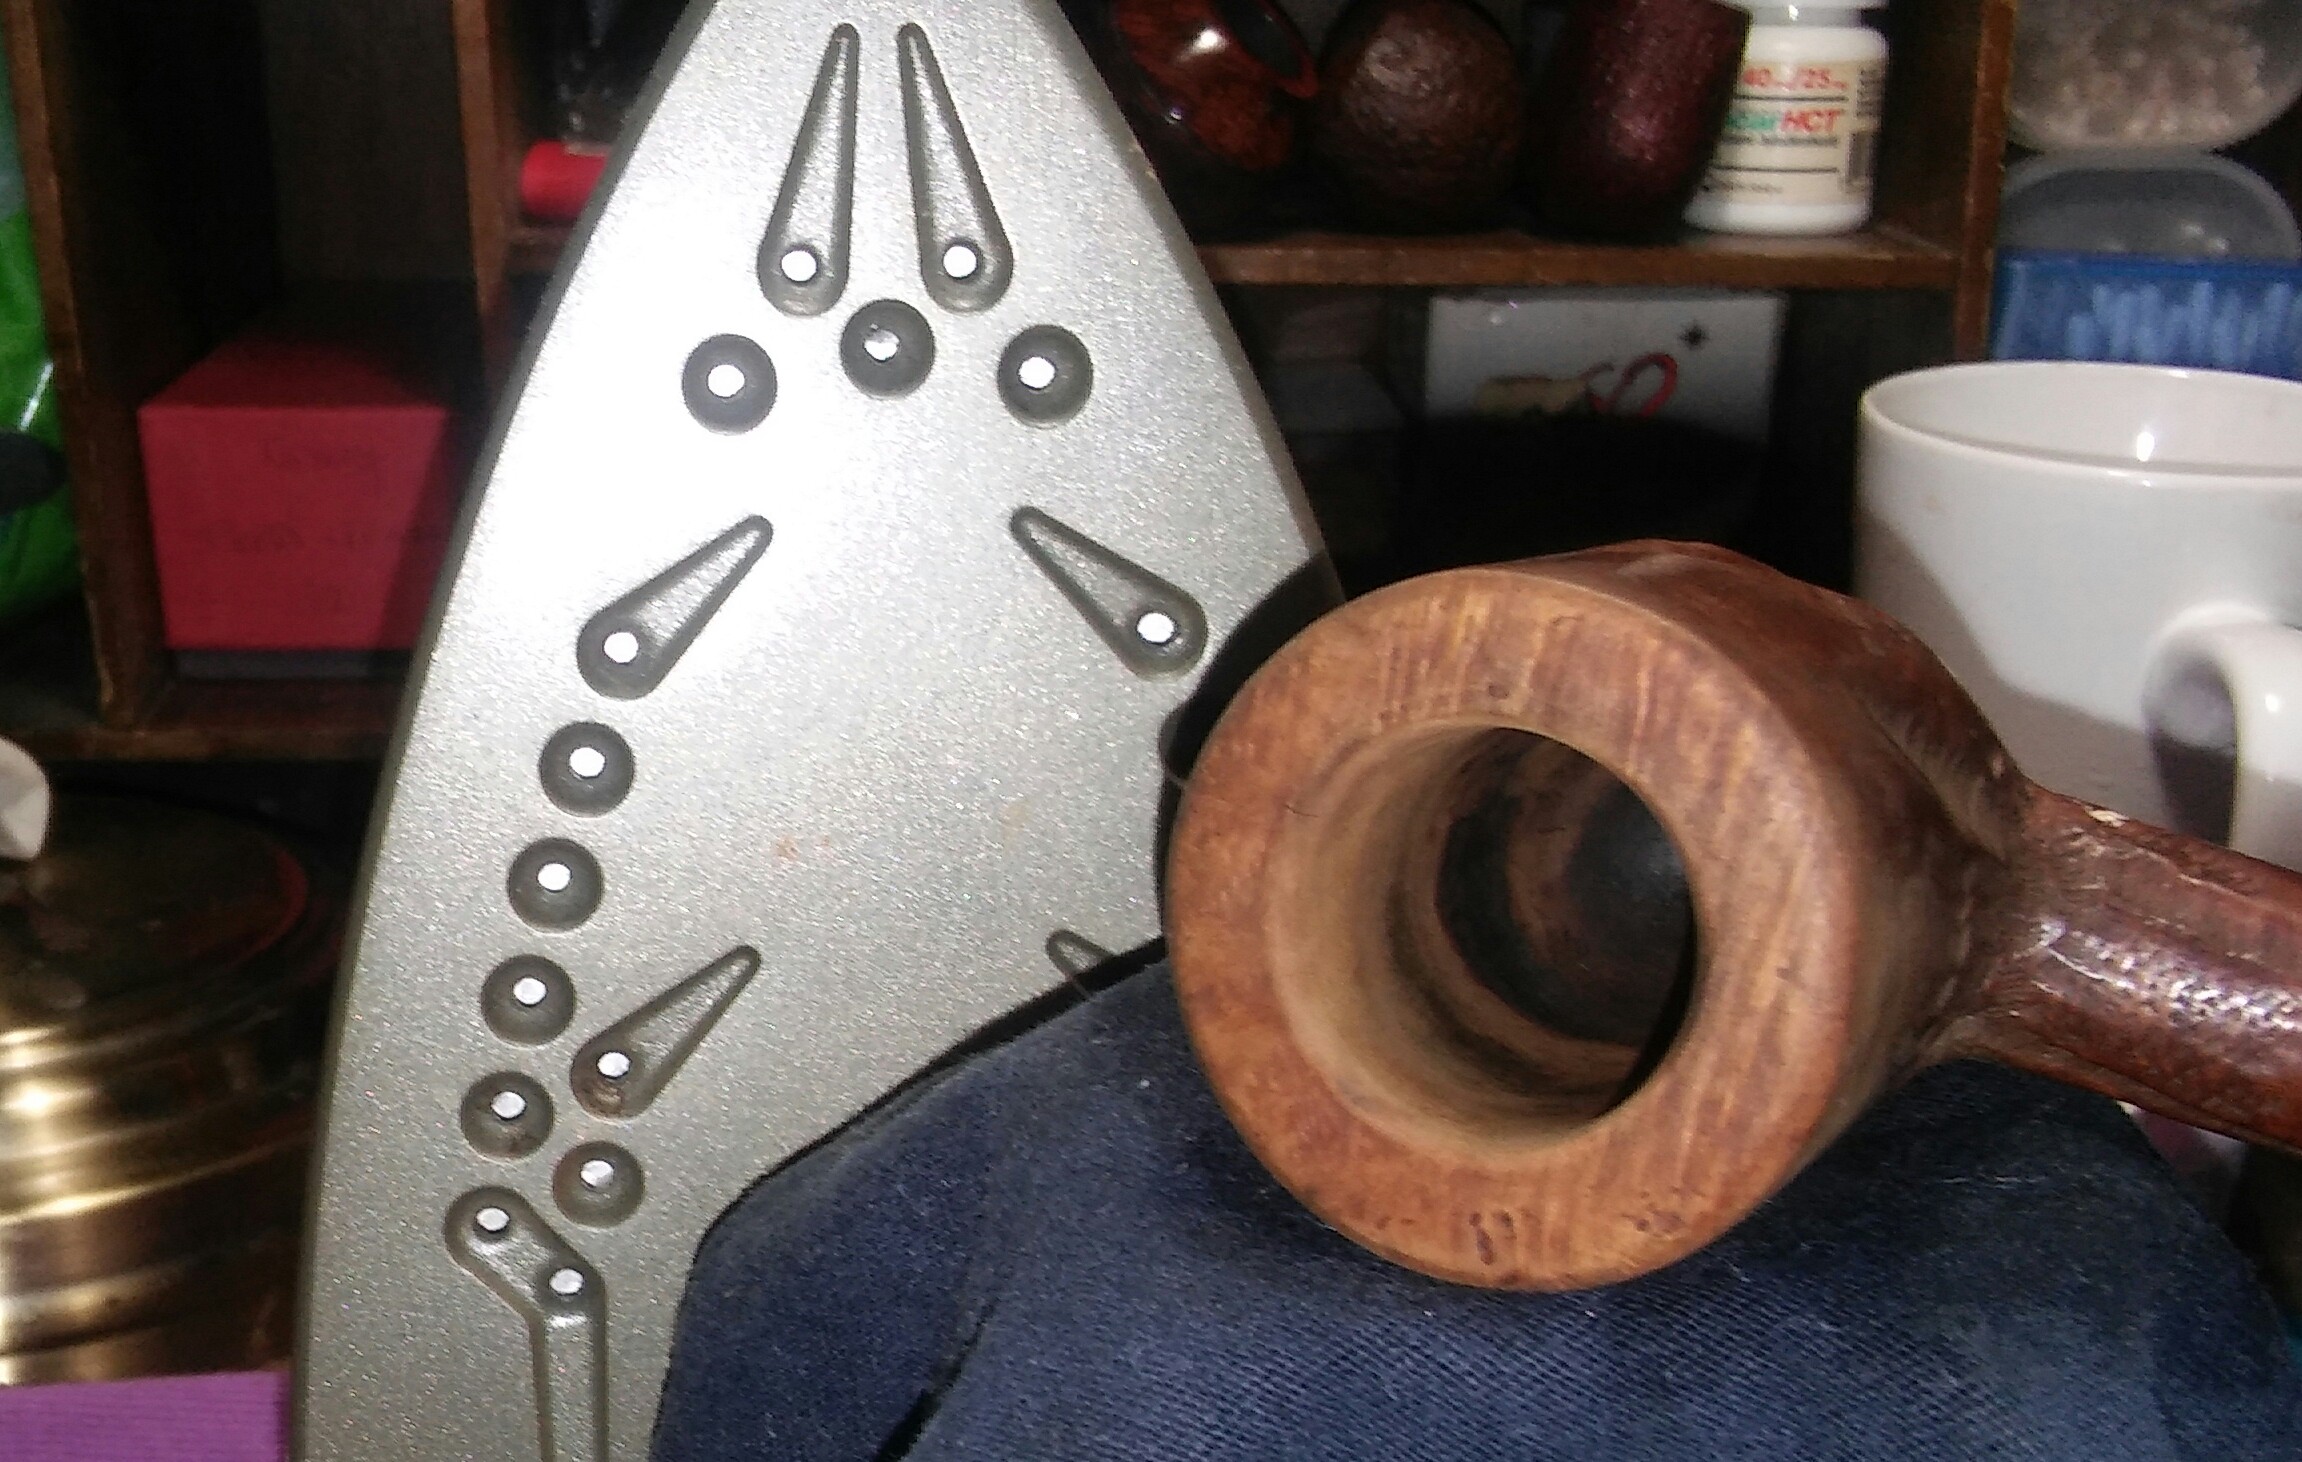
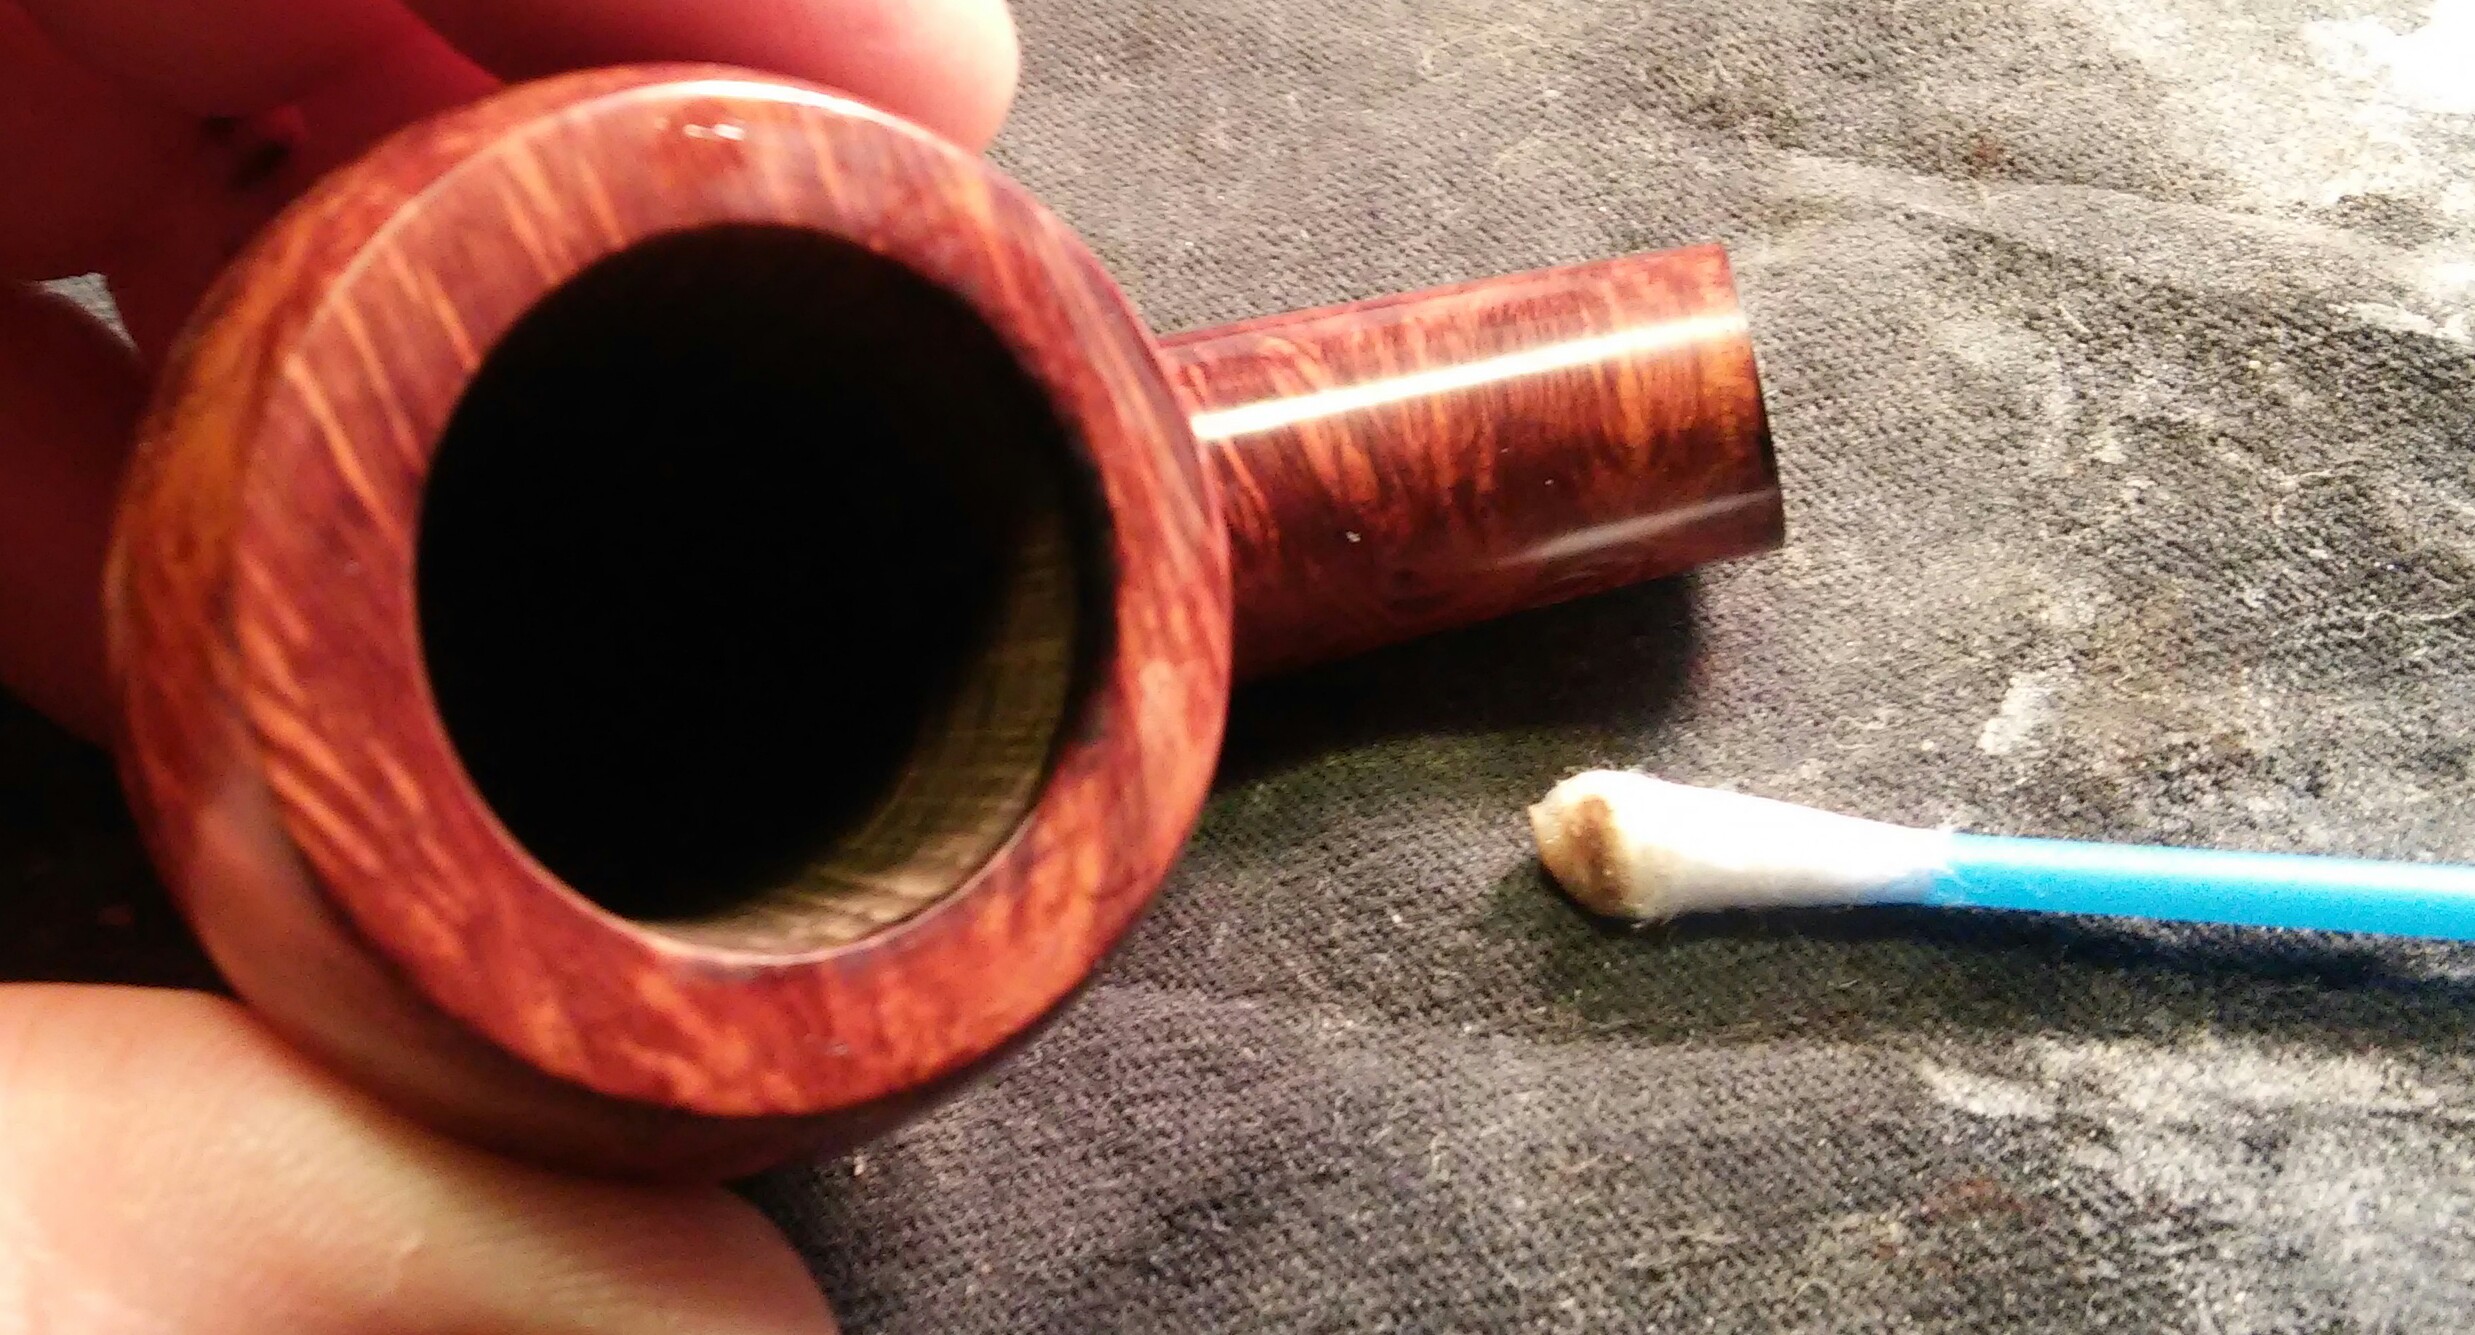
Starting with the chamber and my PipNet reamer I took the cake back to a suitable thickness. The like the rest of the pipe the chamber looked good.

PhotoGrid_1458076493788

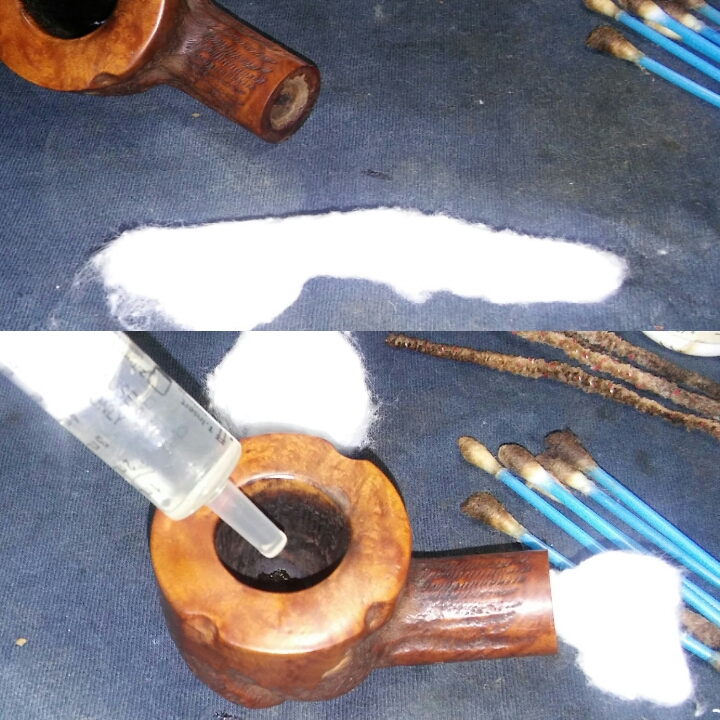
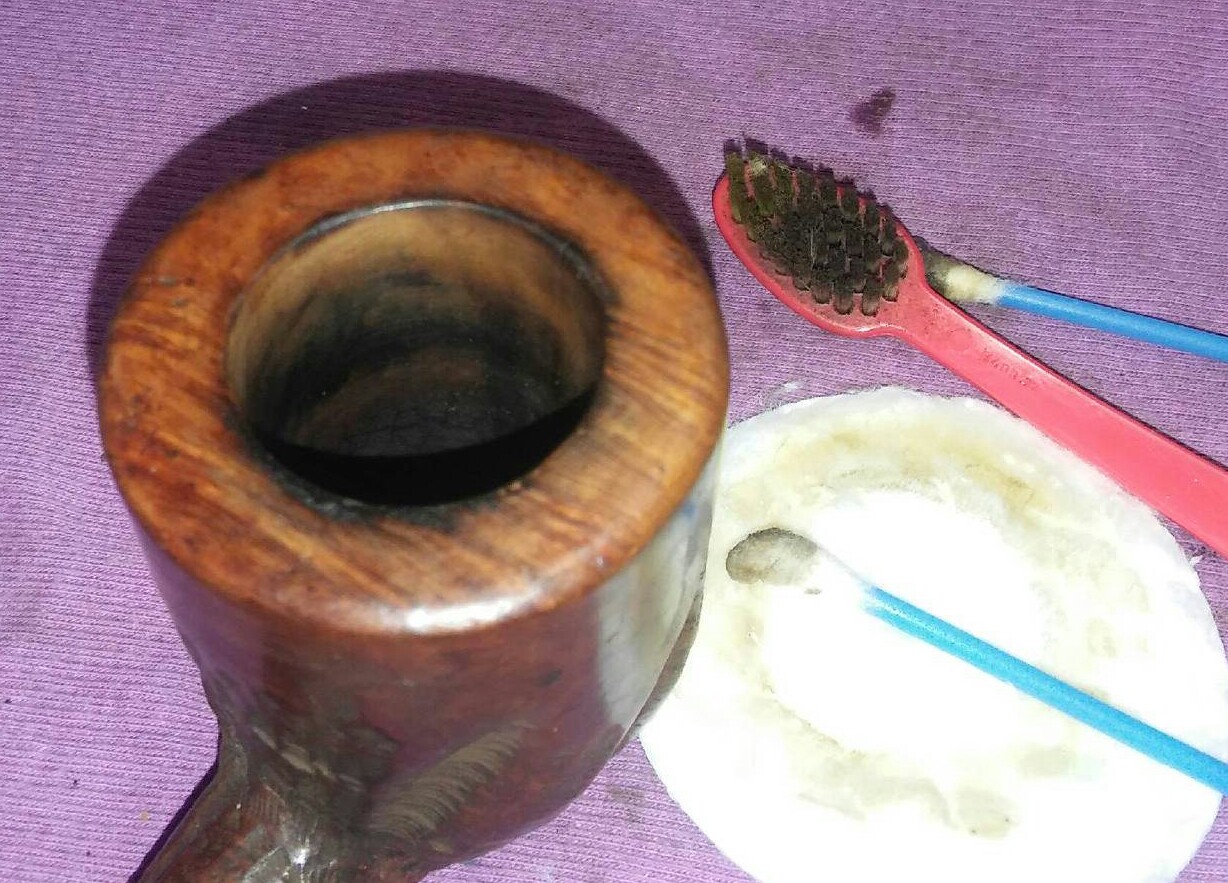
I applied a generous amount of Method Good For Wood Polish to the rim and left it to penetrate the build up. Once the build up softened it was easily removed with a Q-Tip and make-up pads.

PhotoGrid_1458069733666

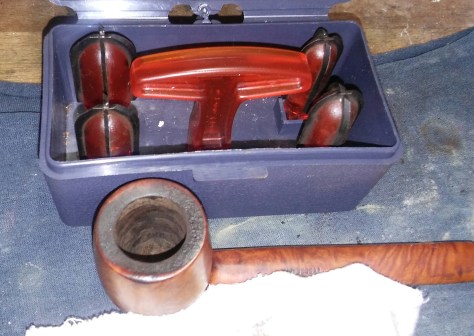
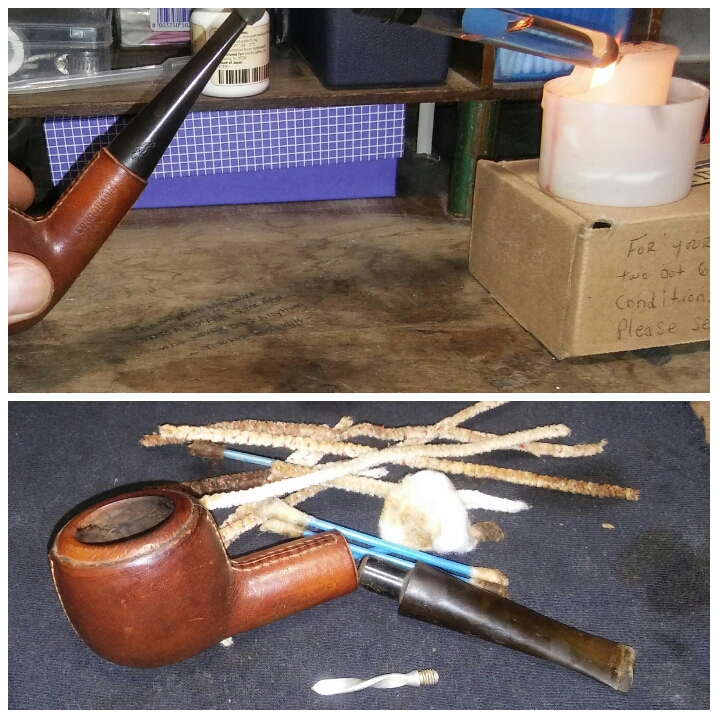
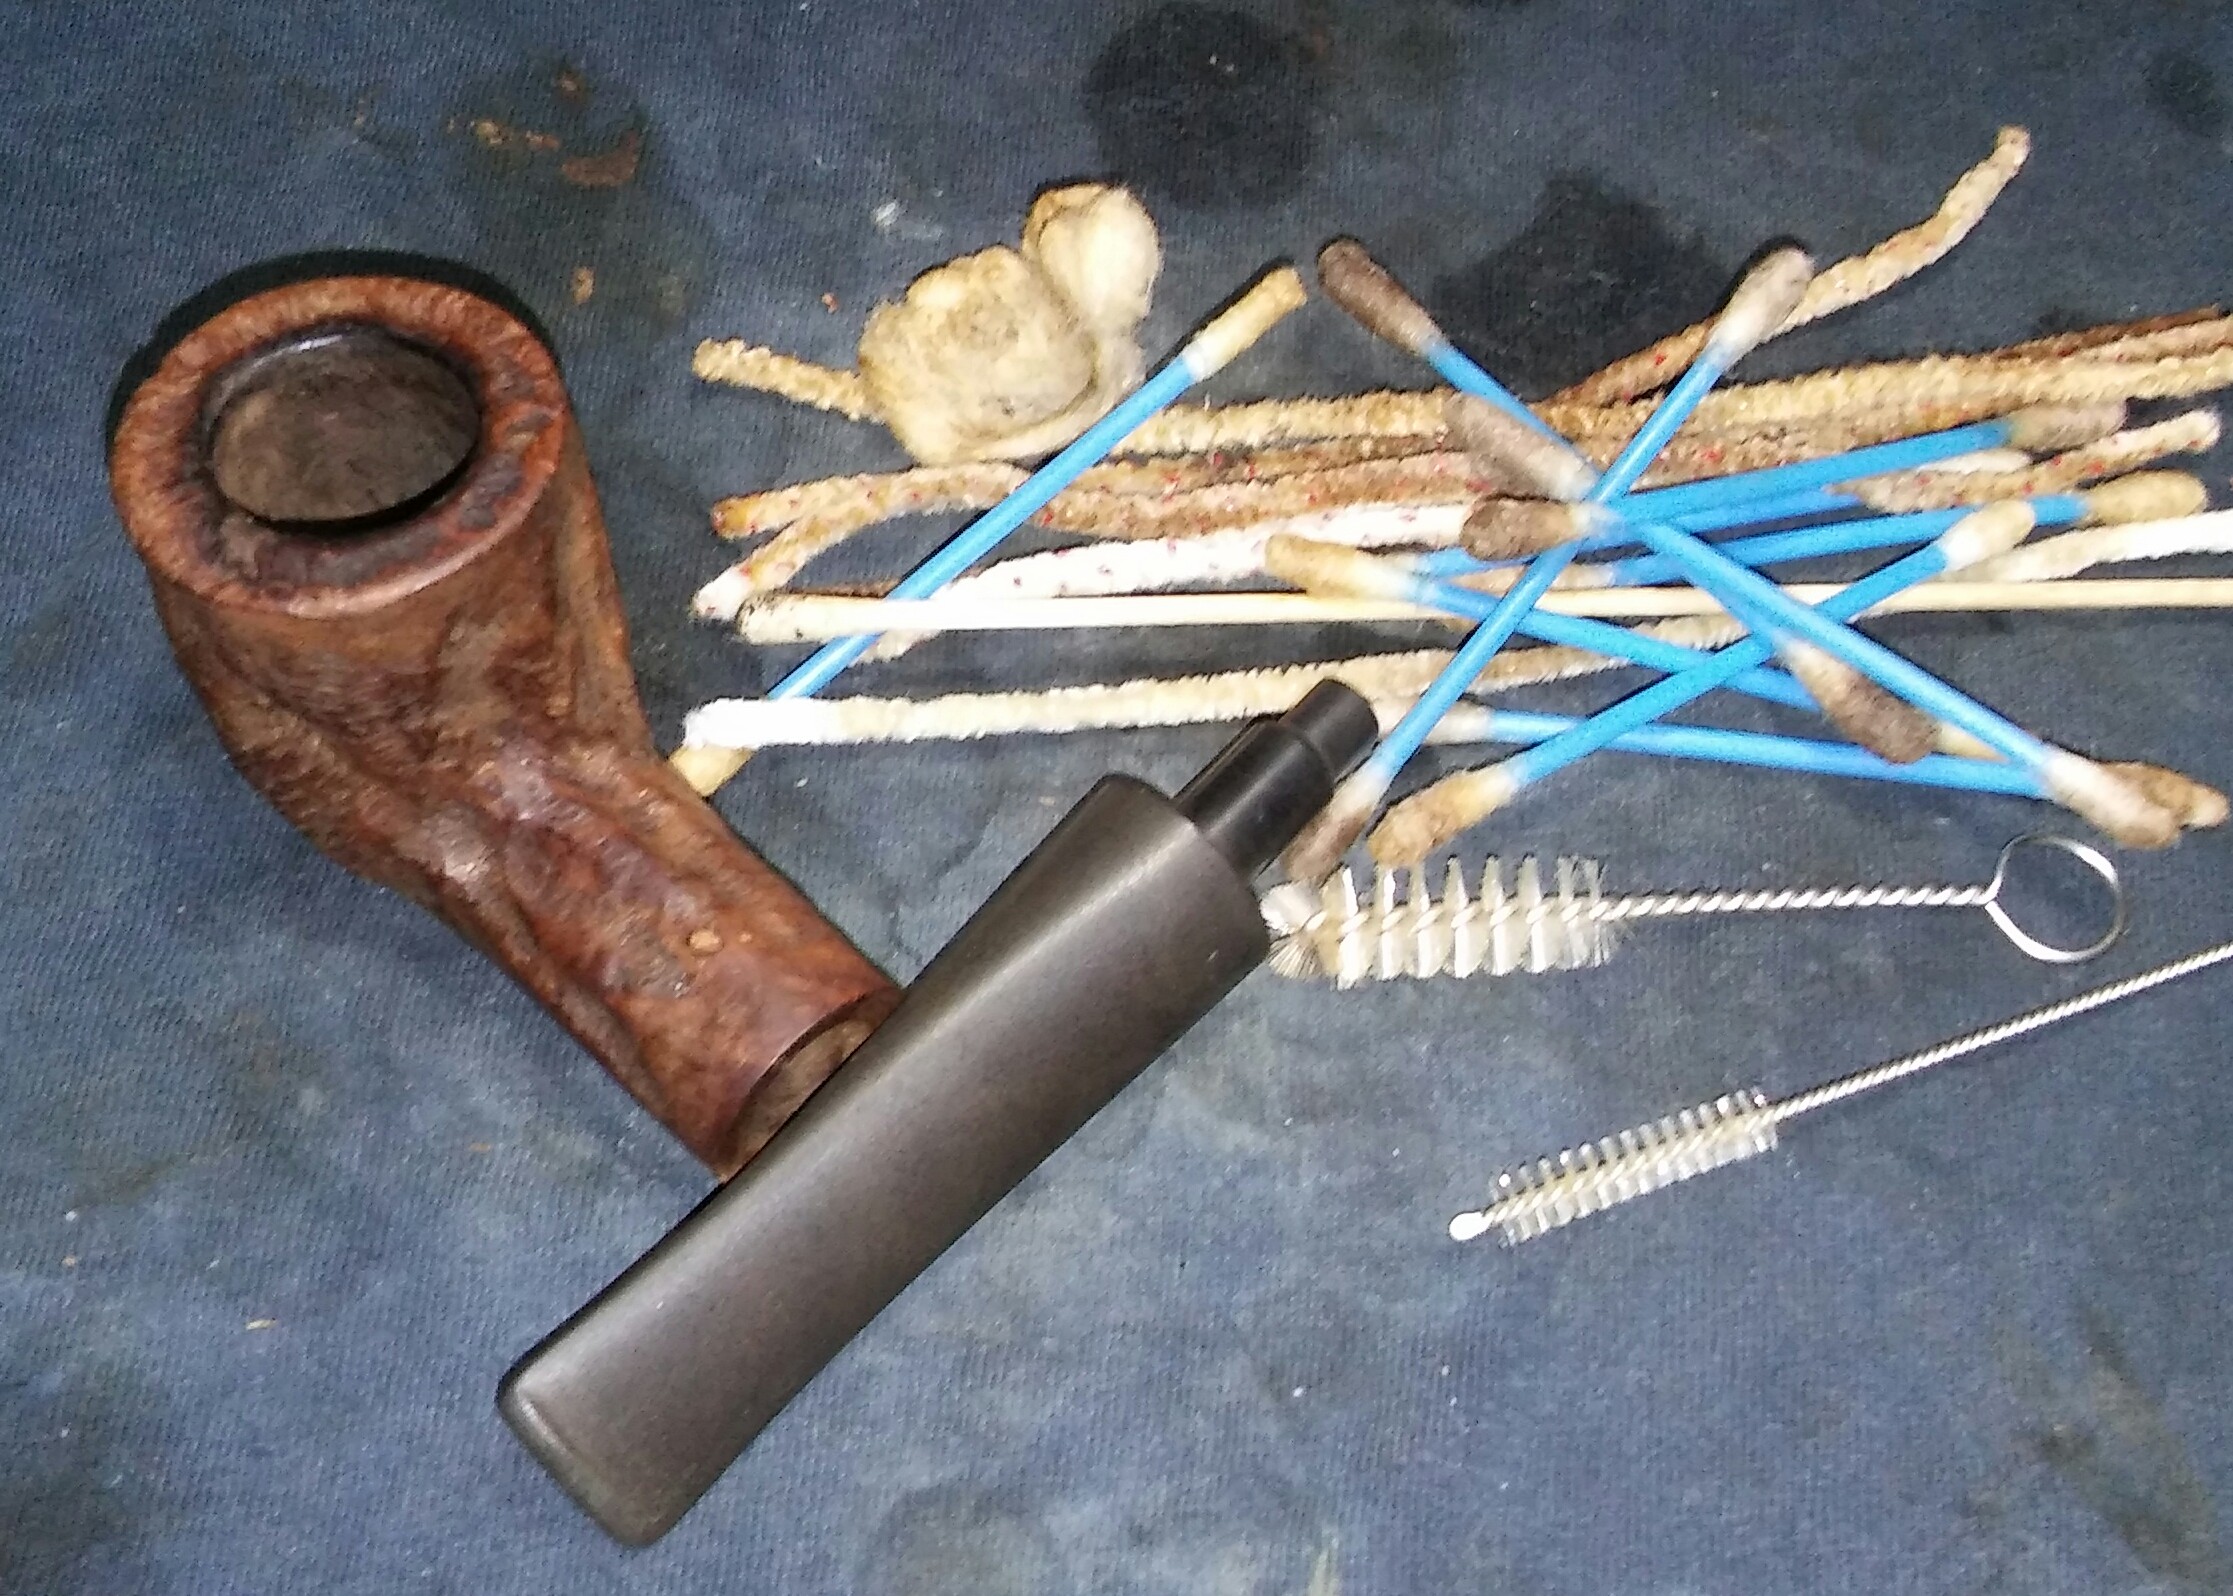
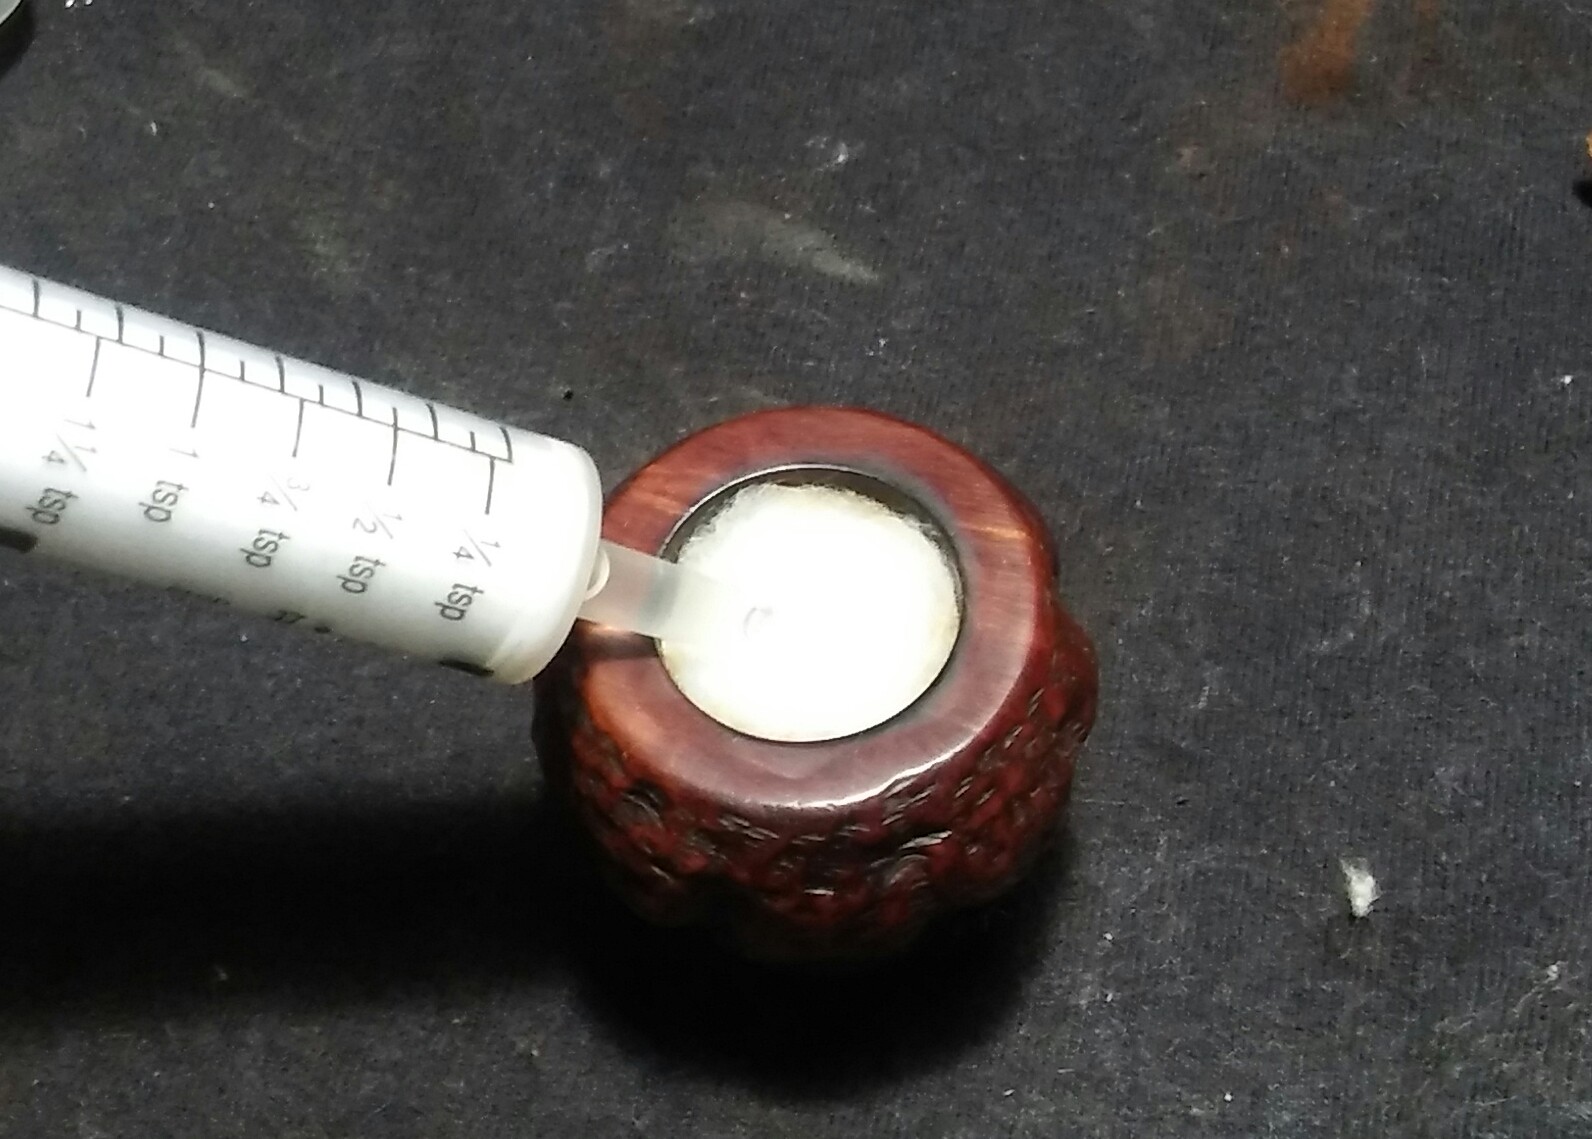
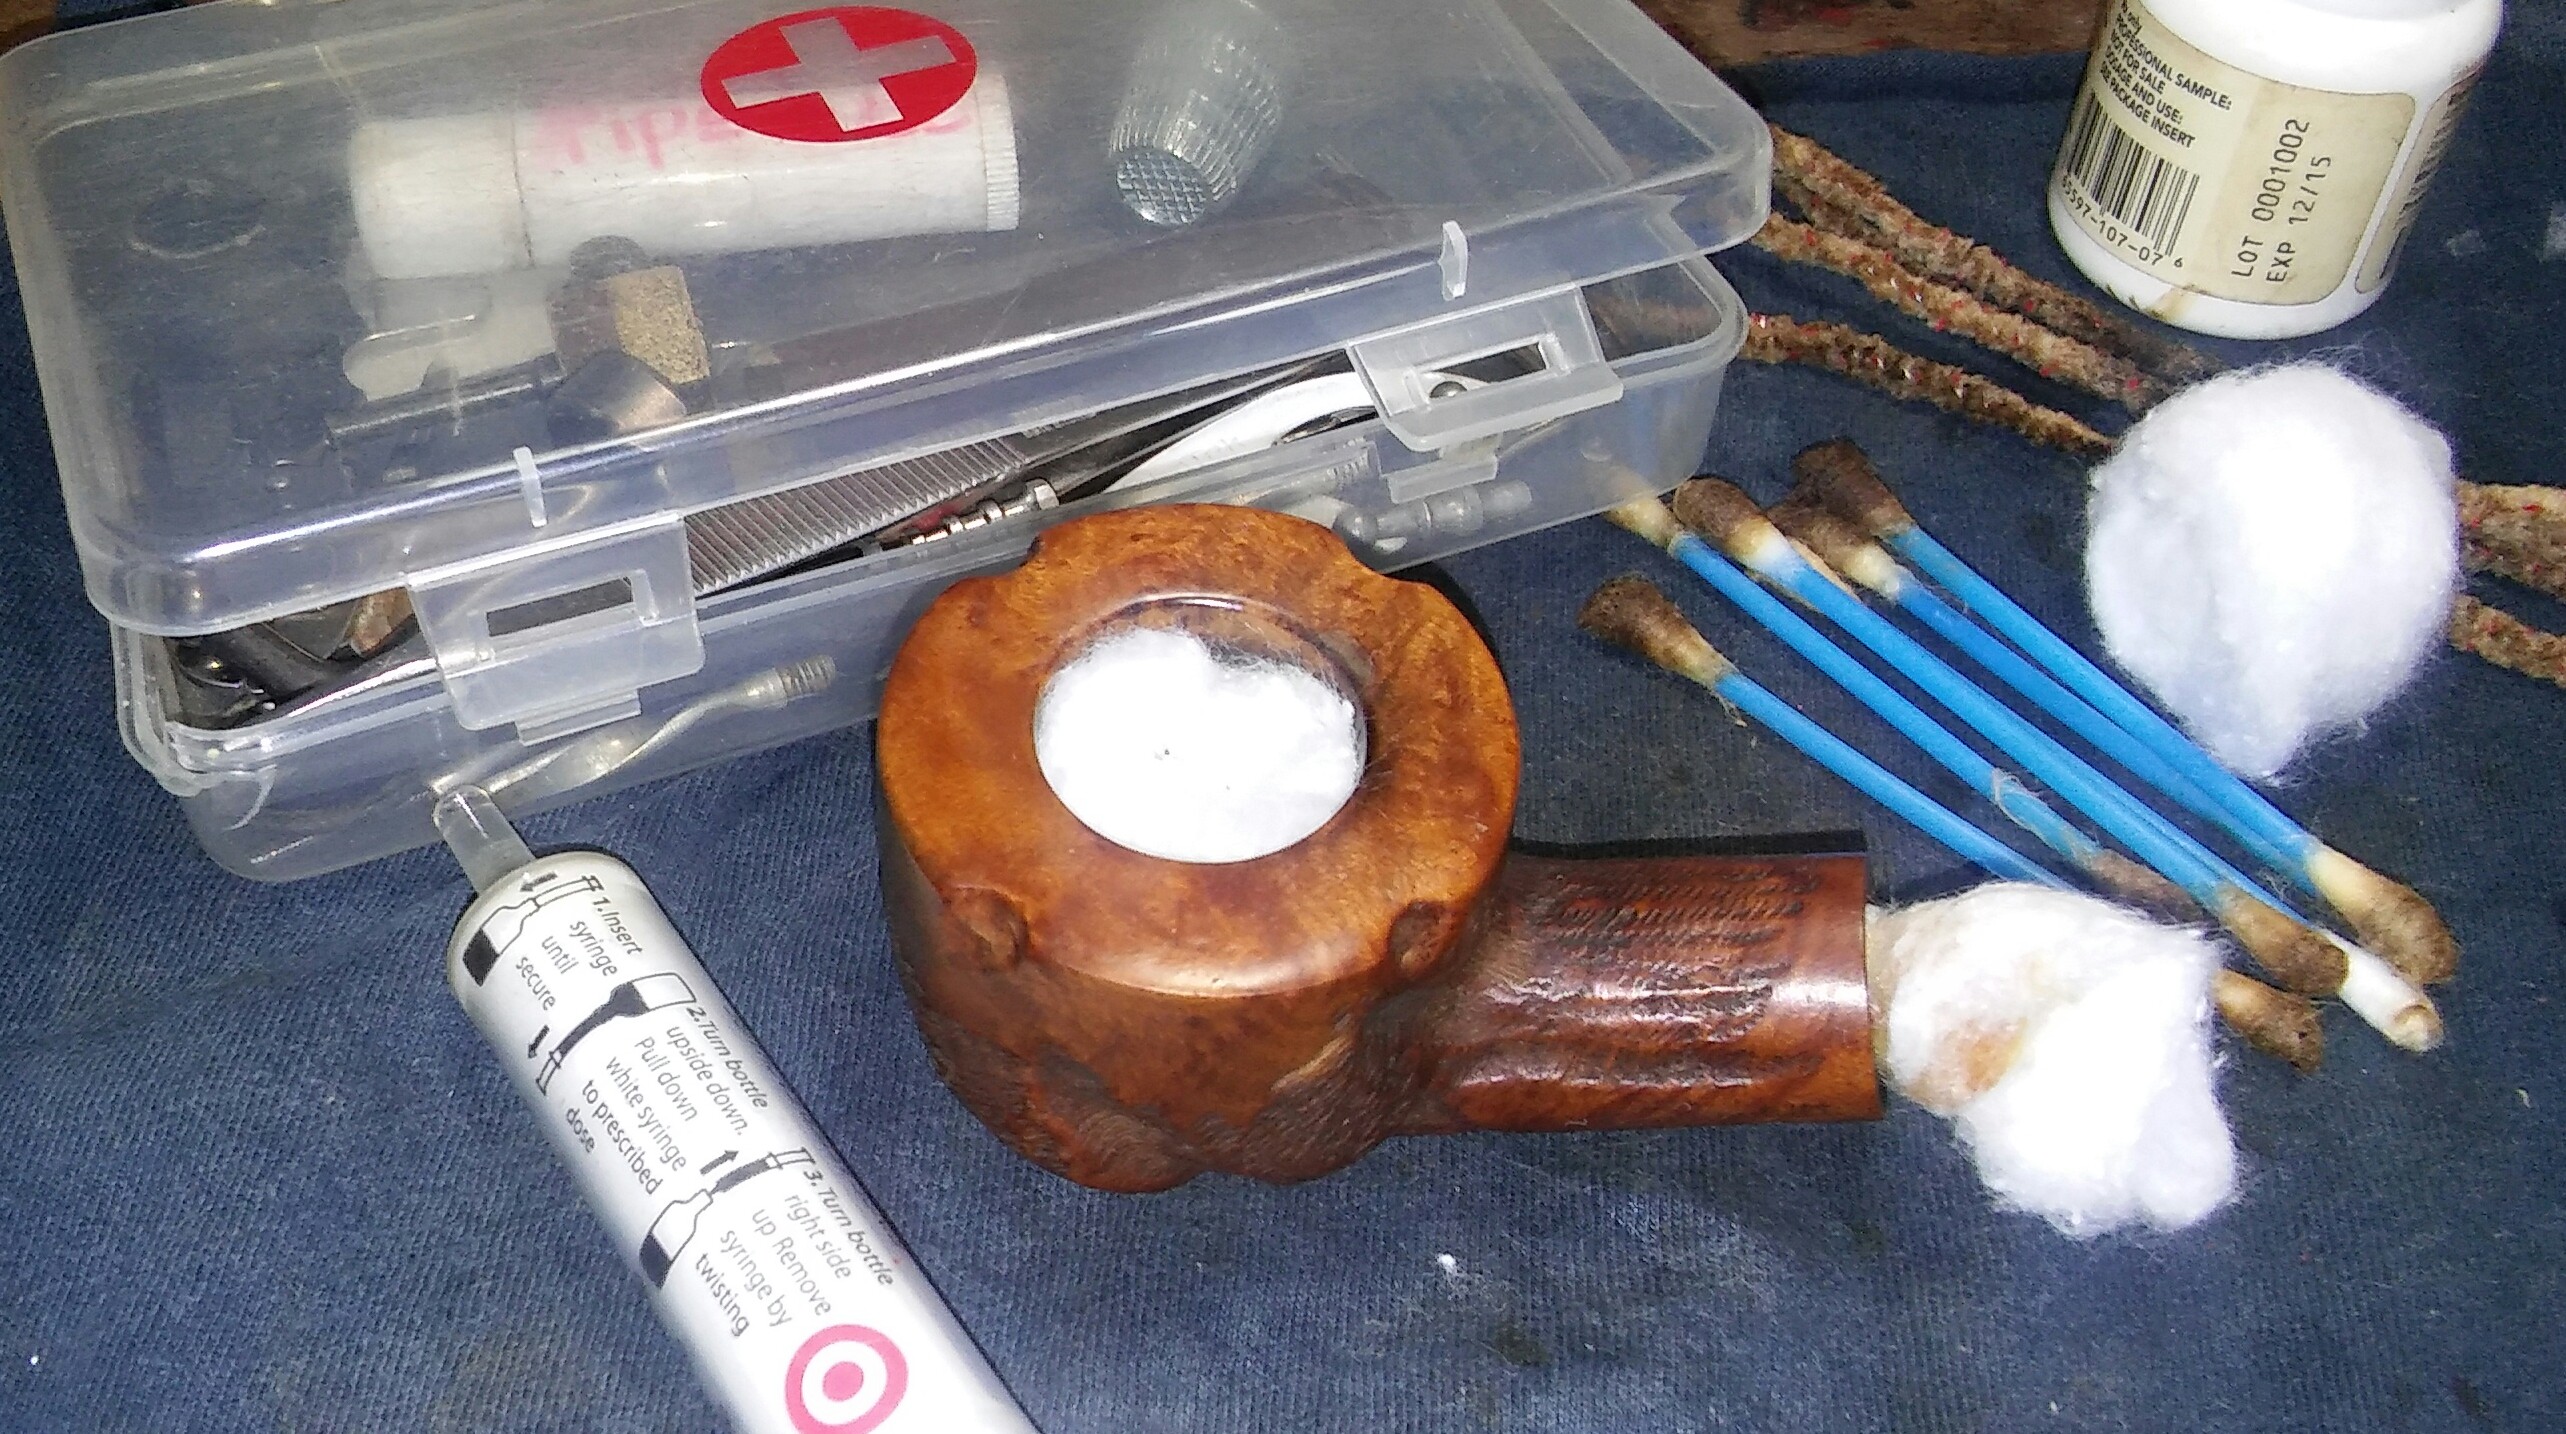
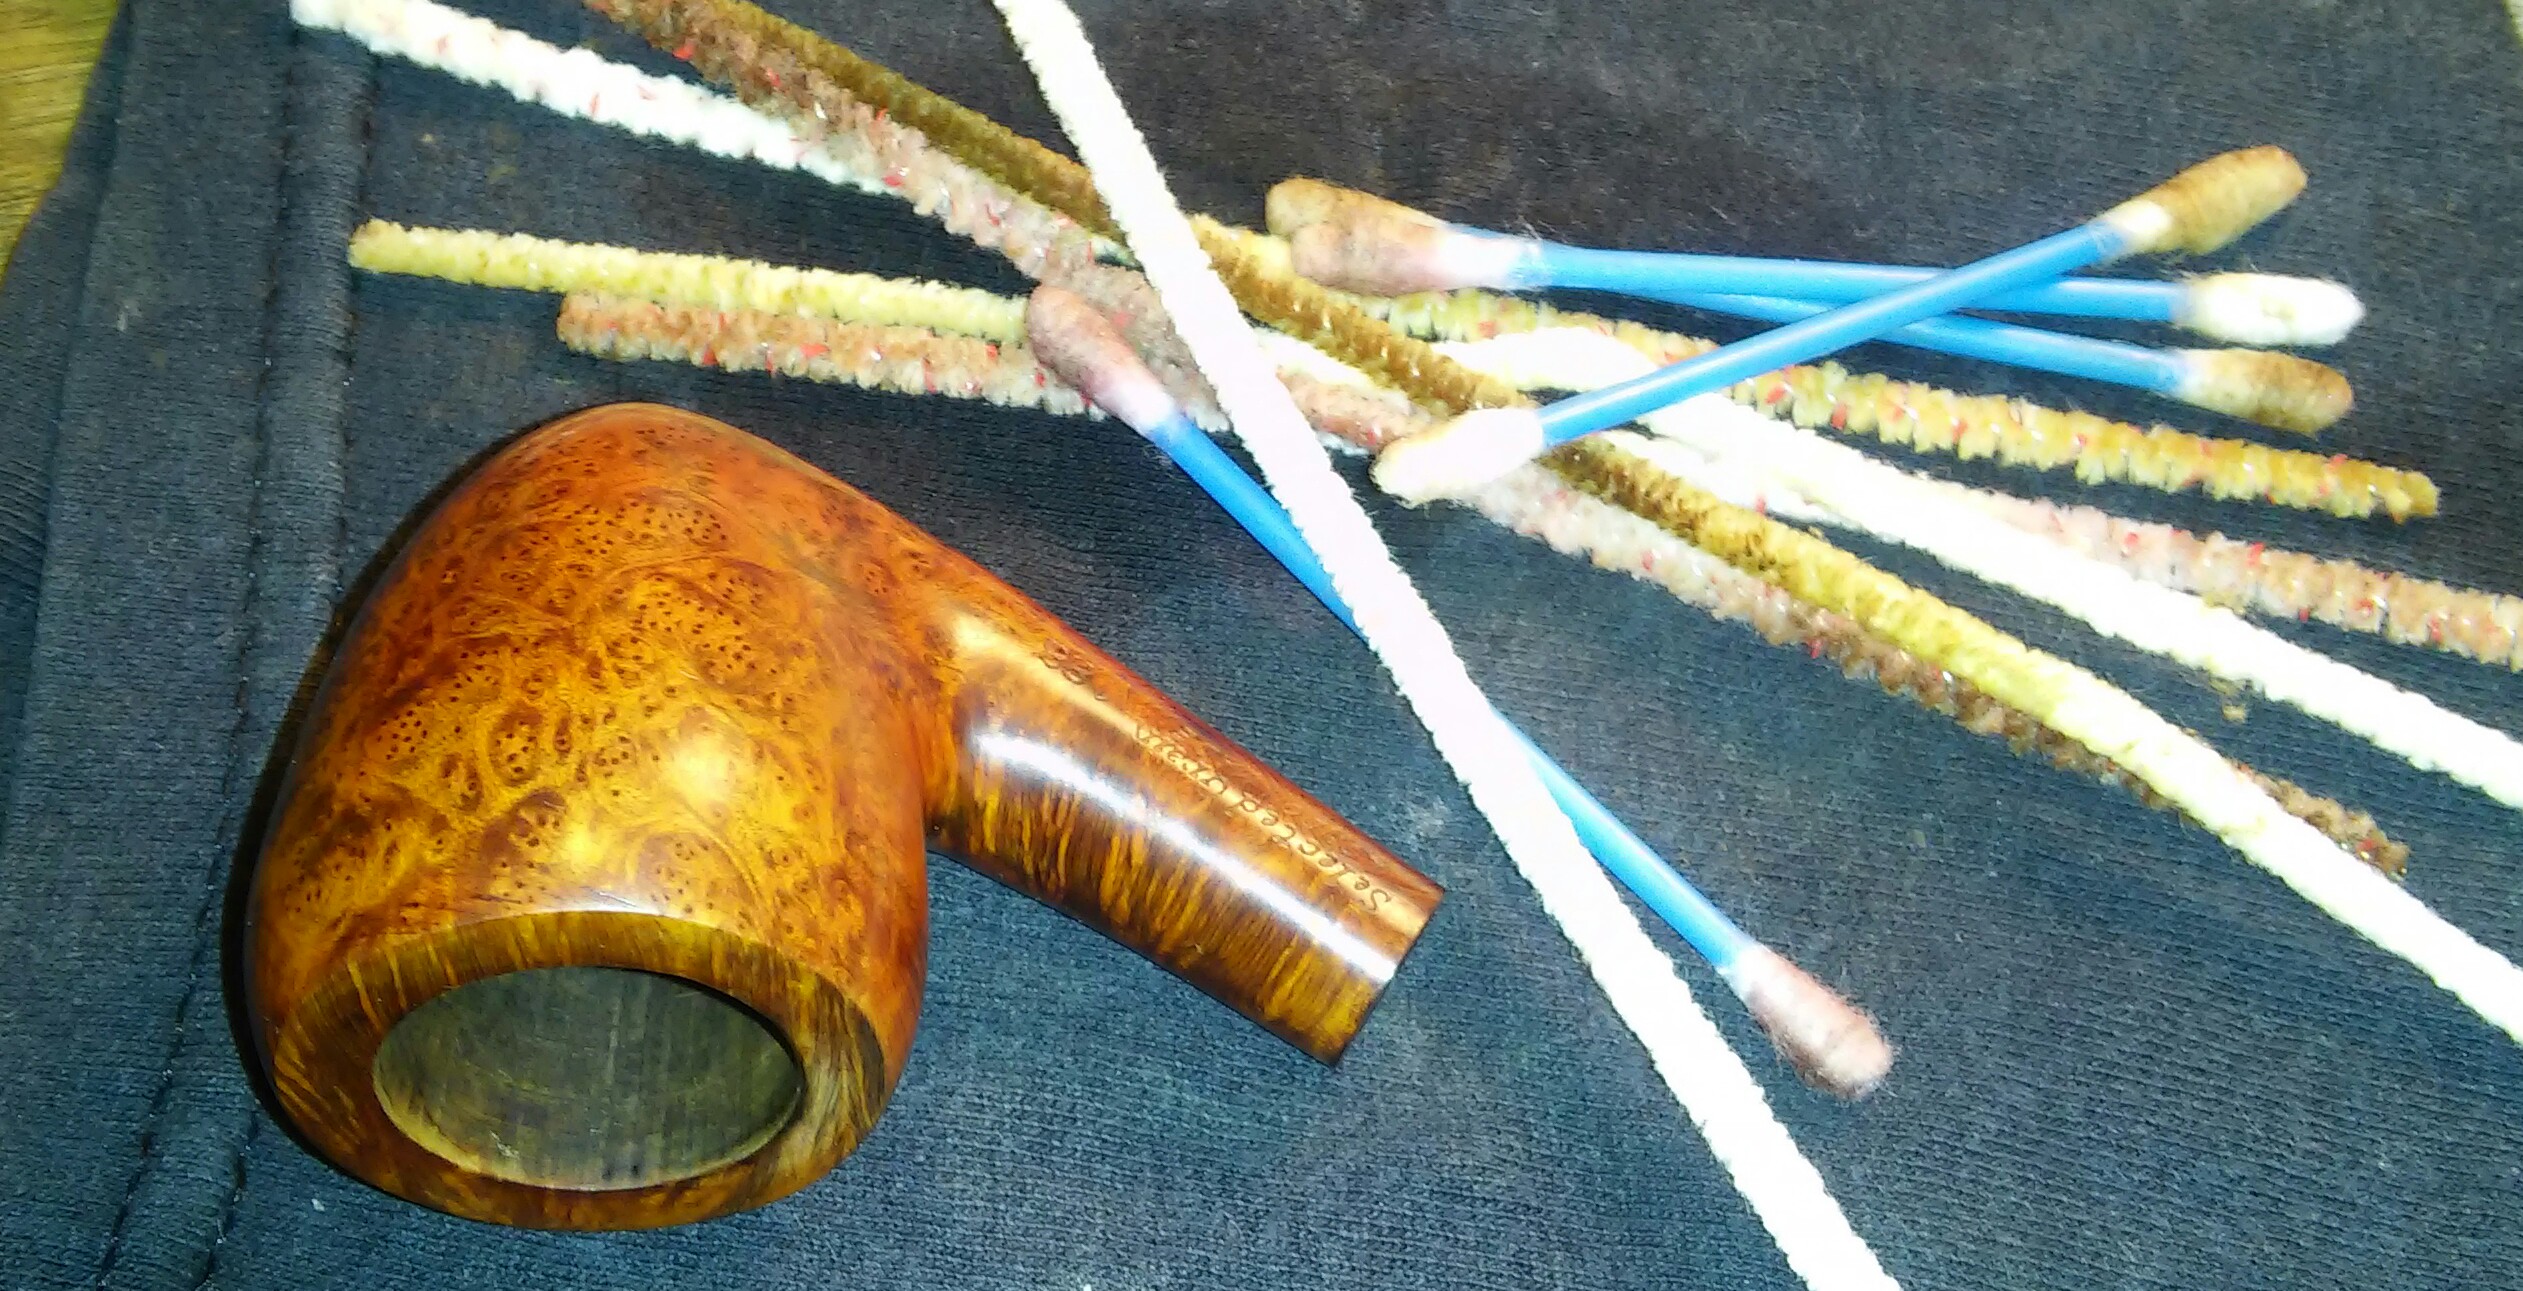
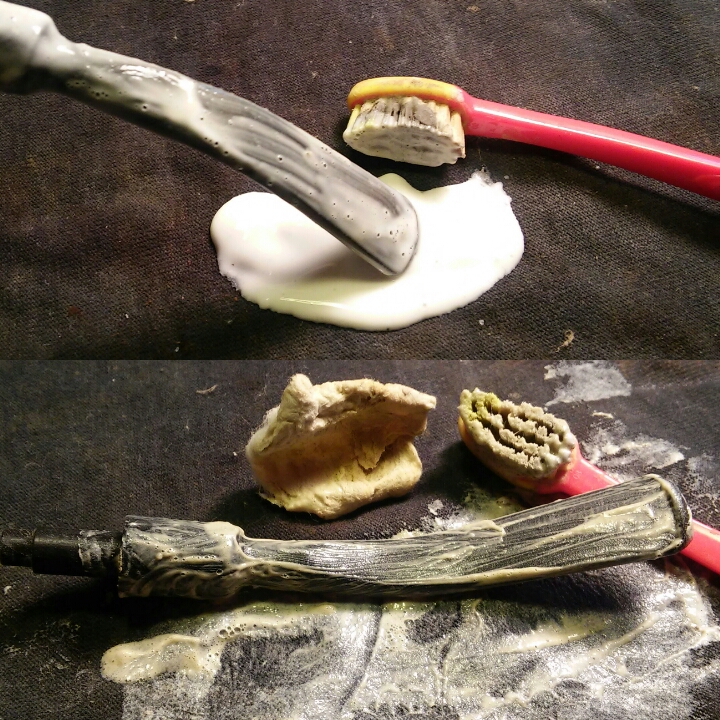
I now concentrated on the internals of the stummel and stem. Using EverClear, Make-up pads, Q-Tips, shank brushes and stiff/soft pipe cleaners, cleaning until the last pipe cleaner came out as it went in.

20160315_130058~2

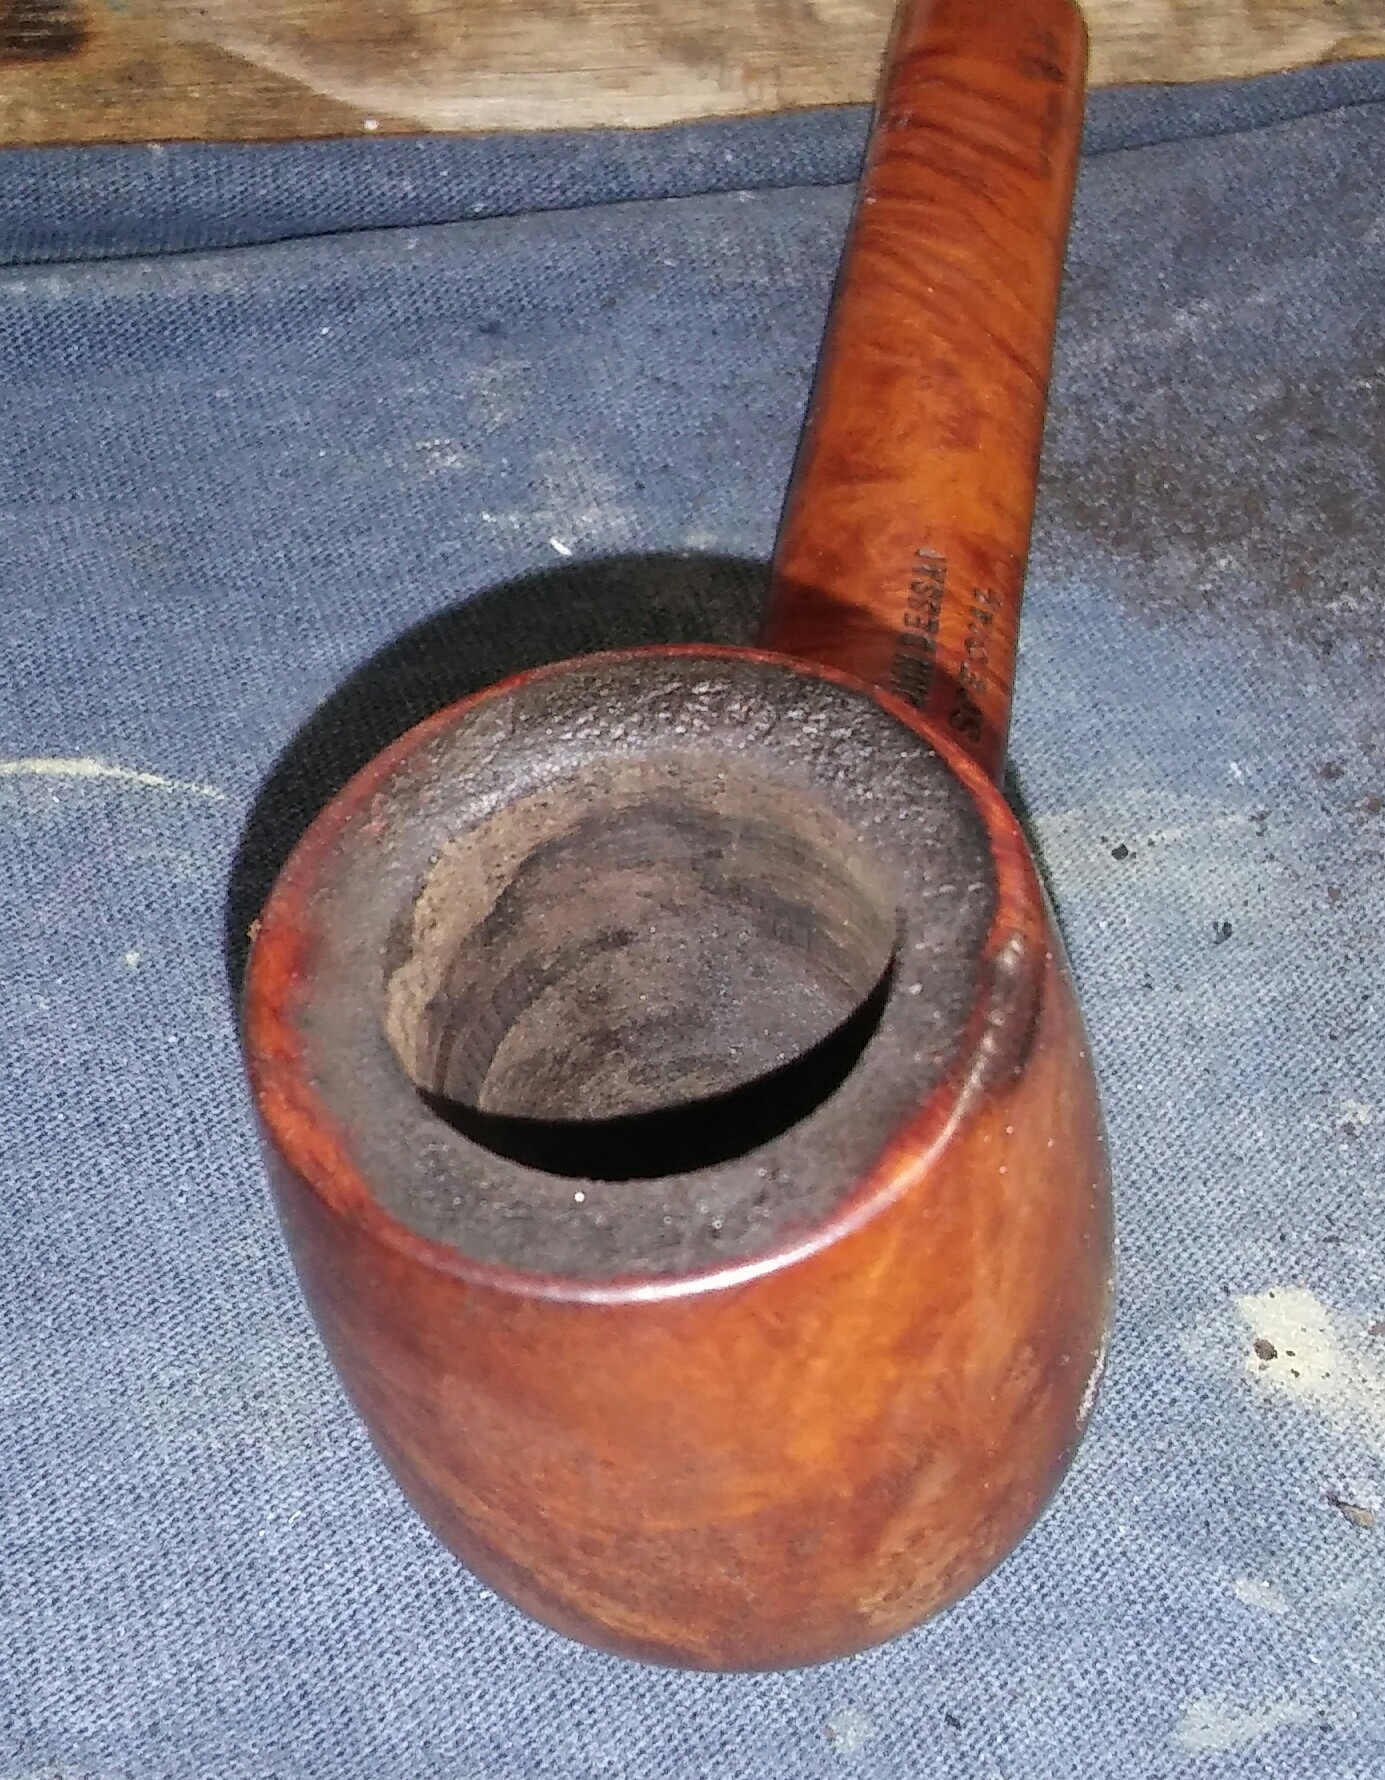
The side of the rim had a small burn, topping was not an option. I didn’t want to  change the shape of the bowl.

20160315_141550~2

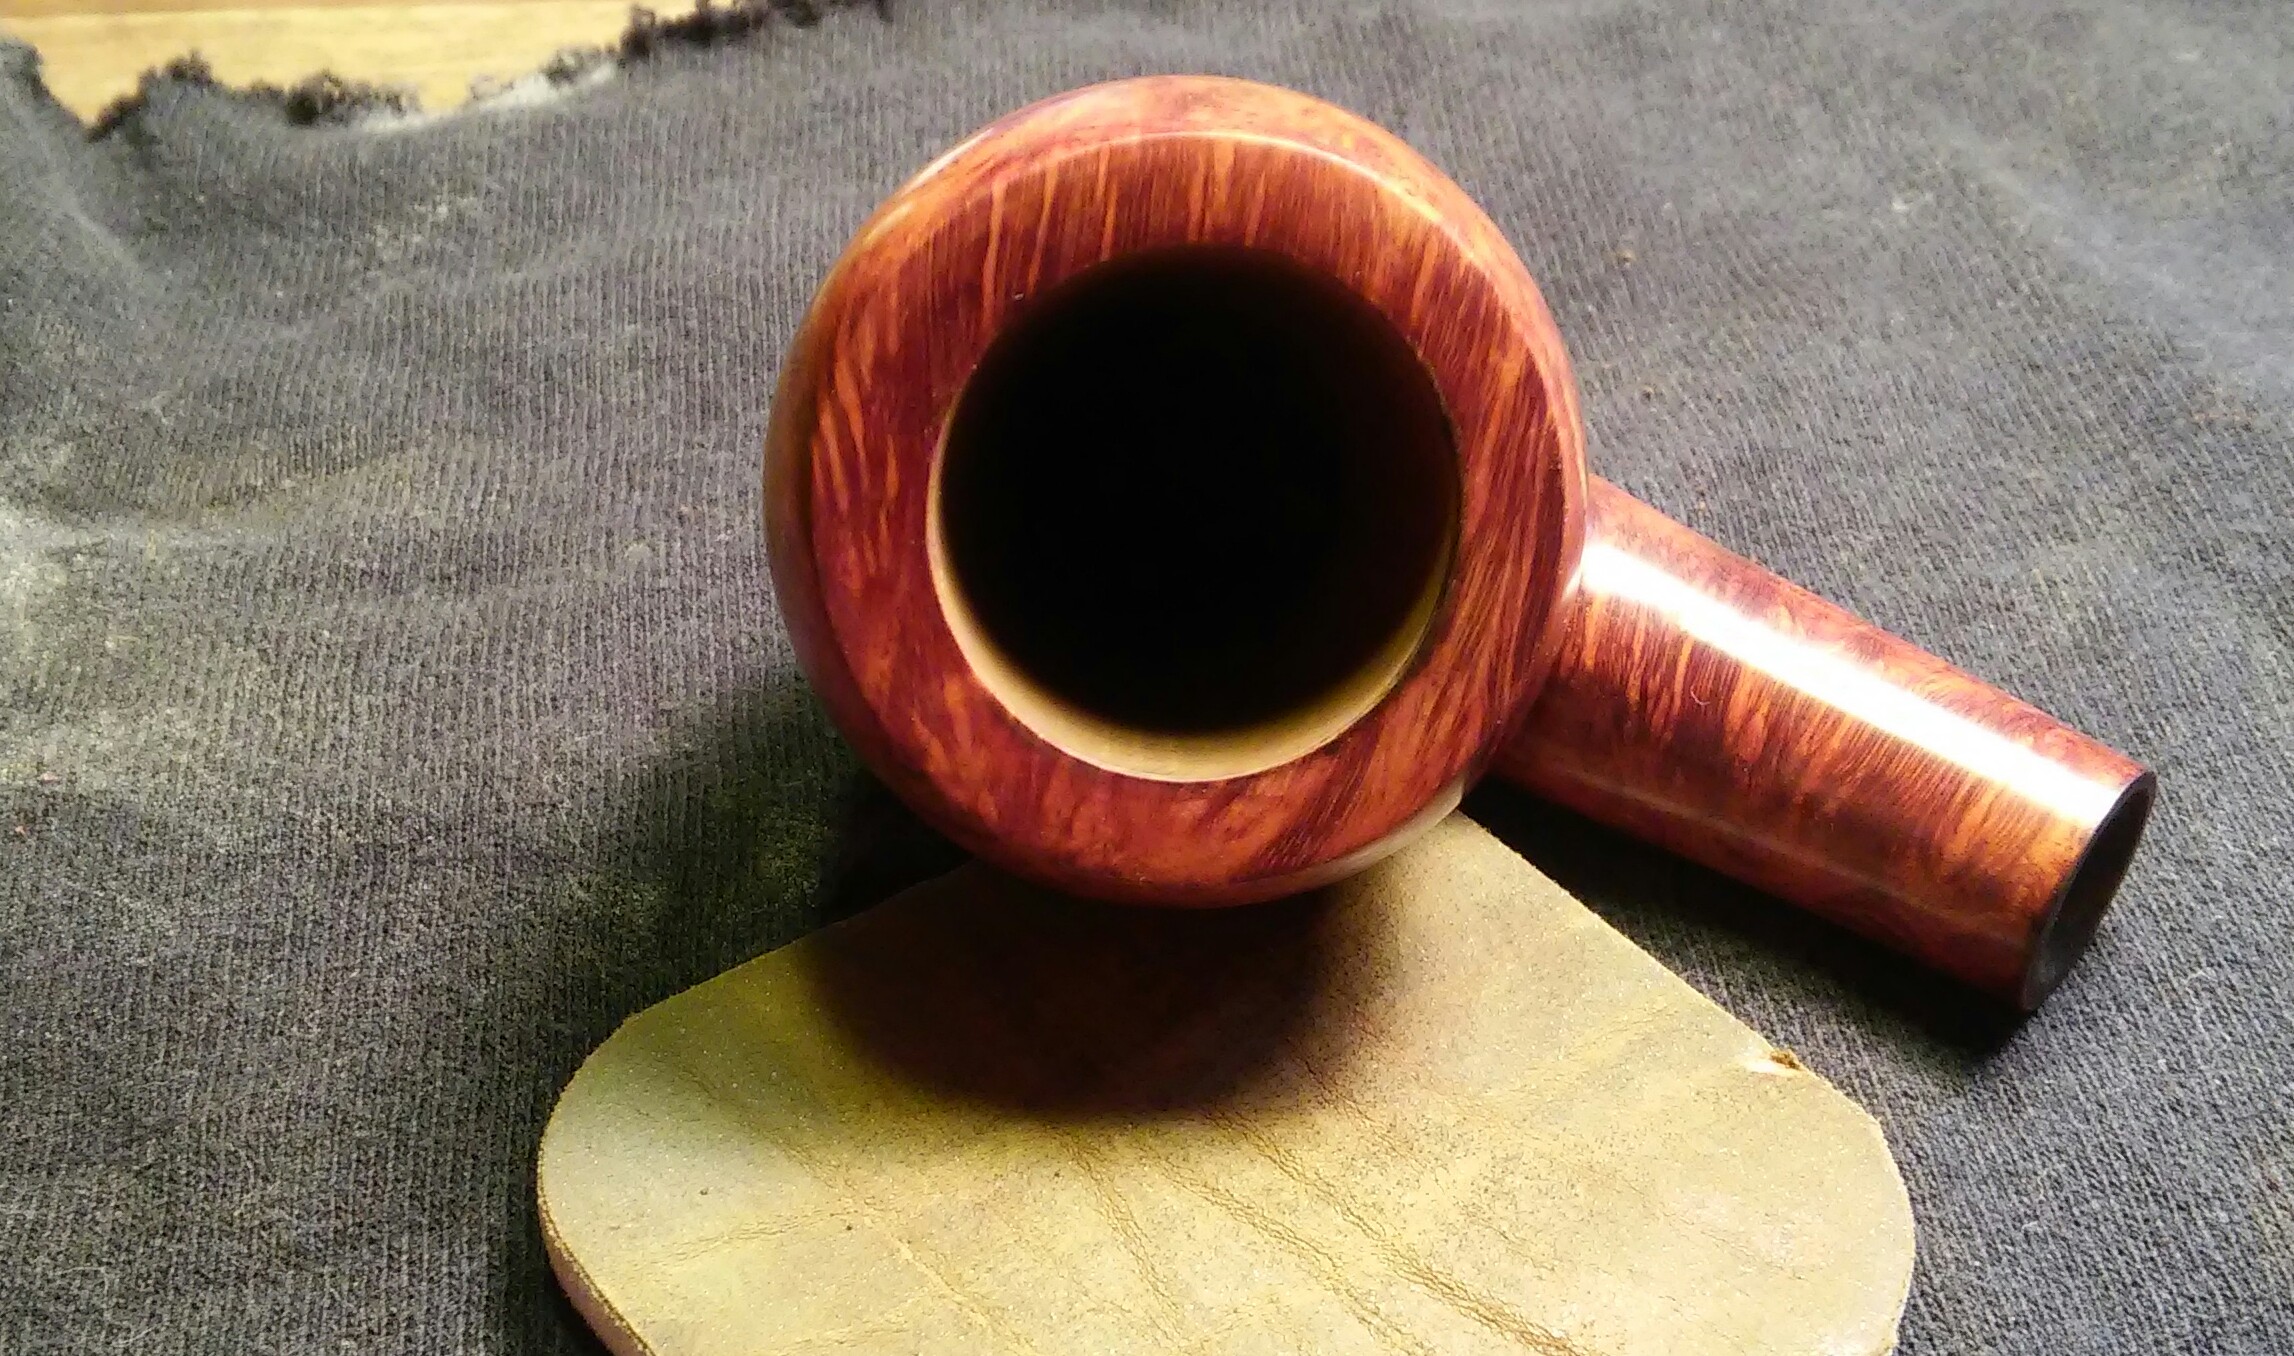
Using 800 grit sandpaper I worked at the burnt area until it faded , it wasn’t perfect but better then loosing the shape.

PhotoGrid_1458069582308

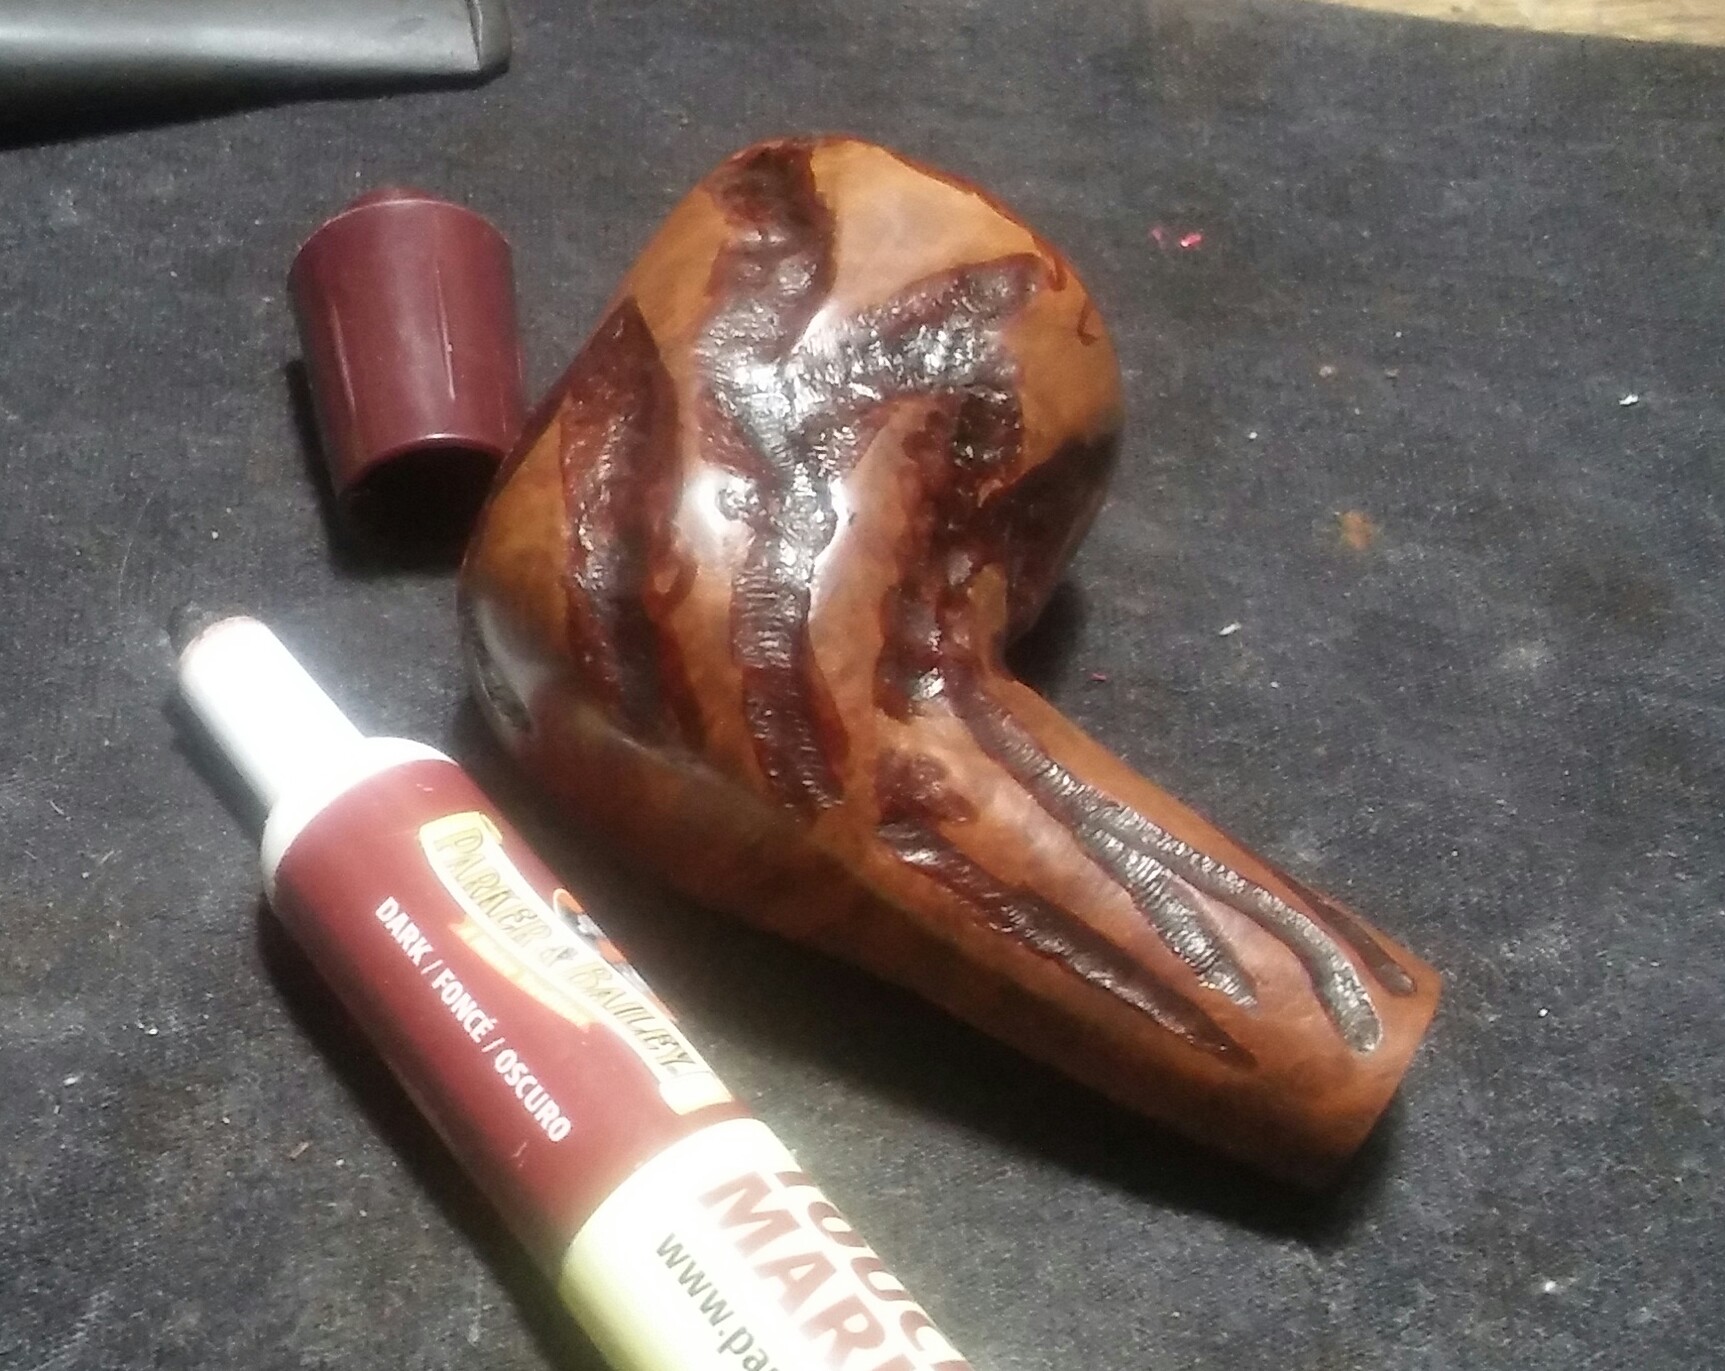
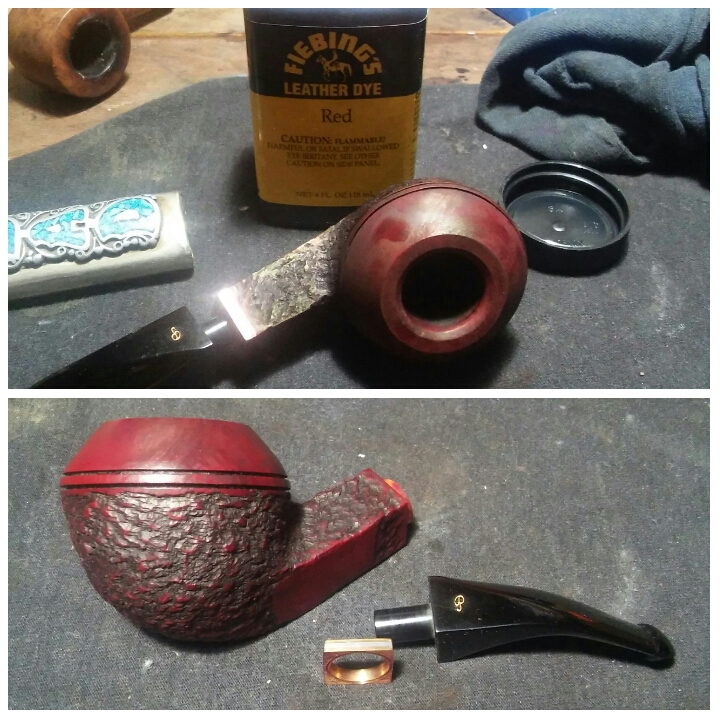
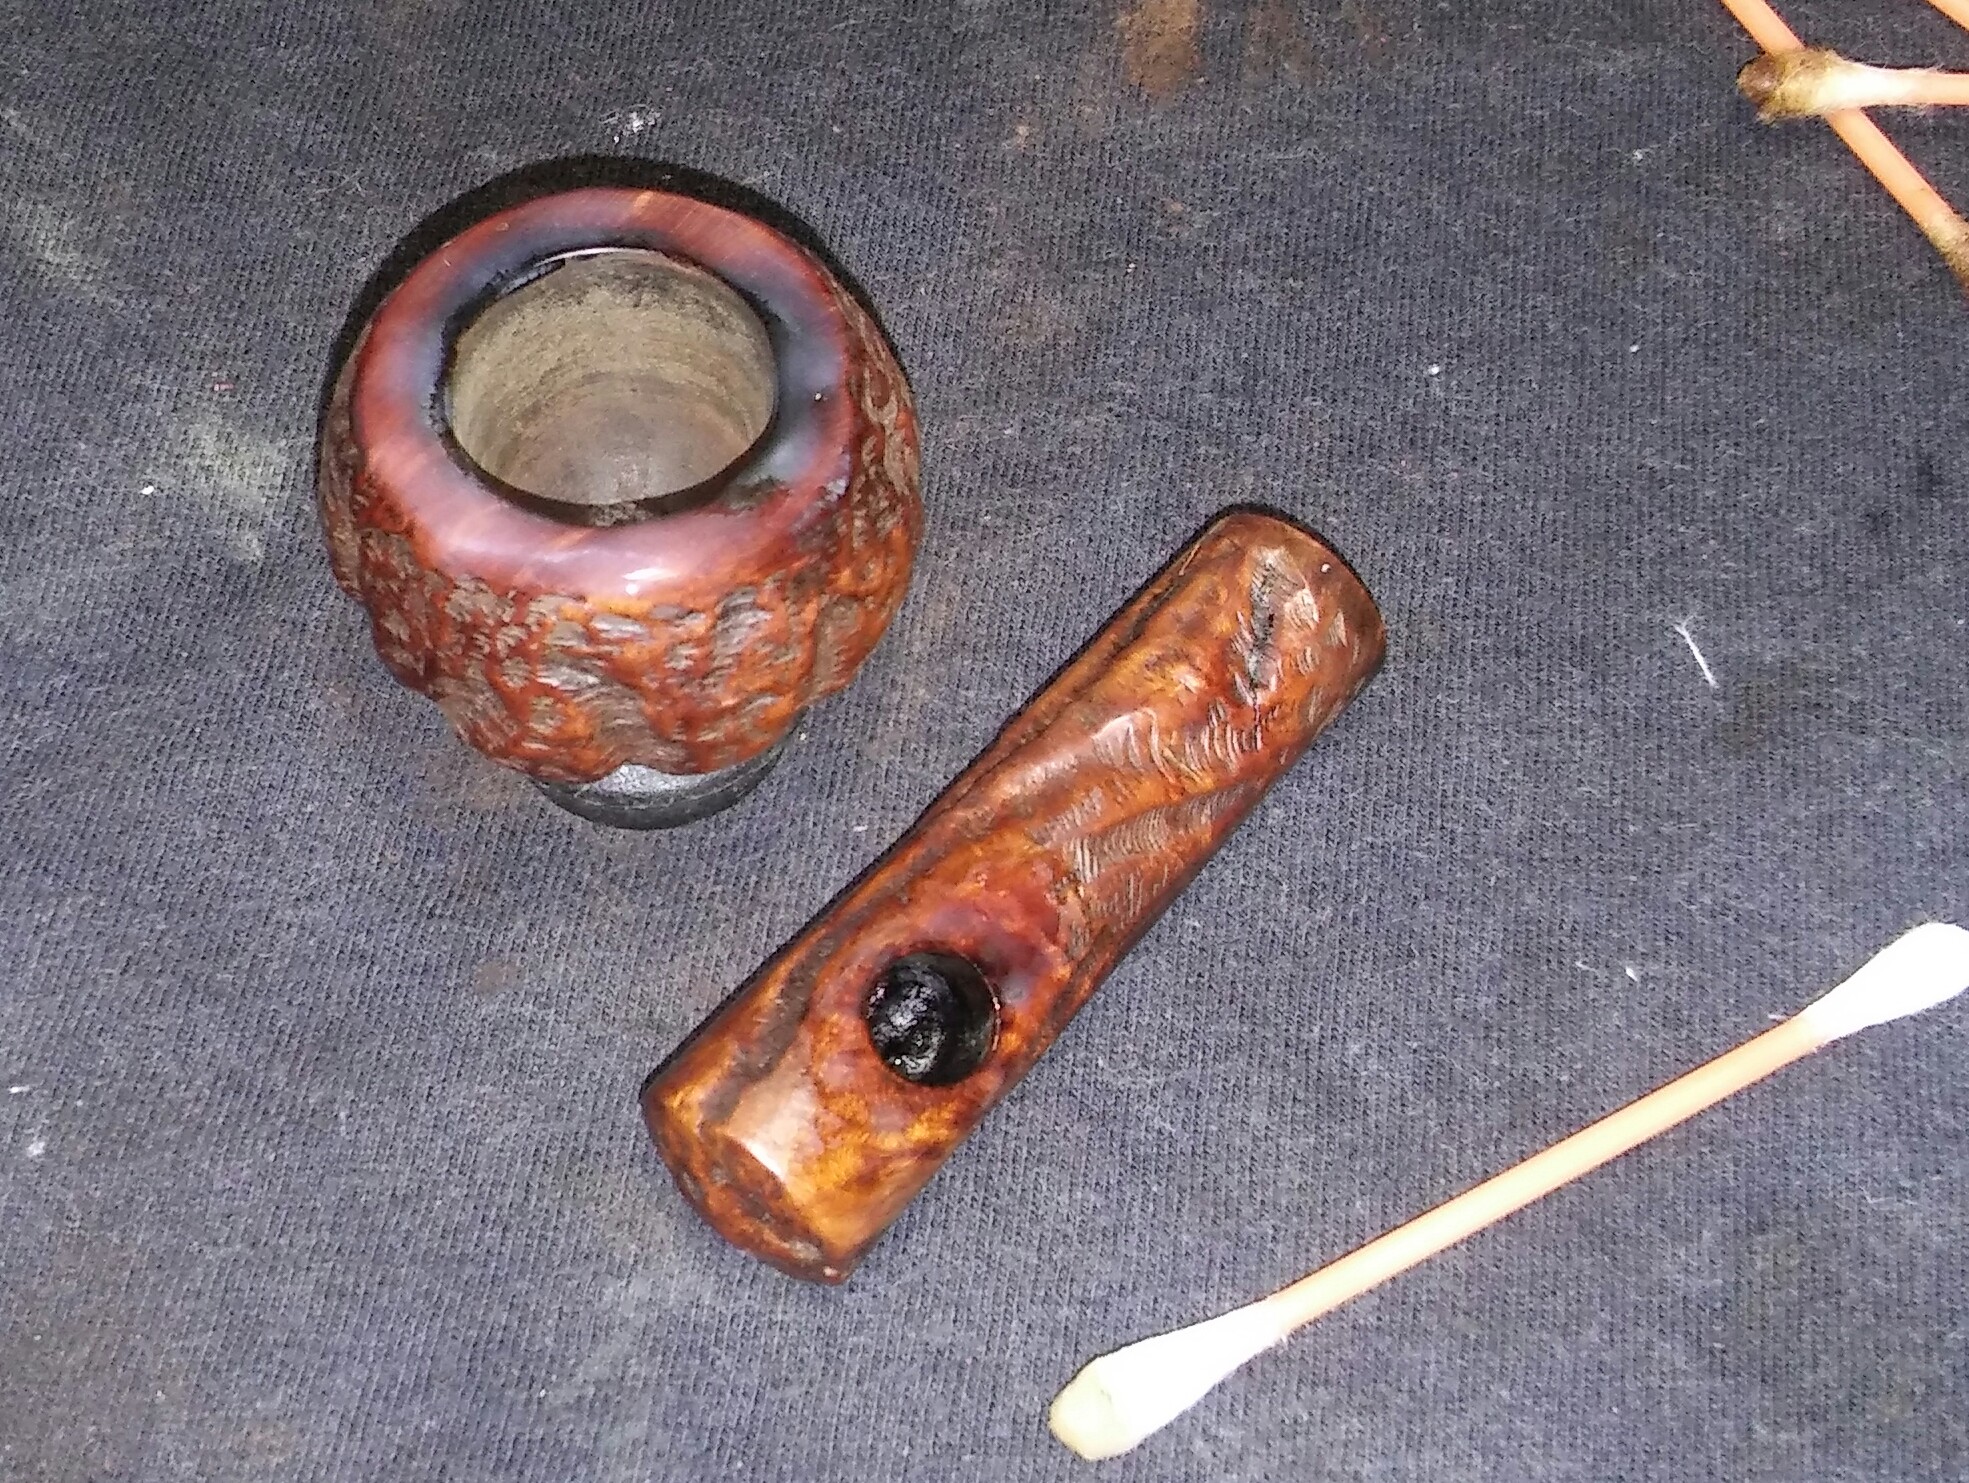
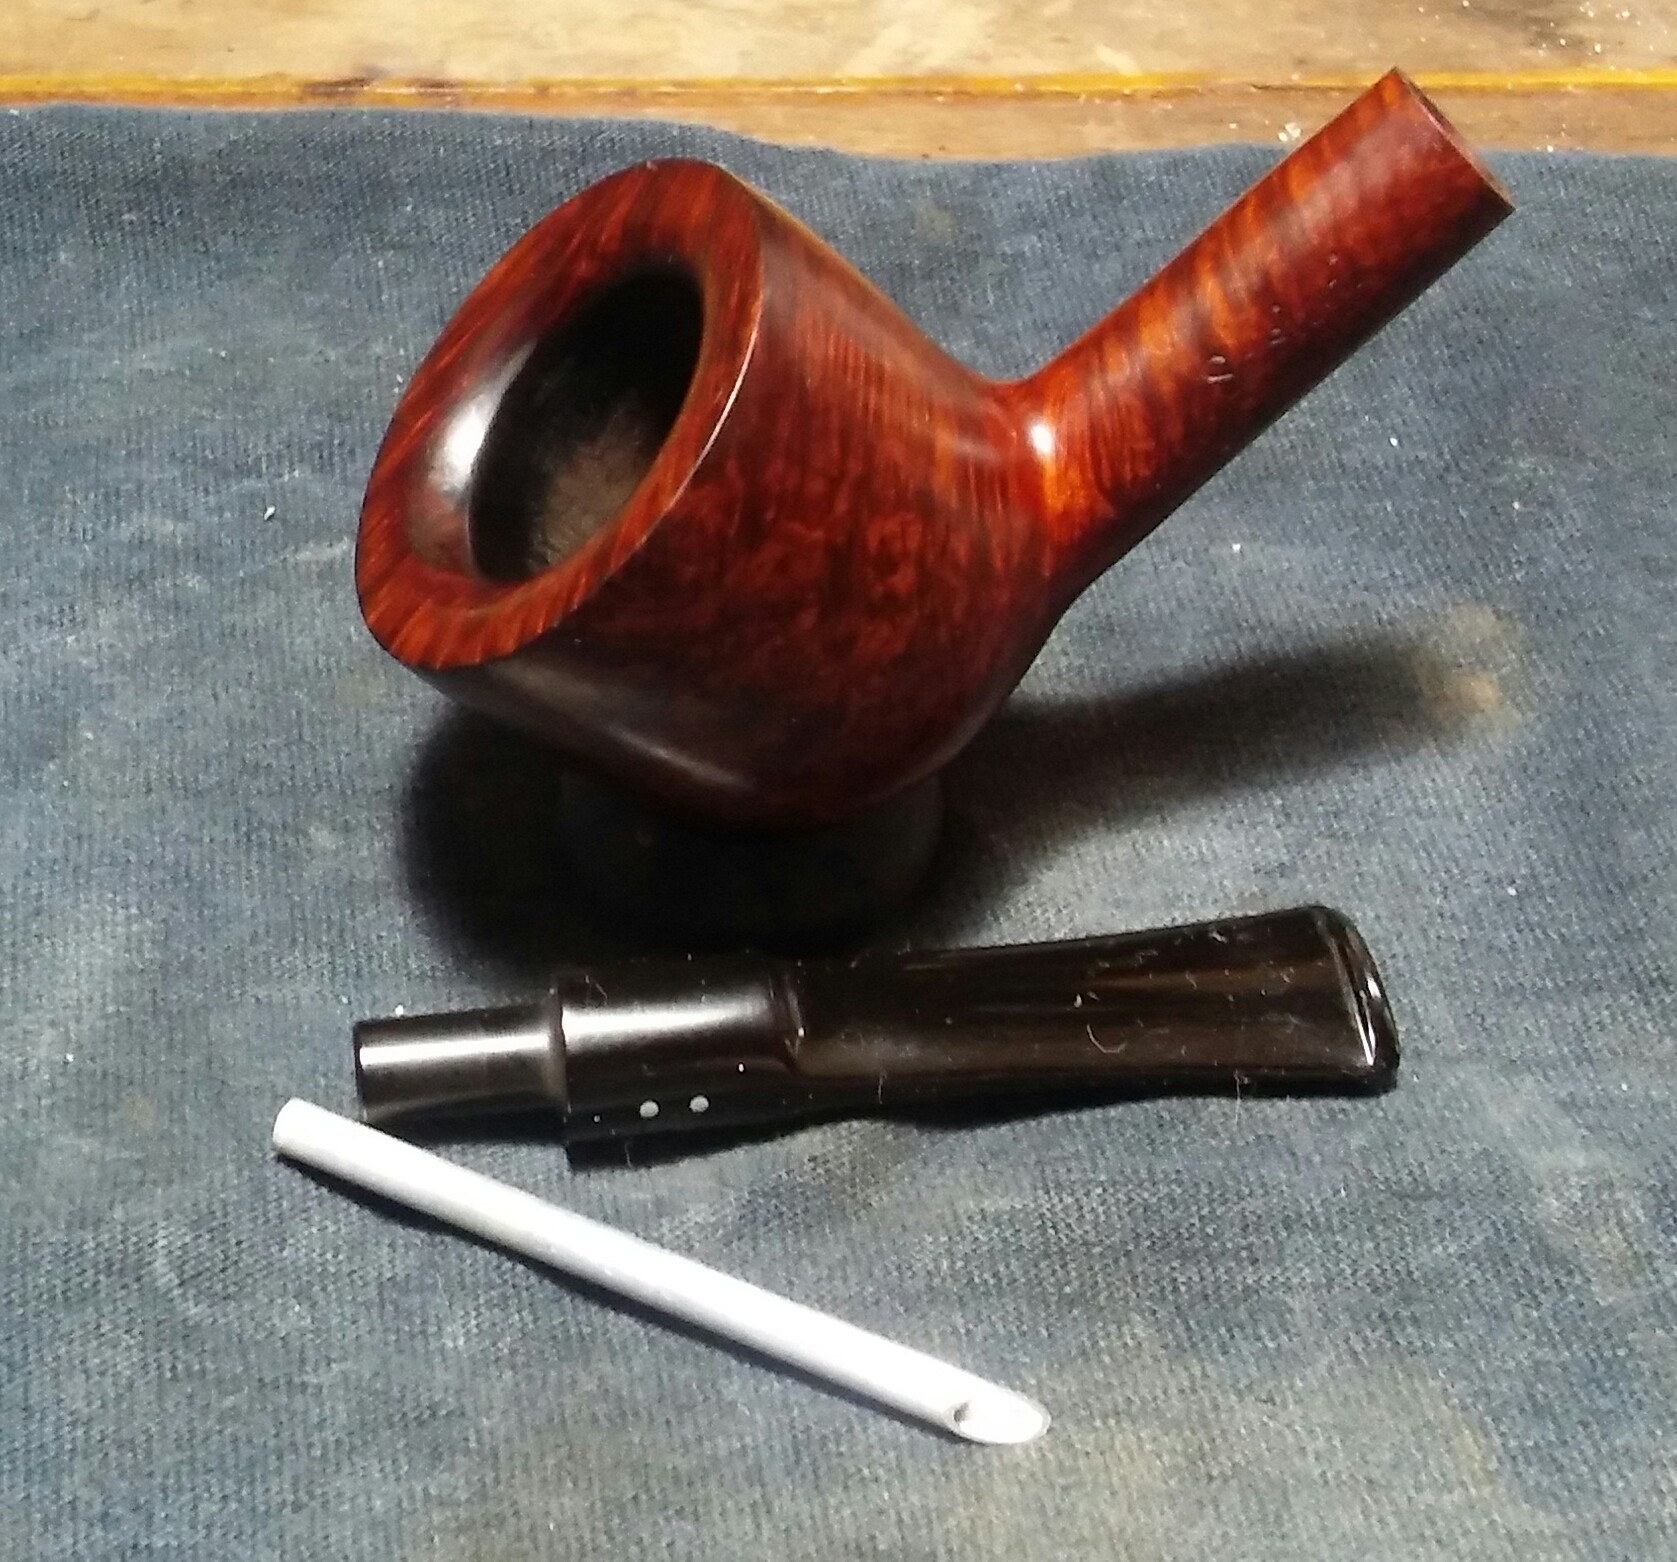
There were three pits on the front of the stummel, ether they were never filled or the fill crumbled away over the years. I cleaned the area with a Q-Tip dipped in EverClear and filled the pits with Gorilla Glue and Briar dust. Once the fill dried I the sanded the filled areas flush with 800 grit sandpaper finishing with 1000 grit sandpaper.

PhotoGrid_1458179620053

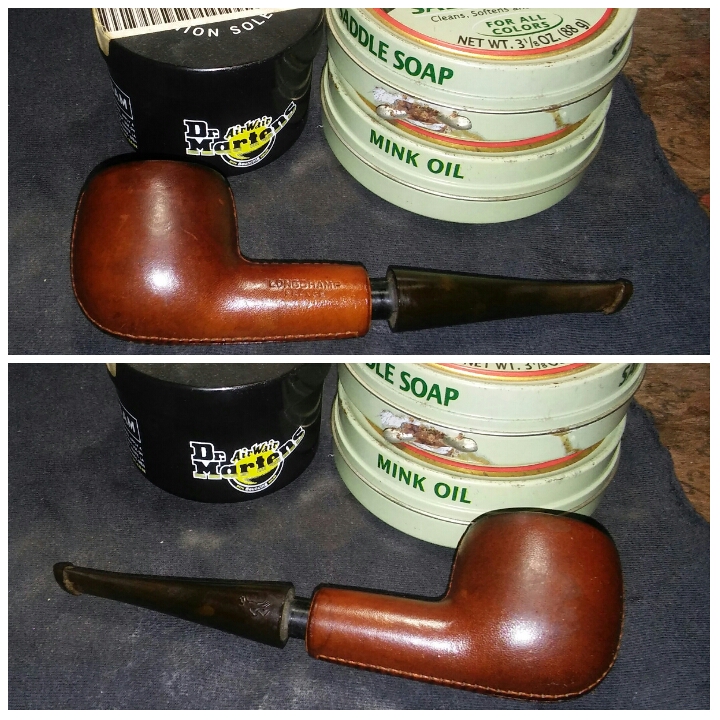
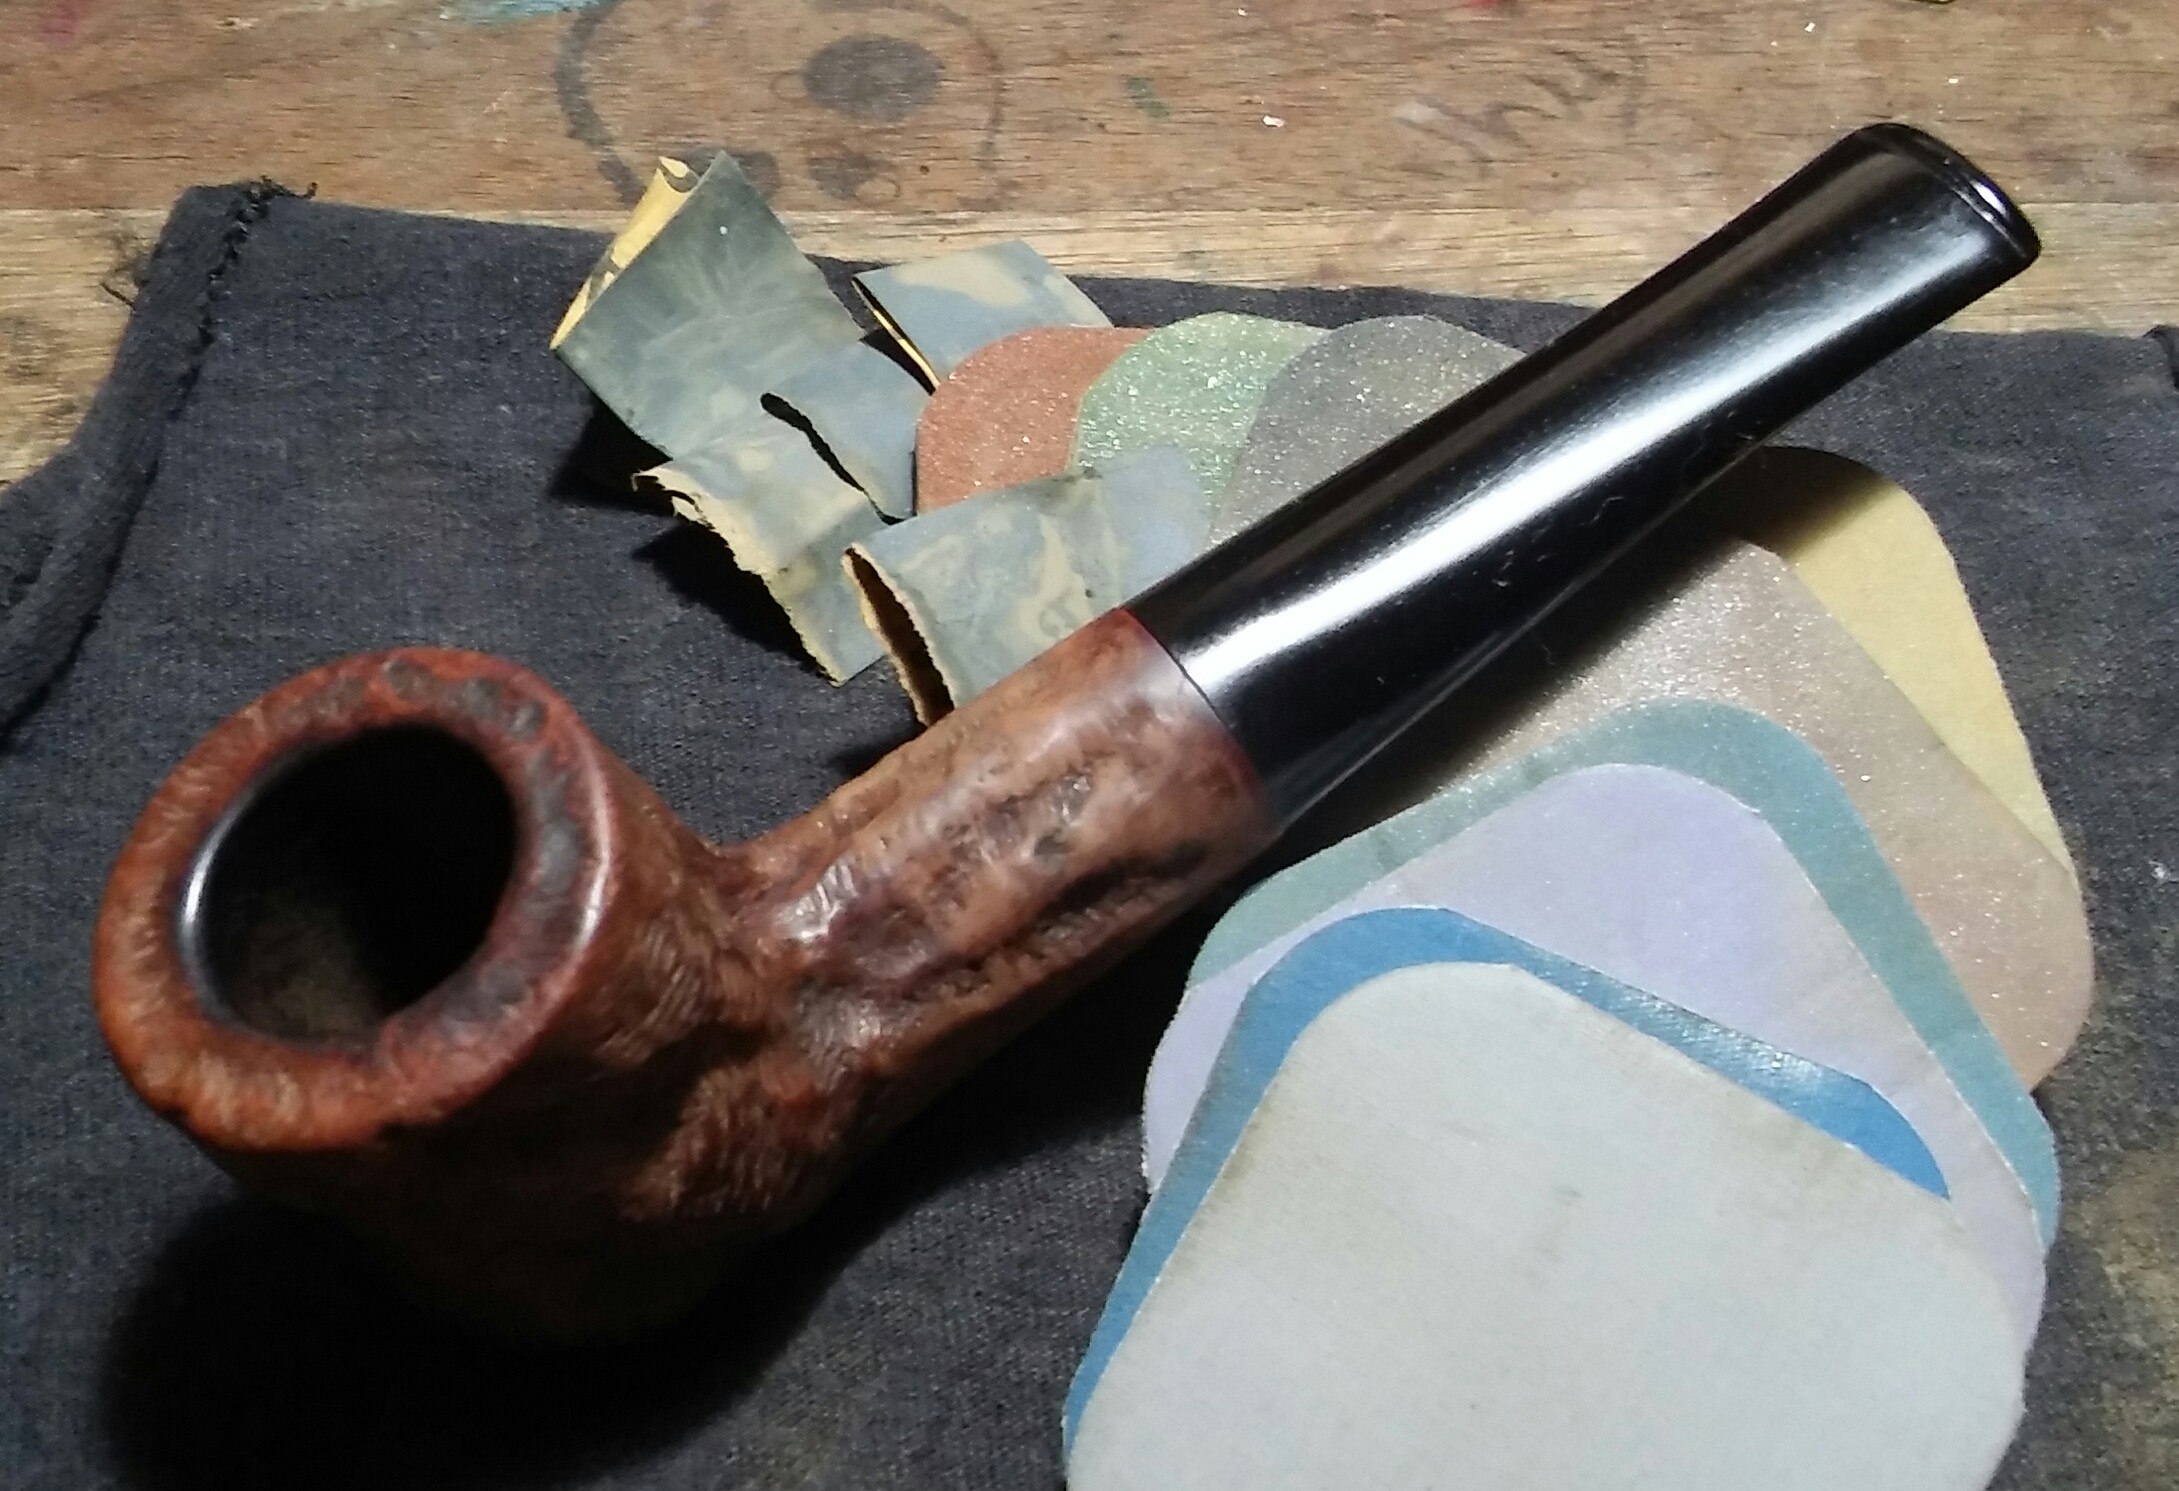
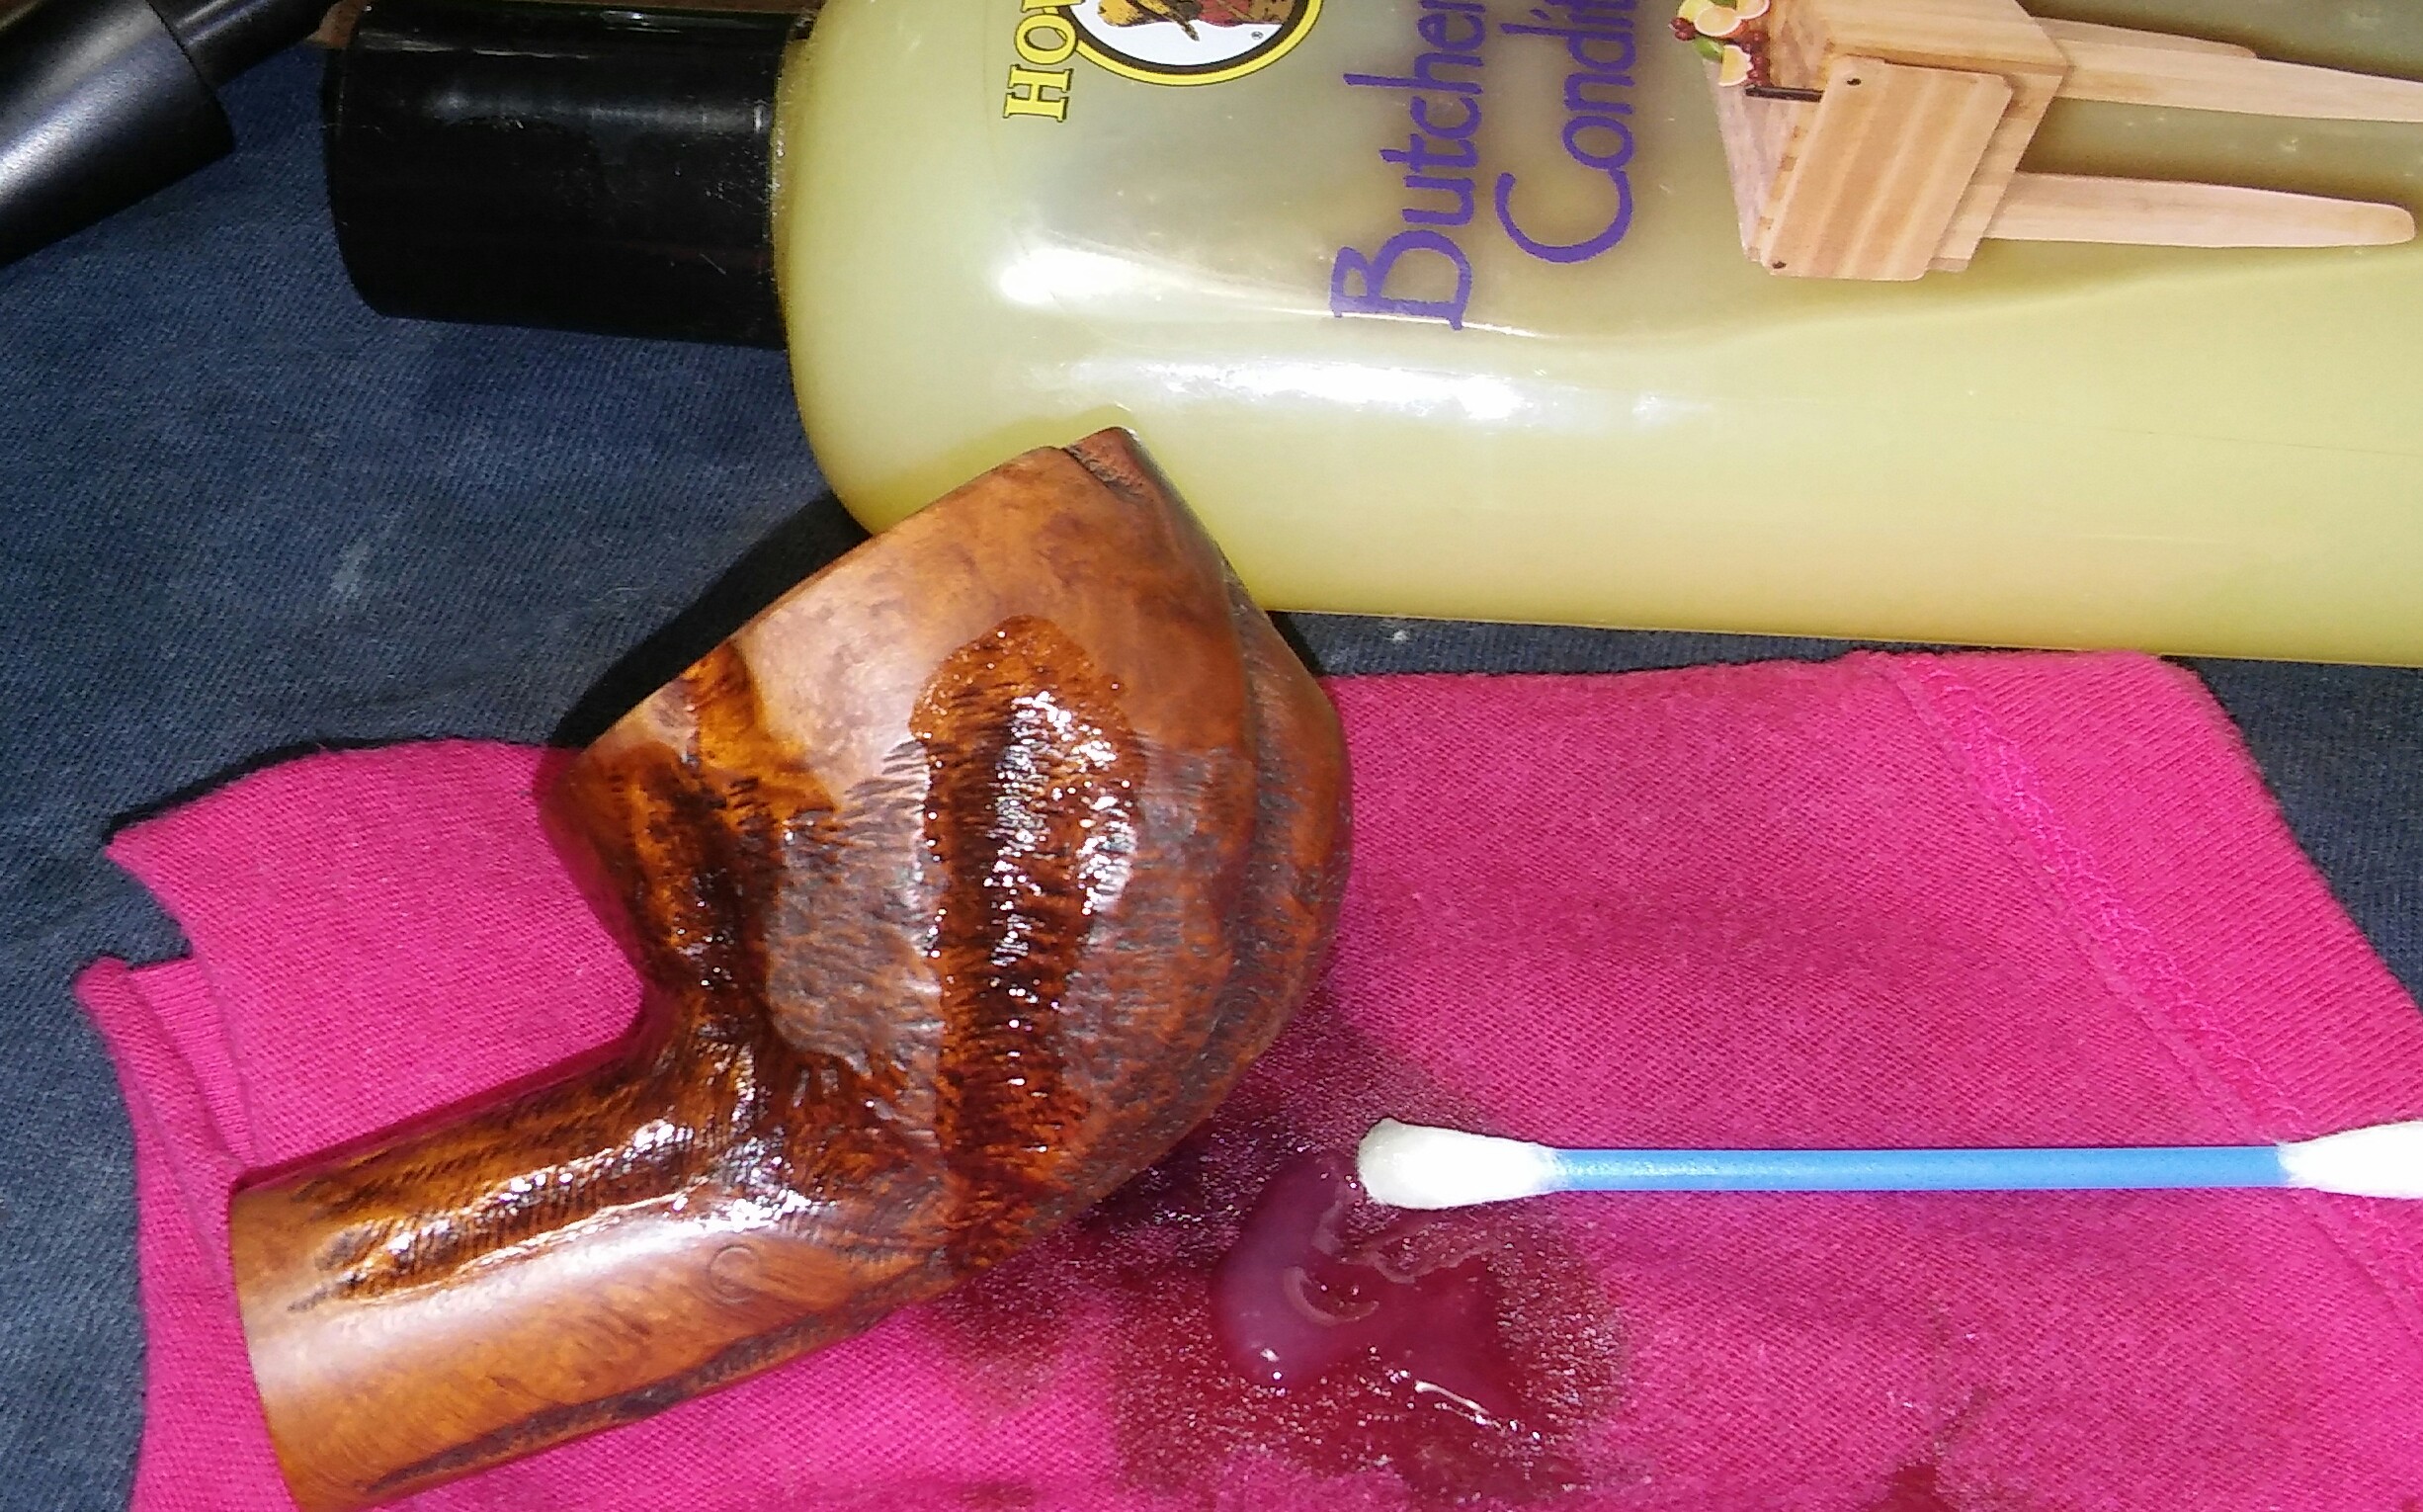
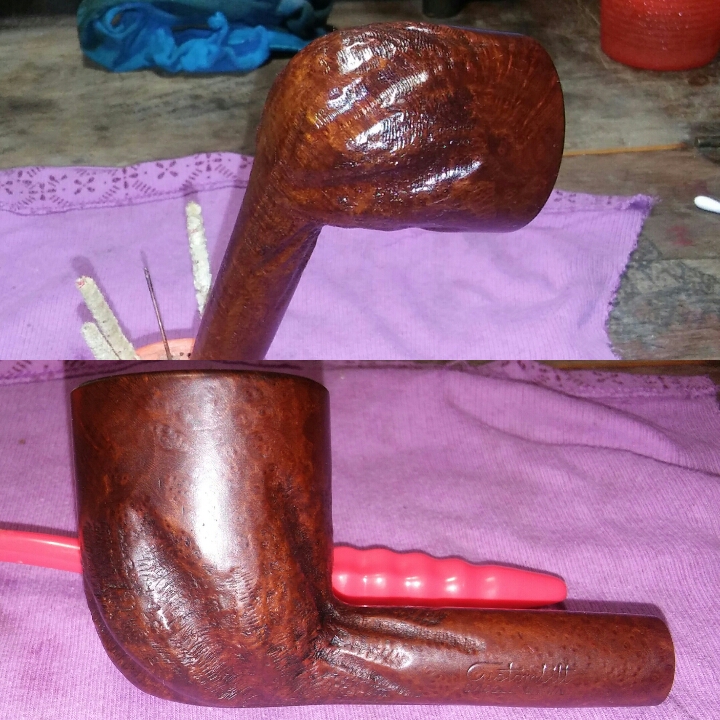
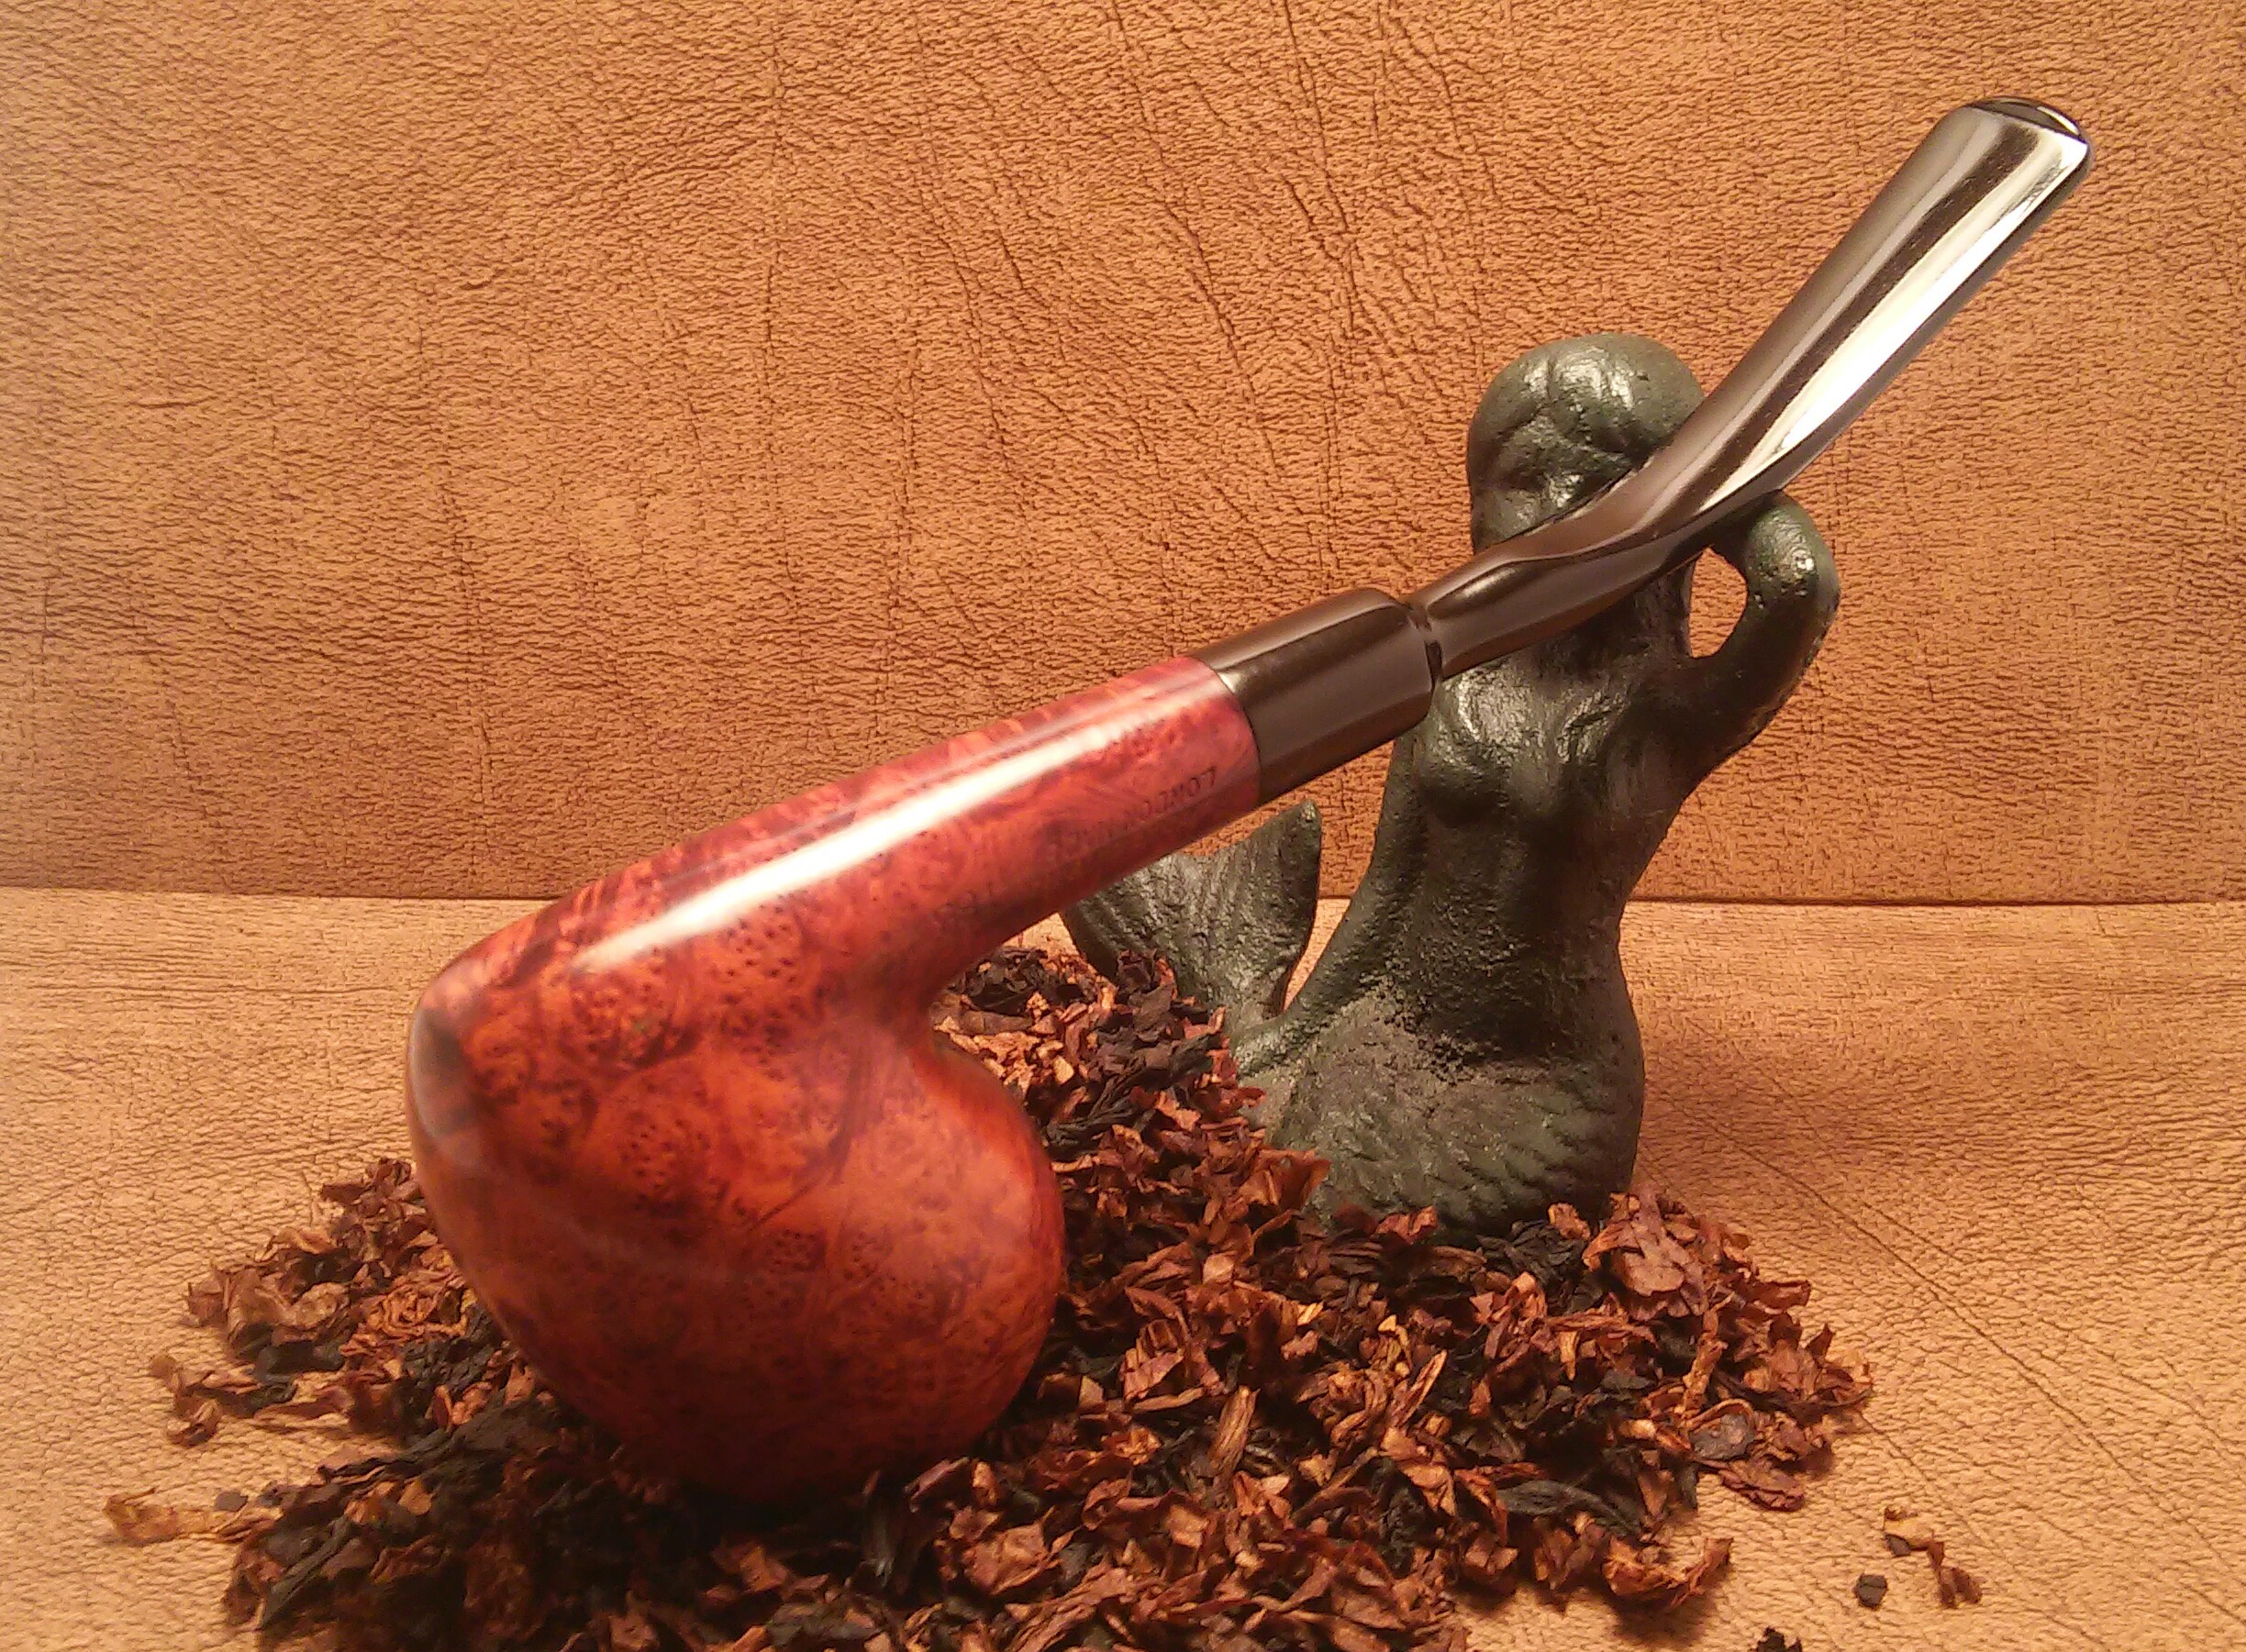
The stain was faded and after sanding the rim and fill areas it left even lighter areas, the stummel would need to be re-stained.I wiped down the stummel with an EverClear dampened rag and let dry. I mixed Fiebing’s leather dye red and dark brown. I applied the stain with a medium paint brush, hitting it with a Bic lighter to set the stain. I removed the excess stain with an alcohol dampened rag and left it to dry.

PhotoGrid_1458069694692

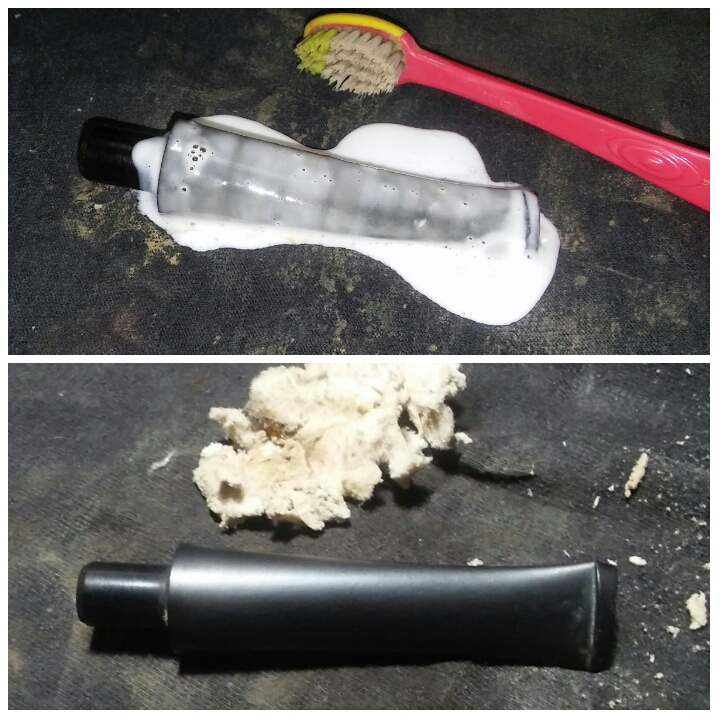
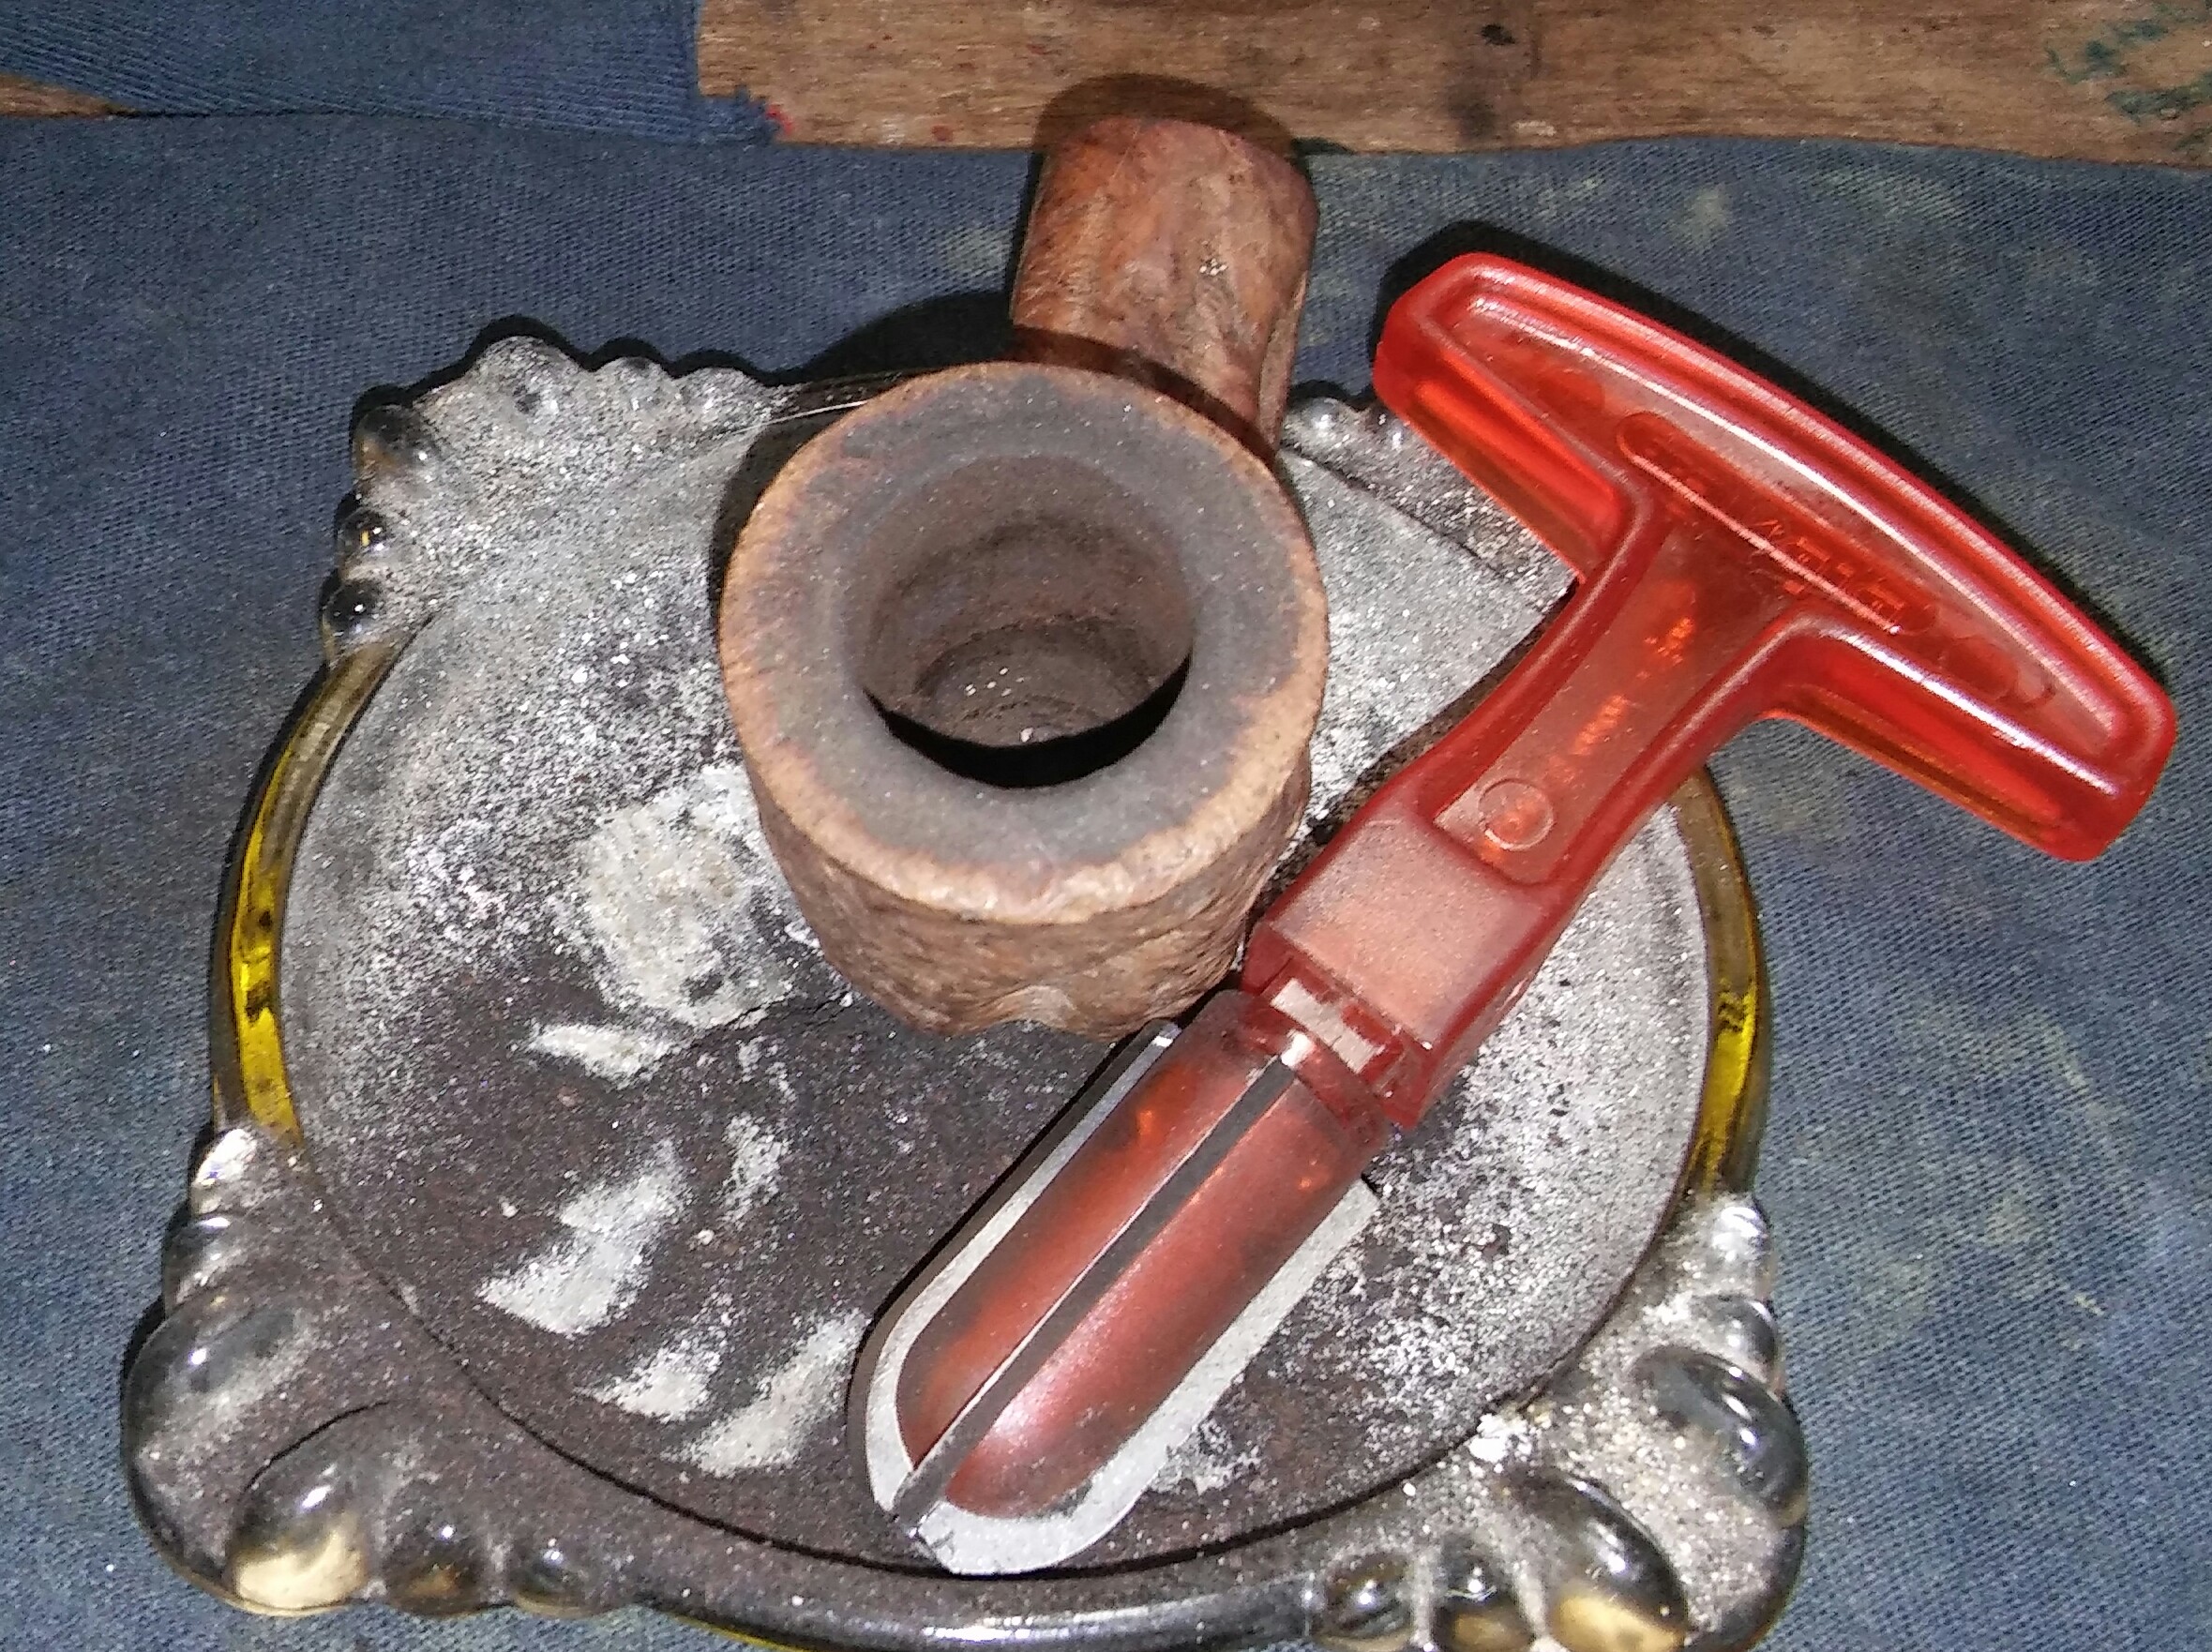
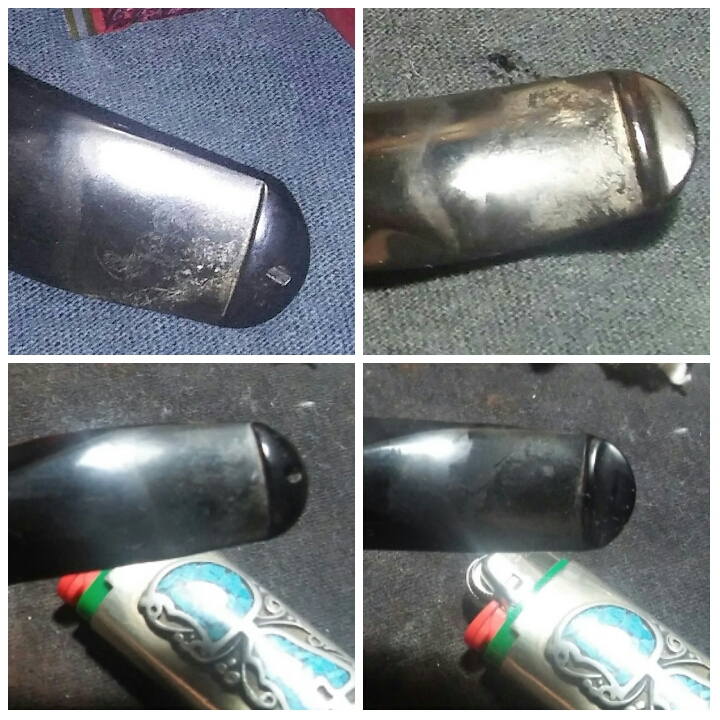
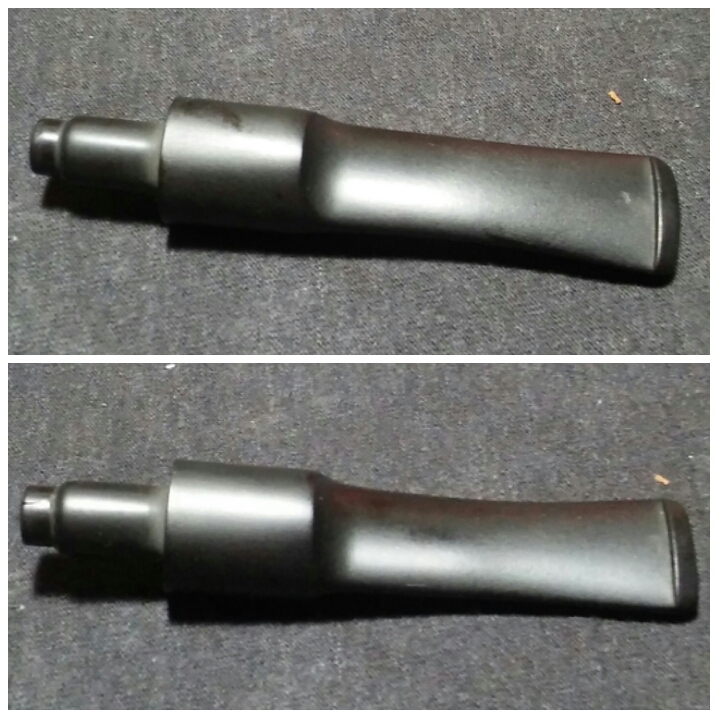
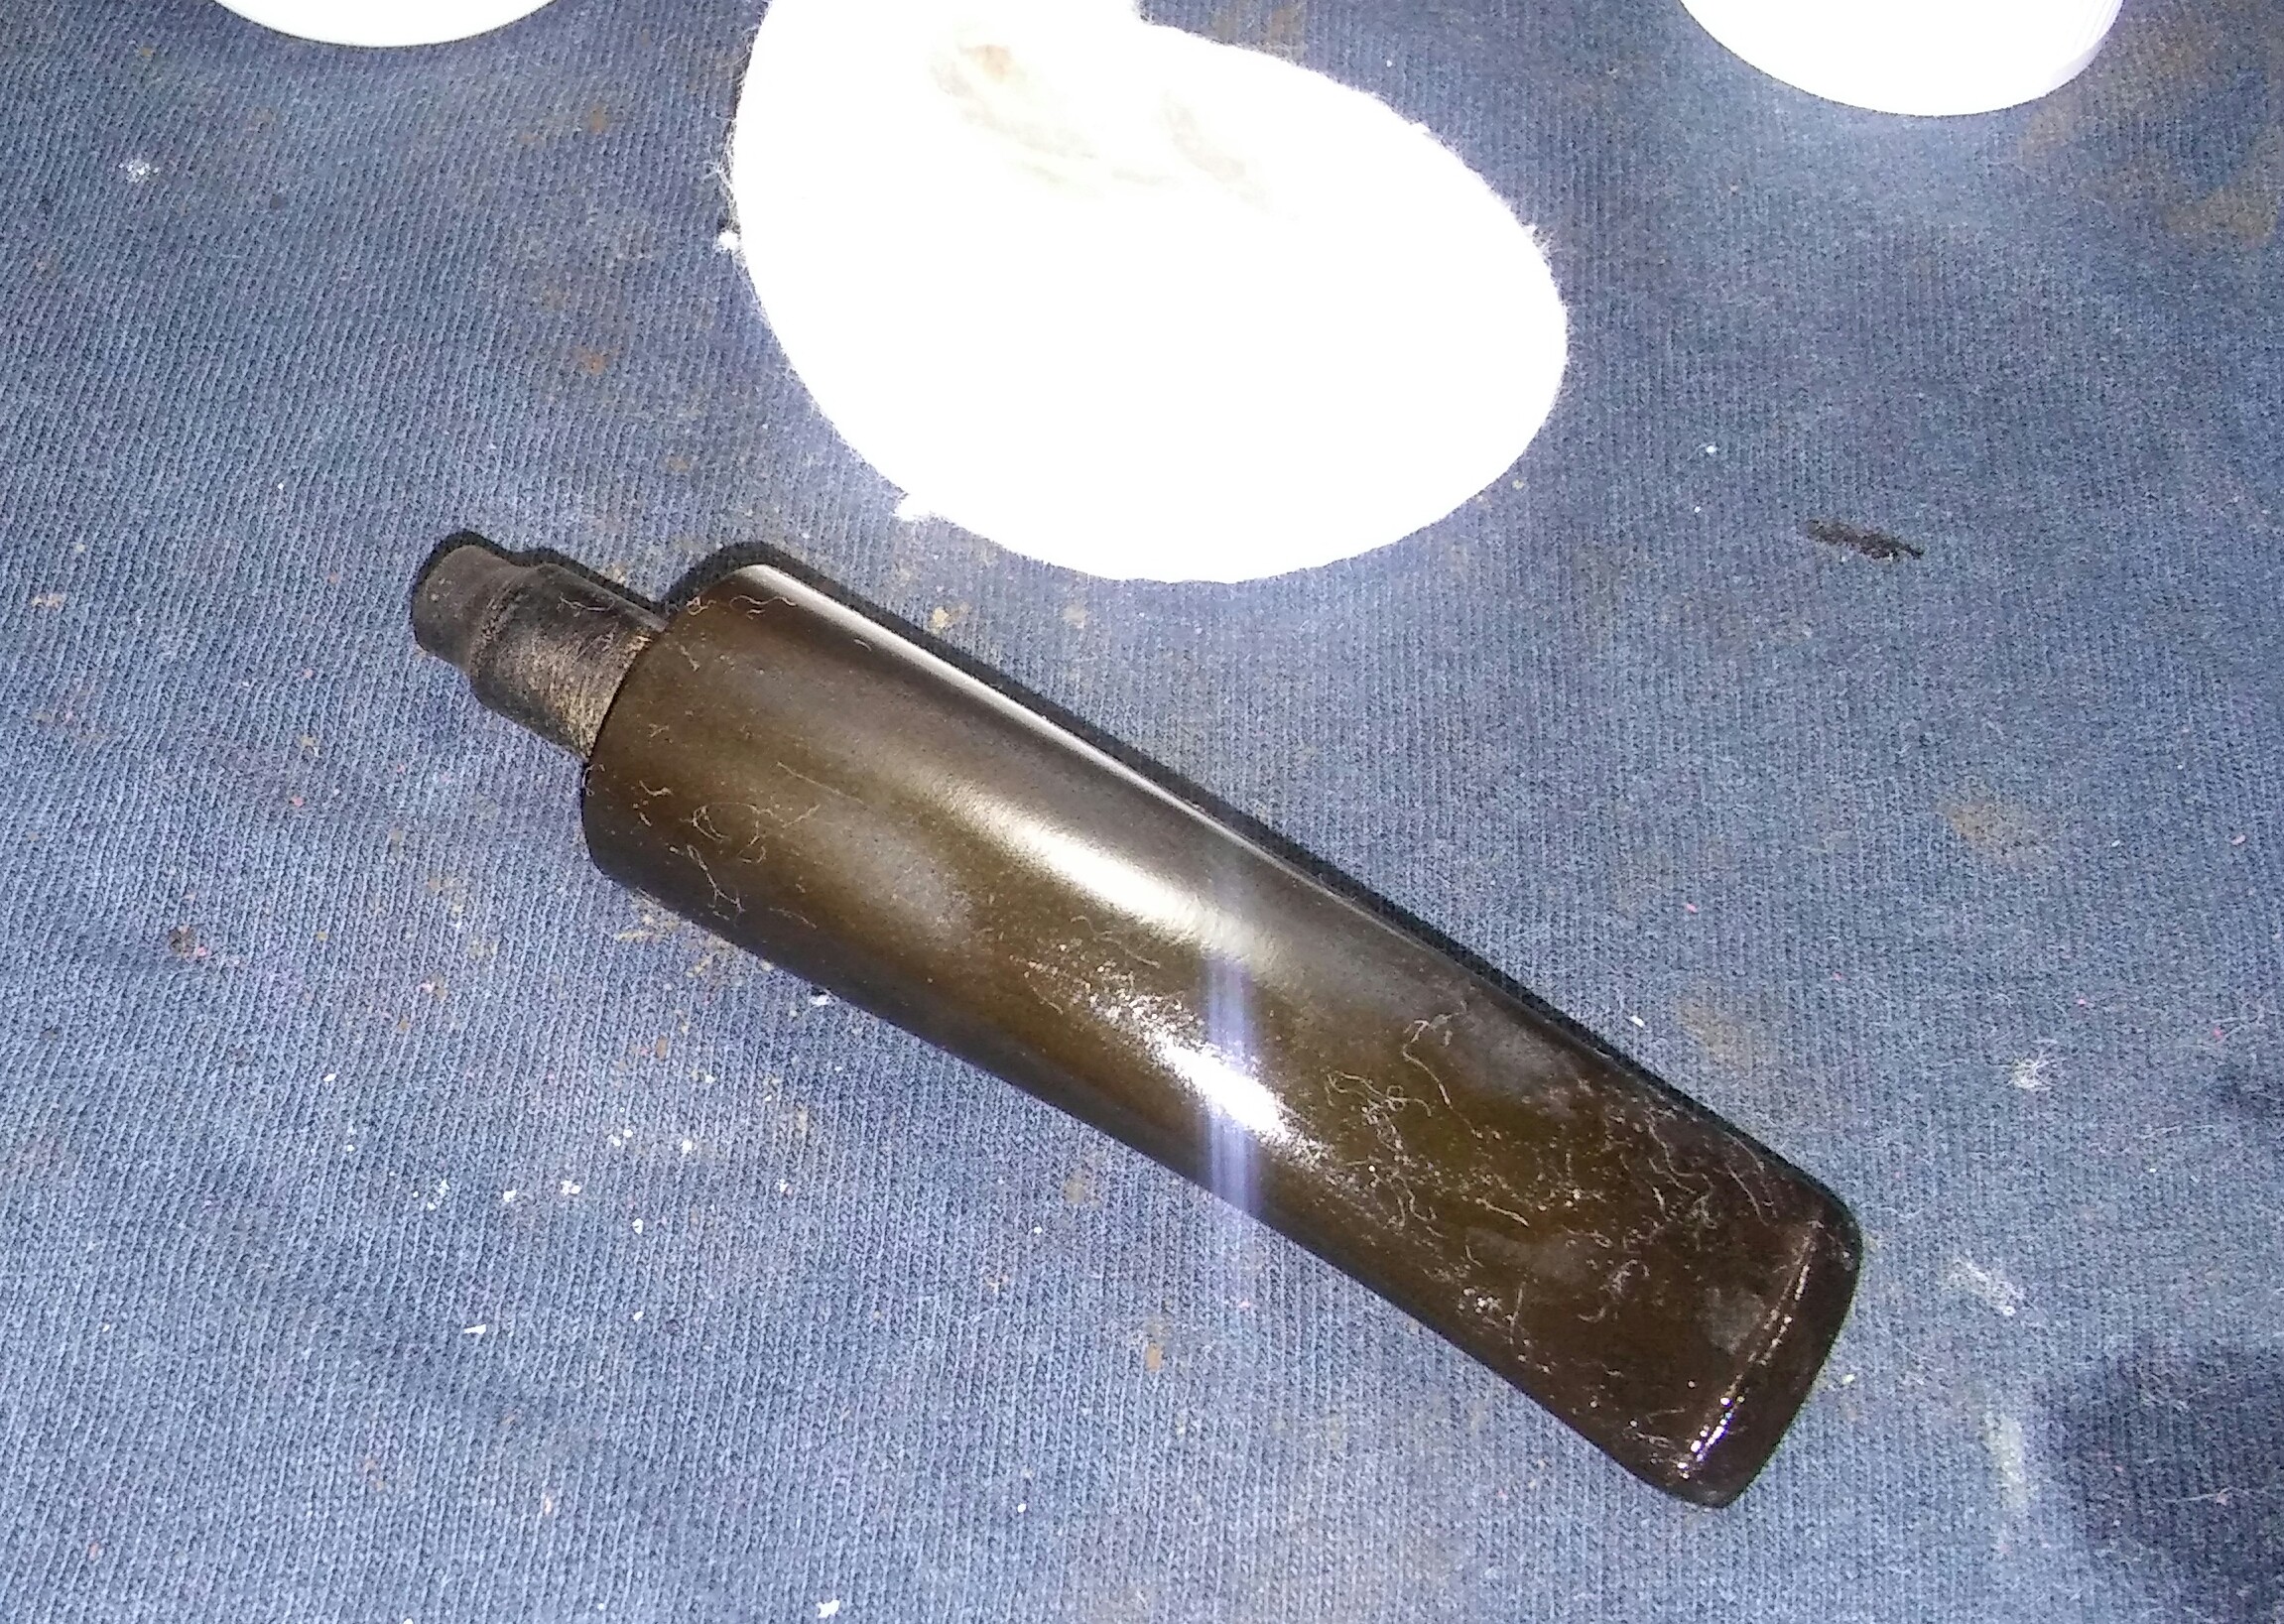
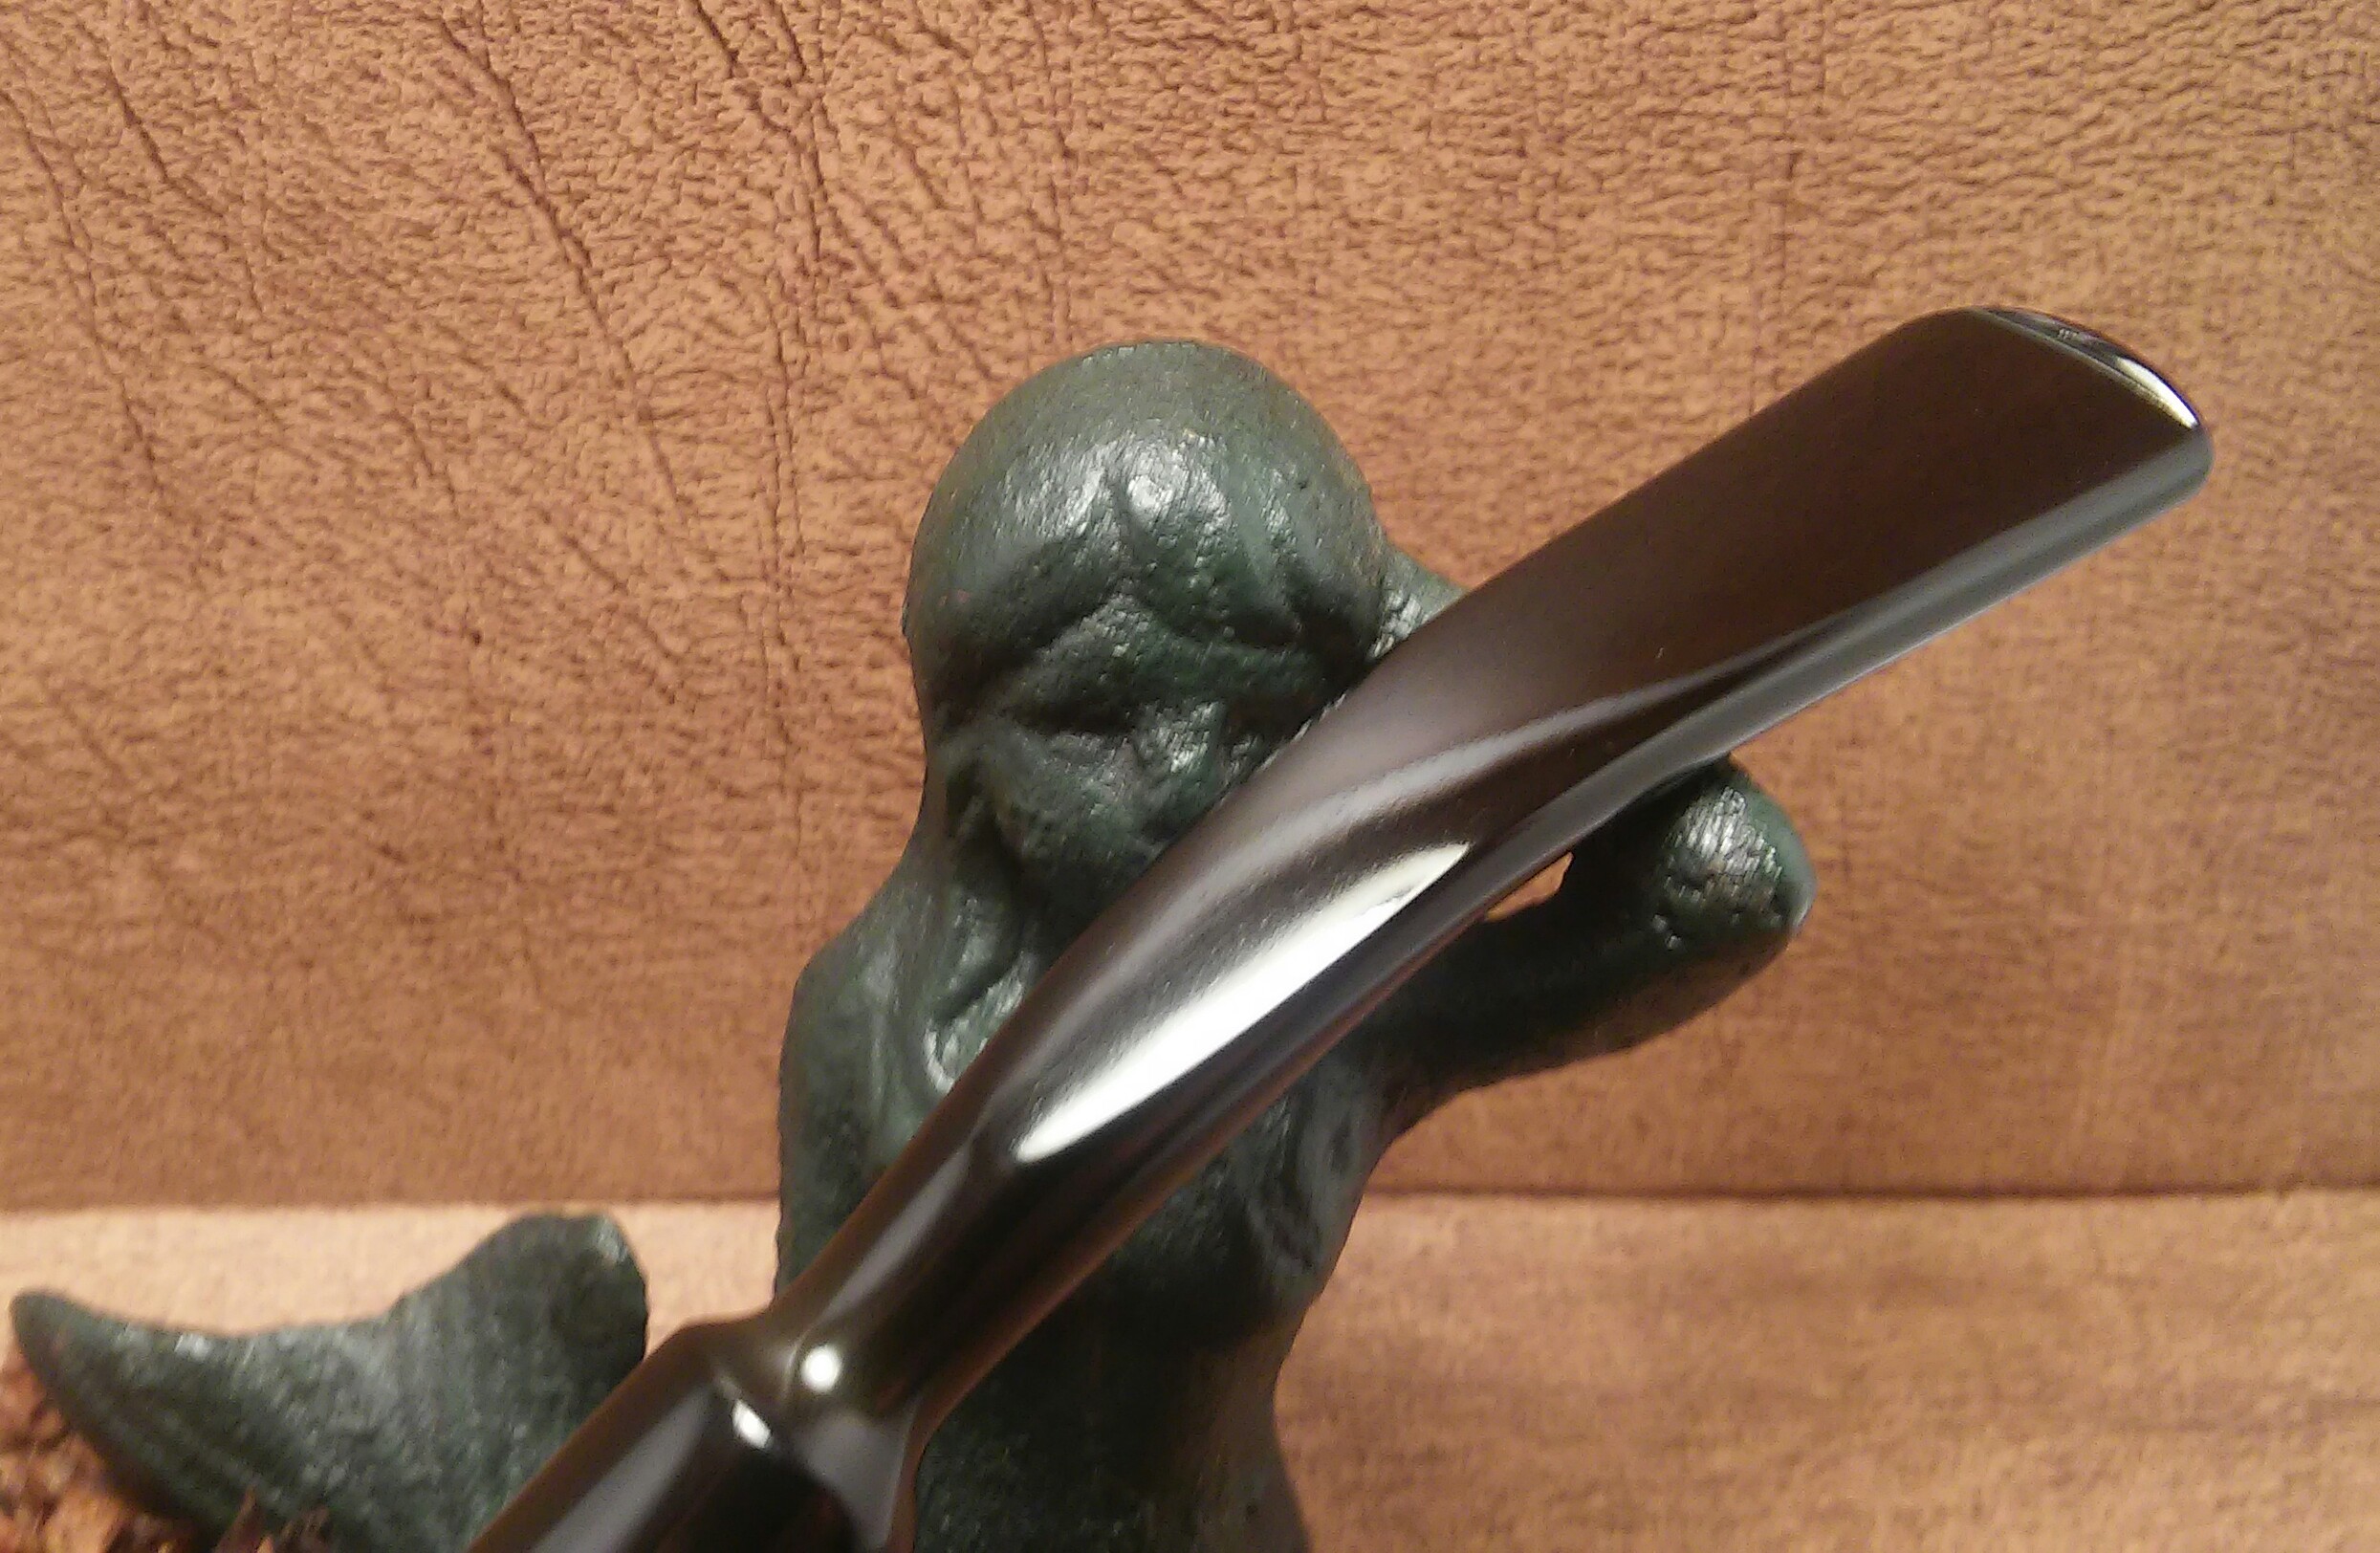
I removed the stem oxidation using non-bleach Soft Scrub and rag. I applied a generous amount of Soft Scrub to the stem and left it to penetrate the oxidation. Once the Soft Scrub turns from white to a brownish color its time to begin scrubbing vigorously with a rag, applying  more Soft Scrub as needed. Holding the stem under natural light will help to see if all oxidation was removed.

PhotoGrid_1458069477205

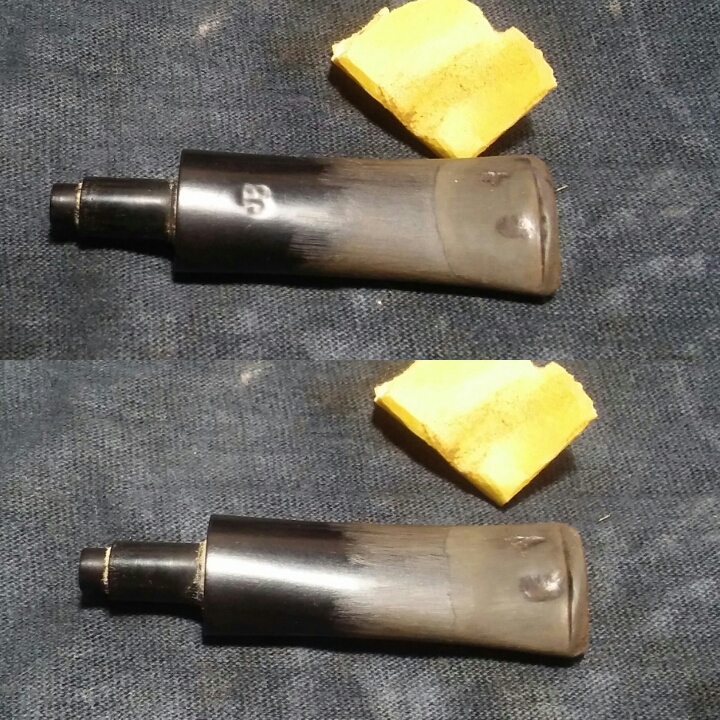
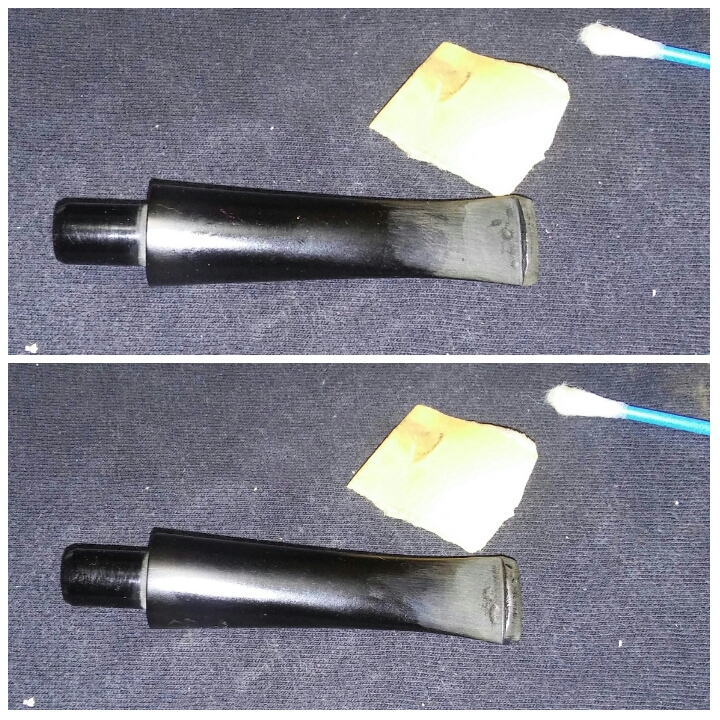
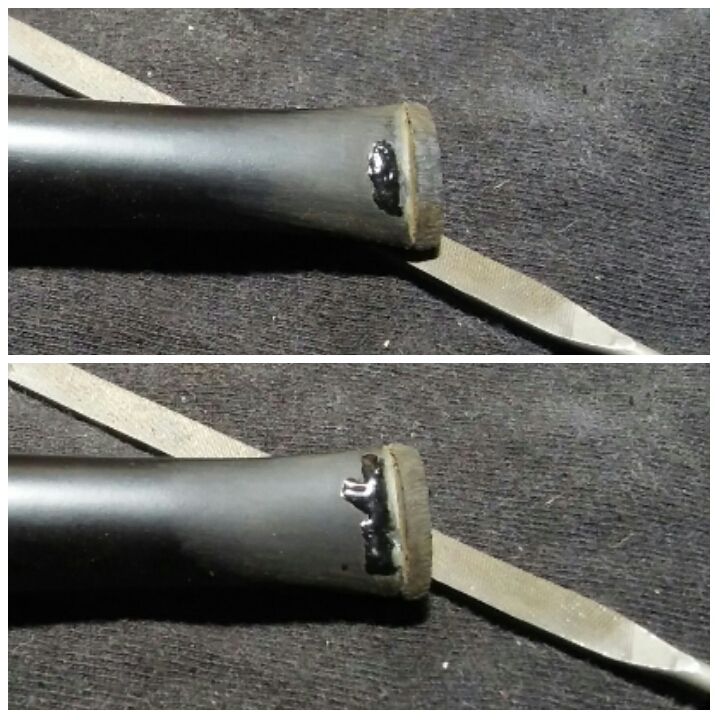
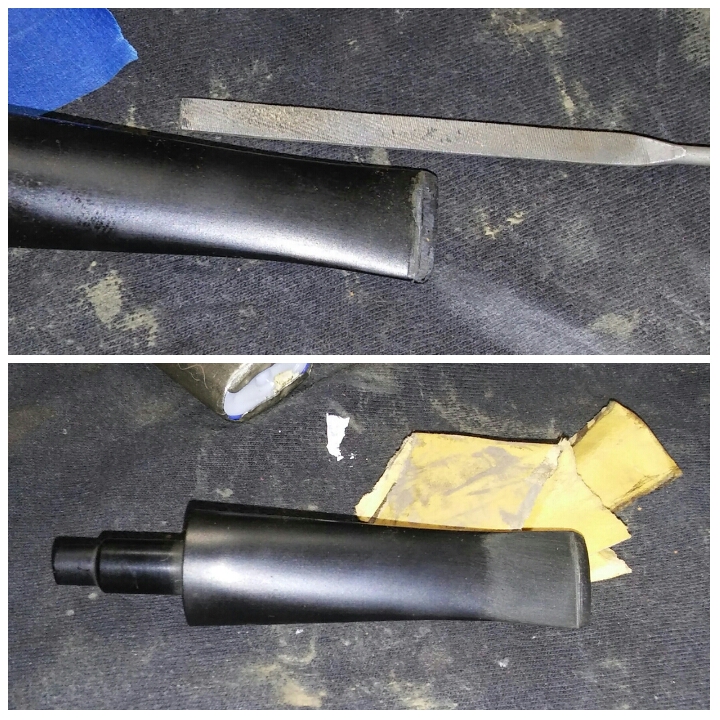
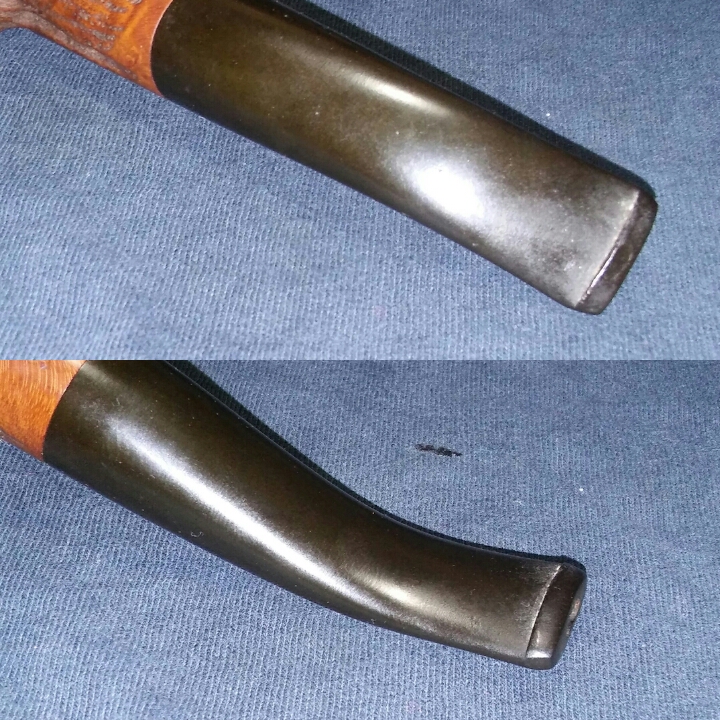
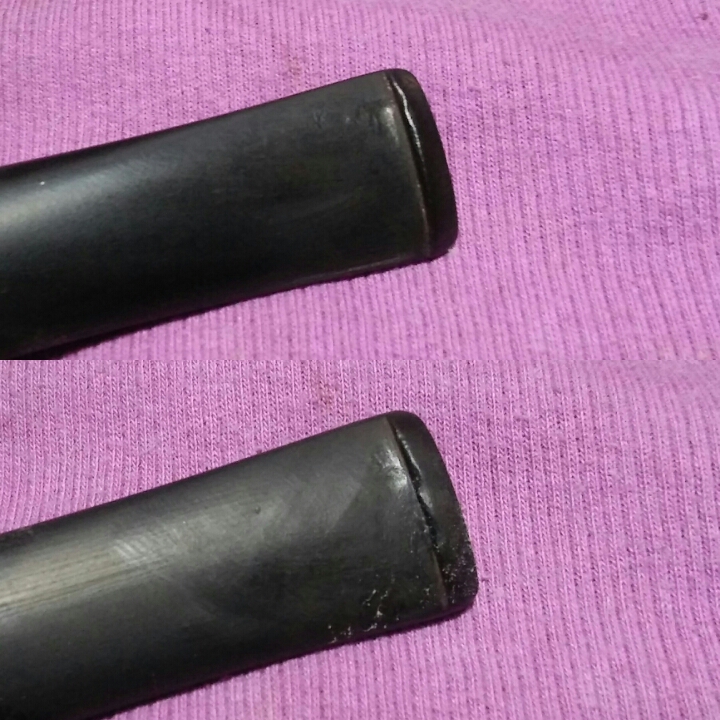
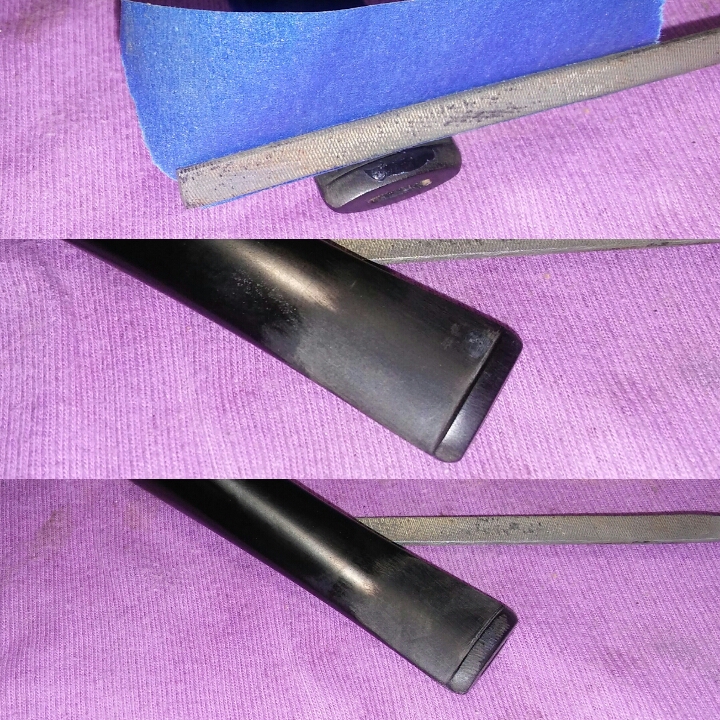
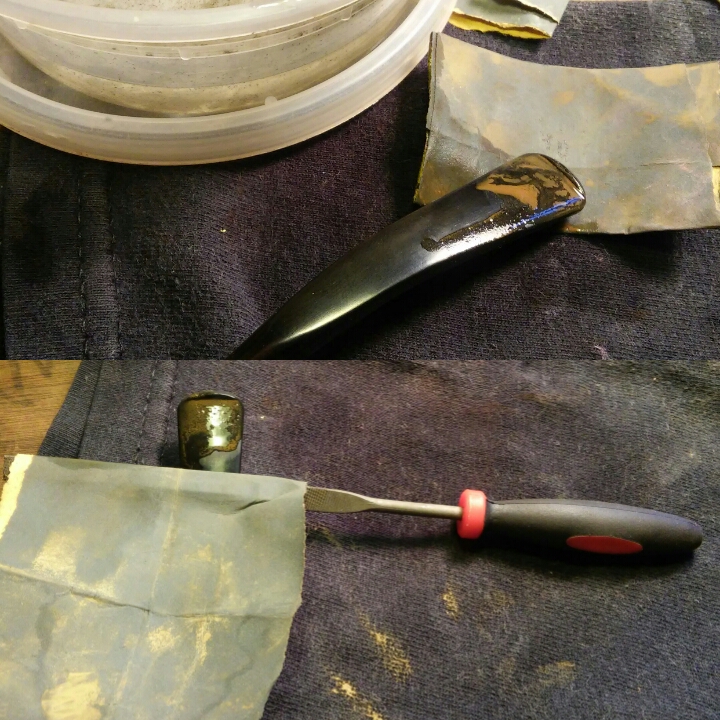
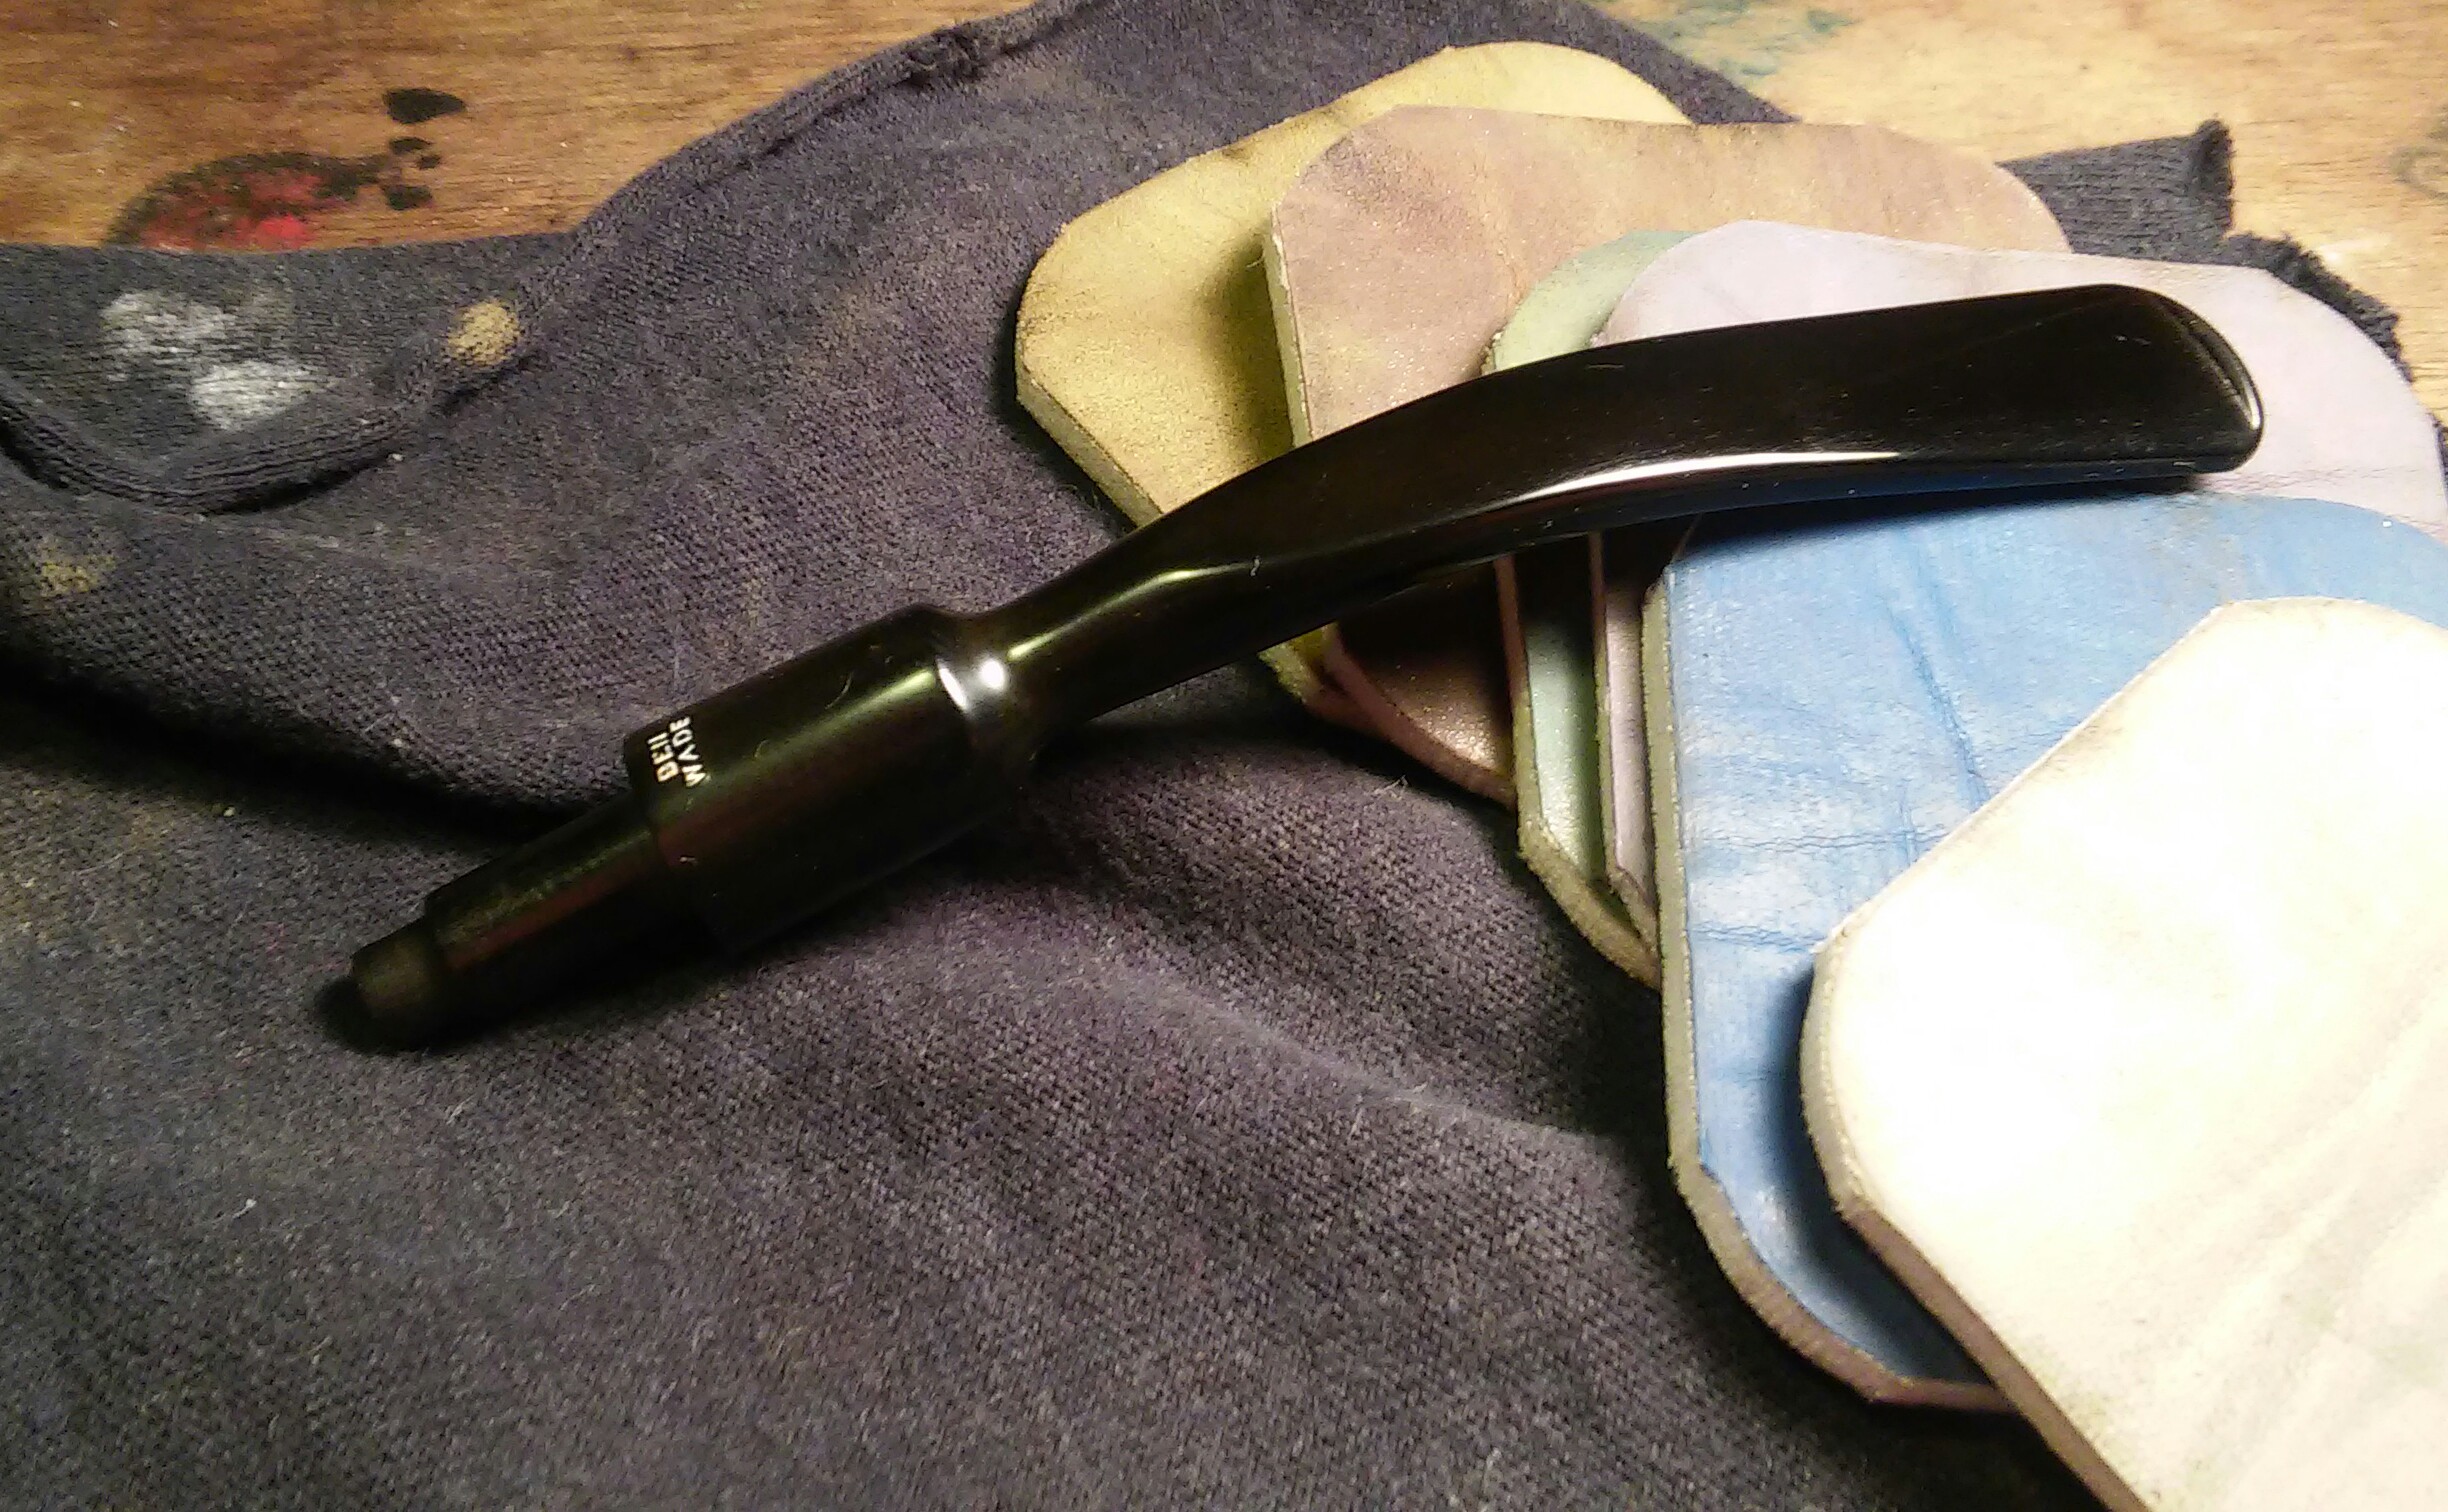
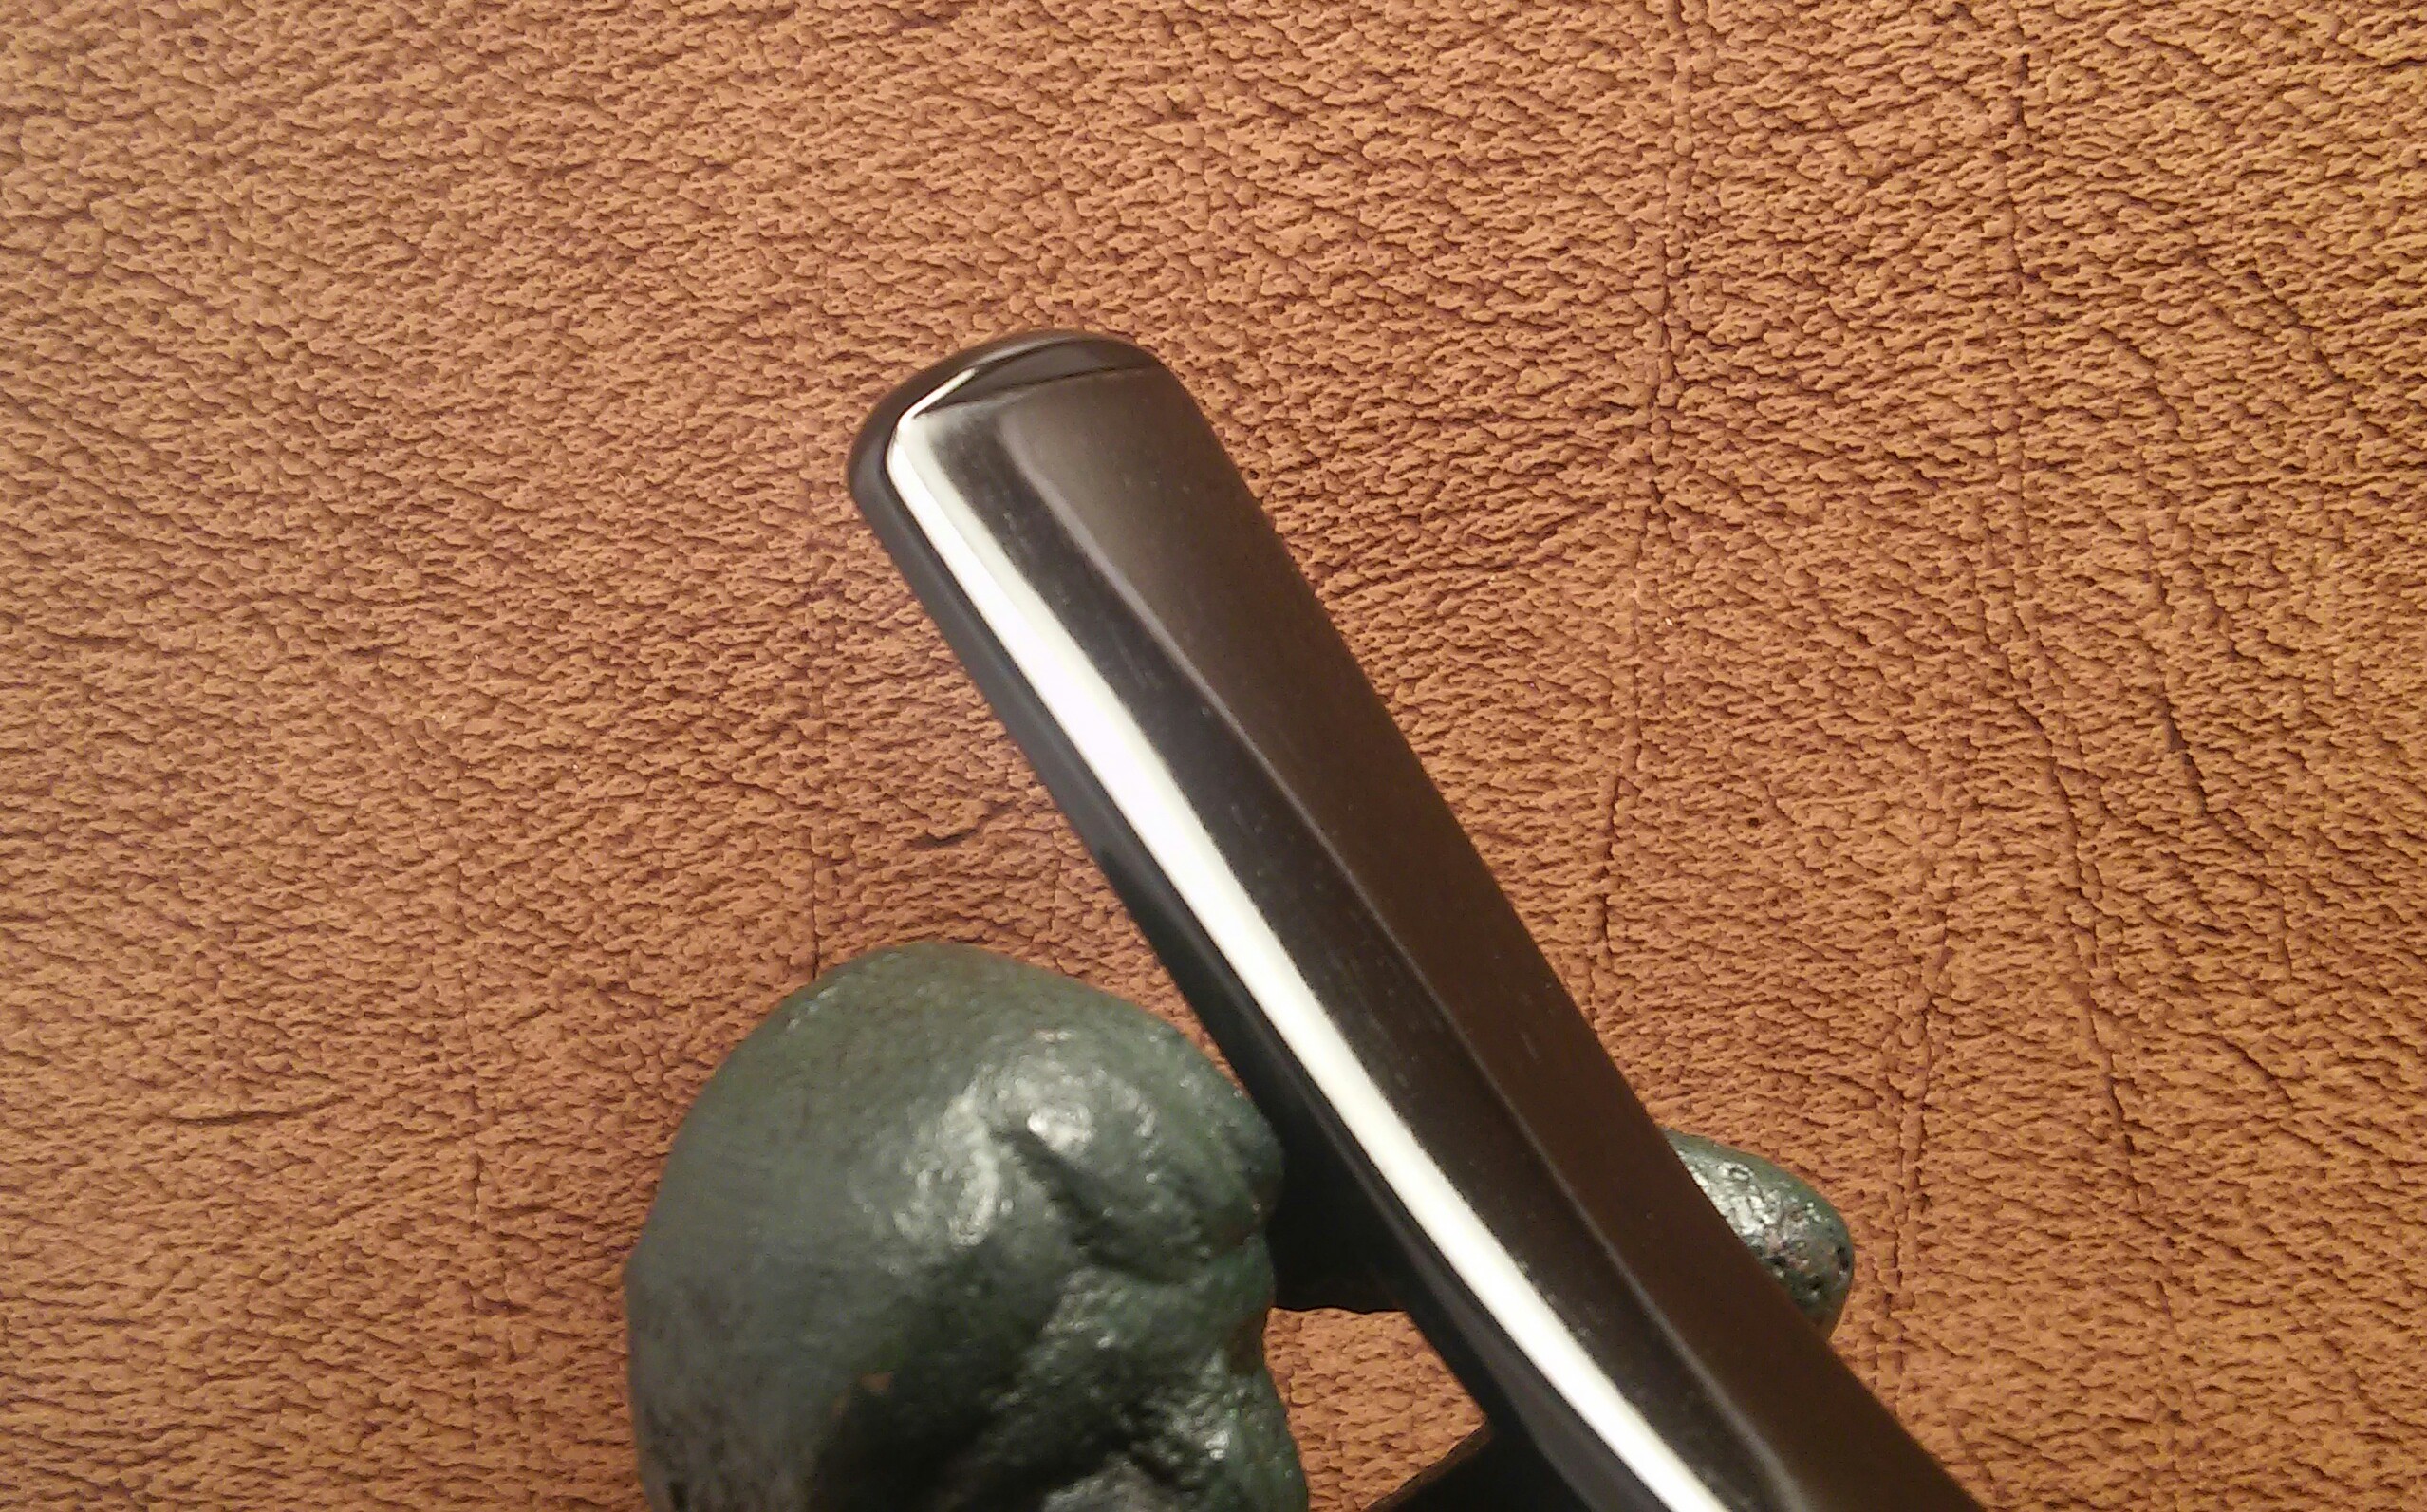
I sanded the area of the deep tooth impressions with 400 grit sandpaper, then wiped down the area with an alcohol dampened rag to remove the dust from sanding.

PhotoGrid_1458069549562PhotoGrid_1458069500259

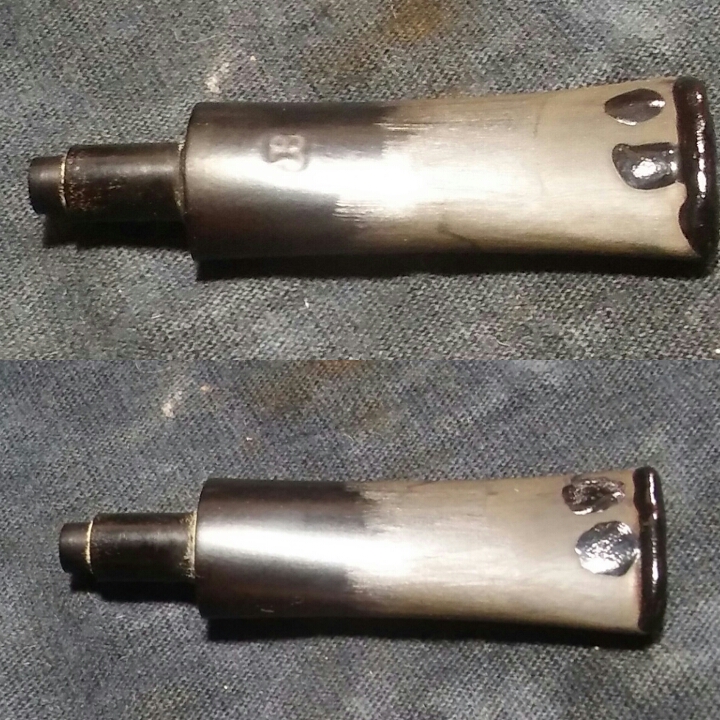
This is were things got interesting, I mixed thick black CA glue and charcoal powder into a paste and applying the paste with a toothpick to the impressions and worn button, as I always do when filling impressions, hitting it with accelerator to set the glue. I left it to cure over night.

PhotoGrid_1458076309157

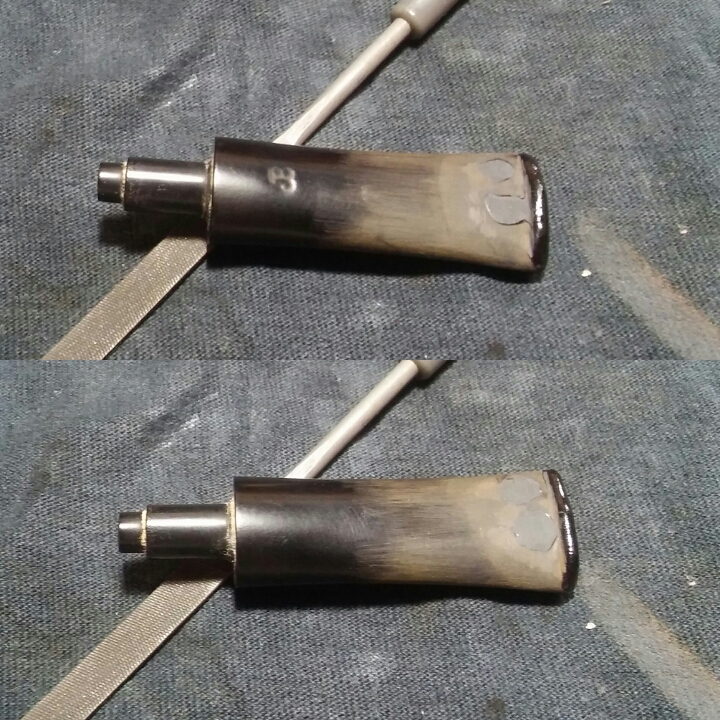
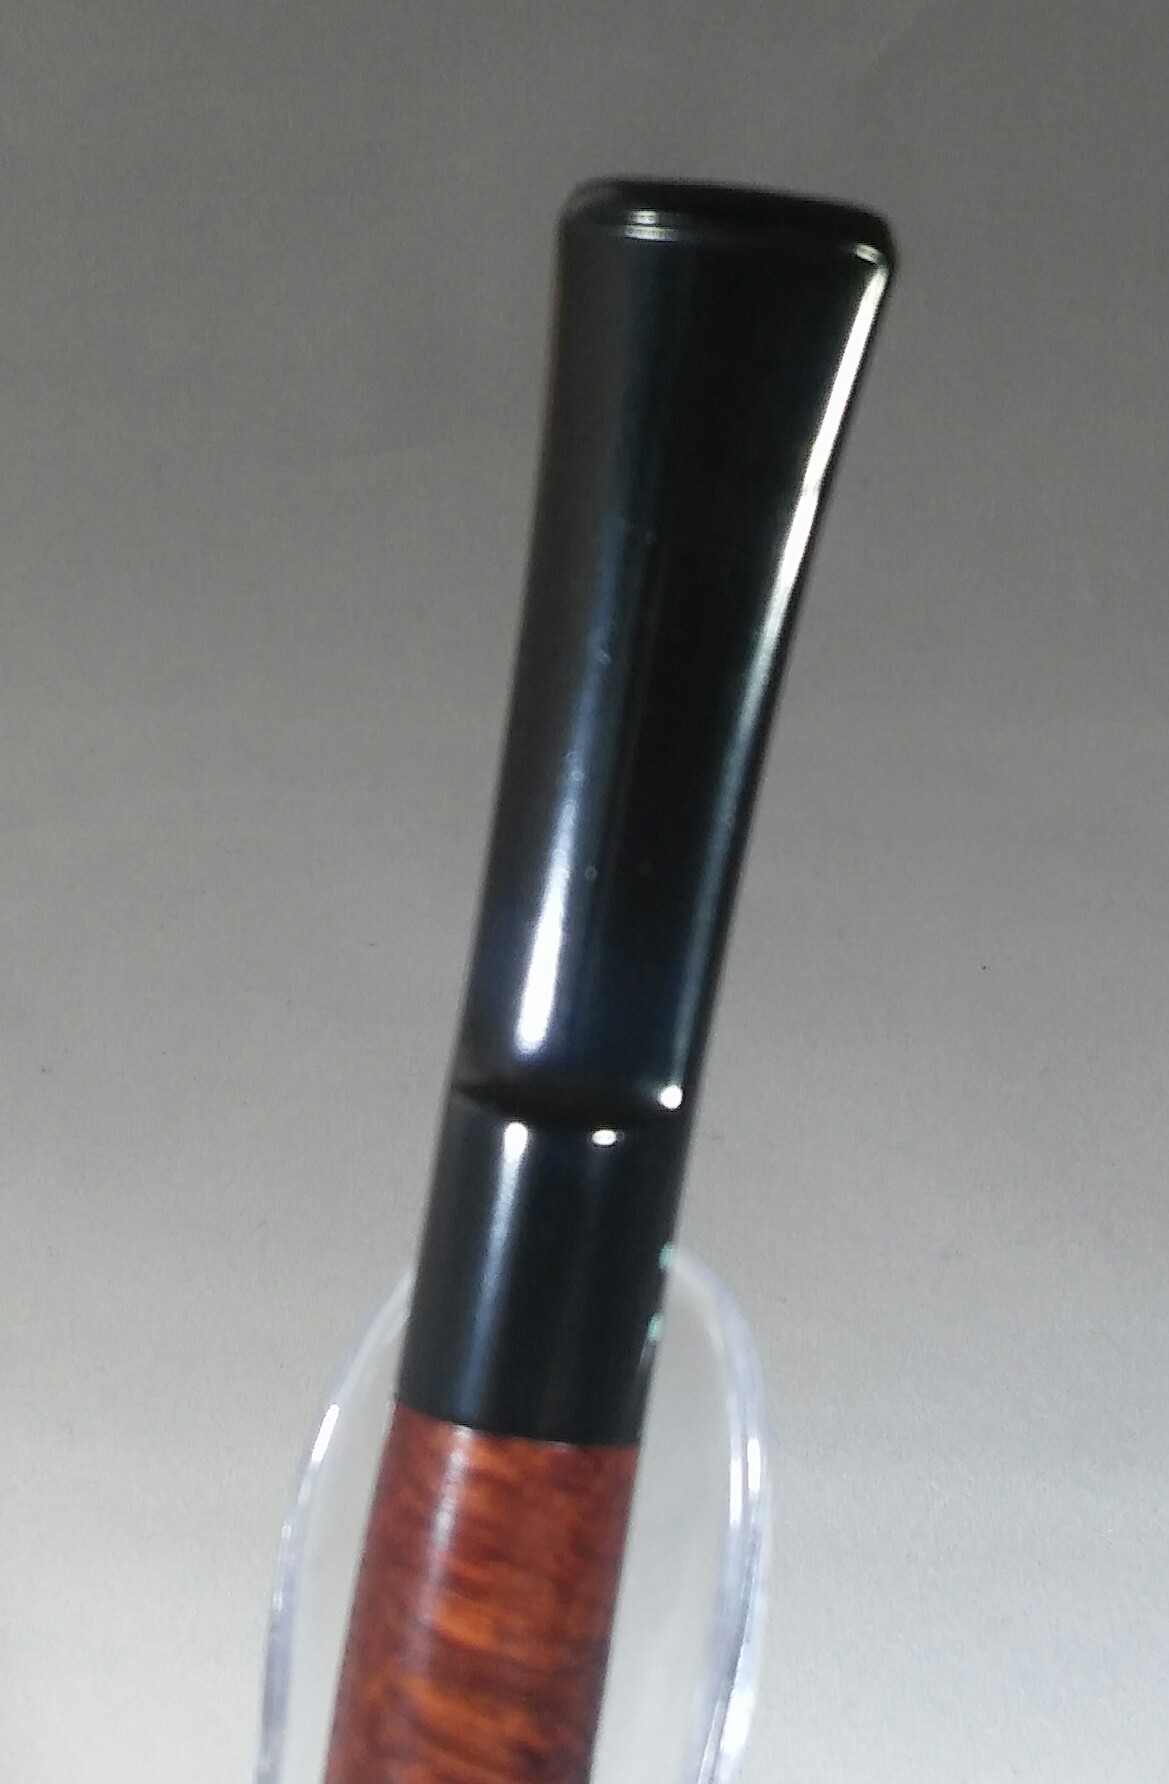
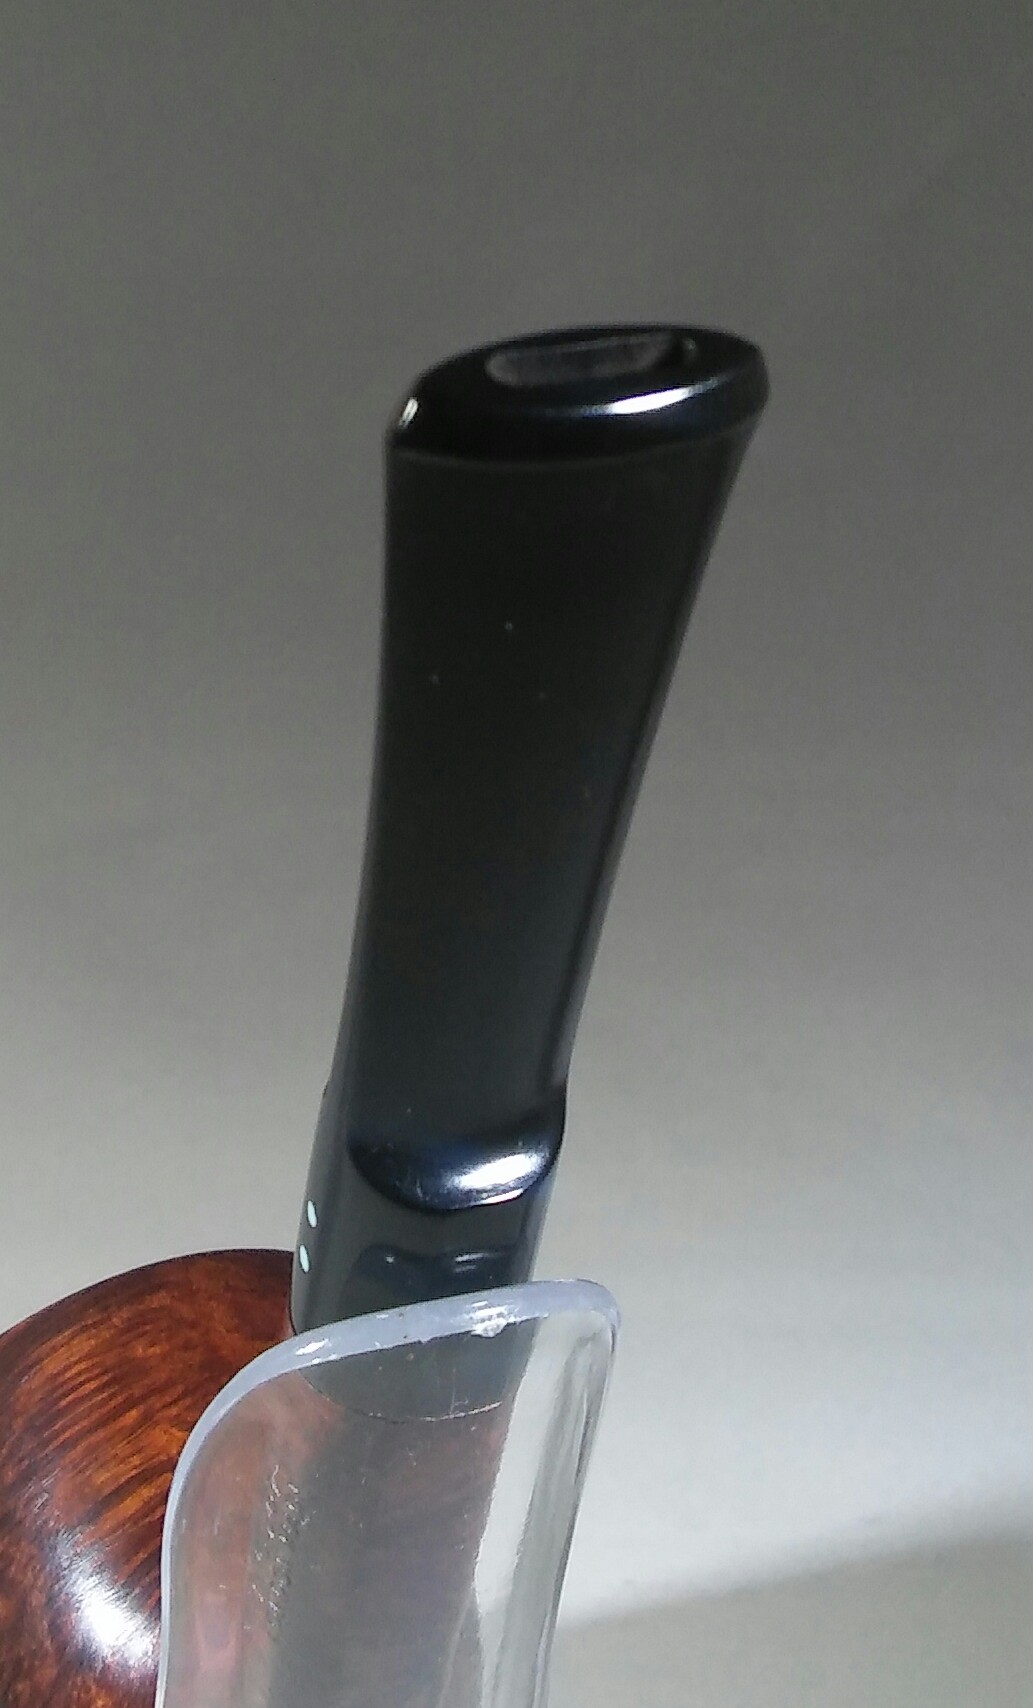
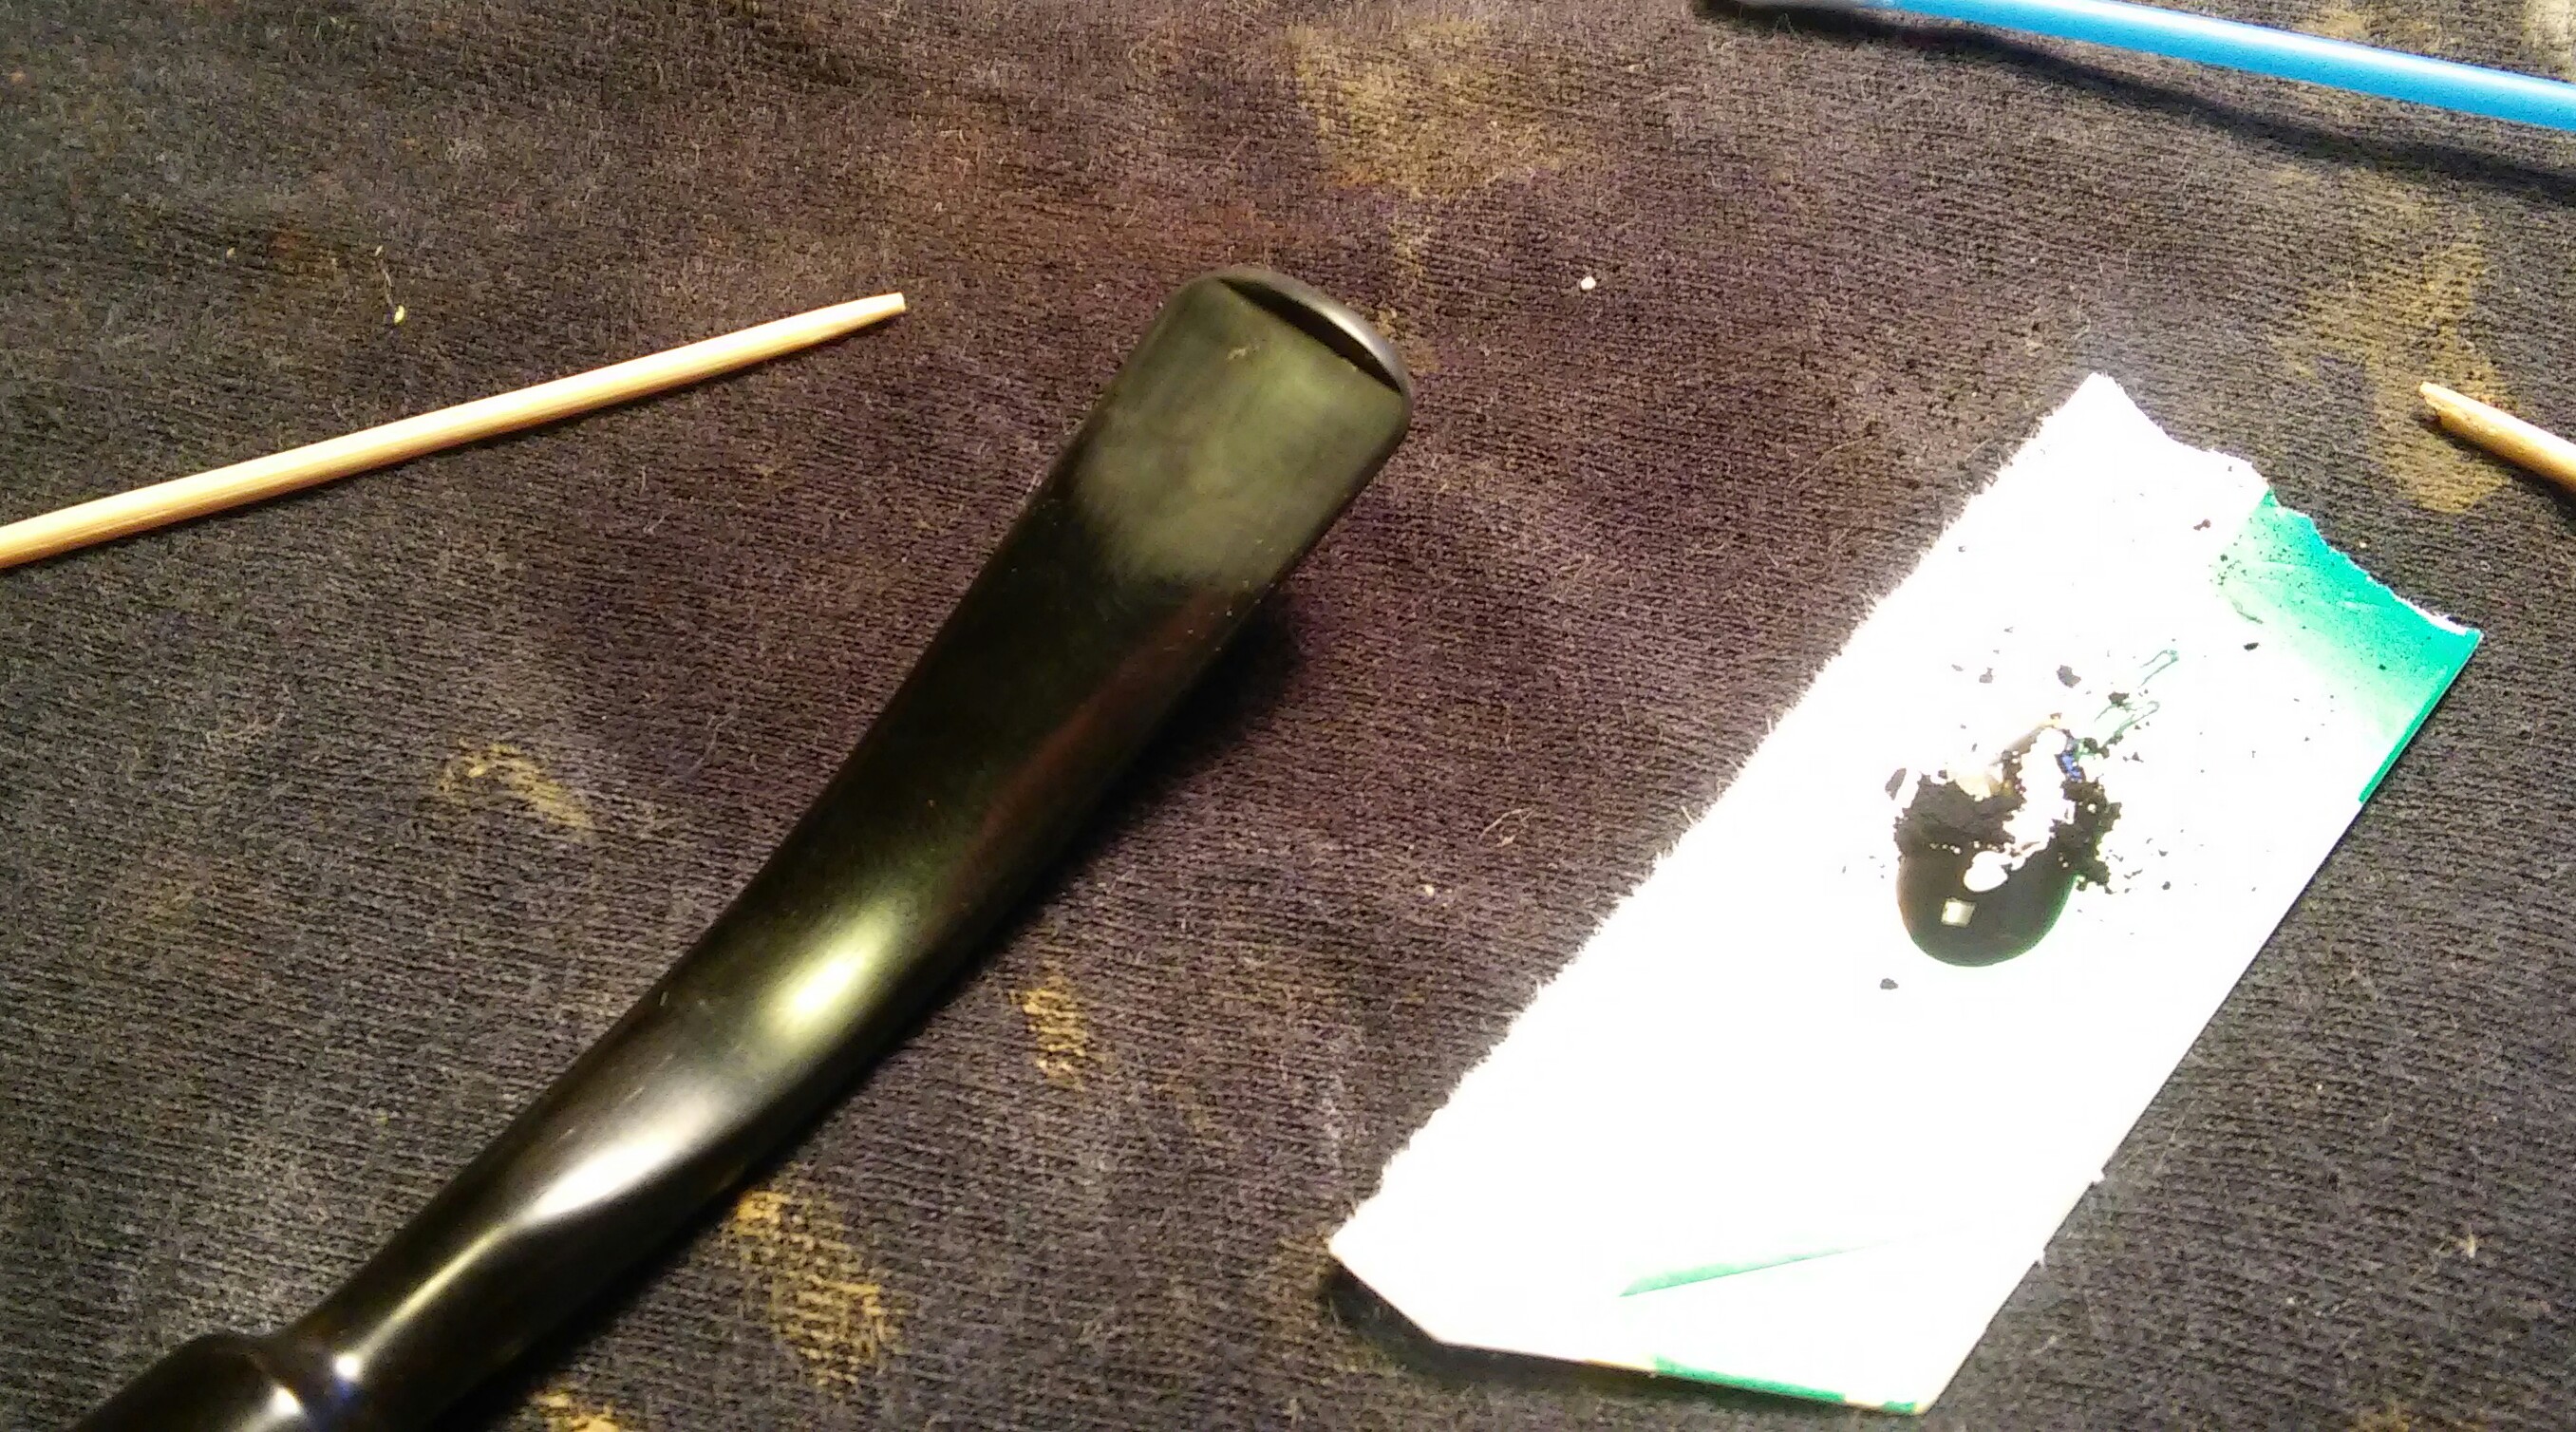
The next morning after having time to cure I began to shape the new button with needle files and file down the area of the impressions. The patch looked funny as I began removing layers, the patch began to crumble/flake and I started uncovering a ton of bubbles in the patch. So I started over and mixed a new batch of CA glue and charcoal powder. I thought maybe I used the wrong amount of something and it was throwing it off but once again the same bubbles and flaking. I didn’t take photos but I went over this process a few time before I stopped and took a look at my CA glue, the CA glue had separated leaving a thick mass at the bottom of the bottle and a watery thin liquid on top. In the end I ordered a new bottle of CA and moved on. After receiving the new CA glue and sanding the stem completely with sandpaper and the various micro-mesh pads it looked pretty good but there was a slight discoloration at the bit end.

PhotoGrid_1458179691160

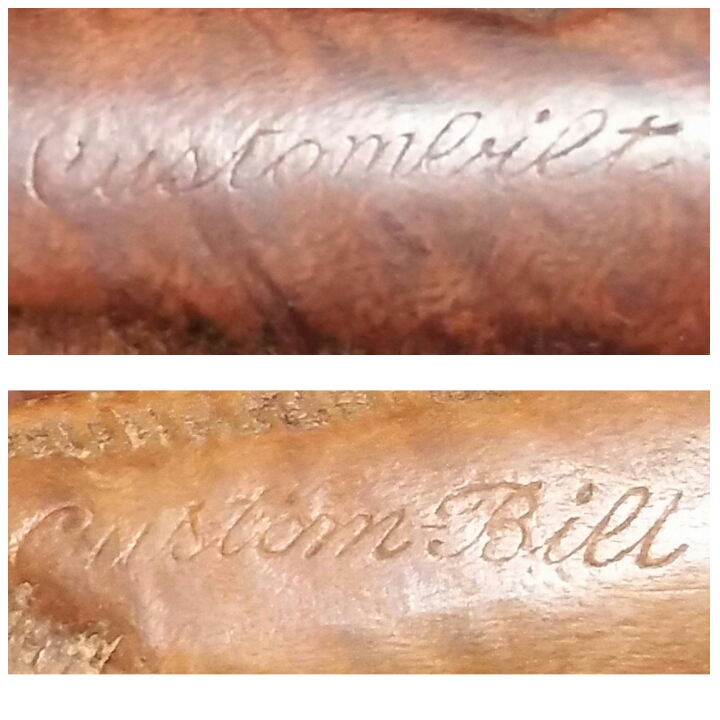
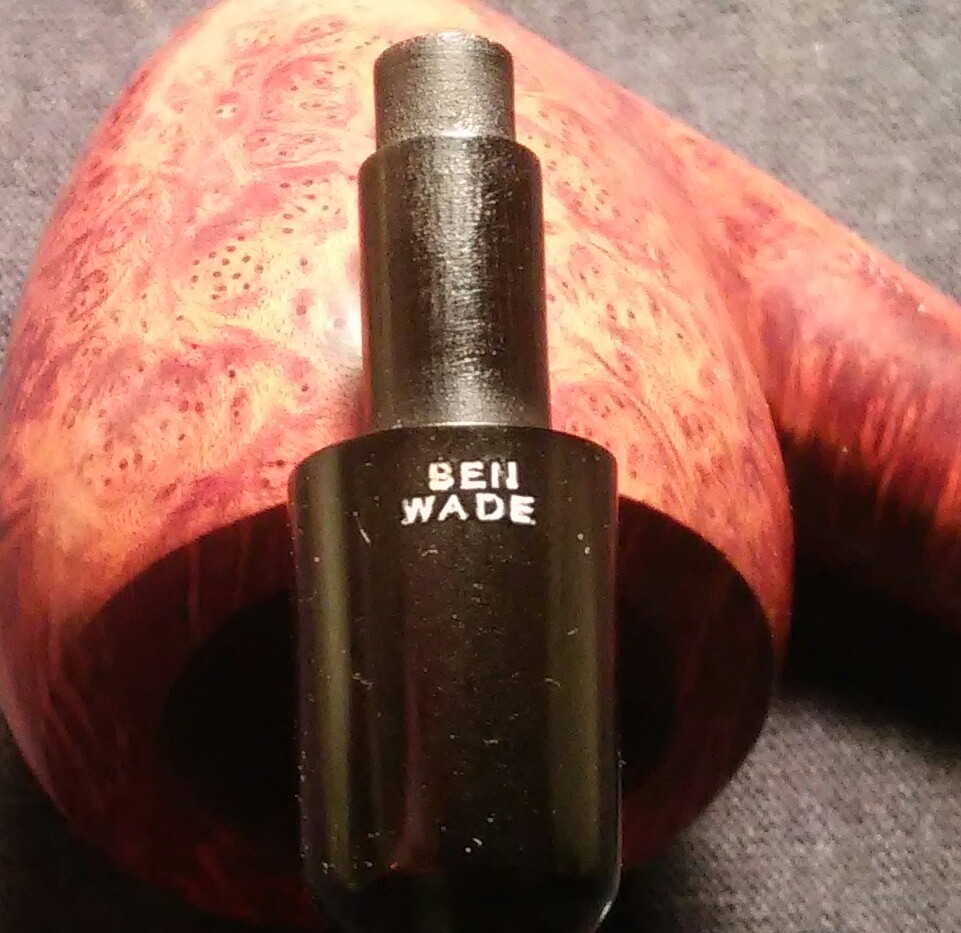
Last thing before hitting the buffer was to add the JB back to the stem, my conventional method would be to apply Rub&Buff and simply wipe the excess away leaving a prefect logo but the logo impression was not deep enough. I used a bristle from my boars hair beard brush as a paint brush. I applied white nail polish to the logo using the bristle and left it to dry, unconventional but it came out nice.
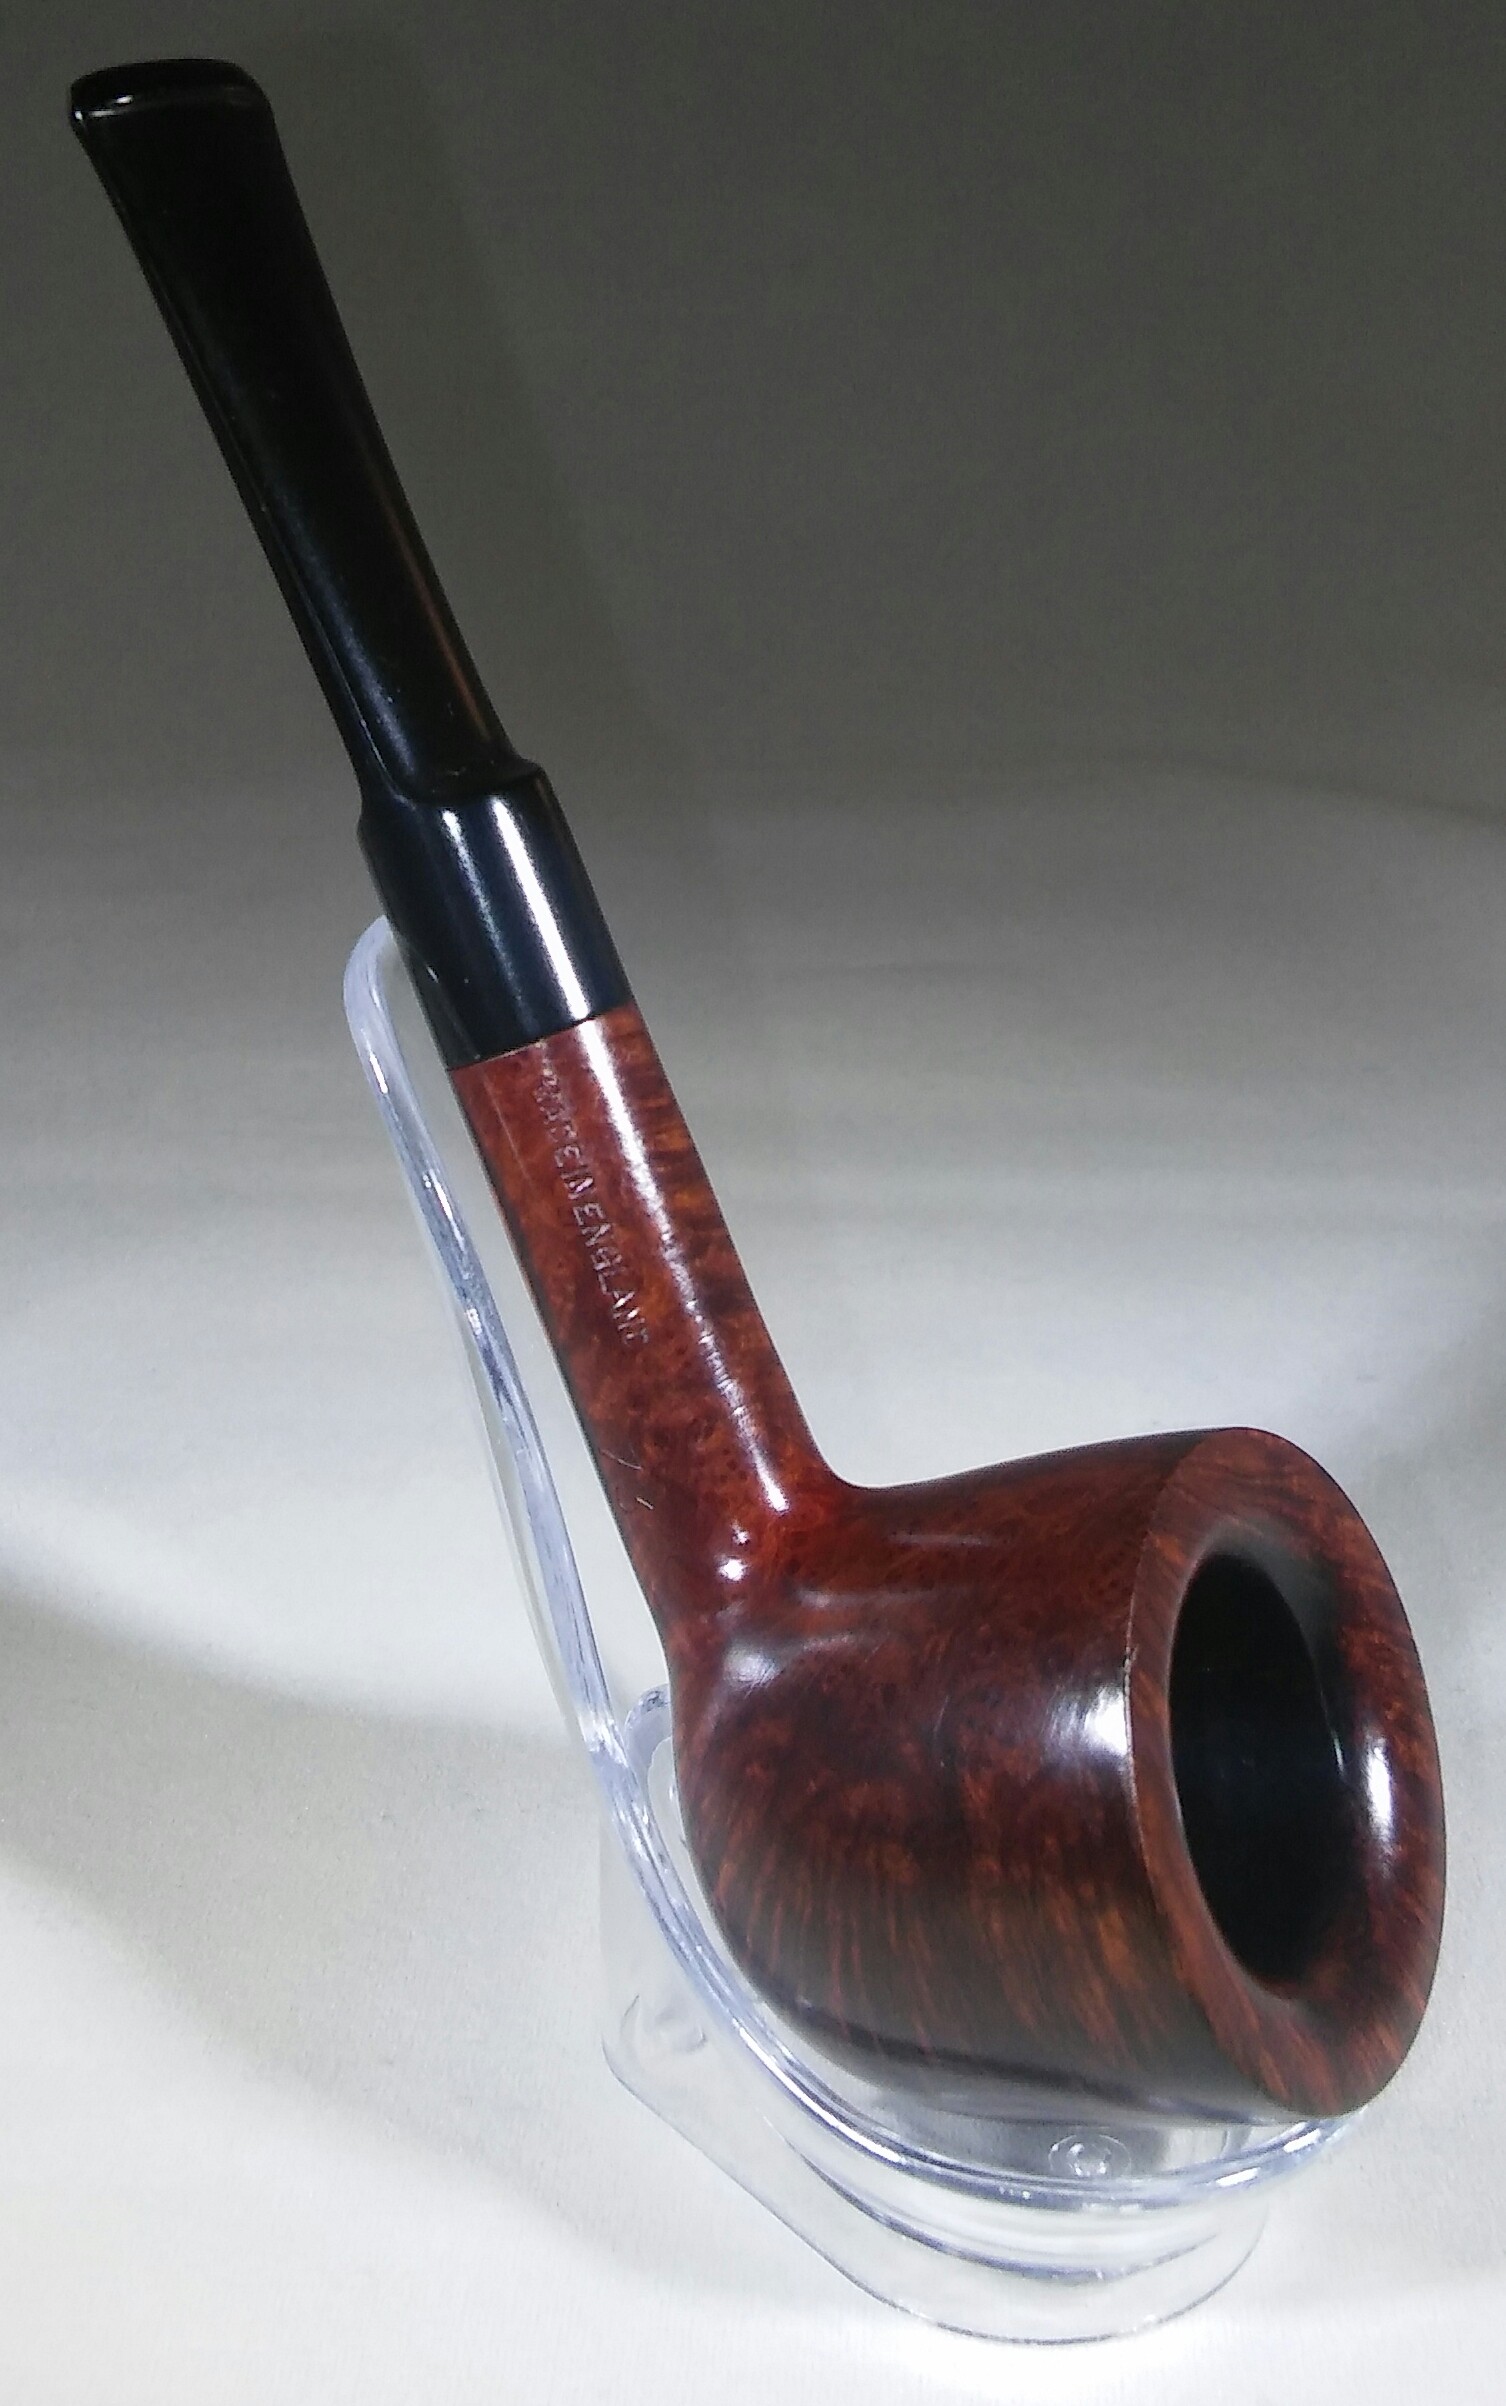
Fin.

20160425205143~220160425205210~220160425205312~220160425205346~220160425205234~2PhotoGrid_1461631761711

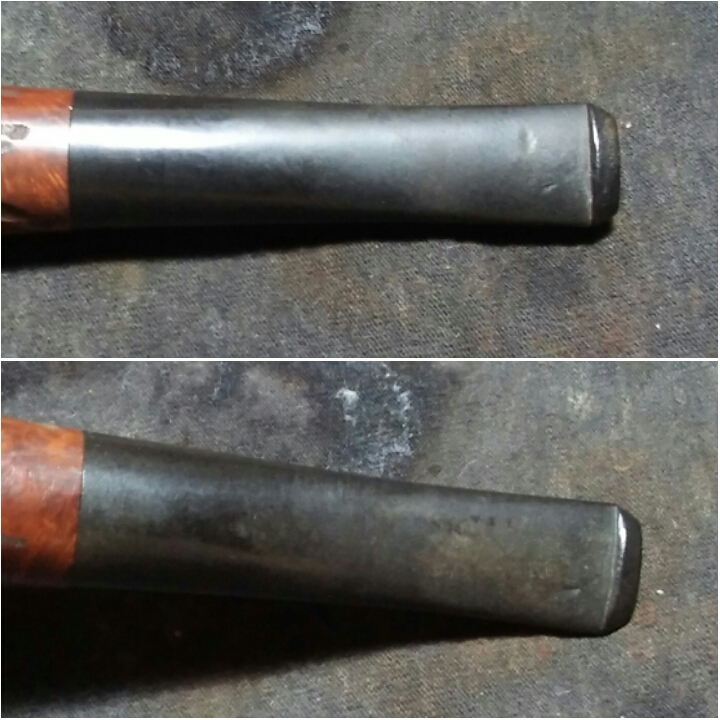
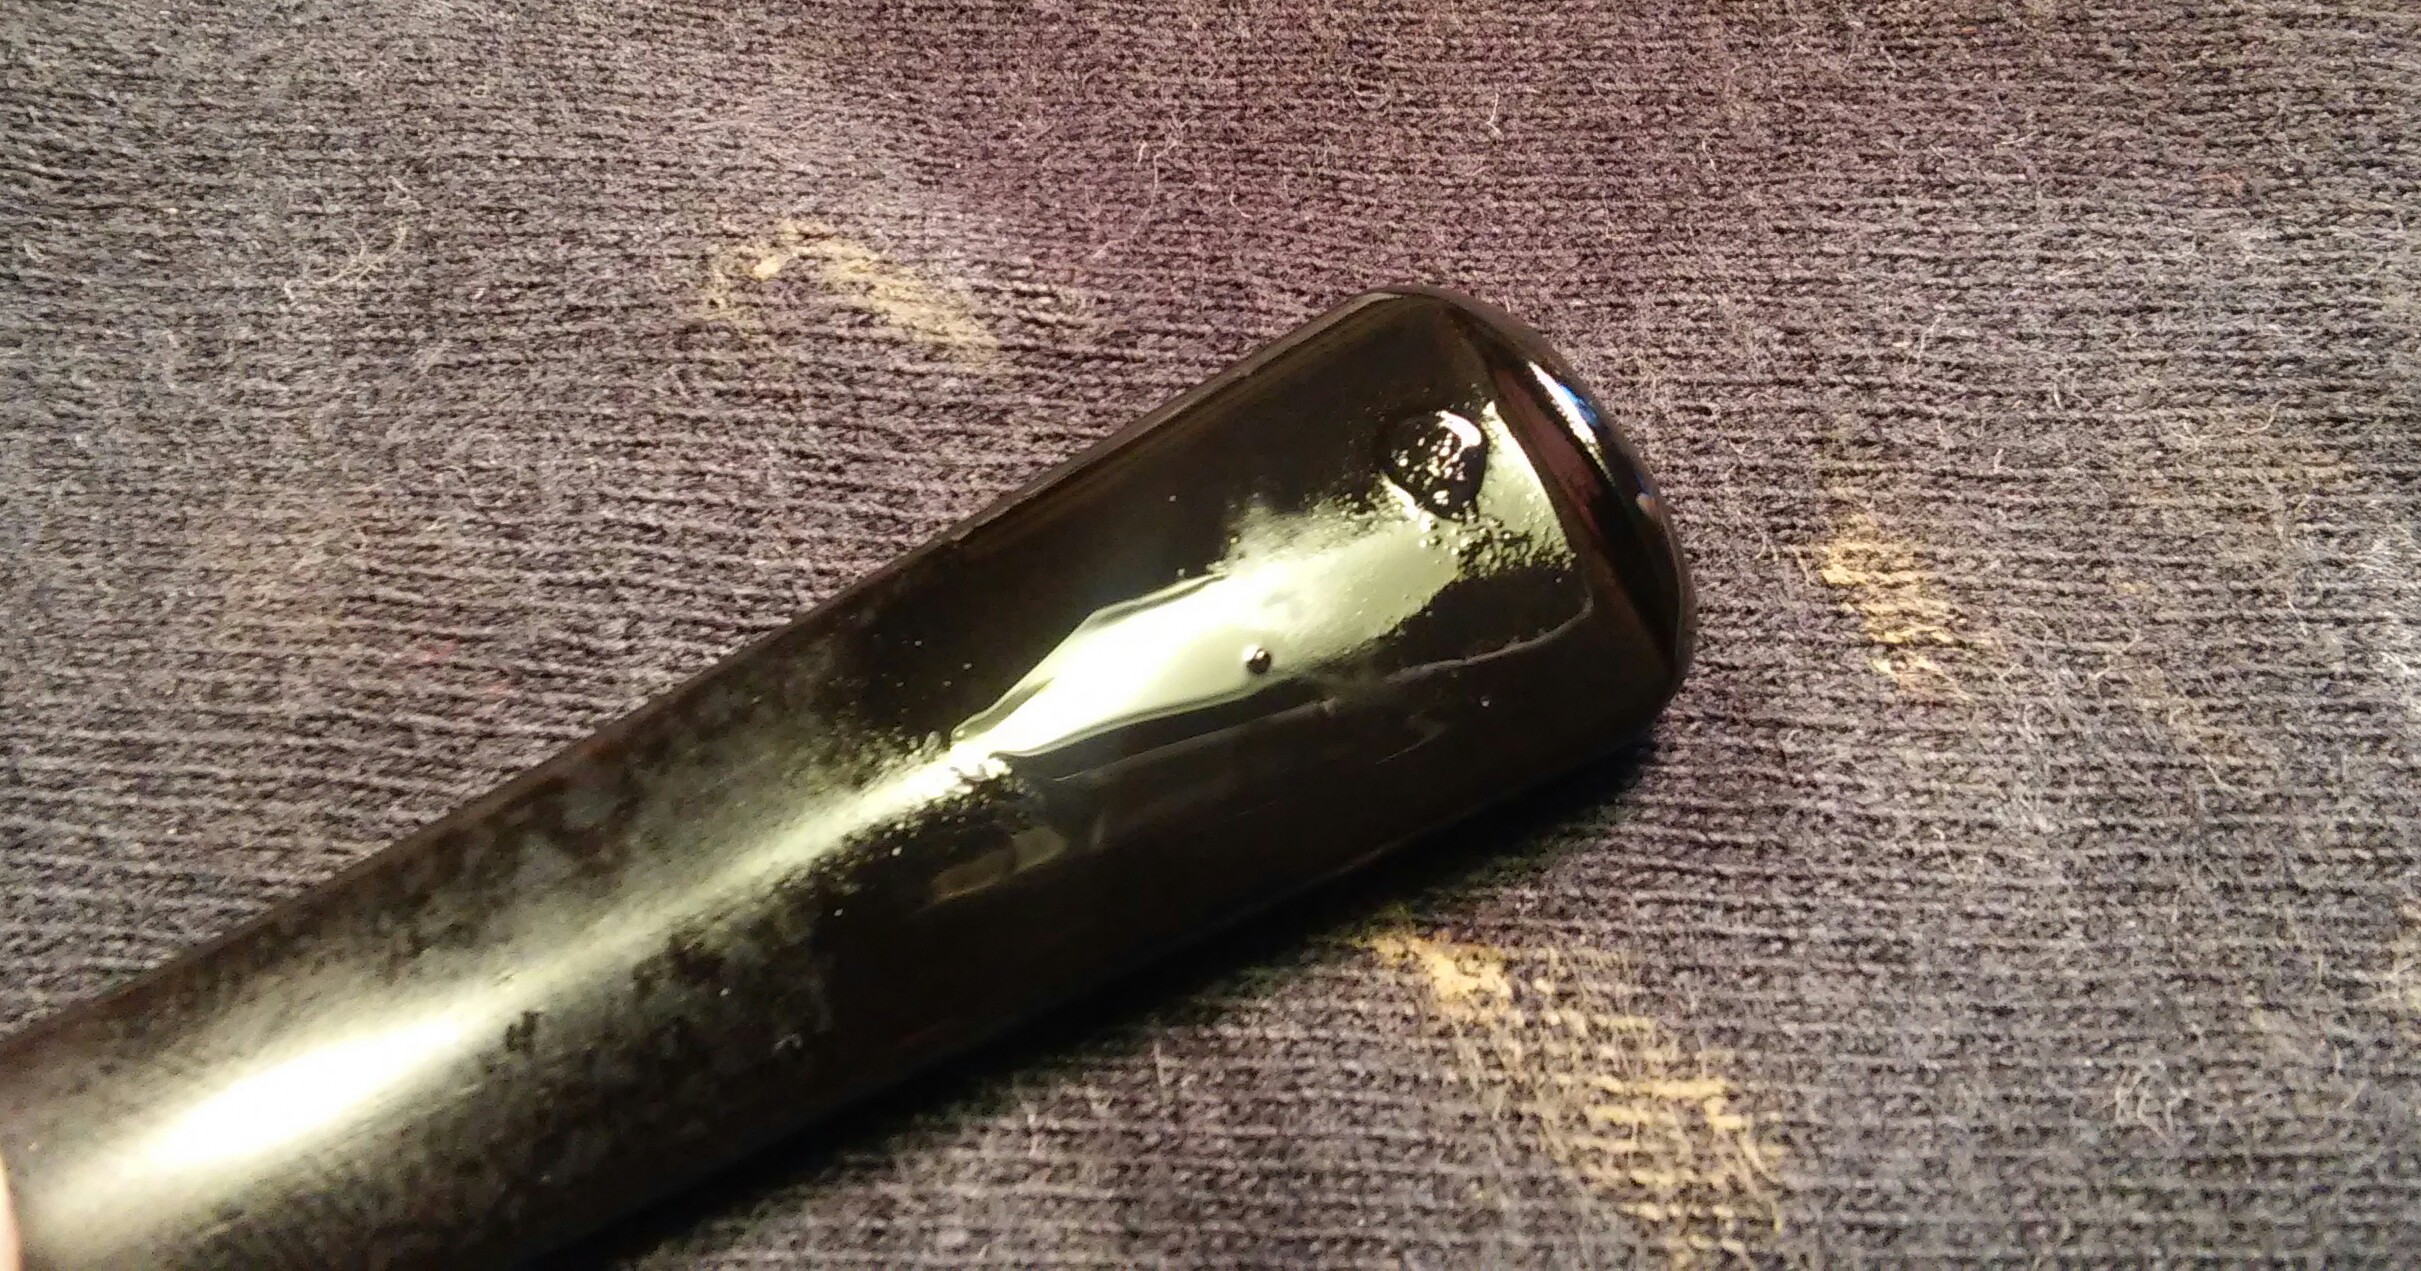
Finished up on the wheel with white diamond, a few coats of carnauba and a micro-fiber hand buffing. Buffing the stem with blue compound and carnauba.

The last of Clint’s trio and my favorite by far, I myself am searching for a similar pipe. Thanks Clint for the incredible Pen & Ink and giving me the opportunity to work on your pipes. I enjoyed seeing them come back to life.

PhotoGrid_1458190471174~220160425_203026~2

Thank For Stopping In And Taking A Look.

Continue reading Scoundrels – John Bessai Canadian

Custom-Bilt Dublin ( Mincer Years )

20151009_1027472_zpsuvvs9drj~2

The last of my medium Custom-Bilt refurbs . I have always enjoy the Dublin shape and in the Custom-Bilt carving it looks even better.
As Received.


20160208_005111~2PhotoGrid_1455109004929PhotoGrid_1455108966955

She was in well-loved condition, chatter, a couple of deep tooth impressions, rim tar and char and the nomenclature was worn to almost non-existent. The tell tail Custom is all that’s left .

20160216_174613~2

The chamber was pre-reamed by the previous owner/seller, I smoothed things out with 400 grit sandpaper wrapped around a finger. The chamber was free of damage.

20160208_004922~2~2

Next I tackled the caked rim I applied a generous amount of Method Good For Wood Polish to the rim with a Q-tip and allowed it to penetrate for a few minutes, removing the build-up with Q-tips and makeup pads. I would repeat this process a few times.

20160216_181101~2

The internals needed attention. Using EverClear, Q-tips , shank brushes and stiff soft pipe  I cleaned the internals of the mortise and chamber ,until the pipe cleaners came out as they went in.

20160216_181436~2

Using an alcohol dampened makeup pad, I wiped down the stummel to remove the dirt and debris.

20160216_182835~220160216_202114~2

With the stummel clear of dirt and grime, I used a dark touch up marker to highlight the deep gouges, removing the excess with an alcohol dampened makeup pad. I could now move on to the stem

20160217_030058~2

I applied non-bleach Soft Scrub to the stem with a children’s toothbrush and left it aside to allow the Soft Scrub to penetrate the oxidation. Once the Soft Scrub turns from white to a brownish color its time to scrub vigorously with a rag until the oxidation is removed.

PhotoGrid_1455787686198

After the removal of the oxidation there were deep tooth impressions left. I attemped to raise some of the impressions with heat( moving the lighter at all times never leaving it in one spot too long ) to no avail. Instead they would need to be filled.

PhotoGrid_1455787598582

Using thick black CA glue and activated charcoal powder I made a paste. I roughly sanded the area to be repaired with 400 grit sandpaper then wiped down with EverClear. I applied the paste with a toothpick to the impressions and hit it with accelerator to set the repair, I applied pressure with my finger to the patch pressing it into the impression just before it set. I now left it aside to cure overnight.

PhotoGrid_1455787625977

The following morning I began sanding the repair with 400 grit sandpaper wet , with the patch blended into the stem I could move on to the various grits of sandpaper and micro-mesh pads.

20160219_012636~2

Using a washer between the stummel and stem to keep my sanding in one area, I now ran the stem through the various grits of sandpaper and micro-mesh pads starting with 800 grit sandpaper wet, 1000 grit sandpaper wet, 1500 mesh wet, 1800 mesh wet, 2000 grit sandpaper wet and 2400 mesh wet , then 3200- 12000 micro-mesh dry.

20160219_013135~2

Before hitting the wheel I applied Howard’s Butcher Block Conditioner with a rag and let it penetrate for a few minutes, removing the excess with a clean rag.

Complete

20160221045755~220160221050041~220160221050052~2PhotoGrid_1456042153759PhotoGrid_1456042138342

I finished up on the wheel with white diamond, a few coats of carnauba and a microfiber hand buffing. Buffing the stem with blue compound.

Thanks For Taking A Look.


My Daughters Pick, A Leather Covered LONGCHAMP OVAL BOWL

Screenshot_2016-02-01-16-15-06~2
Photo and Information Courtesy of Pipedia.
In 1948 Jean Cassegrain inherited a small shop near the French Theater on the Boulevard Poissonnière in Paris, called “Au Sultan”. Articles for smokers and fountain pens were offered there.
Now, the absolute bulk of the pipes Cassegrain found in the inventory was from war-time production and due to the sharp restrictions on pipe production the French government had enforced in 1940, these pipes were of very poor quality and showed large fills. Strictly speaking, they were not marketable now that the French pipe industry produced pipes of pre-war standards again. In this situation Cassegrain had the probably most enlightened moment in his life: he took some of these pipes to a leather worker who clad bowls and shanks in leather. Only the rims of the bowls and the shanks’ faces remained blank.
I like to get more bang for my buck, so I like to go after pipes listed in lots, keeping what I want and donating or selling off what doesn’t catch my eye. As the small flat rate box fills with extra pipes, I’ll take the box to my wife and daughter to see if anything catches their fancy. Usually it’s let em go to someone else but for some reason the leather-covered LONGCHAMP pipes my daughter found unique. She’s ten now and has taken an interest in some of my refurbishing projects. I have a few in my rotation that she wouldn’t let go, a red Color Duke by Dr.Grabow, a cheerywood Ropp and a BamBoo Briar.


Back Out Of The Box


20160201_134221~2~2PhotoGrid_1454378320469PhotoGrid_1454378094735

The pipe was in good shape, leather wrap was a little dry & dirty, worn button, deep tooth impressions, oxidation, rim darkening and brittle cake.

20160201_134651~2

A conventional reamer would not work with a ovel bowl, instead I started with 220 grit sandpaper and finished with 400 grit sandpaper.

PhotoGrid_1454378176042

The internals were caked in old tars,oils and tobacco. I ran it though a retort using EverClear and cotton balls. I then did a thorough cleaning of the chamber, mortise and stem with EverClear, Q-tips and stiff /soft pipe cleaners. Cleaning until the last pipe cleaner came out as it went in.

PhotoGrid_1454378586208

There were a few dings in the rim, using a household iron on medium/ high heat and a damp rag I would steam out the imperfections. Covering the rim with the damp rag and applying it to the hot iron working in intervals until the imperfections were almost gone.


20160201_144035~2

What was left of the imperfections and darkening, I removed with worn micro-mesh pads.


PhotoGrid_1454378274729

The leather covering was dry and grimy. I busted out my wife’s leather cleaning products. I started with saddle soap to clean away the grease and grime, being careful not to get it into the chamber or mortise. I then switched to Doc Martin’s leather conditioner and finally ended with mink oil. The leather was now soft and supple.

PhotoGrid_1454378217030PhotoGrid_1454378455047

The oxidized stem, I applied a generous amount of non-bleach Soft Scrub to the stem with a children’s toothbrush and left it aside to penetrate the oxidation. Once the Soft Scrub turns from white to a brownish color its time to scrub vigorously with a rag until the oxidation is removed, finishing up with a damp Magic Eraser to remove the leftover oxidation.

PhotoGrid_1454378192141

It was now time to address the tooth impressions, I first roughed up the area of repair with 400 grit sandpaper so my fill would have a good hold and then cleaning with EverClear to remove my sanding dust.

20160201_205051~2

To fill the deep impressions and rebuild the worn button I mixed thick black CA glue and activated charcoal power into a paste and applied it to the impressions/button using a toothpick. I then hit it with accelerator to set the repair, leaving it aside to cure overnight.

PhotoGrid_1454391163072

Now that the repair had time to cure overnight, I could shape the new button. Using a flat needle file I removed the excess until I had an uniformed shape.

PhotoGrid_1454391187726

Once the new button was at a suitable thickness I moved to 400 grit sandpaper to remove the file marks.

20160202_122051~2

Before hitting the micro-mesh, I re-touched the logo. I tried multiple applications Rub & Buff, White Out Pen and finally white nail polish, which was the winner.

20160207_031839~2

I then sanded the whole stem with 1000 grit sandpaper wet, then ran it though the various grits of micro-mesh pads, 1500-2400 wet and 3200-12000 dry. Stummel and stem complete she was now ready for the final buffing.

Complete.

PhotoGrid_145493989014620160208103921~220160208103950~220160208104018~2

Finished up the rim on the wheel with white diamond, a few coats of carnauba and a microfiber hand buffing. I lightly buffed the leather covering with a clean buffing wheel. Buffing the stem with blue compound.

Thanks For Taking A Look.


Custombilt ( Rare Stamping )

20160129_100652~220160129_103155~2

This stamping was a puzzler for Bill Unger, as he wrote in his book. It’s equally as puzzling for me, out of the thirty or so in my collection this is the only one with this stamping. Bill found that the stamping was used on what he thought was a Eugene Rich Era and Wally Frank Era Custombilt pipe. My example I could swear is Tracy Mincer Era.
PhotoGrid_1454081640667 PhotoGrid_1454081722255   
  I received two pipes from the same seller one marked with the standard Mincer stamp and shape stamp  of a triangle, the other pipe has the rare stamp and a shape stamp of a square. Both pipes are of similar medium size and deep rustication. I have seen sets with two pipes in a claim shell case and I think that’s what I have here, minus the case. Any Custombilt collectors with more information please leave a comment.
Pipe As Received.

PhotoGrid_145407098617420160128_193743220160128_1937542PhotoGrid_1454071030116PhotoGrid_1454071008778

Very well-loved, thick cake, oxidation, worn button, rim char, rim tar and worn finish.

20160128_231701~2

I started with my Pipnet Reamer and the smallest attachment working up to the second largest. Finished with 400 grit sandpaper wrapped around a finger.

PhotoGrid_1454104869641

The rim was embedded with tars ,oils and char. I applied a generous amount of Method Good For Wood Polish to the rim and set aside to penetrate the build-up. I removed the build-up with Q-tips. I removed the rim char and darkening with worn micro-mesh until it faded.

PhotoGrid_1454104405876

The pipe was heavily smoked, I decided to run a retort using EverClear and cotton balls. I would repeat the process twice to get a good clean.

20160129_114700~2

After the retort I cleaned the internals of the stummel and stem with EverClear, Q-tips, stiff/soft pipe cleaners, a mortise brush and a shank brush. Cleaning until the last pipe cleaner came out clean.

PhotoGrid_1454104731247

I now turned to the oxidized stem, I applied non-bleach Soft Scrub to the stem with a children’s toothbrush and left it to penetrate the oxidation. Once the Soft Scrub turns from white to a brownish color, I scrubbed vigorously with a rag until the oxidation was removed, finishing up with a damp Magic Eraser to remove the leftover oxidation.

20160129_131822~2

The button was worn down and would have to be built back up. I first taped off the button portion of the stem with blue painters tape so my work would remain in one area. I mixed thick black CA glue and activated charcoal power into a paste .

PhotoGrid_1454104278156

 I applied the paste to the button with a toothpick, then removing the tape just before hitting with the accelerator. I left it aside for a few hours to cure.

PhotoGrid_1454104355842

Once the repair had time to cure, I could begin to form the new button. Using needle files I shaped the button to a suitable thickness. I finished up with 400 grit sandpaper wet to remove the file marks.

20160129_163406~2

I now ran the stem through the various grits of sandpaper and micro-mesh. 1000 grit sandpaper wet, 1500 mesh wet, 1800 mesh wet, 2000 grit sandpaper wet and 2400 mesh wet. Then finishing up with the rest of the micro-mesh pads 3200-12000 dry.

PhotoGrid_1454104577491

Just before hitting the wheel I applied Howard’s butcher block conditioner to the stummel with a rag and let it penetrate for a few minutes hand buffing off the excess with a clean rag. The change in coloring of this pipe was incredible after applying the Howard’s Conditioner. I use Howard’s butcher block conditioner on all my Custombilt, Tom Howard, BP Jum and Kaywoodie Handmade pipes before buffing.

Complete

PhotoGrid_1454124028848PhotoGrid_145412399569820160129235625~220160129235652~220160129235744~2

 I finished her up on the wheel with white diamond, a few coats of carnauba and a microfiber hand buffing. Buffing the stem with blue compound.

Thanks For Taking A Look.

Peterson Captain Pete XL80

Screenshot_2016-01-21-21-34-52~2
I was gifted this Captain Pete for Christmas by my wife its one that has pasted me by a few times and I didn't think I'd get in the shape I wanted the XL80, a shape I'm very found of.  The Captain Pete XL80 is chunky and has a shorter stem then the standard 80 shape and thats what was so eye catching for me, short and fat like many of the pipes in my collection. Jim Lilley connoisseur and collector of Peterson Pipes wrote a post on the Captain Pete on his blog, he has also contributed to Pipedia The Peterson Page , the Peterson's in his collection are amazing.
As Received
20151226_231320220160120_164427~3~2PhotoGrid_1453351875420
The Captain was in was in decent shape when I received it, rim build up, tight tennon fit, a little chatter, worn stain and the start of an uneven cake.
PhotoGrid_1453338820830
After looking over and disassembling the pipe, I set aside the stem and started with the stummel. First reaming the chamber with my Pipnet reamer starting with the smallest attachment and working up to the second attachment, smoothing things out with 400 grit sandpaper wrapped around a finger. The chamber was free of burn or pitting. Now my attention turned to the rim build up, I applied a generous amount of Method Wood For Good Polish with a Q-tip and allowed it to penetrate the oils and tars.
20160120_215204~2
After the Method Polish had time to penetrate the build it was easily removed with Q-tips. Some of the stain was removed along with the build up, which doesn't typically happen with Method polish.
PhotoGrid_1453351993631
With the rim free of oils/tar I began my internal cleaning of the stem, chamber and mortise using EverClear, Q-tips, makeup pads and stiff/soft pipe cleaners, cleaning until the pipe cleaners came out as they went in.
20160121_191506~2
After my internal cleaning, I did a EverClear and cotton ball soak on the chamber allowing it to absorb the tars and oils while I worked on the stem.
PhotoGrid_1453338716397
The stem was in good condition aside from a a little chatter and a couple of tooth impressions. To remove some of the shallow tooth chatter I heated the area with a Bic Lighter ( moving the flame at all times never leaving it in one spot too long) all but a couple of impressions raised.
PhotoGrid_1453422352636
I now applied non-bleach Soft Scrub to the stem with a children's toothbrush and left it aside to penetrat the oxidation. Once the Soft Scrub turns from white to a brownish color its time to scrub vigorously with a rag until the oxidation is removed, removing the leftover oxidation with a damp Magic Eraser.
PhotoGrid_1453422173363
The couple of tooth impressions that were left I would remove with 1000 grit sandpaper wet. I tapped off the bit/button portion of the stem with blue painters tape so my rough sanding would remain in one area.
PhotoGrid_1453429652299
Before polishing the stem with the finial three Micro-Mesh pads I touched up the P with Rub'n Buff. I applied it with a Q-tip and buffed off the excess with a rag and continued with my final polishing with the last three micro-mesh pads.
20160121_163530~320160121_215951~2
The  rest of the stem would not need as much work as the bit/button portion, as the Soft Scrub and Magic Eraser removed all the oxidation. I left the painters tape on the stem and  ran the button area though the various grits of sandpaper and micro-mesh 1500, 1800, 2000 paper, 2400 wet then 3200-4000 dry, I removed the painters tape just before sanding the entire stem with the last three Micro-Mesh pads 6000-12000 dry.
PhotoGrid_1453422789282
Raising rim dents with steam. Using a household iron on medium/high heat and damp rag, I covered the rim dents with the damp rag and applied it to the hot iron working in intervals until all the dents raised.
PhotoGrid_1453422643851PhotoGrid_1453422706940
This is the first time I had results work this well and would not have to sand the area afterwords.
PhotoGrid_1453429694158
When I received the Captain the red stain on the rim was faded to an almost pink color and after cleaning the debris from the rim it was more so. I decided to re-stain the whole stummel with Fiebings Red leather dye. I gave the stummel a wipe down with an alcohol dampened rag, allowing it to dry then appling the red stain, I hit it with a Bic Lighter to set the stain, removed the excess stain with a alcohol dampened rag and left it overnight to dry completely before buffing.
Captain Complete
20160124181457~220160124181541~2PhotoGrid_145367218872520160124181714~220160122152256~2PhotoGrid_1453490486893PhotoGrid_1453490601364 

I Finished up on the wheel with white diamond, a few coats of carnauba and a microfiber hand buffing. Buffing the stem with blue compound and buffing the spacer with black emery before gluing it back in place.


I had fun taking photos of this one, My Pop was a Navy Man so I’m also a collector of vintage nautical item’s as well.

Thanks For Taking A Look.

Custombilt Convertibole

20160119_202249~2
Advertisement courtesy of Bill Unger’s book. “As Individual As A Thumbprint” The Custom-bilt Pipe Story.


Custombilt Convertibole

The elusive Convertibole, its taken two long years to hunt this oddity down. They were always just out of reach. I have an addiction to Custom-Bilt / Custombilt Pipes but I’m not willing to brake the bank to add one to my collection. So I was pretty happy when this one went out cheap on EBAY. The Convertibole  first appeared in 1946 and was distributed by Eugene Rich, the interchangeable bowls made ease in changing between blends.  

As Received

PhotoGrid_1453166505315PhotoGrid_1453166906896

She was in rough shape, well used but the price was right and I was up for a challenge. The shank was cracked, a band would have easily fixed the problem but it would also take away from the pipe itself. So a little unconventional fix would have to do.

PhotoGrid_1453167007002

Starting with the bowls chamber and my Pipnet reamer, I reamed the cake back to briar starting with the smallest attachment and working up to the third, she was free of any defects. I finished up with 400 grit sandpaper wrapped around a finger.

20160118_080410~2

With the chamber reamed, I moved on to the rim and shank. There was a build up of tar/oils on the rim and where the bowl and shank met. I applied Method Wood For Good Polish to the rim and shank area with a Q-tip and let the Method penetrate the build up. Once the Method penetrated the tars/oils it was easily removed with Q-tips and makeup pads.

20160118_084156~2

I did an EverClear and cotton ball soak on the bowls chamber, leaving it aside to allow the cotton balls to absorb the oils and tars.

PhotoGrid_1453167252317

The internals were next . I did an initial internal cleaning of the mortise and stem with EverClear,Q-tips and bristle/soft pipe cleaners to remove the loose debris. Now I un-rolled cotton balls to form a long swab , using the swab I twisted it into the mortise tightly and added EverClear until the cotton swab absorbed the alcohol and left it aside to pull the tars/oils out. After sitting I did one more good internal cleaning of the mortise and stem, cleaning the exterior of the stem with EverClear and makeup pads.

PhotoGrid_1453270548458

Now my unconventional shank fix. I cleaned the area of the crack with EverClear and Q-tips and allowed it to dry. I applied Gorilla Glue to the crack on the outer side of the shank and inner of the mortise with a toothpick then packed the outer shank side with briar dust and applied a hose clamp to the shank and tightened the clamp until the crack was closed. I now left it to dry overnight.

PhotoGrid_1453167400719

The following morning the repair had cured and I was able to begin work on removing the excess glue, first the mortise,leaving the hose clamp in place I used needle files and sandpaper to remove the excess glue until I had a clean surface for the tennon to be inserted once again. The crack had gone through a rusticated area of the shank which was good luck on my part as I was hoping I could blend the repair into the craggy rustication.( Above photo was attempt one to blend.)

PhotoGrid_1453167493057

 (Top photo was attempt two.) I used touch up markers ,briar dust ,Gorilla Glue and a X-Acto knife to recreate the rustication lost by the repair patch. By my third try I was happy ,it seemed to blend well.(lower photo)

PhotoGrid_1453171223865

Happy with the repair my attention now turned to the oxidized stem. I applied a generous amount of non-bleach Soft Scrub with a children’s toothbrush and left it aside to begin softening the oxidation. Once the Soft Scrub turns from white to a brownish color its time to introduce the old elbow grease and scrub vigorously with a rag until the oxidation is removed. Finishing with a damp Magic Eraser to remove the leftover oxidation.

PhotoGrid_1453171260141

Using a bic lighter I heated the bit/button portion of the stem to raise some of the chatter ( moving the flame at all times never leaving it in one spot too long). There were two impressions that wouldn’t raise with heat but were shallow enough to remove with sanding.

20160119_142622~220160119_200613~2

I tapped off the shank with painters tape so my sanding would remain on the stem and not damage the shank. Starting with the bit/button area and 1000 grit wet sandpaper I removed the stubborn impressions that didn’t raise with heat. I now ran the stem through the various grits of micro-mesh 1500-12000.

20160119_201121~2

Just before hitting the wheel I applied Howard’s butcher block conditioner with a rag and let it penetrate for a few minutes removing the excess with a clean rag.

Complete


20160119231535~220160119231421~220160119231433~220160119231354~2PhotoGrid_145325700024420160119231616~2

Finished her up on the wheel with white diamond,  a few coats of carnauba and a microfiber hand buffing. Buffing the stem with blue compound .

Quick Clean up , Pre-Transition Sasieni two dot 73

Pre-Transition Sasieni Two Dot 73
(1961-1979)

20160107_135420~2

The baby blue dots,
I’ve always been a fan of Sasieni pipes and there history. In fact the kick off to my estate refurbishing and collecting stated with a lot of pipes from a friends fathers estate. Included was nine or ten boxed smoked and Un-Smoked Sasieni two dot pipes. Many had the dreaded pink filler but a few I could never figure out why they were two dot and not four . I have two left in my collection , one Un-smoked Two Dot Oom Paul 80sxs with one small spot of filler and the one I’m writing about a thick walled, stubby Two dot 73. For life of me I cannot find one flaw, its been in the rack about three years now and with winter here I thought I could use a nose warmer. 

The unappreciated subject
PhotoGrid_1452201260114PhotoGrid_1452201373889PhotoGrid_1452201308354

She was redone five years ago and went untouched for three. The stem has since oxidized, a little tar&char and a few impressions that would need attention.

20160107_140011~2

The new toy, my Castleford reamer has reached its end the attachments no longer stay in its handle. After reading many reviews and fellow refurbishing bloggers giving the thumbs up on the Pipnet reamer, my wife picked one up for me. I must say its a different world, the shape of the reamer attachments are far superior to the Castleford set, in that it reaches the bottom of the chamber more evenly and producers a cleaner cut through the cake.

I’m impressed.

PhotoGrid_145220169394320160107_164009~2

Starting with the stummel and my Pipnet reamer I cut back what little cake there was, first with the smallest attachment and working up to the third, then I lightly sanded the chamber with 1000 grit sandpaper. There was a little rim tar&char, I applied a little Method Wood For Good Polish with a Q-tip and allowed the polish to soften the build up. With the build up removed I worked on the rim darkening with worn micro-mesh until it faded.

20160107_150831~2

I now moved on to the internals. Using EverClear, Q-tips, makeup pads and stiff/soft pipe cleaners I cleaned the mortise, chamber, inner tube and the stem internals until the pipe cleaners came out as they went in. I cleaned the stem exterior with EverClear and a makeup pad.

20160107_205636~2

I applied Soft Scrub to the oxidized stem with a children’s toothbrush and left until the Soft Scrub turns from white to a brownish color.

PhotoGrid_1452273520223

Once the Soft Scrub turns from white to a brownish color its time to introduce the old elbow grease. Scrubbing vigorously with a rag until the oxidation is removed, then finishing with a damp Magic Eraser to get off the last bit of oxidation.

PhotoGrid_1452273547923

Now the chatter, I attempted to raise the chatter with heat to no avail. The Soft Scrub and Magic Eraser removed all the oxidation and the stem other then the chatter was in great shape. So I taped off the bit/button portion of the stem with blue painters tape so my work would remain in one area. I removed the impressions with 400 grit sandpaper wet and then ran the stem through the various grits of sandpaper and micro-mesh 1000-2400 wet, then 3200-6000 dry. I removed the painters tape before sanding with the last two micro-mesh pads and sanded the entire stem with 8000 and 12000 dry to shine it up before buffing.

PhotoGrid_145227838051820160108_113217~2

Its hard to see in the photos but there were a few dings in the rim. Using a hot iron and damp rag I steamed out the imperfections.

20160108_113325~2

Just before hitting the wheel I wiped down the stummel with Method polish and let dry.

Complete


20160108_131645~220160108_131428~220160108_131531~220160108_132349~220160108_132415~220160108_131555~220160108_131603~220160108_131610~2

Finished her up on the wheel with white diamond, a few coats of carnauba and a microfiber hand buff. I buffed the inner tube with black emery compound.

Custombilt Clean up (Rich era)

The scoundrel Pipes

Two down one to go it seems fitting to keep plugging away at the pipes I received from fellow blogger Pipe Scoundrel.

20160103_105200~2

Custombilt Eugene Rich Years.

1946-1952

My original impressions of Custombilt pipes was anything post Mincer was not worth my time or efforts but I’ve been wrong before. The change of hands did not necessarily mean a change in quality, yes the dash was eliminated and the rustication was not quiet as deep but big , thick and chunky they still are. I now have four in my ever-growing collection drilled perfect and not one ounce filler to be found. Eugene J Rich INC definitely did the Custombilt name justice.

Pipe As Received

PhotoGrid_1451839361020PhotoGrid_1451839409791PhotoGrid_1451839430908

The next was in beautiful used condition and unlike the first was lacking any paint which would make for an easier start. A Little rim tar&char , thin cake and light stem chatter.

PhotoGrid_1451944167633

I started with my Castleford reamer working from the smallest attachment to the largest that the chamber would accept, in this case it would accept the largest. I brought the chamber back to briar to be able to see the start of a burn out, I found only slight pitting on the inner wall on one side. After reaming I sanded the chamber with 400 grit paper until the pitting smoothed out. I could now work on the build up on the rim. I applied a generous amount of Method Good For Wood Polish with a Q-tip to the rim and left it aside to penetrate the tars.

PhotoGrid_1451926081325

The build up on the rim was quite thick towards the shank and would need more time to sit. I applied another helping of Method polish to the rim and left the stummel upside down on a makeup pad for 20 minutes. After sitting the 20 minutes the rest of the build up was easier to remove. I was now left with a little rim darkening.

20160104_104054~2

Using worn micro-mesh I was able to fade most of the darker spots.

PhotoGrid_1451925994052

With the chamber and rim free of crud I could now move on to the internals. I did a quick clean of the mortise and chamber with EverClear soaked Q-tips to loosen up the residual residue. Next I rolled two cotton balls, twisted them together to form one long swab and twisted it tightly into the mortise. With the swab inserted in the mortise I filled the chamber a quarter of the way with EverClear and allowed the swab to absorb the alcohol.

20160104_111442~2

Once the swab absorbed the EverClear I filled the chamber with two cotton balls and added EverClear to the chamber until the cotton balls are saturated. I left the stummel aside  now so the cotton balls can absorb the tars and any ghosting.

20160104_085100~2

With the stummel set aside I moved to the stem, first cleaning the externals with EverClear and makeup pads.

PhotoGrid_1451944296880

Now I applied non-bleach Soft Scrub to the stem with a children’s toothbrush and left it so the Soft Scrub could work its magic on the oxidation. I allow the Soft Scrub to turn from white to a brownish color before scrubbing vigorously with a rag. From the photo above you can see it removed 90% of the oxidation. I now used a damp Magic Eraser to remove the rest. The surface of the stem was left with a rough texture and would still need to be sanded. Before moving on I cleaned the internals of the stem with EverClear and stiff/soft pipe cleaners until the last pipe cleaner came as it went in.

20160104_132419~2

There were shallow tooth impressions at the bit/button area that raised a bit by heating the area with a Bic lighter (moving the flame at all times never leaving it in one spot too long). The stem was now ready for sanding.

20160104_144652~2

I sanded the stem first with 1000 grit wet sandpaper then 1800, 2000, 2400 wet moving on to the dry 3200-12000. Ready for the buffing wheel.

20160104_131222~2

Moving back to the stummel,  after sitting while working on the stem it had time for the EverClear and cotton balls to pull the tars and old tobacco out of the mortise and chamber. I gave it a good cleaning now with EverClear, Q-tips, cotton balls and stiff/soft pipe cleaners, cleaning until the last pipe cleaner came out as it went in.

PhotoGrid_1451944228522

I now cleaned the exterior of the stummel with Method Good For Wood Polish and allowed it to dry.

20160104_131806~2

With all my CustomBilts I add a little Howard’s butcher block conditioner just before the final buffing on the wheel. I used a Q-tip to get the Howard’s into the deeper crags

 PhotoGrid_1451944257622

I then apply Howard’s to the whole stummel and allow it to penetrate for a few minutes and hand buffing off the excess. She could now receive a final buffing.

Complete

20160104_160324~220160104_160337~2PhotoGrid_145194396807720160106_191528~220160106_191539~220160106_191552~220160104_160310~220160104_160148~220160104_160202~2

I finished her up on the wheel with white diamond, a few coats of carnauba and a microfiber hand buffing.

Another beautiful addition to my Custombilt collection and a pleasure to clean up.

Custombilt Saddle Grain

Now after two month’s of dealing with a medical annoyance doctor’s have put me on a cocktail of meds to control my chronic hives and angioedema. The swelling in my hands has finally subsided so I can now get back to my refurbishing projects.

20151218_124449~2

 Starting the New Year off right .The Custombilt pipes that I received in November from fellow blogger Clint of Pipe Scoundrel were all in pretty nice shape. First up a large Rich Era Custombilt saddle grain billiard, its the first saddle grain Custombilt in my collection. 


Pipe as received.

PhotoGrid_1450463757250PhotoGrid_1450463996402

Overall she’s in nice shape some tar build up around the rim , chunky brittle cake, some red and white paint embedded in the crags. The stem had a few impressions as well.

PhotoGrid_1451541940492

I started off with the stummel and set the stem aside to work on later. The chamber had a thick, uneven, crumbling cake and would have to go. Starting with the smallest attachment my Castleford reamer had to offer and working up to the largest that the chamber would except I removed the tired cake bring it back to briar. The chamber was free of any signs of a burn out. I finished up with 400 grit paper to smooth things out.

PhotoGrid_145154199064020160101_152536~2

My attention now turned to the rim. Caked with tar, paint and char. I applied a generous amount of Method wood for good polish to the rim and set aside to penetrate the built up. After allowing the polish to soften the build up I worked on the rim with a children’s tooth brush, makeup pads and Q-tips until the build up was removed. When I run into a tough build up I’ll leave the stummel upside down on a Method polish soaked makeup pad for 20 minutes.

20160101_160854~2

With the build up removed I could concentrat on the rim char. Using worn miro-mesh I was able to remove most of the rim darkening.

20160101_161827~2

There were a few dings in the rim after the tar and char was removed. I used a hot iron and damp rag to steam out the imperfections.

20160101_170349~2PhotoGrid_1451715765841

The internals needed a good cleaning, I ran it though a retort using EverClear. I used a mortise brush, shank brush, Q-tips, cotton balls and hard/soft pipe cleaners to remove the debris.

PhotoGrid_1451716123076PhotoGrid_1451716151540

Next the externals, I started with Method polish but would need something stronger to remove the red and white oil based paint and what I think is blacktop crack filler for driveways. I used EverClear and Q-tips to remove the gunk.

PhotoGrid_145171555132320160102_011731~2

There was one scratch on the outside of the bowl that would need filling. I cleaned the area of work with EverClear and a Q-tip, filled the imperfection with Gorilla Glue and briar dust and left to dry. After drying I removed the excess glue and dust with miro-mesh. I restained the area with touch markers and wiped away the excess with an alcohol dampened rag.

PhotoGrid_1451716181938

I now applied Howard’s butcher block conditioner with a rag and let it penetrate for 10 minutes , hand buffing off the excess with a clean rag.

20160101_163817~2PhotoGrid_1451758939146

With the stummel complete now on to the stem, starting first with non-bleach Soft Scrub to remove the oxidation. I applied a generous amount using a children’s toothbrush and left it aside to begin working. Once the Soft Scrub turns from white to a brownish color I begin to remove the oxidation with a rag and plenty of elbow grease.

PhotoGrid_1451715817648

The button/bit area of the stem had a few impressions that needed attention.

PhotoGrid_1451715949731

I first rough sanded the area to be repaired with 400 grit wet sandpaper and then wiped down the area with an alcohol dampened rag. I mixed thick black CA glue and activated charcoal power into a paste and applied it with a toothpick to the impressions and worn button, I taped off the button with painters tape so the repair would stay in one spot I allowed the paste to harden a bit before removing the tape and again hitting it with accelerator. I now left it to cure for a few hours.

PhotoGrid_1451716254744

After my internal cleaning of the mortise the tennon fit was left loose, this happens with many of my estates. I ues jewellers pliers to expand the tennon from the inside out by heating the tennon lightly with a bic lighter and inserting the tip of the pliers into the tennon and slowly expanding the tennon until a snug fit is achieved between mortise and tennon.

PhotoGrid_1451716030812

After allowing the repair to cure I could now shape the new button. Using needle files I removed the excess paste and new button began to form. I used blue painters tape to tape the under side of my needle file so I wouldn’t cut into the bit and would be able to get the file flush against the new button.

20160102_004026~2

After completing the repair I wet sanded the stem first with 1000,1800, 2000 grit sandpaper then the various gits of micro-mesh.

Complete

PhotoGrid_145178968006820160102213710~220160102213726_1~220160102213305~220160102213104~220160102213233~2PhotoGrid_1451789730428PhotoGrid_1451789710844

Finished up on the buffing wheel with white diamond, carnauba, and miro fiber hand buff.

This Custombilt was a true pleasure to clean up and add to my collection. Thanks Clint.

Ben wade selected grain #188

20151104_213218~2

A few years ago I purchased a collection of pipes from a friend who’s father had passed. I had talked with him about cleaning up old pipes and he thought I would appreciate the collection. Back then I was more or less just getting my feet wet with the whole refurbishing thing and luckily I had put a few away for a later time. Recently I stumbled across the box I had stowed away. One of the few that caught my eye was a Ben Wade selected grain No. 188 London Made, it’s acorn shape and birds eye made it an easy pick. Most of the pipes in the collection were from the 70’s and 80’s era ,I believe this Wade falls somewhere in and about this area.

PhotoGrid_1446727942010PhotoGrid_1446691292817PhotoGrid_1446691271454PhotoGrid_1446691252197

 Overall she was in good condition. The chamber was pre-reamed ,its been packed away for so long I can’t remember if it was myself or the previous owner ,a scorched area on the rim ,light chatter/oxidation and would need a good buffing.

20151105_082504~2

The pipe had been reamed but left rough, I lightly sanded the chamber with 400 grit paper wrapped around a finger until smooth.

20151105_082922~220151105_091823~220151105_101542~2

Next I worked the scorched area on the rim, I applied Method wood for good polish to the rim and left it to soak for a few minutes. I worked the area with Q-tips scrubbing vigorously until the darkened area had faded. I finished up with a worn 3600 mesh pad. There was still a little discoloration left but the final buff would take care of this.

20151105_103309~2

I cleaned the internals with EverClear,Q-tips and soft pipe cleaners, working until till the pipe cleaners came out as they went in.

20151105_103230~2

I cleaned the internals and externals of the stem using EverClear,pipe cleaners and cotton balls. Working carefully around the stem logo, so not to accidentally remove it.

PhotoGrid_1446773081414PhotoGrid_1446773111688

There was light oxidation on the stem, I applied non-bleach Soft Scrub with a children’s toothbrush and let it sit for 10min. After sitting I scrubbed the stem vigorously with cotton balls and a rag until the oxidation was removed.

 PhotoGrid_1446773566400

With the oxidation removed I moved on to the chatter, most of the impressions were shallow. I wet sanded the bit area with 1000 grit paper and removed all but one of the tooth impressions.

20151105_111515~2

With the bit area already roughed up from my sanding it was ready for filler ,I mixed thick black CA glue and activated charcoal powder together with a toothpick to form a paste .

PhotoGrid_144677369347320151105_111734~2

I applied a small dot of the mixture to the impression and sprayed it with accelerator, I then immediately pushed the mixture into the indentation before it set to make sure it filled the impression completely. I left it overnight to cure.

20151105_103309~2~220151105_112113~220151106_210647~2

With the stem set aside I addressed the rim , my previous work removing  the scorched area left a small part of the rim lighter then the rest. I used touch up markers on the lightened area and left it to dry. After drying I wiped the excess with an EverClear damp rag.

20151105_120158~2

The next morning after the stem fill had time to set up I began working the area of the repair. I wrapped 1000 grit paper around a flat needle file and sanded the area flush.

20151105_132828~2

I tapped off the bit with painters tape so my sanding would remain in the area of the damage, the rest of the stem looked good and would not need as much work. I sanded the bit area with 1500-2400 wet and 3200-6000 dry.

20151105_181832~2

I removed the painters tape for last two micro mesh pads and sanded the entire stem with 8000 and 12000.

20151106_211222~220151107_232415~2~2

Before buffing the stem I wanted to touch up the stem logo. I uesd a whiteout pen to bringing back the Ben Wade, applying it over the name and using micro mesh to remove the excess.

20151108_164135~220151108_163711~320151108_163829~220151108_163940~220151108_163916~220151108_163717~220151108_163900~2

I finished with white diamond, a few coats of carnauba and a micro fiber hand buffing.