His Nibs ( Custombilt )

PhotoGrid_1471032644773

The List

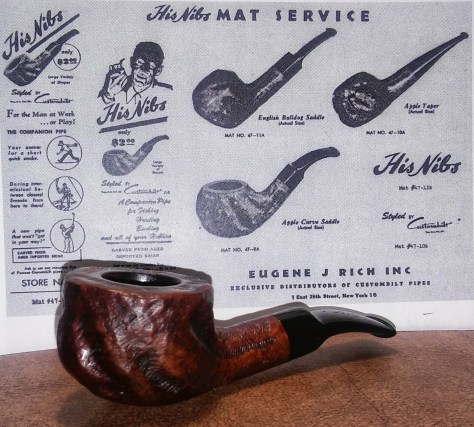
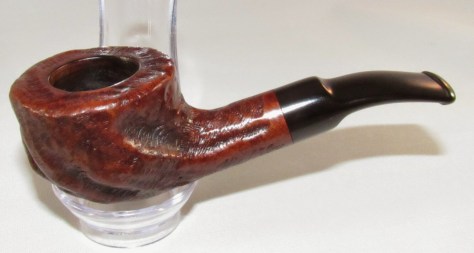
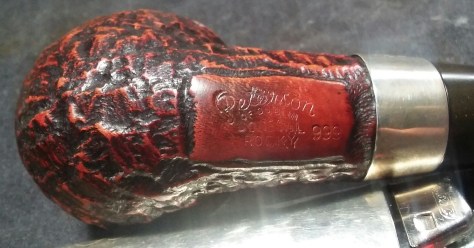
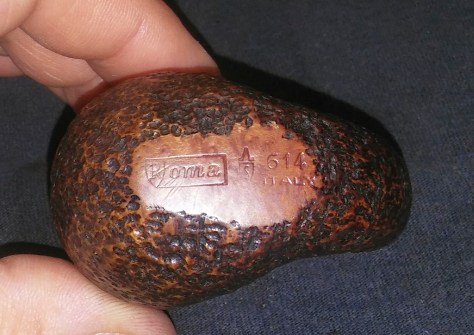
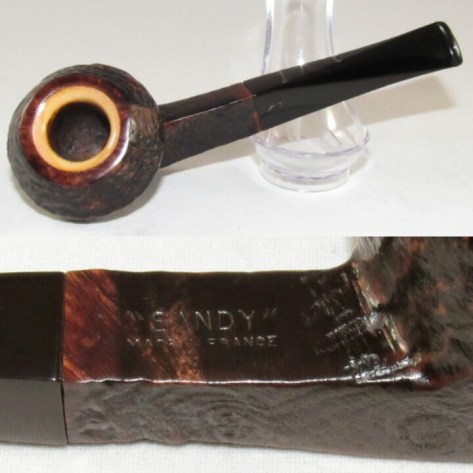
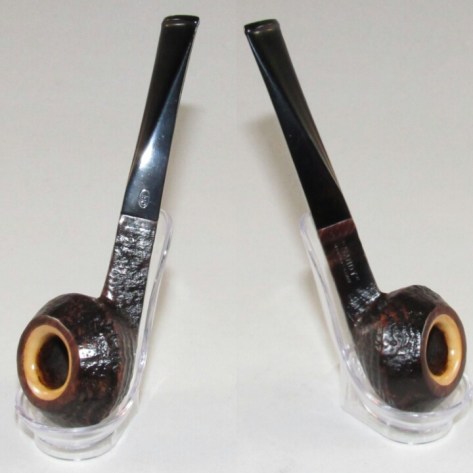
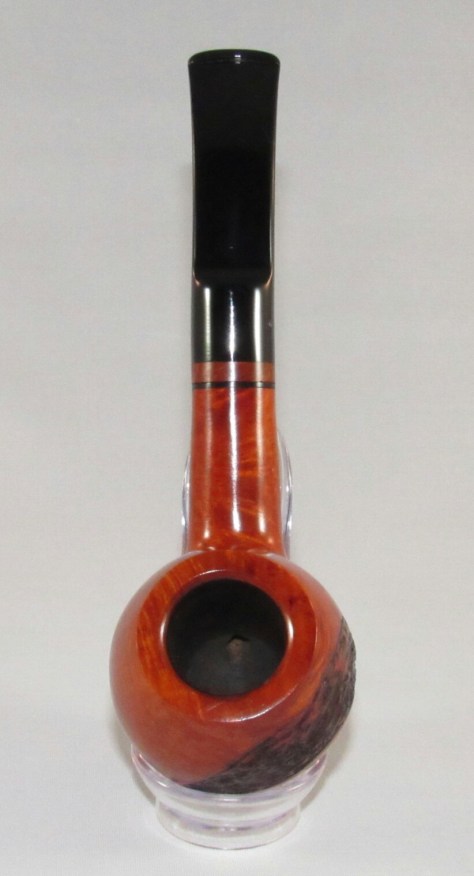
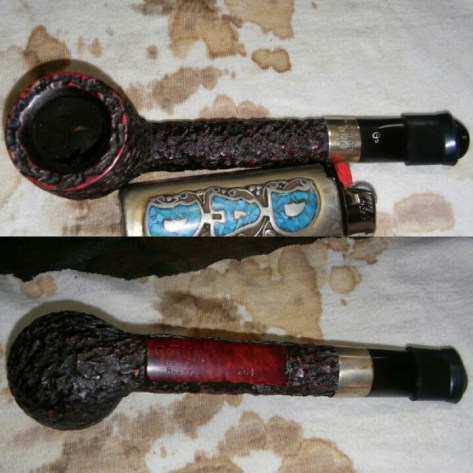
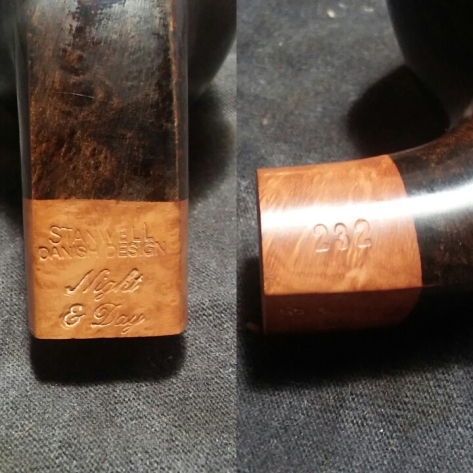
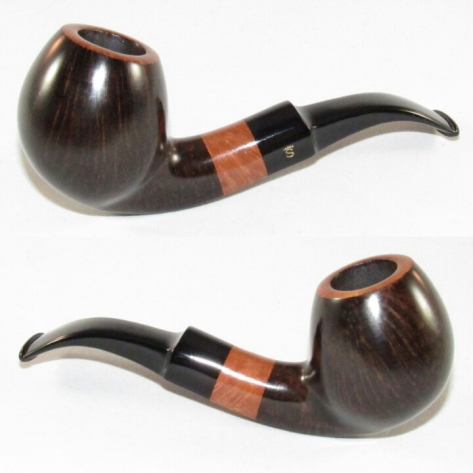
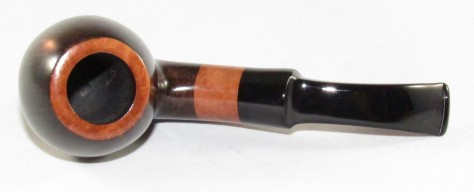
Everyone has his or her own, a list of pipes he or she desires to complete a collection. For me its Custom-Bilt and Custombilt pipes, I’ve been collecting these ugly, chunky, roughly carved pieces of briar for a long time and just recently stopped to take a look at what I really had. Originally it was Custom-Bilt pipes ( Tracy Mincer years ) and I had to have everyone I could get my hands on, I’ve redone many. Then Custombilt ( Eugene Rich years ) and a whole new line of pipes went on the list , many hard to find these days and finally the Wally Frank years still Custombilt but the nomenclature had changed, similar to the Rich era nomenclature but the standard S had been dropped for a cursive S. So this brings me to the His Nibs, introduced in 1947 by Mincer and Rich, at 4 inches long its certainly not the biggest Bilt but carved with the same care, retail price just $2.00, worth every penny. My wife picked this one up on Ebay, at last I could cross it off my list, many pop up but I’m picky the nomenclature is hard to find well stamped, sometimes its lightly stamped and other times its off and stamped half on the briar and half on the stem, this one is spot on beautiful. 
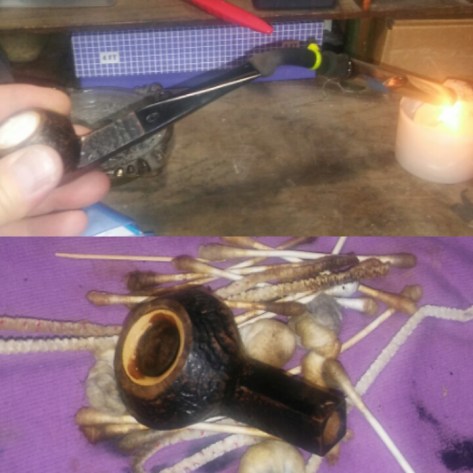
The restore


PhotoGrid_1470874178302PhotoGrid_1470874363131PhotoGrid_1470874239711

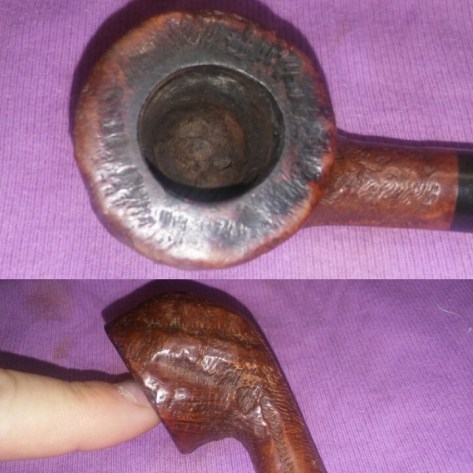
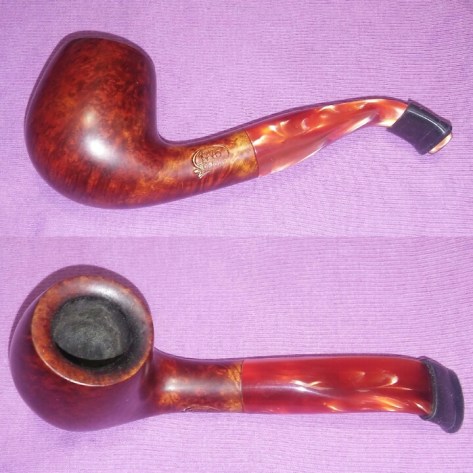
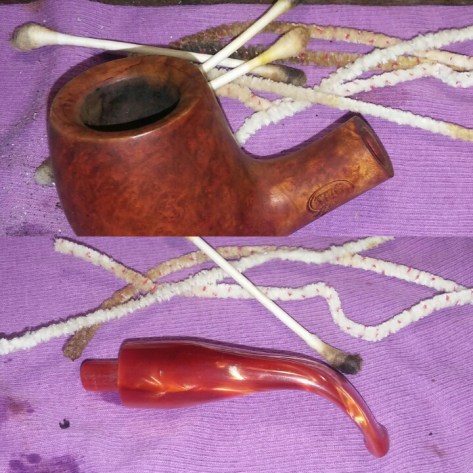
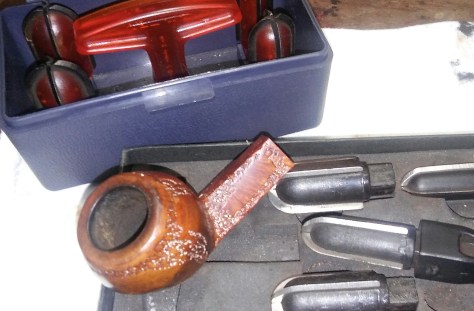
The pipes was in great shape, very light chatter, a couple deeper tooth impressions, rim build up and one spot of filler.

20160810_202625~2

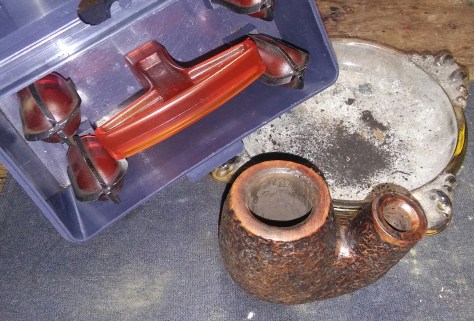
I started with chamber and my PipNet reamer starting with smallest and working up to the largest the chamber would except, in this case the third largest, it has a generous chamber for a 4 inch pipe. I took it back to bare briar to make sure things were solid.

PhotoGrid_1471018921169

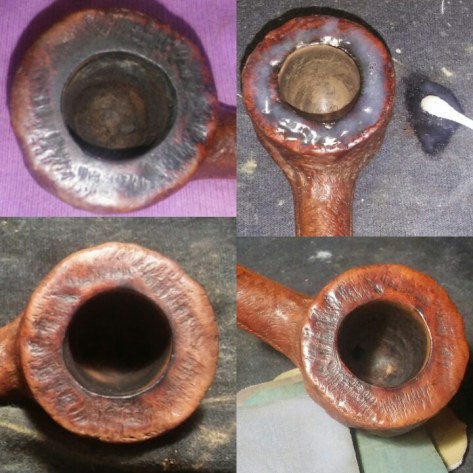
Next the rim build up, I applied Method Wood For Good Polish to the rim with a Q-Tip and left it aside to penetrate the residue. Once the Method works its magic on the build up it is removed with Q-Tips and a children’s toothbrush. There was some rim burn percent after removing the residue, I used worn micro-mesh to lighten it up. ( 3200, 3600, 4000 and 6000 pads )

PhotoGrid_1471017138553

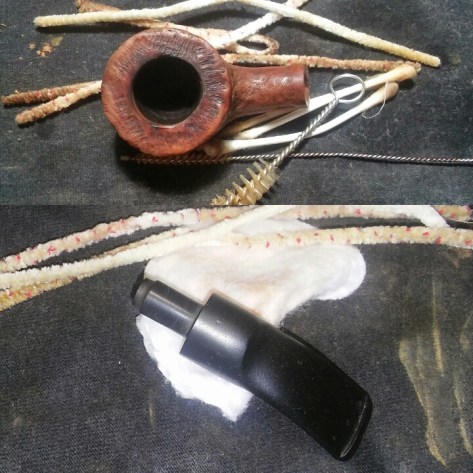
With the rim complete I turned my attention to the internals of the pipe. Cleaning the chamber, airways and mortise using EverClear, shank & mortise brushes, stiff/soft pipe cleaners and Q-Tips, cleaning until my finial pipe cleaner came out as it went in.

20160810_214224~2

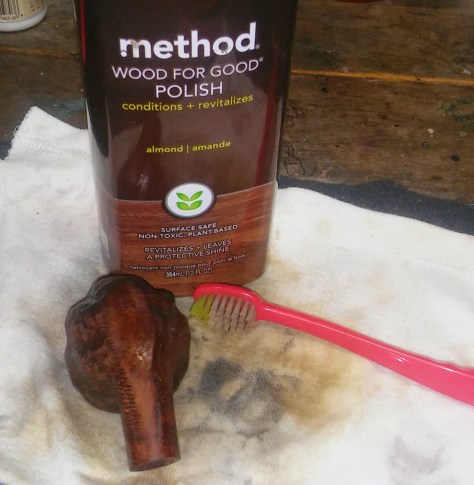
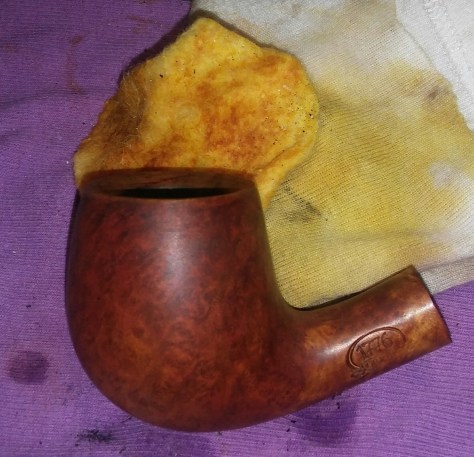
Now I gave the stummel a good cleaning with Method Wood For Good Polish and a children’s toothbrush to remove the oils and embedded debris in the briar.
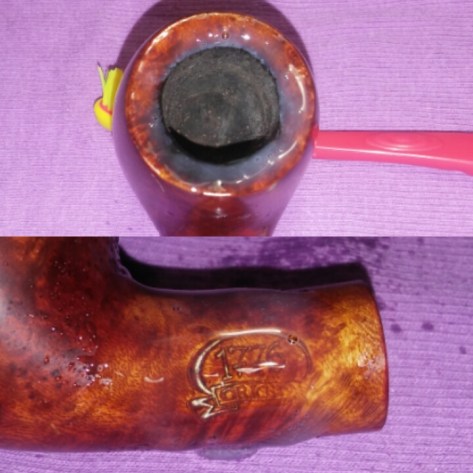
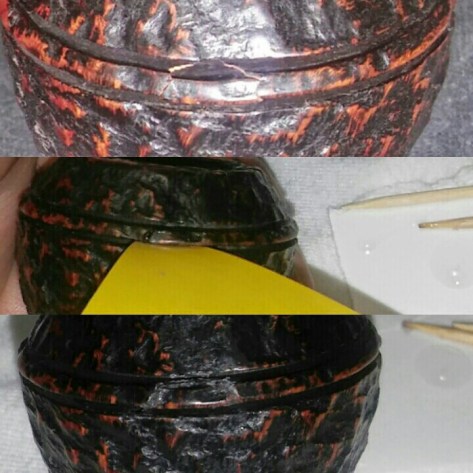
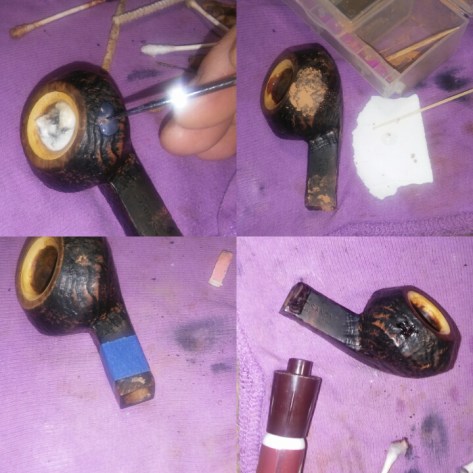
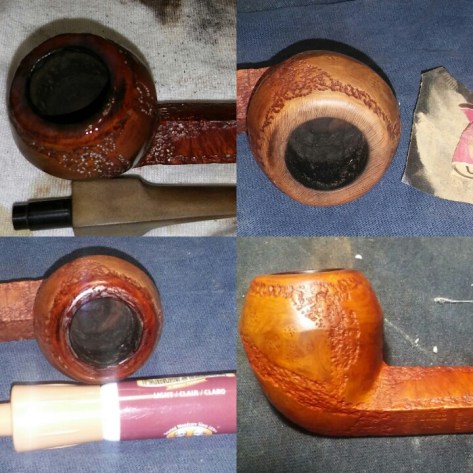
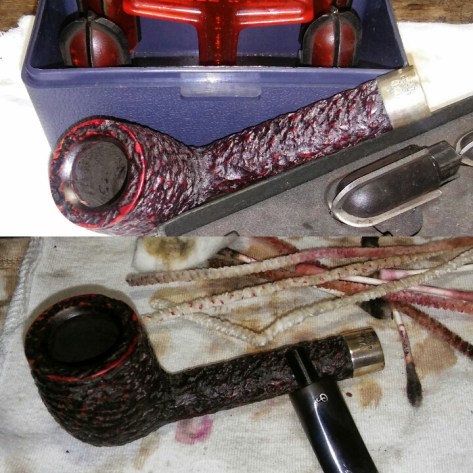
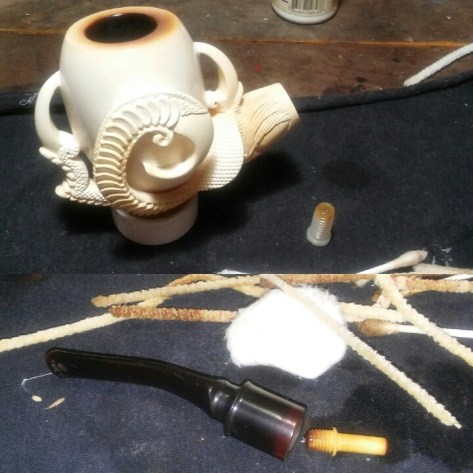
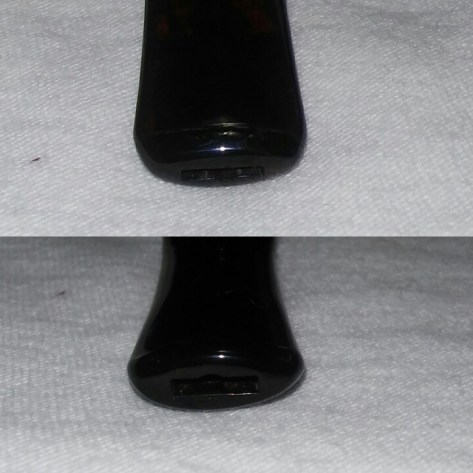
PhotoGrid_1471018535261

There was one spot of filler top left photo ) its hard to see but its there, once it was removed the pit was a perfect rectangle, I was tempted to leave it because it was unique but filling it would give it a cleaner look or as clean a look as a Custombilt could have. I cleaned the area to be repaired with EverClear and a Q-Tip,filled the pit with Gorilla Glue and briar dust, I then left it aside to dry. Once dry I lightly sanded the area with worn micro-mesh, re-stained with a dark touch-up marker, removing the excess with an alcohol dampened Q-Tip.

PhotoGrid_1471018643209

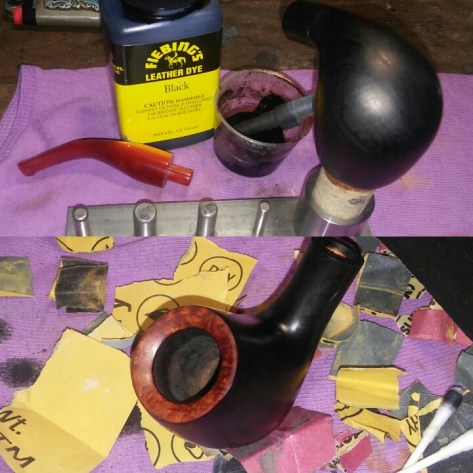
After staining the filled area I realized the whole stummel could be re-stained, using a dark brown touch-up maker I stained the deep crags.

20160811_161140~2

While in the process of removing the excess stain I also re-stained the whole pipe, leaving the deeper carvings darker and the rest of the stummel a lighter shade. Handling the stummel while working on the stem colored the it further, the end result was perfect.

PhotoGrid_1471017223853

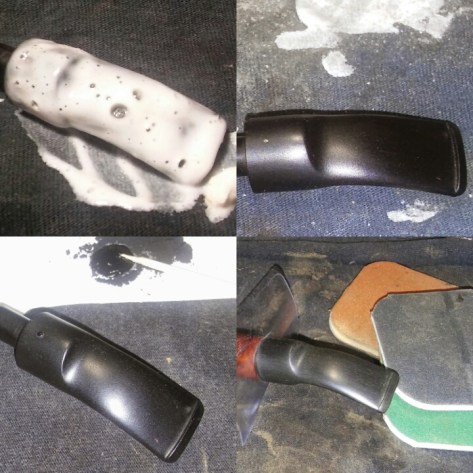
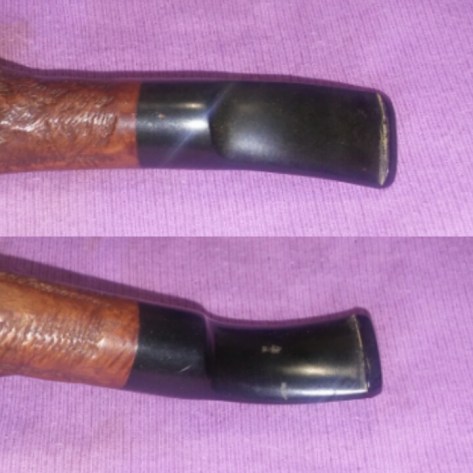
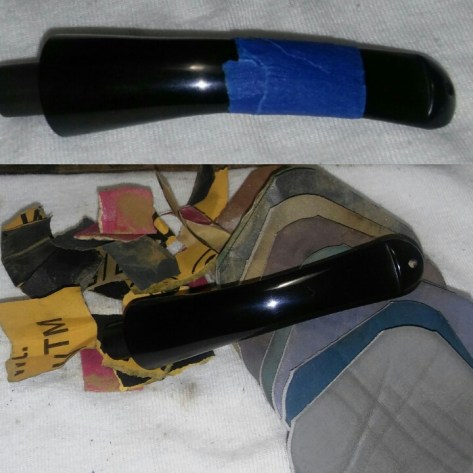
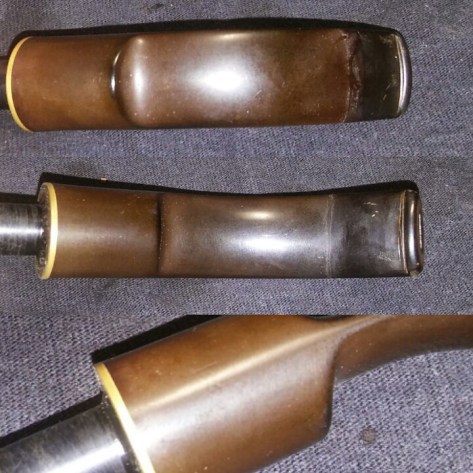
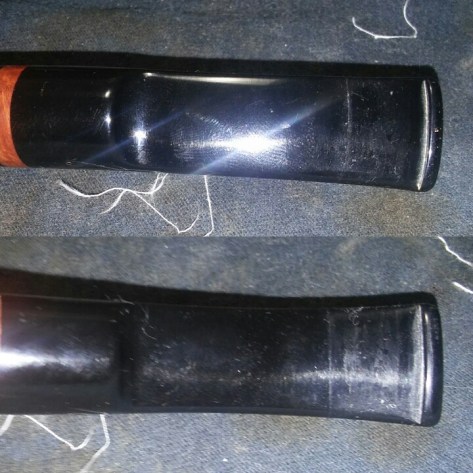
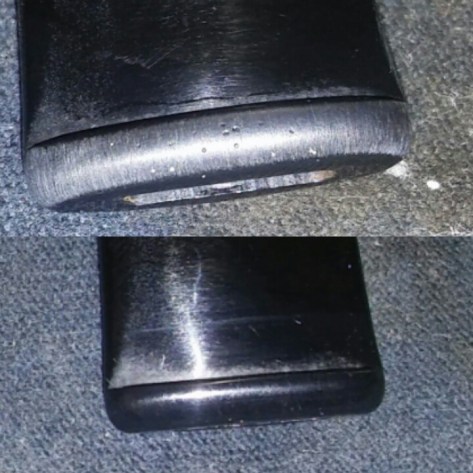
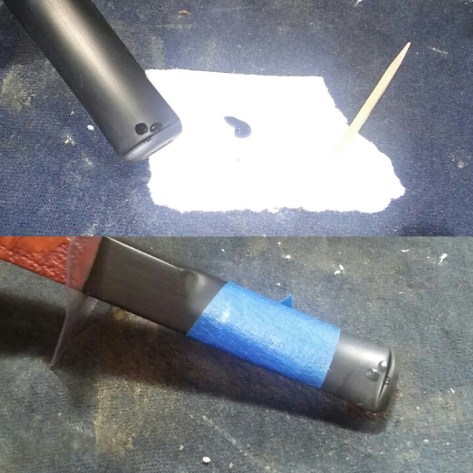
The stem was a little oxidized and had a couple of deeper tooth impressions that needed filling. To remove the oxidation I applied non-bleach soft scrub and left the stem aside to allow the Soft Scrub to penetrate the oxidation. Once the Soft Scrub turns from white to a brownish color its time to scrub vigorously with a rag, adding more Soft Scrub as needed.    ( holding the stem under natural light will help to see if all oxidation has been removed ) I now gave the stem an EverClear wipe down before filling the tooth impressions. I mixed thick black CA glue along with a little charcoal powder to form a paste, I applied the paste with a toothpick, hitting it with accelerator to set the patch and leaving it over night to cure. The following morning I ran the stem though the first three micro-mesh pads 1500-2400 wet.

20160812_122444~2

I now ran the stem though the finial six grits of micro-mesh 3200-12000 dry  During the sanding I uncovered a few pores/bubbles in the rubber stem, there were far to many to attempt to fill, I’ll call them character marks.
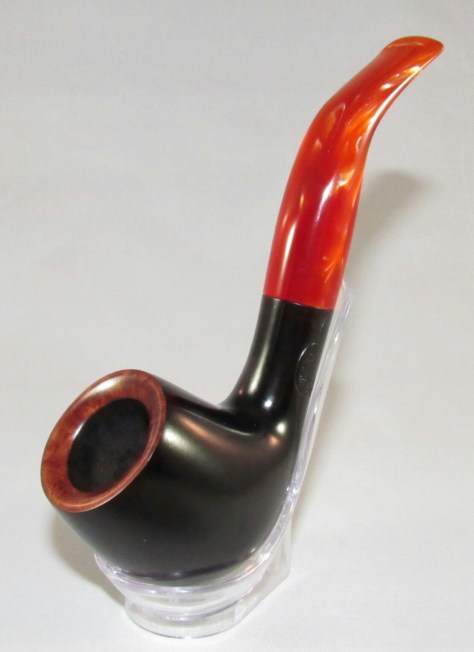
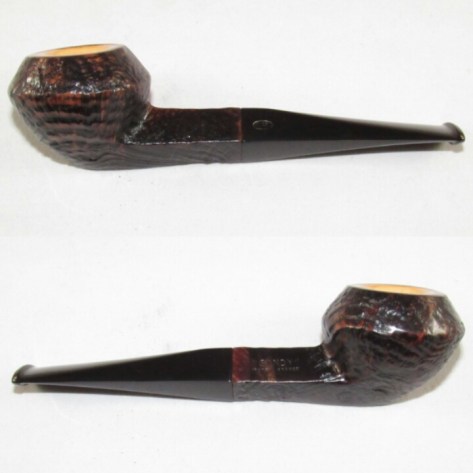
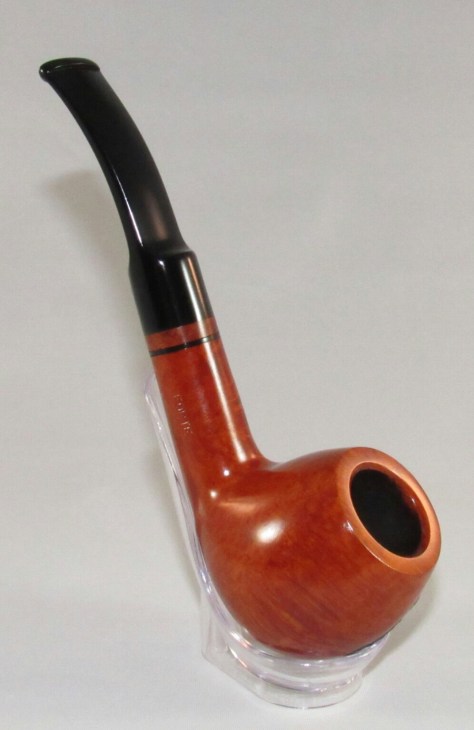
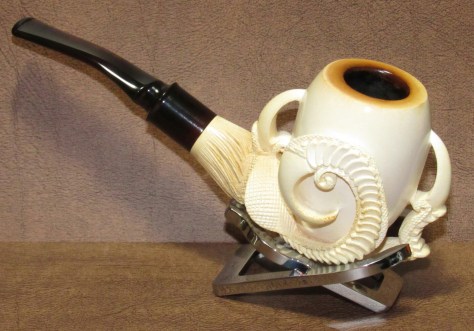
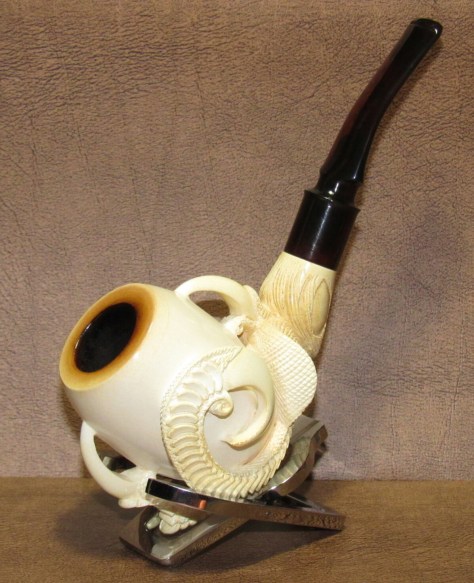
Complete

20160812_124338~220160816155731~220160816155620~220160816155635~220160816155656~2

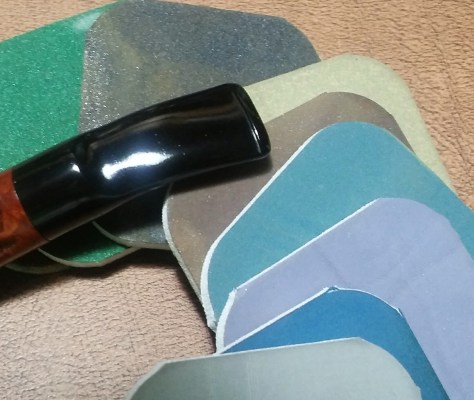
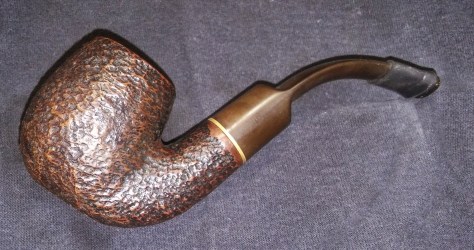
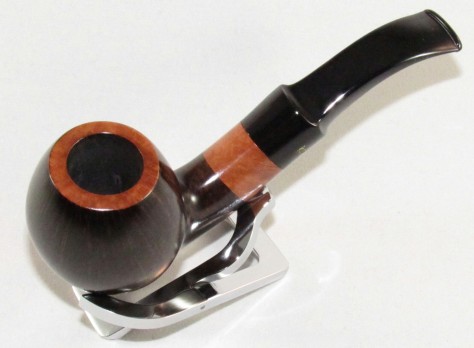
I finished up on the wheel with a few coats carnauba and a micro-fiber hand buff, buffing the stem with blue compound and carnuauba.

It was a pleasure to cross this one off the list.

20160816155731~2

Happy Collecting, Restoring And Puffing.

Tim.

Sue’s Pick-1776 Original

My wife who writes a blog at Mother Fogger.net  picked this pipe as I was experimenting with different stain techniques, she stopped my work half way though and told me she loved the way it look and it was now hers, so its now the Mother Fogger Pipe which was cool with me. Due to my wife’s interest in vaping I have finally kicked my filthy 26 year cigarette habit and I must say not only do I feel better but I also have a new found love for my pipe tobacco, I can sit and enjoy my pipe and truly taste the notes I have been missing with my muted taste buds ( Thank You Sue ). As for the pipe I can not find any info on the brand/make the only stamping is 1776 original on the left side of the shank, I vaguely remember pipes similar to this offered by Pipes and Cigars a few years back but I could be wrong. The pipe came to me in a large lot I purchased a few weeks back and it needed something and apparently my wife had the answer.

The Restore/Face-lift 

PhotoGrid_1469798402285

It was one more from the mad buffer lot it would seem he slowed as he approached the nomenclature, sparring most of it so its still legible. From the photos above you can see the excess carnauba wax caked in the stamping on the stummel. So much wax was used that the finish seemed dull. The acrylic stem was bent in an odd way a sharp bend at the very end of the bit.

PhotoGrid_1469798997198

 I started with the caked rim, I applied a generous amount of Method Wood For Good Polish to the rim with a Q-Tip and left it to penetrate the tars and oils. Once the build up softens it was easily removed with Q-Tips and makeup pads. Next I moved to the excess wax build up on the stummel, I applied Method to the stummel and used a rag to remove the excess wax, using a children’s toothbrush to remove the wax from the stamping.

20160728_154058~2

Now using my Castle Ford reamer I reamed the cake back to a suitable thickness ( to be honest there wasn’t much there). It was also lightly smoked like many of the others in this lot.

PhotoGrid_1469798317464

Now for the internals, using EverClear, Q-Tips and stiff/soft pipe cleaners I cleaned the mortise, draught and stems airway until my finial pipe cleaner came out as it went in.

20160728_154043~2

Originally I was going to try different stain coats with this inexpensive pipe, so removing the old stain was in order. I used acetone to remove the old stain and in the process I uncovered multiple fills.

PhotoGrid_1469798268284

Using a pick I removed the old fill, I cleaned the area to be refilled with EverClear and a Q-Tip, then refilling with Gorilla Glue and briar dust and allowed time to dry. I sanded the newly filled pits with 800, 1000 and 1500 grit sandpaper.

20160728_152956

Next it was time to address the odd bend in the stem. I heated the stem on low heat with my Wagner heat gun until it became pliable, straightening the stem first to loose the odd bend and then re-bending it over a pill bottle. The rubber bit also saved this stem from chatter got to love em.

PhotoGrid_1469799077090

This step is about the time my wife walked in and caught sight of the black stummel and orange acrylic stem and fell in love with the look ( shes crazy about orange ). Originally I was going for a dark first coat and a lighter top coat after some sanding but she loved it as is. I’ve never stained a pipe full black and soon realized it was going to take much more then one or two coats, I lost count it was definitely more then one or two. Last minute I decided to go with a lighter rim stain, in my opinion the contrast in color was a nice touch.

Complete

PhotoGrid_1469753550200

Mother Fogger Approved!

20160816155414~220160816155428~220160816155439~220160816155451~2

I finished her up on the wheel with a few coats carnauba and a micro-fiber hand buff, buffing the stem with carnauba.

Happy Collecting, Restoring and Puffing 

Tim.

Peterson – Donegal Rocky 999

20160705_174524

I’m down to the last few from the lot I picked up, I was drawn to this lot because of the Donegal’s its one of my favorite lines from Peterson, this is the first 999 I’ve gotten my hands on and I can see why its so popular with Peterson collectors, the shape alone is appealing but the comfort in hand is what sold me. I have parted with many from this lot but the Donegal’s are at home here.

The Restoration

PhotoGrid_146809091055420160709_124042~2PhotoGrid_1468090956390PhotoGrid_1468091021079PhotoGrid_1468090925882

 She was in good, lightly smoked condition, the biggest issue was a crack in the bead but thankfully the piece was still in place. The stem was oxidized and the P logo was half buffed flush with the stem surface, light chatter and a little rim build-up. The silver band would need a bit of shining up as well.

PhotoGrid_1468091425037

The chamber had seen very little use, it would not need reaming, a quick  scrub with EverClear  and Q-Tips would do the trick. The original bowl coating was still in great shape, it looked almost new.

PhotoGrid_1468091228916

Like the pipes chamber the draught, mortise and stems airway needed very little cleaning. Using EverClear, Q-Tips and stiff/soft pipe cleaners I cleaned the internals until my finial pipe cleaner came out as it went in.

20160709_140100~2

I now gave the rim, stummel and silver band a wipe down with Method Wood For Good Polish to remove the old oils, dirt and tarnish.

PhotoGrid_1468091138408~2~2

With the stummel clean I could now address the crack in the bead. I cleaned the area to be repaired with EverClear and a Q-Tip and let dry. I first applied Gorilla Glue to the crack with a toothpick, using an old charge card wedged in the recess I slowly moved the cracked portion back into place.I held the piece in place until the glue set. Once set I left the repair  to dry for an hour or so.

PhotoGrid_1468091190242~2~2

After dry time I could now remove any excess glue, using folded 400, 1000 and 1500 sandpaper I carefully sanded away the excess, cleaning the area with alcohol to remove the fine sanding dust. I now re-stained the recessed portion of the bead with Fiebing’s black  leather dye, removing the excess stain with an alcohol dampened Q-Tip.

PhotoGrid_1468105799694

The stummels finish was worn and the repaired area was lighter from the work done. I mixed Fiebing’s dark brown and red leather dye together with a little EverClear to lighten the stain bit and applied a few coats to the stummel with a brush, hitting it with a Bic lighter to set the stain. I used an alcohol dampened rag to remove the excess.

20160709_212352~2

Now to shine the band up. I taped off the shank with painters tape to keep the compound from overlapping and darkening the shank. I buffed the band with brown tripoli back to a shine. The stummel was now ready for the wheel.

PhotoGrid_1468105727066

With the summel complete and waiting to be buffed I could now concentrate on the stem oxidation, I applied non-bleach Soft Scrub to the stem and left aside so the Soft Scrub could penetrate the oxidation. Once the Soft Scrub turns from white to a brownish color its time to scrub vigorously with a rag until all oxidation has been removed, adding more Soft Scrub as needed. ( Holding the stem under natural light will help to see if all oxidation has been removed )

PhotoGrid_1471355475242

The stem could now be sanded and polished. I tapped off the bit end of the stem with painters tape so my more abrasive sanding would remain in one area. To remove the light chatter I sanded with 800 and 1000 grit sandpaper wet and micro-mesh pads 1500-2400 wet then 3200-4000 dry. I removed the tape and sanded the whole stem with the remaining micro-mesh pads 6000-12000 dry.

20160709_203305~2

Before attempting to reapply the logo I buffed the stem with blue compound to remove the fine sanding blemishes.

20160816_113313~2

I used an alcohol dampened Q-Tip to remove the oils and compound from the P logo area. The bottom of the logo was still recessed but the top portion was buffed flush, the remaining top of the P was more of a faint outline. Using white enamel nail polish and paintbrushes for nail art ( gotta love having women in the house ) I attempted to reapplied the P logo numerous times to no success, my hands and eyes are not what they used to be, so my wife stepped in and reapplied the P, its damn close in my opinion , she left it aside to dry before I put it on the wheel.

Complete

20160816160400~220160816160509~220160816160448~22016081616033920160816160350

I taped off the silver band and buffed the stummel with a few coats carnauba and a micro-fiber hand buff, buffing the stem with blue compound and carnauba.

Happy  Collecting, Restoring and Puffing

Tim.

Savinelli Roma 614

20160705_174524

I’m down to the finial few from the pipe lot I picked up. Savinelli I can’t say enough, just a great smoking pipe and this one more to add. Savinelli Roma 614 a smaller pipe then I would typically puff but very comfortable clenched in jaw while working on more pipes.

The Restore

20160729_235503~220160729_235512~220160729_235522~220160729_235737~2PhotoGrid_1470458356589

A great looking pipe if you can see past the dirt, grime and oxidation. The nomenclature is well stamped, the stem logo buffed almost clean off which is nothing new with this lot and the softy bit didn’t save this one completely from chatter, just a couple of tooth impressions that would need attention. The rim and chamber looked good just a little rim burn on the right side.

20160802_203900~2

I started with the chamber and my PipNet reamer, starting with the smallest and working up to the largest the chamber would except, reaming the cake back to a suitable thickness.

PhotoGrid_1470458301313

The rim had a light build-up and a burn to the right of the bowl. I applied Method Wood For Good Polish to the rim and allowed it to penetrate the old tars and oils. Once the build-up softens it would be removed with Q-Tips and makeup pads.

20160802_211047~2

Next the stummel and stem internal cleaning. Using EverClear, Q-Tips, stiff/soft pipe cleaners and shank/mortise brushes, I cleaned the airways and chamber until my finial pipe cleaner came out as it went in. I then stuffed the chamber and mortise with cotton balls and added EverClear to pull out the more stubborn tars, oils and lessen any ghosting.

PhotoGrid_1470458038399

The stem was heavily oxidized, I applied a generous amount of non-bleach Soft Scrub and left it aside to penetrate the oxidation. Once the soft turns from white to a brownish color its time to scrub vigorously with a rag adding more Soft Scrub as needed ( Holding he stem under natural light will help to see if all oxidation has been removed. ) I would repeat this process a few times to remove all the oxidation .

PhotoGrid_1470458192530

The bit portion of the stem had a few shallow tooth impressions but the rest of the stem looked good. I taped off the bit end of the stem with painters tape to keep my sanding in one area. I removed the impressions with micro-mesh pads 1500-3200 wet and 4000-3600 dry, then I removed the tape and sanded the whole stem with 6000-12000 dry.

Complete

20160816160146~220160816160201~220160816160129~2

I finished her up on the wheel with a few coats of carnauba and a micro-fiber hand buff, buffing the stem with blue compound and a few coats of carnauba.

Thanks For Taking A Look.

Tim.

Presumably, A Majestic C.G.F. Meer Lined (“SANDY”)

PhotoGrid_1471104648869

I believe this to be a Majestic C.G.F. made pipe, the name “SANDY” is stamped on the right side of the shank, below that Made In France, there is no other stamping on the stummel. There is a C.G.F. logo on the stem, I have researched the C.G.F. logo and it seems to point to the Majestic company out of Paris France, there is very little info on Pipedia other then a few advertisements and examples of there pipes ( Majestic info ). I’m unsure if ” SANDY” refers to the pipes finish or a pipers name, I know there were mail order gimmicks back in the day where you could have a pipe personalized but I’m unsure if this is one of them.

Restoration

PhotoGrid_1470098302760PhotoGrid_1470098326219

The overall condition of the pipe was good. The meer lining was crack free, the stem chatter free and the C.G.F. logo was legible, it would seem the mad buffer did not get to this one. The chamber was a little caked and one noticeable fill .

PhotoGrid_1470098513815

I jumped right in on the internal cleaning of the stummel and stem. The chamber being Meer I didn’t go with my PipNet reamer, instead I cleaned the chamber with EverClear, Q-Tips and 1000 grit sandpaper to remove the stubborn leftovers. The draught, mortise and stem were cleaned using EverClear, Q-Tips and stiff/soft pipe cleaners but this well used pipe would require a retort to get a deeper clean. After the retort I did one more good internal cleaning with EverClear, Q-Tips and pipe cleaners until my finial pipe cleaner came out clean.

PhotoGrid_1470098410649

The right side of the bowl and shank had noticeable filler that needed to be removed. I applied Method Wood For Good Polish to the filler and left it to soften. Once the filler softened up I removed it with a pick and straight pin. I cleaned the area to be refilled with alcohol and a Q-Tip, filled the sand pit with Gorilla Glue and briar dust wiping away the excess with a alcohol dampened rag and left to dry. Once dry I lightly sanded the filled areas with a 3200 grit micro-mesh pad, tapping off the shank so not to disturb the  nomenclature with my sanding. I now touched up the new fills with a dark stain marker, let dry and removed the excess stain with an alcohol dampened Q-Tip.

PhotoGrid_1470098470888

In the process of filling the sand pits I inadvertently removed some of the original stain surrounding the repair. I used a makeup pad and EverClear to remove the rest stain from the stummel and re-stained the stummel with a dark brown touch-up marker, allowing dry time and removing the excess with an alcohol dampened rag. Sandy was now ready for the wheel. The stem was oxidation free and chatter free, I cleaned the stem inside and out with EverClear and would just need a good buffing.

Complete

PhotoGrid_1471060222529PhotoGrid_1471060121452PhotoGrid_1471060088968

 Before buffing the stummel I lightly polished the meer rim with worn micro-mesh 4000-12000. I finished the stummel on the wheel with white diamond, a few coats carnauba and micro-fiber hand buffing. Buffing the stem with blue compound and a few coats carnauba.

Thanks For Taking A Look.

Tim.

Refreshing A Cassano

One of the last few from the lot I picked up a few weeks ago. Cassano a brand I’m unfamiliar with, from what I could find it has mixed reviews, some consider it an under rated brand and others think its a poor quality make. Having not puffed the pipe myself I can only go by what I see before me and to be honest it looks to be a well made pipe, thick walls, proper drilling and a nice overall finish. To find a larger pipe at a price that won’t brake the bank is a rarity these days, so for a few bucks ( $60-$80 New  )I think you’d have an enjoyable smoking and looking pipe. Pipedia has a bit of history on the brand Cassano.

The Refresh.

PhotoGrid_1468504431081PhotoGrid_1468504362739

The pipe was in beautiful shape when I received it, very lightly smoked, smoked once I’d say and not to the bottom bowl. The chamber still has its bowl coating and the stem is free of chatter ( rubber bits always help ). The nomenclature is crisp but the stem logo has been partially buffed off, like many of the other pipes in this lot. It would seem there is a mad buffer out there, not only do they use a very firm hand when buffing but they also like there carnauba as well, bucket loads were used to buff these pipes.

20160712_152806~2

I cleaned the internals of the stummel and stem with EverClear, soft pipe cleaners and Q-Tips. Cleaning until my finial pipe cleaner came out as it went in.

PhotoGrid_1468504474230

The stem was in great condition with the exception of a few bubbles on the button that would be easily corrected with a bit of sanding. I ran the button through the various grits of micro-mesh to remove the imperfections. The damage done to the stem logo was irreversible it was buffed flush with the stem surface, not leaving an indentation to be refilled. The rest of the stem would just need a buff and shine to bring back its luster.

Complete.

20160816155809~220160816155824~220160816155845~220160816155919

Finished up on the wheel with a few coats carnauba and a micro-fiber hand buff, buffing the stem with blue compound and carnauba.

Thanks For Dropping In

Tim.

Savinelli SherWood Rock Briar 504

20160705_174524

One more from the lot. Savinelli one of my favorite brands, beautiful pipes, that smoke great and at a price an average Joe can afford. I have quite a few in my collection, from my more expensive Autograph 4 to my less expensive Trevi each one preforms wonderfully.

The Restoration.

PhotoGrid_146829123285920160709_215727~2PhotoGrid_1468291302240

The pipe had a few issues, oxidation, chatter and the stem logo was buffed clean off. The edge of the rim towards the shank was sanded or buffed down unevenly compared to the rest of the rim. A ton of carnauba wax was used and caked in every nook and cranny. On the plus side the nomenclature is crisp and the pipe seemed pretty clean.

20160709_220256~2

The use of both the PipNet and the CastleFord reamer would be used once again to ream back the cake in this smaller chambered pipe.

PhotoGrid_1468291357738

Next I cleaned the internals of the stem and stummel with EverClear,  stiff/soft pipe cleaners, Q-Tips and makeup pads, cleaning until my final pipe cleaner came out as it went in. The internals were surprisingly clean.

PhotoGrid_1468291717978

The stummel was over waxed, every crevice was caked in the stuff. Using Method Wood For Good Polish, a children’s toothbrush and a straight pin I began to remove the excess wax.

PhotoGrid_1468291977222

I removed the little build up on the rim with Method and a Q-Tip. The rim was uneven, it looked as if the previous owner tried to remove a rim burn and left it unfinished. To even things out I sanded the higher portions of the rim with 400, 800 and 1000 grit sandpaper until I had a uniformed shape. I re-stained the rim with a light brown touch-up marker and removed the excess with a alcohol dampened rag.

PhotoGrid_1468292777262PhotoGrid_1468292796112

The stem was heavily oxidized, I applied a generous amount of non-bleach Soft Scrub and left it aside to penetrate the oxidation. Once the Soft Scrub turns from white to a brownish color its time to scrub vigorously with a rag until the oxidation is removed, adding more Soft Scrub as needed. Holding the stem under natural light will help to see if all oxidation was removed. I tried heat to remove some of the deep tooth impressions using a Bic lighter (moving the flame at all times never leaving it in one spot to long) a few raised but a couple of stubborn deeper impressions would need filling.

PhotoGrid_1468504577315

I mixed thick black CA glue and charcoal powder together to fill in the deep impressions hitting it with accelerator to set the patch, I left it overnight to cure. The following morning I taped off the bit/lip area so my more abrasive sanding would remain in one area. I sanded with 400, 800 and 1000 grit sandpaper to blend the repair.

20160712_131716~2

I now ran the stem though the various grits of micro-mesh pads.

Complete.

20160724184306~220160724184321~220160724184338~220160724184411~2PhotoGrid_1469497446012

I finished up on the wheel with white diamond, a few coats carnauba and a micro-fiber hand buff. Buffing the stem with blue compound and carnauba.

Thanks For Taking A Look.

Tim.

Peterson – Donegal Rocky 264

20160705_174524

My latest estate lot had quite a few goodies and I found myself totally engulfed in my work, pipe after pipe, only pausing to take photos of my process. The next subject to hit my work desk, a Peterson Donegal Rocky 264. A more petite Pete then I would typically collect but I’ve always had a soft spot for the Donegal Rocky series. I have a new found respect for the Lovat shape, a mini version of the Canadian shape that I so love.

The Restoration  

PhotoGrid_1468504063897PhotoGrid_1468504012077PhotoGrid_1468458836257

Lightly smoked like many of the pipes in this lot, the chamber was free of any real build up and its silver band was tarnished. A little oxidation was present, as well as some light chatter, the Peterson’s “P” logo was present and accounted for, it seems it did not meet its demise as its counterparts did in this lot.

PhotoGrid_1468504128520

I tag-teamed the chamber with my PipNet and Castle Ford reamer, taking what little cake there was back to a suitable level. I then cleaned the internals with EverClear, stiff/soft pipe cleaners, makeup pads and Q-Tips, cleaning until my final pipe cleaner came out as it went in.

20160713_110554~2

I gave the stummel and silver band a wipe down with Method Wood For Good Polish with a rag to remove the oils, dirt and debris. I left it aside to dry.

20160713_143719~2

While the stummel dried I mixed Fiebing’s red and dark brown leather dye together, more red then brown and added a little EverClear to lighten the stain.

PhotoGrid_1468503210926

I applied a few coats of the stain with a brush and hit it with a Bic lighter to set the stain, removing the excess stain with an alcohol dampened rag.

20160713_145240~2

After cleaning the silver band it was dull and had a few faint surface scratches. I taped off the shank with blue painters tape and buffed the band with tripoli, bringing back its shine.

PhotoGrid_1468458885077

I used caution when removing the oxidation from the stem, the “P” logo was in fine shape. Many of the pipe stem logos in this lot were buffed clean off or at least partially missing. I applied non-bleach Soft Scrub to the oxidized areas of the stem and let the Soft Scrub penetrate the oxidation. Once the Soft Scrub turned from white to a brownish color I scrubbed the area with a Q-Tip so not to disturb the logo. I usually use a rag to remove the oxidation but in fear of loosing the logo I went slow with a Q-Tip, I would have to repeat this a few times until all oxidation was removed.

20160713_210657~2

There was some light chatter at the bit/lip area of the stem I used 400, 800 and 1000 grit sandpaper to remove the chatter. I then ran the stem though the various grits of micro-mesh.

Complete

20160725152830~220160725152852~220160725152926~2PhotoGrid_1469471850921PhotoGrid_1469471800219

 Finished up on the wheel with white diamond, a few coats carnauba and a micro-fiber hand buff. Buffing the stem with blue compound and carnauba.

Thanks For Stopping In

Tim.


Quick Clean Up- Stanwell Night & Day 232

20160705_174524

My most recent purchase. A few caught my eye right off the bat, Peterson Donegal Rocky 999 and 264, Savinelli Alligator, Roma and Sherwood Rock Briar, Jobey Asti and a Stanwell Night & Day. All in very nice lightly smoked condition, rubber bits protecting most of the stems. I was happy with the lot from the start but the seller sweetened the deal even more by throwing in a few surprise extras, two pipe cases, pipe cleaners, a chrome stand and tobacco. I started with the Stanwell I liked the shape and it was hardly touched, I knew I’d have time to clean her up quick in between the few things I had going on today. 

The Refresh.    

PhotoGrid_1468004985198PhotoGrid_1468005012333PhotoGrid_1468004952605

Smoked once, maybe twice.She was in like new condition, the carbon bowl coating was still in place, not a single tooth mark on the stem and the internals were spotless. There was a weird oil or grease on the stummel that left my fingers slippery .

20160708_140358~2

I cleaned the internals of the stummel and stem with EverClear Q-Tips, soft/stiff pipe cleaners and a makeup pad to wipe down the stems exterior.I gave the stummel a good wipe down with Method Wood For Good Polish to remove the oily residue. This was by far the quickest clear up I’ve done aside from maintaining my own rotation.

Spic & Span

20160708155806~2PhotoGrid_1468005084805PhotoGrid_146800504748420160708160100~220160708160114~220160708155956~2

Finished up on the wheel with white diamond, a few coats carnauba and micro-fiber hand buff. Buffing the stem with blue compound and carnauba

Thanks For Dropping By.

Tim.

Forgotten Meer

Meerschaum.

A soft white clay like material consisting of hydrated magnesium silicate, found chiefly in Turkey.


To be honest Meerschaum freaks me out,  far too many do’s and don’ts and fragile, I guess I’m a little clumsy and briar is far more resilient. I’ve redone a couple in the past but always let them go, this unmarked Meer I received a year ago in a lot and forgot all about it until I was digging in my tobacco drawer for a new tin and stumbled across its case. I’m amazed by the skill used to carve these intricate pieces and many are unsigned, the carver never gets credit for there time and effort. I’ve always enjoyed seeing a well colored Meer, I’ll hang on to this one and see how she turns out.

The Restoration.


PhotoGrid_1467418064114PhotoGrid_1467418239993PhotoGrid_1467418201360

The pipe was in decent shape, a few shallow scratches and light rim build up. The stummel was in sold condition free of cracks and the chamber was free of cake. The stem was the biggest issue, plugged shut with tars and oils, the threaded tenon was seized in place and the bit was chewed and chipped.

PhotoGrid_1467418110463

To fee the threaded tenon I dripped a little EverClear around the tenon and left it to sit, after twenty minutes I was able to free it from the stem. I cleaned the internals of the stem and stummel with EverClear, Q-Tips and soft pipe cleaners, cleaning until the pipe clears came out clean. I cleaned the rim with Method Good For Wood Polish removing the build up of tars and oils.

PhotoGrid_1467418150741

The lip/bit was chewed, cracked and chipped. The stem being lucite made things a bit more difficult to repair the missing piece of the button. I mixed thick black CA glue and a little charcoal powder and applied it to the lip/bit area with a toothpick hitting with accelerator to set the patch. The patch wouldn’t be transparent but the repair would be stronger then using Gorilla glue.

PhotoGrid_1467837460068

I left the stem to sit overnight to allow the patch to cure, the next morning I reshaped the button with needle files and 400, 800 and 1000 grit sandpaper.

20160706_142046~2

With the new button formed I ran the stem though the various grits of micro-mesh.

PhotoGrid_1467837417636

In the end the patch blended pretty well.

Complete.


20160706161737~220160706161801~220160706162205~220160706161821~220160706162443~2

I gave the stummel a wipe down with Howard’s Butcher Block Conditioner and hand buffed off the excess. I lightly buffed the stem at a low rpm with blue compound, a few coats of carnauba and a micro-fiber hand buffing.

Thanks For Taking A Look

Tim.

Photobooth Journal

A life in a photobooth.

The Pipe Steward

Restoring Pipes and Reclaiming Lives

PipeDreamer

The musings of a pipe smoker

Peterson Pipe Notes

Peterson Pipe Notes: Shapes, Lines & Series

Confessions of a Pipe Smoker

Tobacco and Pipe Reviews for the Common Smoker

Ramona Brown - The Cigar Lady

A Beautiful Cigar Touches All My Senses ™

Lone Star Briar Works Blog

tobacco pipe refurbishing

PipesRevived

From Revival To Survival

pipe scoundrel

Pipes Cigars & Musings

%d bloggers like this: